
In today’s fast-paced world, emergencies can happen at any time. When faced with a medical emergency, every second counts, and having access to critical information about your health history can make a life-saving difference. This is where the Medical ID feature on the iPhone comes into play. With the Medical ID, you can store essential information about your medical conditions, allergies, medications, and emergency contacts directly on your device. But did you know that you can take it a step further and automatically share your Medical ID during an emergency call on your iPhone? This feature can provide emergency responders with vital information about your health, even if you’re unable to communicate. Let’s explore how to set up and use this convenient feature on your iPhone, ensuring peace of mind during critical situations.
Inside This Article
- Enabling Emergency SOS feature
- Setting up Medical ID on your iPhone
- Adjusting Emergency SOS settings
- Testing the Automatic Medical ID sharing feature
- Conclusion
- FAQs
Enabling Emergency SOS feature
The Emergency SOS feature on the iPhone is a powerful tool that can potentially save lives in critical situations. By enabling this feature, you can quickly contact emergency services and share vital information, such as your Medical ID, with them. To ensure that you can take advantage of this feature when needed, follow the steps below to enable Emergency SOS on your iPhone.
1. Open the Settings app on your iPhone.
2. Scroll down and tap on the “Emergency SOS” option.
3. On the Emergency SOS screen, you will find the “Call with Side Button” toggle. This allows you to initiate Emergency SOS by pressing the side button multiple times. Make sure this toggle is turned on.
4. Below the “Call with Side Button” toggle, you will see the option to enable “Auto Call.” When this setting is enabled, your iPhone will automatically dial emergency services after a countdown of a few seconds. Toggle this option based on your preference. Please note that enabling Auto Call may result in accidental emergency calls if the side button is pressed inadvertently.
5. Next, locate the “Set Up Emergency Contacts in Health” option. Tap on this option to set up your emergency contacts and Medical ID information.
6. On the Health app screen, tap on “Medical ID” at the bottom right corner of the screen.
7. Select “Edit” on the top-right corner of the Medical ID screen.
8. Scroll down and find the “Emergency Contacts” section. Tap on the green “+” button to add emergency contacts to your Medical ID.
9. Enter the contact details for your emergency contacts, including their names, phone numbers, and relationships to you.
10. Once you have entered the necessary information, tap “Done” to save your changes.
Now that you have enabled the Emergency SOS feature and set up your Medical ID, you can take comfort in knowing that you have a reliable way to contact emergency services and share important information during critical moments. Familiarize yourself with how to use Emergency SOS on your iPhone, as it could potentially make a significant difference in emergency situations.
Setting up Medical ID on your iPhone
Having your medical information readily accessible during an emergency can be a lifesaver. The Medical ID feature on your iPhone allows you to store crucial health information that can be easily accessed by medical professionals or emergency responders. Here’s how to set up Medical ID on your iPhone:
1. Open the Health app: Locate the “Health” app icon on your iPhone’s home screen and tap on it to open the app.
2. Tap on the Medical ID tab: At the bottom right corner of the screen, you’ll find a “Medical ID” tab. Tap on it to access the Medical ID setup.
3. Fill in your information: You’ll now see various sections where you can input your medical information. Start by tapping on “Edit” in the top right corner of the screen.
4. Add your personal details: Enter your name, date of birth, and add a photo if you prefer. This will help medical professionals identify you quickly and accurately.
5. Include emergency contacts: Scroll down to the “Emergency Contacts” section and tap on “Add Emergency Contact.” From your contacts list, select the person you want to designate as your emergency contact and add their relationship to you.
6. Enter medical conditions and notes: In the “Medical Conditions” and “Notes” sections, you can provide important details about your health, such as allergies, chronic conditions, medications, and any other relevant information that could impact your treatment during an emergency.
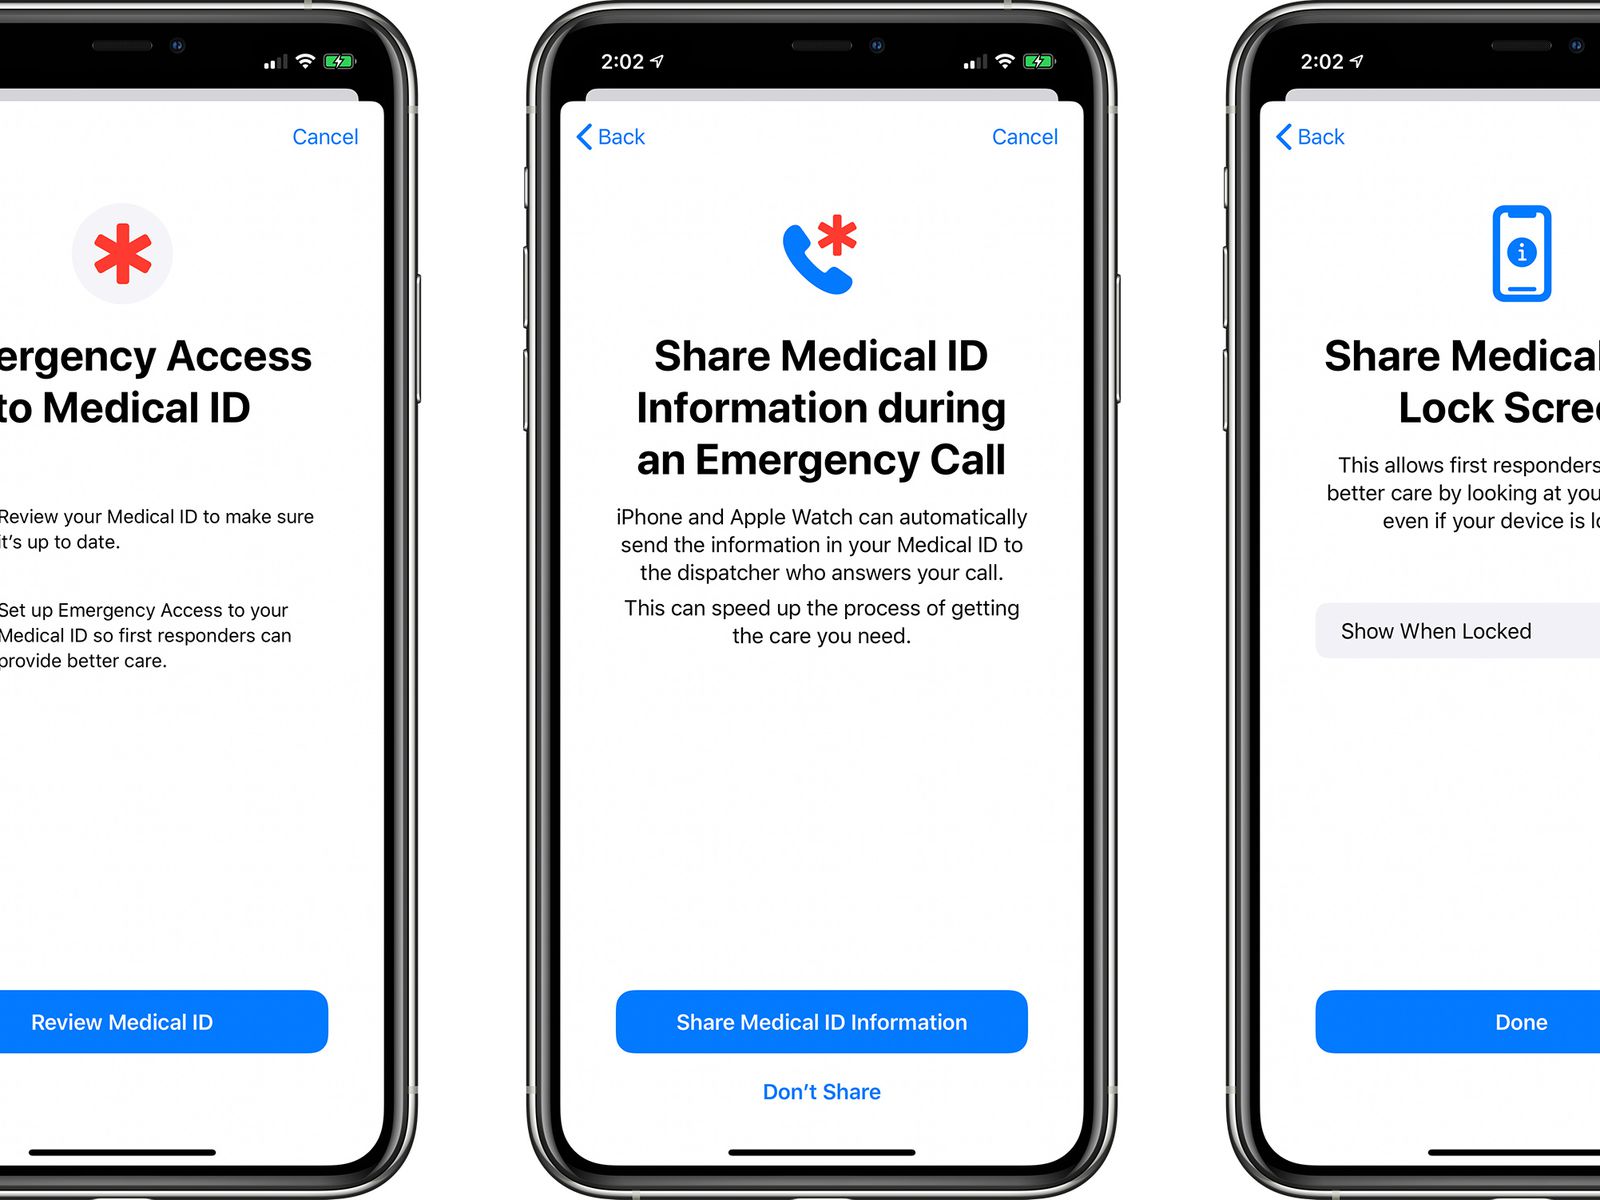
7. Enable Emergency Access: At the top of the screen, you’ll find a toggle switch labeled “Show When Locked.” Toggle it on to make your Medical ID accessible even when your iPhone is locked. This allows medical professionals to access your information without needing to unlock your device.
8. Save your changes: After you’ve completed entering your medical information, tap on “Done” in the top right corner to save your changes.
Now that you’ve set up your Medical ID, it’s crucial to periodically review and update your information to ensure its accuracy. Remember that your privacy and security are important, so it’s crucial to protect your device with a strong passcode or biometric authentication.
In case of an emergency, accessing your Medical ID can provide vital information to those assisting you, potentially improving the quality and efficiency of your medical treatment. Take a few minutes to set up your Medical ID on your iPhone today and have peace of mind knowing that you’re prepared for any unexpected situations.
Adjusting Emergency SOS settings
Emergency SOS is a crucial feature on your iPhone that allows you to quickly reach out for help in an emergency situation. To ensure that the feature is customized to your needs, it’s important to adjust the Emergency SOS settings accordingly. Here are the steps to follow:
1. Open the “Settings” app on your iPhone.
2. Scroll down and tap on “Emergency SOS.”
3. In the Emergency SOS settings, you will find various options that you can adjust to fit your preferences. Let’s take a closer look at each of these settings:
– Call with Side Button: By default, this option is enabled, allowing you to initiate an emergency call by pressing and holding the side button on your iPhone. You can toggle this setting off if you prefer not to use the side button for emergency calls.
– Auto Call: When enabled, this feature automatically calls emergency services after the Emergency SOS countdown ends. You can choose to turn off this option if you want to manually make the emergency call.
– Countdown Sound: This setting plays a loud warning sound at the end of the Emergency SOS countdown. If you find the sound unnecessary or too disruptive, you can disable it.
– Emergency Contacts: This section allows you to add emergency contacts to your Medical ID. These contacts will be notified when you make an emergency call. To add contacts, tap on “Edit Emergency Contacts,” and then select the contacts you want to add from your address book.
– Share During Emergency Call: This option automatically shares your Medical ID with the emergency services when you make an emergency call. It provides them with critical information about your medical conditions, allergies, and emergency contacts. Ensure that this setting is enabled to maximize the benefits of the Medical ID feature.
4. After adjusting the settings to your preference, you can exit the Emergency SOS menu.
By customizing the Emergency SOS settings, you can optimize the feature’s functionality to suit your individual needs. It’s crucial to review and update these settings periodically to ensure your safety in emergency situations.
Testing the Automatic Medical ID sharing feature
Once you have enabled the Emergency SOS feature and set up your Medical ID on your iPhone, it’s important to test the automatic Medical ID sharing feature to ensure it functions properly during an emergency call.
To test the feature, follow these steps:
- Open the Phone app on your iPhone and go to the Emergency Call screen.
- Initiate an emergency call by dialing the emergency services number (e.g. 911 in the United States).
- When the call is connected, wait for a few seconds to allow the emergency services operator to answer.
- During the call, gently tap the “Medical ID” button located at the bottom left corner of the screen.
- Confirm that your Medical ID information is displayed on the screen that appears.
- Provide any additional necessary information to the emergency services operator.
It’s crucial to ensure that your Medical ID information is accurately and clearly displayed to the operator when testing this feature. This will help emergency responders access critical information about your health conditions, allergies, medications, and emergency contacts in a timely manner.
Remember to inform the emergency services operator that you are testing the Medical ID sharing feature during the call. This can prevent any misunderstandings or unnecessary actions by the emergency responders.
By regularly testing the automatic Medical ID sharing feature, you can have peace of mind knowing that your essential health information will be readily available when you need it most. This feature can be a lifesaver in critical situations where every second counts.
Conclusion
In conclusion, the ability to automatically share your Medical ID during an emergency call on the iPhone is a valuable feature that can provide critical information to healthcare professionals in times of need. By setting up your Medical ID in the Health app and enabling the Share During Emergency Call option, you can ensure that important medical information, such as allergies, medications, and emergency contacts, is readily accessible to those who can assist you when every second counts. This feature not only streamlines communication in emergency situations but also helps to improve the accuracy and effectiveness of medical care. So, take a few moments to set up your Medical ID and activate the automatic sharing feature on your iPhone, and gain peace of mind knowing that your vital medical information is always just a phone call away.
FAQs
1. What is the Medical ID feature on the iPhone?
The Medical ID feature on the iPhone is a built-in application that allows users to store important medical information, such as emergency contacts, blood type, allergies, and medications. It can be accessed even from the lock screen in case of emergencies.
2. How do I set up my Medical ID on the iPhone?
To set up your Medical ID on the iPhone, open the Health app and tap on the “Medical ID” tab at the bottom. From there, you can enter your personal information, medical conditions, emergency contacts, and any other relevant details. Make sure to enable the “Show When Locked” option so that your Medical ID can be accessed without unlocking the phone.
3. Can I automatically share my Medical ID during an emergency call?
Yes, you can automatically share your Medical ID during an emergency call on the iPhone. To enable this feature, go to the Settings app, tap on “Emergency SOS,” and turn on the “Share Emergency Location” option. This will send your Medical ID information to emergency services when you make an emergency call.
4. What happens if I don’t have a Medical ID set up on my iPhone?
If you don’t have a Medical ID set up on your iPhone, emergency services will not have access to your medical information during an emergency call. It is highly recommended to set up your Medical ID with essential details so that first responders can provide appropriate and timely care in case of an accident or health crisis.
5. Can I edit or update my Medical ID information?
Absolutely! You can edit or update your Medical ID information at any time. Simply open the Health app on your iPhone, go to the “Medical ID” tab, and make the necessary changes to your personal information, medical conditions, emergency contacts, or any other details. Remember to save the changes for the updated information to be available when needed.