
If you own an iPhone, setting up emergency contacts is a crucial step in ensuring your safety and providing peace of mind for yourself and your loved ones. In times of emergencies, having your emergency contacts readily accessible on your iPhone can make all the difference. Whether it’s a medical emergency, an accident, or any other urgent situation, being able to quickly call or message the right people can be a lifesaver. In this article, we will guide you through the process of setting up emergency contacts on your iPhone. From adding emergency contacts to configuring emergency SOS settings, we’ll cover everything you need to know to ensure that help is just a few taps away when you need it the most. So, let’s get started and make sure you’re well-prepared for any unexpected situations that may arise.
Inside This Article
- Adding Emergency Contacts on iPhone
- Step 1: Open the Health App
- Step 2: Tap on the Medical ID Tab
- Step 3: Tap on Edit
- Step 4: Add Emergency Contacts
- Step 5: Save Changes
- Step 6: Access Emergency Contacts on Locked Screen
- Managing Emergency Contacts on iPhone
- Adding or Removing Emergency Contacts
- Editing Contact Details
- Reordering Emergency Contacts
- Deleting Emergency Contacts
- Conclusion
- FAQs
Adding Emergency Contacts on iPhone
One of the essential features of an iPhone is the ability to add emergency contacts. In case of an emergency, having these contacts readily available can provide peace of mind and ensure that help can be easily reached. Here’s how you can add emergency contacts on your iPhone:
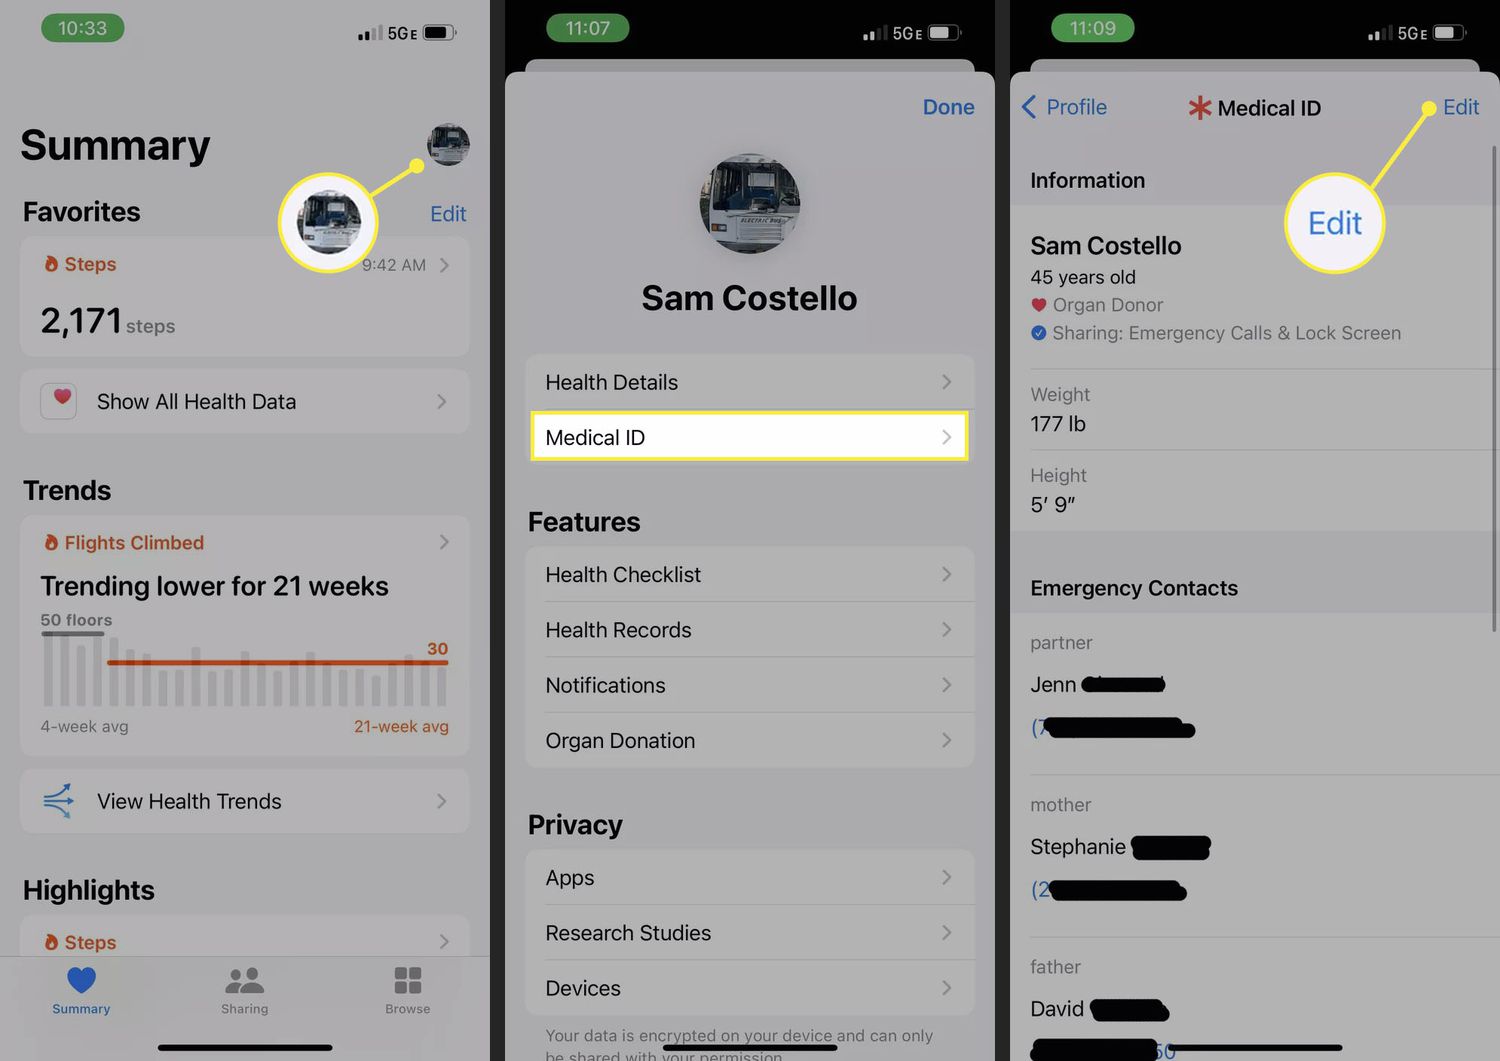
1. Open the “Health” app on your iPhone. This app is pre-installed on your device and can be identified by a white icon with a red heart in the middle.
2. Tap on the “Medical ID” tab located at the bottom right corner of the screen. This tab will take you to your personal medical information.
3. Click on the “Edit” button in the top right corner of the screen. This will allow you to edit your medical ID information.
4. Scroll down to the “Emergency Contacts” section and tap on the green “+” icon to add a contact. You can add multiple contacts if necessary.
5. A list of your contacts will appear, and you can choose the desired contact from your address book. You also have the option to manually enter the contact’s information by tapping “Create New Contact.’
6. After selecting the contact, you can designate the relationship type (e.g., spouse, parent, sibling) by tapping on the “Relationship” field and selecting the appropriate option.
7. You can also add additional notes about the contact in the “Notes” field, if necessary. This can include any specific information or instructions related to the emergency contact.
8. Tap “Done” when you have finished adding the emergency contact details.
Once you have completed these steps, your emergency contacts will be accessible from the Emergency call screen on your iPhone, even when it is locked. It’s important to note that these contacts can be contacted by emergency services directly without unlocking your device.
Having the ability to quickly reach out to emergency contacts can be crucial during critical situations. By following these simple steps, you can ensure that your emergency contacts are readily available on your iPhone when you need them the most.
Step 1: Open the Health App
Setting up emergency contacts on your iPhone is a crucial step in ensuring your safety. To get started, you’ll first need to open the Health app on your device. The Health app comes pre-installed on all iPhones and is represented by a white icon with a red heart in the center.
Once you locate the Health app icon on your home screen, tap on it to launch the app. The Health app is designed to help you track your health and fitness data, but it also provides a convenient way to set up emergency contacts.
After opening the Health app, you will be taken to the “Health Data” screen. This screen displays various categories of health-related information, such as activity, sleep, and vital signs. To proceed with setting up your emergency contacts, you’ll need to navigate to a different section within the app.
In the bottom-right corner of the screen, you’ll see four icons: Discover, Browse, Search, and Profile. Tap on the Profile icon, which is represented by a silhouette of a person. This will take you to your personal profile page, where you can manage your health data and settings.
On your profile page, you will find several options. Scroll down until you see a section labeled “Medical Details” and tap on it. This section allows you to input crucial medical information, including your blood type, allergies, and emergency contacts.
Once you are in the “Medical Details” section, scroll down slightly until you reach a subsection titled “Emergency Contacts”. This subsection provides a simple and straightforward way to add emergency contacts to your iPhone. Simply tap on the “Edit” button located in the top-right corner of the screen, and you’ll be ready to input your emergency contact information.
Now that you’ve successfully opened the Health app and navigated to the “Emergency Contacts” section, you’re ready to move on to the next step in setting up your emergency contacts on your iPhone.
Step 2: Tap on the Medical ID Tab
Once you have accessed the Health app, you will notice a series of tabs at the bottom of the screen. Tap on the “Medical ID” tab, which is located on the far right.
The Medical ID tab is where you can store important medical information, including emergency contacts. It serves as a digital medical ID card that can provide critical information to first responders in case of an emergency.
Under the Medical ID section, you will find various fields to fill out. This is where you can enter details such as your name, date of birth, blood type, medical conditions, and allergies. By providing this information, it can assist medical professionals in delivering appropriate care.
Scroll down until you see the “Emergency Contacts” subsection. This is where you can add your emergency contacts to ensure they are easily accessible when needed.
To add a contact, tap the green “+” symbol next to “add emergency contact.” Select the contact you want to add from your phone’s contacts list. You can add multiple contacts by repeating this process.
For each emergency contact, you can choose their relationship to you (such as spouse, parent, or friend) and indicate whether they should be contacted in case of an emergency. It’s essential to ensure that the selected contacts are reliable and readily available during critical situations.
Once you have added your emergency contacts, make sure to tap “Done” in the top right corner to save your changes. Your emergency contacts will now be accessible from the lock screen of your iPhone, allowing others to contact them quickly in case of an emergency.
I hope this helps!
Step 3: Tap on Edit
Now that you have successfully accessed the list of emergency contacts, the next step is to tap on the “Edit” button. This button allows you to make changes to the existing emergency contacts or add new ones.
When you tap on the “Edit” button, you will be presented with several options. You can choose to remove existing emergency contacts by tapping on the red minus (-) button next to their name and then confirming the removal. Alternatively, if you want to add a new emergency contact, you can tap on the green plus (+) button.
Upon tapping the green plus (+) button, you will be directed to your contacts list. From here, select the contact you wish to add as an emergency contact. You can browse through your contacts or use the search bar at the top to quickly find the desired contact.
After selecting the contact, you will be taken back to the Emergency Contacts screen, where you will see the newly added contact listed. The contact’s name and phone number will be displayed, allowing you to easily recognize it in case of an emergency.
If you want to add multiple emergency contacts, simply repeat the above process for each contact you wish to include. Remember, it’s always a good idea to have multiple emergency contacts in case the first contact is unavailable.
Once you have finished making changes or additions to your emergency contacts, you can tap on the “Done” button located in the top-right corner of the screen. This will save your changes and return you to the Emergency Contacts screen.
Step 4: Add Emergency Contacts
Adding emergency contacts to your iPhone is an essential step to ensure that immediate help is just a tap away. In case of an emergency, having important contact information readily available can make all the difference. Follow these simple steps to add emergency contacts to your iPhone:
1. Open the Contacts app on your iPhone. It is represented by a gray silhouette of a person’s head on a white background.
2. Tap on the + sign, usually found in the top-right corner of the screen. This will allow you to add a new contact.
3. Fill in the necessary contact details for the emergency contact. Include their name, phone number, and any additional information that you deem relevant, such as their relationship to you.
4. Scroll down to the bottom of the contact’s page. You will find an option labeled “add to emergency contacts.” Tap on this option to designate the contact as an emergency contact.
5. Once you have added the emergency contact, you will notice an “add emergency contacts” button at the bottom of the screen. Tap on this button to add more emergency contacts if needed.
6. To prioritize your emergency contacts, tap on the “edit” button, usually found in the top-right corner of the screen. Drag the contacts up or down to arrange them in the order you prefer. This will determine the sequence in which the emergency contacts are called in case of an emergency.
7. Once you have added and arranged your emergency contacts, make sure to save the changes by tapping on the “done” button, typically located in the top-right corner of the screen.
That’s it! You have successfully added emergency contacts to your iPhone. In case of an emergency, you can easily access these contacts by swiping right on the lock screen and tapping on the “emergency” button.
Note: It is important to remember that adding emergency contacts on your iPhone does not replace the need to call emergency services (such as 911) in a true emergency. Use the emergency contacts feature for quick access to people who can assist you in non-life-threatening situations.
Step 5: Save Changes
Once you have entered all the necessary details for your emergency contacts on your iPhone, it’s important to save the changes you have made. Saving the changes will ensure that your emergency contacts are ready to be contacted when needed. Here’s how you can save the changes:
- Click on the “Save” button: After entering all the information for your emergency contacts, look for the “Save” button in the top-right corner or at the bottom of the screen. This button is usually represented by a floppy disk icon.
- Confirm the changes: After clicking the “Save” button, you may be prompted to confirm the changes you have made. This is just an extra step to ensure that you don’t accidentally make any unintended changes. Simply follow the on-screen instructions and confirm the changes you want to save.
Once you have successfully saved the changes, your emergency contacts will be set up on your iPhone. It’s a good idea to periodically review and update your emergency contact information to ensure that it remains accurate and up to date. This will help emergency responders quickly get in touch with the right people in case of any unforeseen circumstances.
Step 6: Access Emergency Contacts on Locked Screen
When you find yourself in an emergency situation and your iPhone is locked, accessing your emergency contacts quickly can be crucial. Fortunately, iPhones provide a feature that allows you to do just that.
To access emergency contacts on the locked screen of your iPhone, follow these simple steps:
- Wake up your iPhone by pressing the power button or lifting it.
- Swipe right on the lock screen to reveal the passcode entry screen.
- Tap on the “Emergency” option located at the bottom left corner of the screen.
- At the top of the screen, you will see a keypad along with a link that says “Medical ID”. Tap on “Medical ID”.
- On the Medical ID screen, you will find the emergency contacts that you have previously set up. Tap on a contact’s name to call or message them.
It’s important to note that in order to access emergency contacts from the lock screen, you will need to have the Emergency SOS feature enabled on your iPhone. This feature allows you to quickly call emergency services and your designated emergency contacts in case of an emergency.
By customizing your Emergency SOS settings, you can specify which contacts should be notified and how your iPhone should behave during emergency situations.
Now that you have learned how to access emergency contacts on the locked screen of your iPhone, you can have peace of mind knowing that help is just a few taps away when you need it the most.
Managing Emergency Contacts on iPhone
When it comes to emergency situations, having quick access to important contacts can make a world of difference. The iPhone offers several options for managing emergency contacts, allowing you to easily reach out for help when you need it the most. Whether you prefer to set up emergency contacts through the Health app or customize the Emergency SOS feature, this guide will walk you through the process.
Setting up Emergency Contacts from the Health app
The Health app on your iPhone provides a convenient way to store important medical information, including emergency contacts. To set up emergency contacts through the Health app, follow these steps:
- Open the Health app on your iPhone.
- Tap on your profile picture in the top right corner.
- Scroll down and select “Medical ID”.
- Tap on “Edit” in the top right corner.
- Scroll down to the “Emergency Contacts” section.
- Tap the “+” button to add a new emergency contact.
- Select the contact from your address book or enter the details manually.
- Edit the relationship and add a custom label if needed.
- Tap “Done” to save the emergency contact.
Once you have set up emergency contacts through the Health app, they will appear on the Emergency SOS screen, which can be accessed even when your iPhone is locked.
Adding Emergency Contacts via Contacts app
If you prefer to manage your emergency contacts directly through the Contacts app, follow these steps:
- Open the Contacts app on your iPhone.
- Select the contact you want to designate as an emergency contact.
- Tap “Edit” in the top right corner.
- Scroll down and tap “add emergency contact”.
- Select the contact from your address book or enter the details manually.
- Edit the relationship and add a custom label if needed.
- Tap “Done” to save the emergency contact.
Your emergency contact will now be easily accessible during an emergency situation.
Customizing Emergency SOS feature on iPhone
In addition to setting up specific emergency contacts, you can also customize the Emergency SOS feature on your iPhone. This feature allows you to quickly dial emergency services by pressing the side button or the Sleep/Wake button five times in rapid succession.
To customize the Emergency SOS feature, follow these steps:
- Go to the Settings app on your iPhone.
- Scroll down and tap on “Emergency SOS”.
- Toggle on the “Call with Side Button” option if it is not already enabled.
- Enable or disable the “Auto Call” feature based on your preference.
- Scroll down to the “Emergency Contacts” section.
- Tap “Add Emergency Contact” to select additional contacts to be notified during an emergency.
By customizing the Emergency SOS feature, you can ensure that the appropriate contacts are notified when an emergency arises.
Dialing emergency contacts from lock screen
Once you have set up emergency contacts on your iPhone, you can easily dial them from the lock screen. Here’s how:
- Wake your iPhone by pressing the side button or the Home button.
- Swipe left on the lock screen to access the Emergency SOS screen.
- Tap “Emergency” to dial emergency services.
- Tap “Medical ID” to view and dial your designated emergency contacts.
Having quick access to emergency contacts can provide peace of mind and ensure prompt assistance during critical situations. By utilizing the features and settings available on your iPhone, you can easily manage and utilize emergency contacts when you need them the most.
Adding or Removing Emergency Contacts
Emergency contacts are crucial for quick response in times of need. Adding emergency contacts to your iPhone ensures that you can easily reach out to your loved ones or important contacts in case of an emergency. Similarly, removing contacts that are no longer relevant can help maintain an updated list of emergency contacts. Here’s how you can add or remove emergency contacts on your iPhone.
To add emergency contacts, follow these simple steps:
- Open your iPhone’s Health app.
- Tap on your profile picture in the top-right corner.
- Select “Medical ID” from the list of options.
- Tap on “Edit” in the top-right corner.
- Scroll down to the “Emergency Contacts” section.
- Tap on the green “+” symbol to add a new contact.
- Select the contact you want to add from your phone’s contacts list.
- Specify the relationship with the contact (e.g., spouse, parent, friend).
- Save the changes by tapping “Done” in the top-right corner.
That’s it! Your emergency contact is now added and can be easily accessed even from the lock screen by tapping on “Emergency” and then “Medical ID.”
If you wish to remove an emergency contact, follow these steps:
- Open the Health app on your iPhone.
- Tap on your profile picture in the top-right corner.
- Select “Medical ID” from the list of options.
- Tap on “Edit” in the top-right corner.
- Scroll down to the “Emergency Contacts” section.
- Tap on the “-” symbol next to the contact you want to remove.
- Confirm the removal by tapping “Delete” in the pop-up window.
- Save the changes by tapping “Done” in the top-right corner.
And that’s it! The emergency contact has been successfully removed from your iPhone.
Remember, having updated emergency contacts can make a significant difference in critical situations. Therefore, it is essential to review and update your emergency contact list periodically.
Editing Contact Details
When it comes to managing your contacts on your iPhone, sometimes you may need to edit the details of a particular contact. Thankfully, the process is simple and straightforward. Follow the steps below to edit contact details on your iPhone:
- Open the Contacts app on your iPhone.
- Scroll through your contacts and tap on the entry you want to edit.
- Once you are on the contact details page, tap on the “Edit” button located at the top right corner of the screen. This will allow you to make changes to the contact’s information.
- You can now edit various fields such as the contact’s name, phone number, email address, and other details.
- Tap on a field that you want to edit, such as the phone number field, and make the necessary changes. You can either type in a new number or edit the existing one.
- Similarly, you can edit other fields by tapping on them and entering the updated information.
- If you want to add additional details, such as a home or work address, tap on the “Add Field” option to include more information.
- Once you have made all the desired changes, tap on the “Done” button at the top right corner to save the edits.
That’s it! You have successfully edited the contact details on your iPhone. The changes you made will now reflect in your contact list and other associated apps.
With the ability to easily edit contact details, you can keep your contacts organized and up-to-date on your iPhone. Whether you need to correct a phone number or update an email address, the process is quick and efficient. Just remember to tap on the “Done” button to save your changes after making the necessary edits.
Reordering Emergency Contacts
Setting up emergency contacts on your iPhone can be a lifesaver in critical situations. Not only does it give you peace of mind, but it also ensures that help can be easily reached when needed. However, what if you want to change the order of your emergency contacts? Well, you’re in luck! Apple understands the importance of personalizing your emergency contacts list, and they make it incredibly simple to reorder them.
To start reordering your emergency contacts, follow these steps:
- Open the Health app on your iPhone:
- Tap on your profile picture:
- Select “Emergency Contacts”:
- Tap on “Edit”:
- Drag the handlebars icon:
- Tap on “Done”:
To access the Health app, simply locate and tap on the app icon on your home screen. The Health app is represented by a white icon with a red heart inside.
In the top-right corner of the Health app, you will find a profile picture icon. Tap on it to access your personal profile settings.
Scroll down until you find the “Emergency Contacts” section. Tap on it to open the emergency contacts settings.
Now, you will see a list of all your emergency contacts. Tap on the “Edit” button located in the top-right corner of the screen.
Next to each contact’s name, you will notice a handlebars icon (three horizontal lines). Press and hold on this icon and drag it up or down to reorder your contacts as desired.
After rearranging your emergency contacts, tap on the “Done” button in the top-right corner of the screen to save the changes.
That’s it! You have successfully reordered your emergency contacts on your iPhone. It’s a simple process that enables you to prioritize the important people you want to be reached in case of an emergency. Keep in mind that when making emergency calls, your iPhone will continue dialing the contacts in the order you have specified, until someone answers.
Emergency situations can be unpredictable, so it’s always good to be prepared. By taking a few moments to set up and customize your emergency contacts on your iPhone, you’re ensuring that help is just a phone call away. Stay safe!
Deleting Emergency Contacts
Having emergency contacts saved on your iPhone can provide peace of mind in case of any unforeseen events. However, there may come a time when you need to remove or delete a contact from your emergency list. Whether it’s because the contact is no longer relevant or you simply want to make changes, deleting emergency contacts is a simple process.
To delete an emergency contact from your iPhone, follow these steps:
- Open the Health app on your iPhone. It is represented by a white icon with a red heart.
- Tap on your profile picture or initials in the top right corner of the screen.
- Select “Medical ID” from the list of options.
- Scroll down to the “Emergency Contacts” section.
- Tap the “Edit” button in the top right corner of the screen.
- You will now see a list of your current emergency contacts. Locate the contact you want to remove and tap the red minus (-) button next to their name.
- A confirmation prompt will appear, asking if you want to remove the contact. Tap “Delete” to confirm.
- The emergency contact will be immediately removed from your iPhone.
It’s important to note that deleting an emergency contact will only remove them from your iPhone’s emergency list. Their contact information will still be saved in your Contacts app if you need to access it in the future.
If you want to re-add the contact as an emergency contact, you can do so by following the steps to add emergency contacts via the Health or Contacts app.
By knowing how to delete emergency contacts on your iPhone, you can keep your emergency list updated and easily manage the contacts you want to rely on in case of an emergency.
Conclusion
Setting up emergency contacts on your iPhone is a crucial step in ensuring your safety and the well-being of your loved ones. With just a few simple steps, you can have peace of mind knowing that help is just a tap away in case of an emergency.
By adding emergency contacts to your iPhone’s Medical ID and setting up the Emergency SOS feature, you can provide important information to first responders and loved ones in times of need. Remember to keep your emergency contacts updated and inform your trusted contacts about your emergency setup.
Taking the time to set up emergency contacts on your iPhone is a small effort that can make a big difference in an emergency situation. Stay safe and prepared with this essential feature and be ready to handle any unforeseen circumstances that may arise.
FAQs
Q: How do I set up emergency contacts on my iPhone?
Setting up emergency contacts on an iPhone is a straightforward process:
- Open the Health app on your iPhone. (If you can’t find it, look in the Extras or Utilities folder.)
- Tap on your profile picture in the upper right corner.
- Scroll down and tap on “Medical ID.”
- Tap on “Edit” located in the upper right corner.
- Scroll down to the “Emergency Contacts” section.
- Tap on the green “+” button to add a new emergency contact. You can select a contact from your address book or add a new contact by tapping “Create New Contact.”
- After selecting the contact, choose the relationship type (e.g., “mother,” “father,” “spouse,” etc.).
- Tap “Done” to save the emergency contact.
Q: Can I add multiple emergency contacts to my iPhone?
Yes, you can add multiple emergency contacts to your iPhone. Simply follow the steps mentioned above but tap the green “+” button each time you want to add a new contact.
Q: Can emergency contacts be accessed from the lock screen?
Yes, emergency contacts can be accessed from the lock screen. When your iPhone is locked, swipe right on the lock screen and you will see the “Emergency” button. Tapping this button will take you to the emergency calling screen, where you can see your Medical ID and emergency contacts.
Q: Are emergency contacts notified when I make an emergency call?
No, your emergency contacts are not automatically notified when you make an emergency call. However, if you have the “Share During Emergency Call” feature enabled, your emergency contacts will receive a message with your location after you end the call.
Q: How can I edit or remove emergency contacts on my iPhone?
To edit or remove emergency contacts on your iPhone, follow these steps:
- Open the Health app on your iPhone.
- Tap on your profile picture in the upper right corner.
- Scroll down and tap on “Medical ID.”
- Tap on “Edit” located in the upper right corner.
- Scroll down to the “Emergency Contacts” section.
- To edit a contact, tap on their name and make the necessary changes. To remove a contact, simply swipe left on their name and tap on “Delete.”
- Tap “Done” to save any changes or deletions.