
Are you in need of canceling your storage plan on your iPhone? Managing your storage settings on your device is essential to ensure you have adequate space for all your photos, videos, apps, and documents. Cancelling a storage plan can be a simple and straightforward process if you know the right steps. In this article, we will guide you through the necessary procedures to cancel your storage plan on your iPhone. Whether you are looking to switch to a different plan, downgrade your current plan, or no longer require the extra storage, we’ve got you covered. So, grab your iPhone and let’s dive in to free up some space!
Inside This Article
- How To Cancel Storage Plan On iPhone
- Overview
- Steps to Cancel Storage Plan Through Settings
- Steps to Cancel Storage Plan Through iCloud Website
- Steps to Cancel Storage Plan Through iTunes
- Conclusion
- FAQs
How To Cancel Storage Plan On iPhone
Are you looking to cancel your storage plan on your iPhone? Whether you’re looking to switch to a different plan or simply don’t need the extra storage anymore, canceling your storage plan is a straightforward process. In this article, we will guide you through the steps of canceling your storage plan on iPhone using three different methods: through Settings, through the iCloud website, and through iTunes.
Method 1: Cancel Storage Plan through Settings
To cancel your storage plan through Settings, follow these steps:
- Open the “Settings” app on your iPhone.
- Tap on your Apple ID at the top of the screen.
- Select “iCloud” from the list of options.
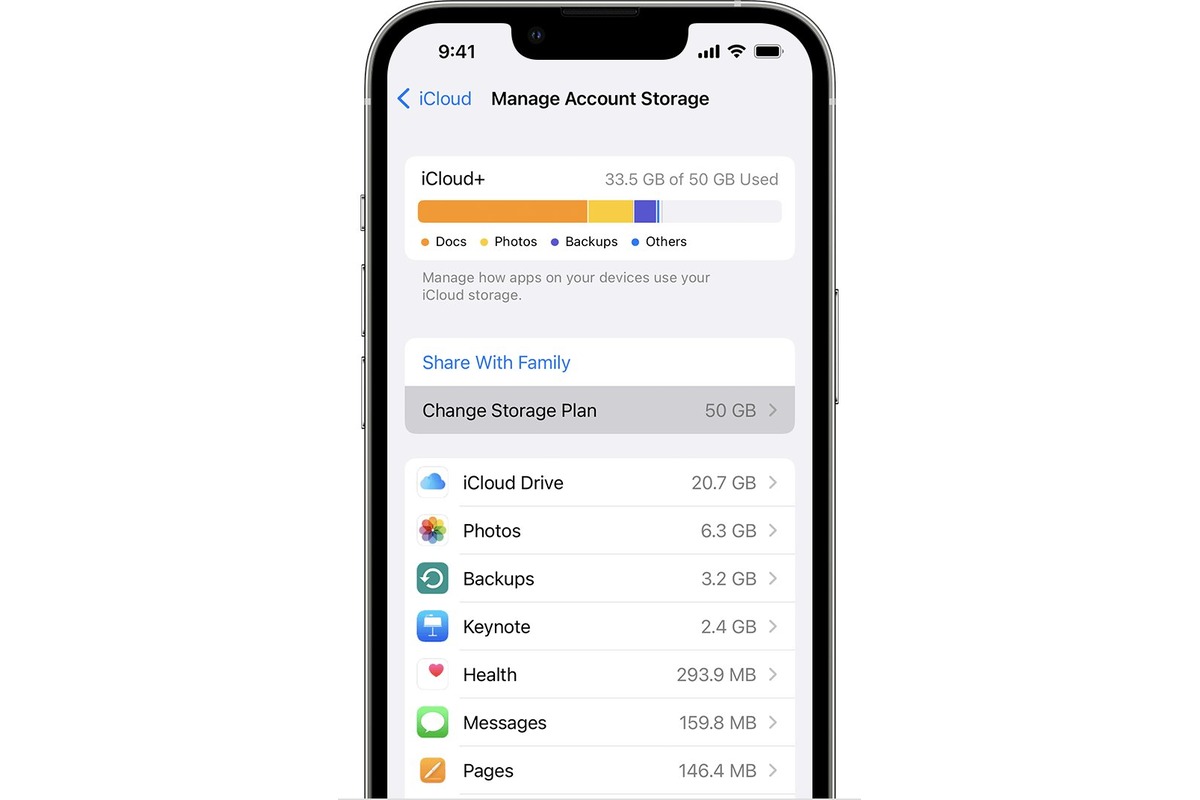
- Scroll down and tap on “Manage Storage”.
- Tap on the “Change Storage Plan” option.
- Choose the “Downgrade Options” to select a lower storage plan or “Cancel Plan” to completely cancel the storage plan.
- Follow the prompts to confirm your selection and cancel the storage plan.
Method 2: Cancel Storage Plan through iCloud Website
If you prefer to cancel your storage plan through the iCloud website, here’s what you need to do:
- Open a web browser on your computer and visit iCloud.com.
- Sign in with your Apple ID and password.
- Click on “Settings” on the iCloud home page.
- Scroll down and click on “Manage” under the “Storage” section.
- Click on “Change Storage Plan” or “Cancel Plan” to proceed.
- Confirm your selection and follow the prompts to cancel your storage plan.
Method 3: Cancel Storage Plan through iTunes
If you prefer to use iTunes to cancel your storage plan, here’s how you can do it:
- Open the iTunes app on your computer.
- Sign in with your Apple ID and password.
- Click on “Account” at the top menu bar and select “View My Account”.
- Scroll to the “Settings” section and click on “Manage” next to Subscriptions.
- Find the storage plan you want to cancel and click on “Edit”.
- Select “Cancel Subscription” to cancel your storage plan.
- Confirm your selection and follow the prompts to complete the cancellation process.
Congratulations! You have successfully cancelled your storage plan on your iPhone. Remember that canceling your storage plan will revert you back to the free 5GB iCloud storage plan. If you require additional storage in the future, you can always choose to upgrade your plan again.
If you have any further questions or need additional assistance, feel free to reach out to Apple Support for further guidance.
Overview
This article provides a guide on how to cancel a storage plan on an iPhone. If you no longer need additional storage space or want to switch to a different storage plan, follow the steps below to cancel your current plan.
Having enough storage on your iPhone is crucial for keeping all your photos, videos, and documents safe and accessible. However, there may come a time when you no longer need the extra space or prefer to use a different storage plan. Canceling your current storage plan is a simple process that can be done directly on your iPhone.
There are a few methods you can use to cancel your storage plan, each providing a straightforward and user-friendly approach. Whether you prefer to use the Settings app, iTunes & App Store, or the iCloud website, you have multiple options to choose from.
Read on to learn about the different methods for canceling your storage plan on an iPhone.
Steps to Cancel Storage Plan Through Settings
To cancel your storage plan directly through the Settings app on your iPhone, follow these steps:
-
Open the “Settings” app on your iPhone home screen.
-
Tap on your Apple ID banner at the top of the screen.
-
Select “iCloud” from the list of options.
-
Tap on “Manage Storage” or “Manage Storage and iCloud Backup.”
-
Tap on “Change Storage Plan.”
-
Select “Downgrade Options” and choose “Free” or a lower storage plan.
-
Confirm your selection by tapping “Done” or “Cancel Subscription.”
Steps to Cancel Storage Plan Through iCloud Website
To cancel your storage plan using the iCloud website, follow these steps:
-
Open a web browser and visit the iCloud website (www.icloud.com) on your computer or smartphone.
-
Sign in with your Apple ID and password.
-
Click on “Settings”.
-
Scroll down and click on “Manage” next to “Storage”.
-
Choose “Change Storage Plan”.
-
Select “Downgrade Options” and choose “Free” or a lower storage plan.
-
Confirm your selection by clicking “Done” or “Cancel Subscription”.
Steps to Cancel Storage Plan Through iTunes
To cancel your storage plan through iTunes on your computer, follow these steps:
- Open the iTunes application on your computer.
- Sign in with your Apple ID.
- Click on “Account” from the top menu bar.
- Select “View My Account.”
- Scroll down to the “Settings” section and click on “Manage” next to “Subscriptions.”
- Find the storage plan subscription and click on “Edit” or “Cancel Subscription.”
- Follow the prompts to cancel the storage plan.
Cancelling your storage plan through iTunes is a straightforward process. By following the steps above, you’ll be able to manage your subscriptions and cancel your storage plan with ease. Remember that cancelling your storage plan will result in the loss of any additional storage space you were utilizing. Make sure to back up any important data before proceeding with the cancellation.
Canceling a storage plan on your iPhone can help you save money and free up valuable space on your device. Whether you no longer need the extra storage or want to switch to a different plan, the process is quick and easy. By following the steps outlined in this article, you can seamlessly navigate through the Settings menu, manage your iCloud storage, and cancel your storage plan.
Remember, it’s important to consider your storage needs before making any changes. If you still require additional space but don’t want to commit to a paid storage plan, you can explore alternative options like offloading apps, deleting unnecessary files, or utilizing cloud storage services. Taking a proactive approach to managing your storage will ensure that your iPhone remains optimized and clutter-free.
With the knowledge gained from this article, you can confidently navigate the iCloud settings on your iPhone and make informed decisions regarding your storage plan. So go ahead and take control of your device’s storage, save money, and keep your iPhone running smoothly. Happy organizing!
FAQs
1. How do I cancel a storage plan on my iPhone?
To cancel a storage plan on your iPhone, follow these steps:
- Go to the “Settings” app on your iPhone.
- Scroll down and tap on your name at the top of the screen.
- Tap on “iCloud”.
- Tap on “Manage Storage”.
- Under “Storage Plan”, select the storage plan you want to cancel.
- Tap on “Change Storage Plan” at the bottom of the screen.
- Tap on “Downgrade Options”.
- Choose the “Free” option to cancel the storage plan.
- Tap on “Done” to confirm the cancellation.
2. Will canceling my storage plan delete my data?
No, canceling your storage plan will not delete your data. Your data will remain intact on your iPhone. However, if you exceed the free storage limit, you may need to manage your data by deleting unnecessary files or upgrading to a storage plan in order to continue syncing and backing up your data.
3. What happens if I cancel my storage plan in the middle of the billing cycle?
If you cancel your storage plan in the middle of the billing cycle, Apple will refund you the prorated amount for the remaining days of the billing cycle. The storage plan will remain active until the end of the billing cycle, and you will still have access to the storage space and features of the plan until the cancellation takes effect.
4. Can I cancel my storage plan and use the free iCloud storage instead?
Yes, you can cancel your storage plan and switch to the free iCloud storage. To do this, follow the steps mentioned in question 1 and select the “Free” option when prompted. Keep in mind that the free iCloud storage has limited capacity, so you may need to manage your data to stay within the free storage limit.
5. Can I cancel my storage plan and then upgrade again in the future?
Yes, you can cancel your storage plan and upgrade to a higher storage plan again in the future. Simply follow the steps mentioned in question 1 and select the desired storage plan when prompted. Your new storage plan will take effect immediately, and you can start using the additional storage space for all your iCloud needs.