
Are you an iPhone user who wants to maximize the value of your Apple experience? Then, enabling the Apple One subscription on your iPhone is the perfect solution for you. Apple One is a subscription bundle that allows you to access a range of Apple services and enjoy great savings. With Apple One, you can enjoy services like Apple Music, Apple TV+, Apple Arcade, iCloud storage, and more, all bundled into one convenient package.
In this article, we will guide you through the process of enabling the Apple One subscription on your iPhone. Whether you are a new user or looking to upgrade your existing subscription, we have all the steps you need to get started. So, grab your iPhone and let’s dive in to unlock all the benefits and features of Apple One!
Inside This Article
- Enabling Apple One on Your iPhone
- Step 1: Update to the Latest iOS Version
- Step 2: Open the App Store
- Step 3: Tap on Your Profile Picture
- Step 4: Tap on Subscriptions
- Step 5: Select Apple One
- Step 6: Choose Your Preferred Plan
- Step 7: Confirm the Subscription
- Step 8: Enjoy Apple One Services on Your iPhone
- Conclusion
- FAQs
Enabling Apple One on Your iPhone
Apple One is a subscription service offered by Apple that bundles various Apple services into a single convenient package. With Apple One, you can access services like Apple Music, Apple TV+, Apple Arcade, Apple News+, Apple Fitness+, and iCloud storage, all for a single monthly fee.
If you’re an iPhone user and want to take advantage of the Apple One subscription, follow these steps to enable it on your device:
- Step 1: Check Device Compatibility
- Step 2: Sign Up for Apple One
- Step 3: Access the Settings Menu
- Step 4: Select your Apple One Subscription Plan
- Step 5: Confirm and Enable Apple One Services
Before proceeding, ensure that your iPhone is compatible with Apple One and running the latest version of iOS. Apple One is available on iPhones with iOS 14 and later.
To get started, open the App Store on your iPhone and search for “Apple One.” Tap on the Apple One app and select the “Get” or “Subscribe” button to initiate the subscription process. If you already have Apple services like Apple Music or Apple TV+ installed, you can also sign up for Apple One directly from the respective app.
Once you’ve signed up for Apple One, go to the Settings app on your iPhone. Scroll down and tap on your Apple ID at the top of the screen.
In the Apple ID settings menu, look for the “Subscriptions” option and tap on it. Here, you’ll see a list of your active subscriptions, including Apple One. Tap on the Apple One subscription to manage it.
In the Apple One subscription settings, you’ll find all the services included in your Apple One package. From here, you can enable or disable individual services based on your preferences. Make sure to toggle on the services you want to access as part of your Apple One subscription. You can also customize your iCloud storage plan if needed.
Once you’ve selected your desired services, confirm the changes and exit the Settings app. You’ve successfully enabled Apple One on your iPhone, and now you can enjoy the benefits of multiple Apple services under a single subscription.
With Apple One, you not only save money but also enjoy the convenience of managing all your subscriptions in one place. It’s a great way to explore and make the most of what Apple has to offer.
So, why wait? Take advantage of Apple One and elevate your iPhone experience today!
Step 1: Update to the Latest iOS Version
Before proceeding with the Apple One subscription, it is crucial to ensure that your iPhone is running on the latest iOS version. Updating your iOS version not only guarantees a smooth experience but also ensures compatibility with Apple One services.
Updating your iOS version is a simple process. Here are the steps:
- Go to your iPhone’s home screen and tap on the “Settings” app.
- Scroll down and tap on “General”.
- In the “General” settings, tap on “Software Update”.
- Your iPhone will now check for available updates. If an update is available, tap on “Download and Install”.
- You may be prompted to enter your passcode during the update process.
- Wait for the update to download and install. This may take some time depending on the size of the update and your internet speed.
- Once the update is installed, your iPhone will restart, and you will be running on the latest iOS version.
It is important to regularly update your iOS version to ensure that you have access to the latest features and security patches. By keeping your iPhone up to date, you can enjoy the full benefits of Apple One subscription without any compatibility issues.
Now that your iPhone is running on the latest iOS version, you are ready to move on to the next step and sign up for Apple One subscription.
Step 2: Open the App Store
To enable Apple One subscription on your iPhone, the first step is to open the App Store. The App Store is where you can find a wide range of apps, games, and other digital content for your device.
To open the App Store, simply locate the App Store icon on your iPhone’s home screen. It’s a blue icon with a white capital “A” inside a black circle. Tap on the icon to launch the App Store.
Once the App Store is open, you’ll be taken to the main App Store interface, where you can browse and search for apps, games, and other content. Here, you’ll also find various tabs at the bottom of the screen, such as Today, Games, Apps, Search, and Updates.
Tap on the “Search” tab at the bottom of the screen. This will allow you to search for specific apps or content within the App Store. You can either type in the name of the app or use keywords to find what you’re looking for.
If you prefer to explore the App Store’s curated suggestions, you can tap on the “Today” or “Games” tabs to discover new apps and games that are currently in the spotlight.
Once you’ve opened the App Store and are ready to proceed with enabling your Apple One subscription, you can move on to the next step.
Step 3: Tap on Your Profile Picture
To enable Apple One subscription on your iPhone, after signing up, you’ll need to access the Settings menu. To do this, start by tapping on your profile picture at the top right corner of the screen. This will take you to your Apple ID settings.
Once you tap on your profile picture, a dropdown menu will appear. It will display various options related to your Apple ID, device settings, and subscriptions. Look for the option that says “Settings” and tap on it.
After tapping on “Settings,” you will be taken to the main settings menu of your device. Here, you can customize and manage various aspects of your iPhone. This is where you will enable your Apple One subscription.
Scroll down the settings menu until you find the section labeled “Subscriptions.” This section is where you can view and manage all your active subscriptions, including Apple One.
Tap on the “Subscriptions” section to access the list of subscriptions associated with your Apple ID. This list will display all the subscriptions you’ve signed up for, and it’s where you will enable your Apple One subscription.
Locate the Apple One subscription in the list and tap on it. This will take you to a dedicated page for Apple One, where you can manage your subscription settings.
On the Apple One page, you will see the details of your subscription plan, including the services that are included in it. You can review the plan and make any necessary changes if required.
After reviewing your Apple One subscription details, scroll down to the bottom of the page. Here, you will find the option to enable or disable the Apple One services.
To enable Apple One, toggle the switch next to “Enable Apple One” to the right. This will activate all the services included in your chosen Apple One subscription plan.
Once you’ve enabled Apple One, the switch will turn green, indicating that the services are now active. You can also customize the specific settings for each service by tapping on the individual service icons.
That’s it! You have successfully enabled Apple One subscription on your iPhone. You can now enjoy the benefits of Apple’s bundle of services, including Apple Music, Apple TV+, Apple Arcade, and more.
Note: The availability of Apple One and its services may vary depending on your region and the specific subscription plan you choose.
Step 4: Tap on Subscriptions
Once you have reached the Settings menu, the next step is to tap on the “Subscriptions” option. This is where you can manage all your subscriptions, including the newly introduced Apple One subscription.
When you tap on the “Subscriptions” menu, you will be presented with a list of all the subscriptions associated with your Apple ID. Here, you can view details such as the subscription name, billing cycle, and the amount you are being charged.
Scroll through the list to locate the Apple One subscription. It may be listed under a separate section or grouped with other subscriptions from Apple services such as Apple Music, Apple TV+, or iCloud. Look for the Apple One subscription plan that corresponds to your chosen tier.
Once you have found the Apple One subscription, tap on it to access its details. In this section, you can review the included services, their individual costs, and any other relevant information about the subscription plan.
If you are satisfied with the details, proceed to the next step to confirm and enable the Apple One subscription on your iPhone.
Step 5: Select Apple One
After you have signed up for Apple One and accessed the settings menu on your iPhone, it’s time to select your Apple One subscription plan. This step is crucial, as it determines the services and features you will have access to.
When you select Apple One, you will be presented with different subscription options, each offering a unique combination of services. These options may include Apple Music, Apple TV+, Apple Arcade, Apple News+, and iCloud storage.
It’s important to carefully review each subscription plan and consider which services are the most valuable to you. Take into account your entertainment preferences, gaming habits, reading habits, and storage needs.
Once you have weighed your options, simply tap on the subscription plan that best suits your needs. This will select the plan and enable the corresponding services on your iPhone.
Keep in mind that depending on the subscription plan you choose, certain apps and features may require additional downloads or activation. For example, if you select a plan that includes Apple Arcade, you may need to download the Apple Arcade app from the App Store.
After selecting your Apple One subscription plan, you will be one step closer to enjoying a seamless and integrated experience across all of Apple’s services on your iPhone.
Step 6: Choose Your Preferred Plan
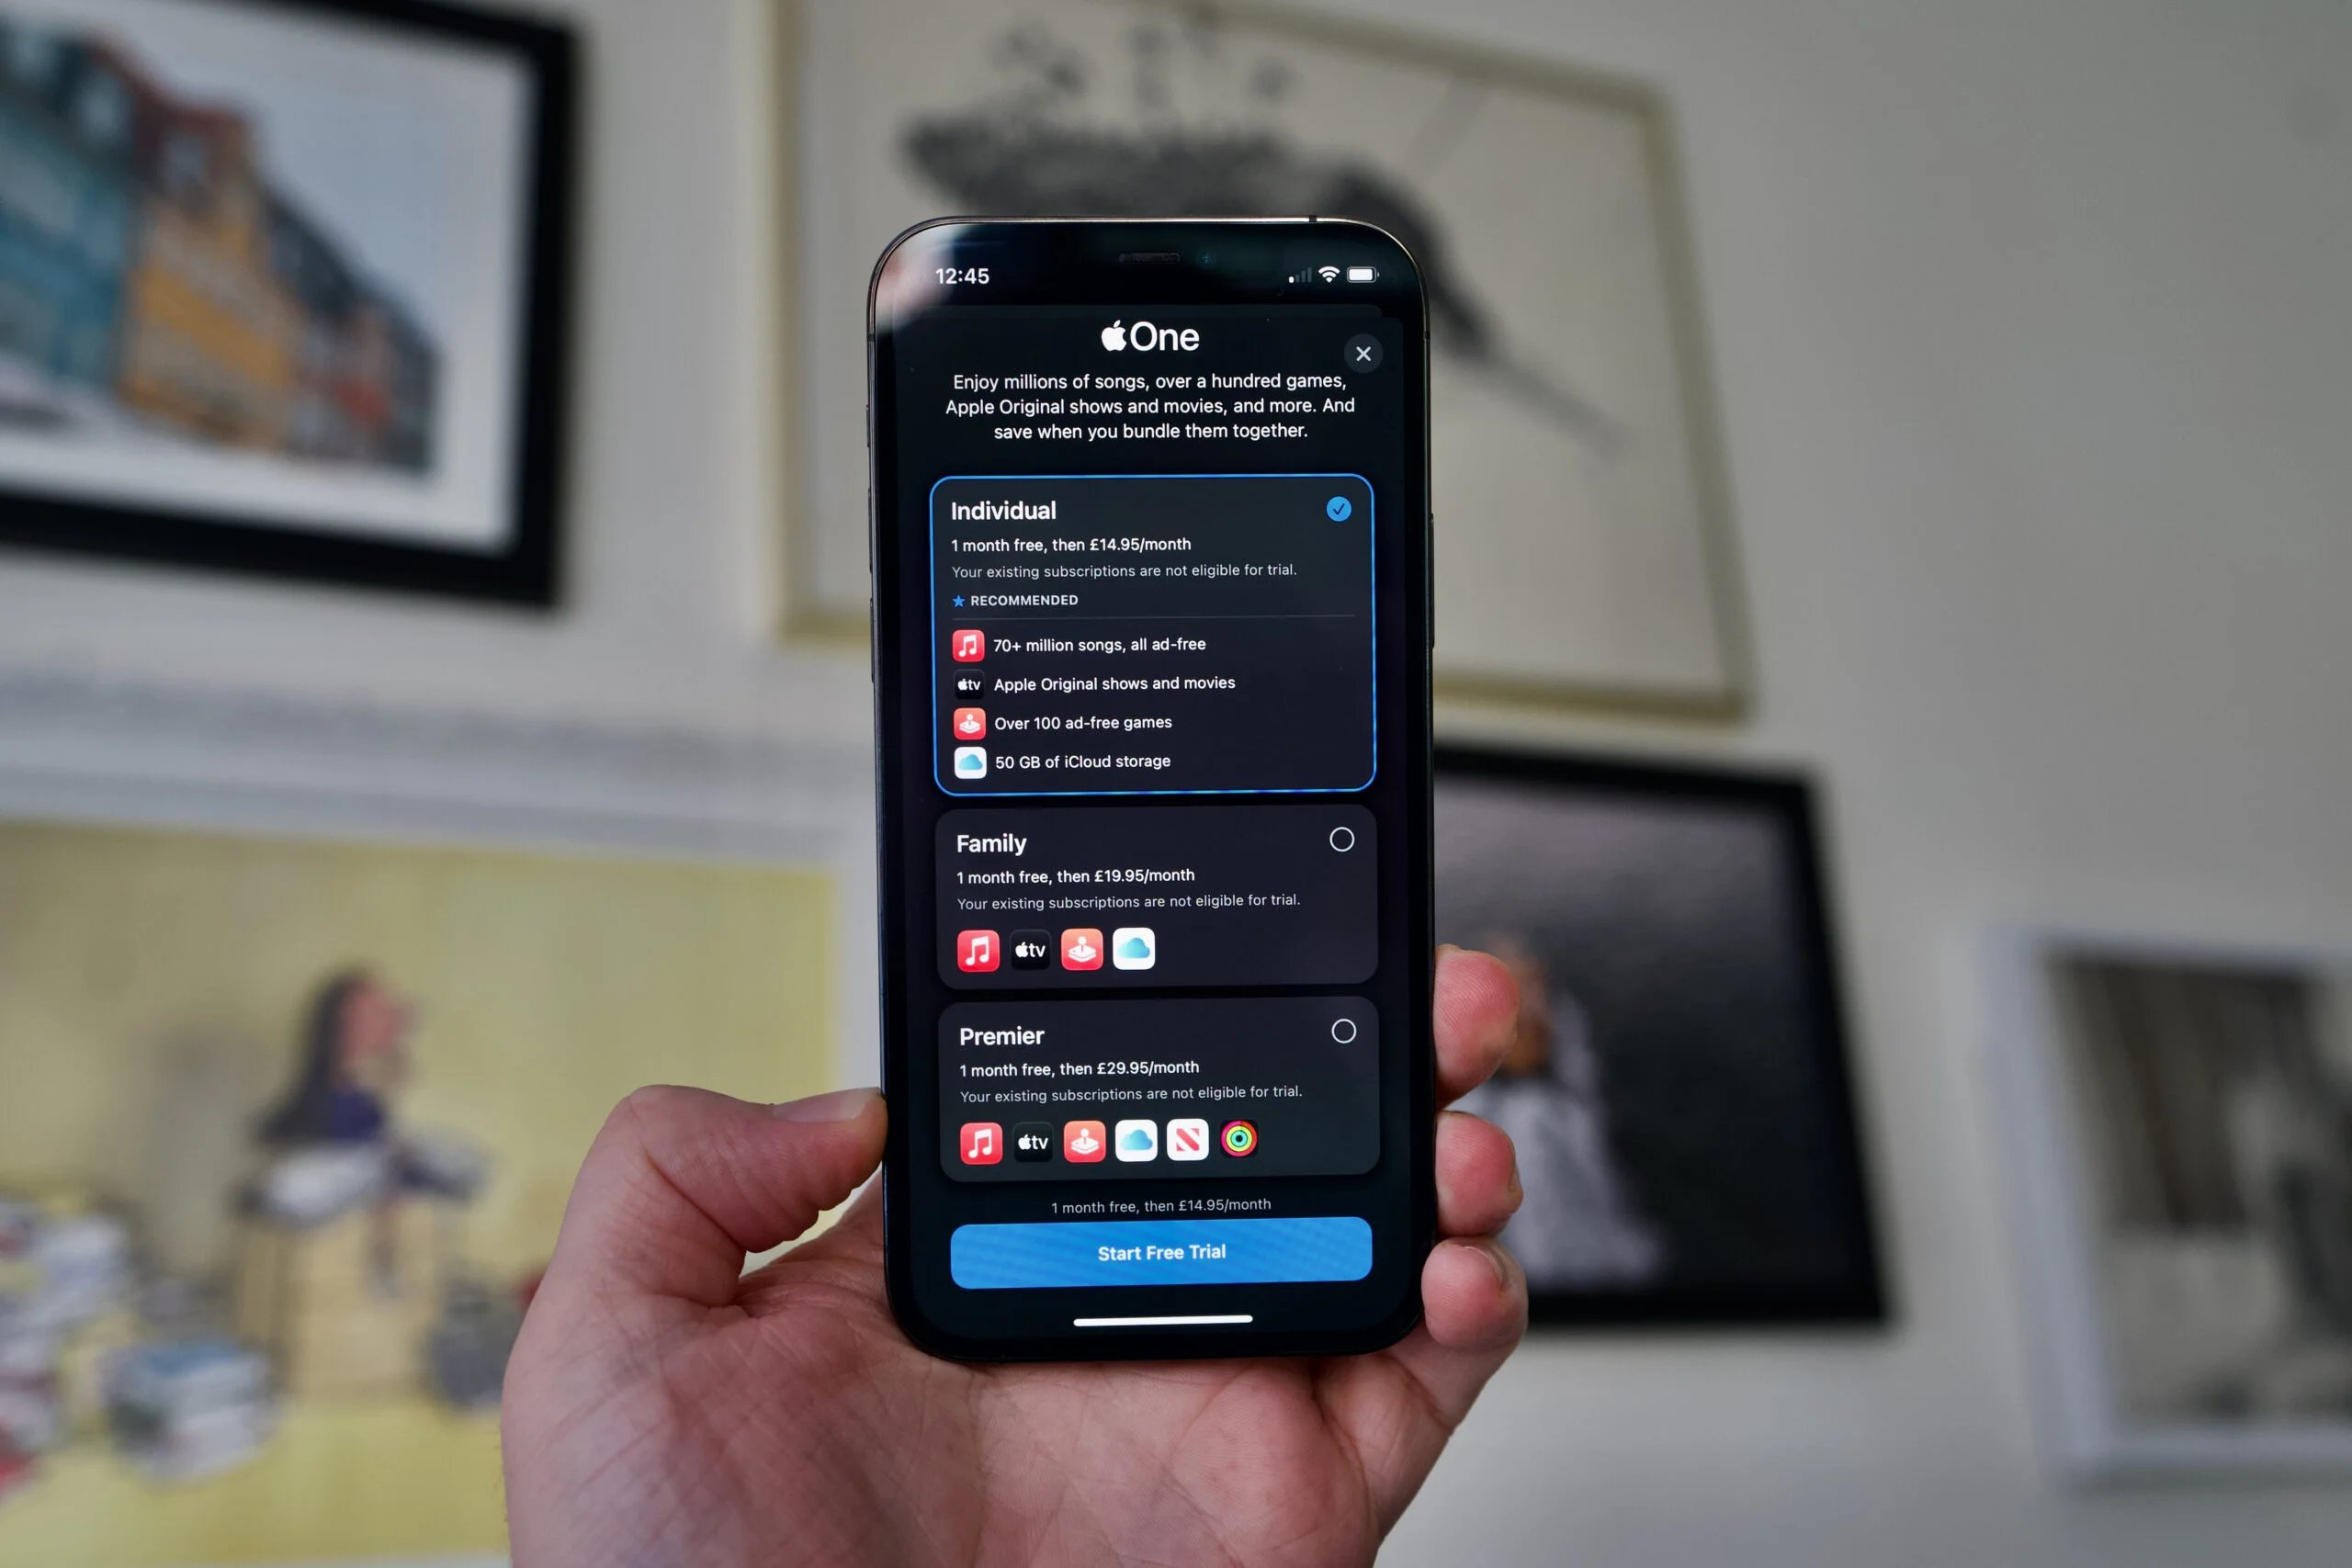
After confirming your subscription to Apple One in the previous step, you will now have the option to choose your preferred plan. Apple One offers different tiers of subscription plans, each providing a unique combination of services at varying price points. Here’s how you can choose your preferred plan:
1. On the Apple One subscription page, you will see a list of the available plans. Each plan includes a combination of services such as Apple Music, Apple TV+, Apple Arcade, iCloud storage, and more. Take some time to review each plan and consider which services are most important to you.
2. Consider your usage patterns and needs. If you’re an avid music lover, the plan that includes Apple Music may be the best fit for you. If you enjoy gaming, the plan with Apple Arcade might be worth considering. Evaluate your needs and preferences to make an informed decision.
3. Pay attention to the pricing and the value of each plan. Apple One offers bundled pricing, which means you can potentially save money by subscribing to multiple services together. Compare the cost of individual subscriptions versus the bundled plan to determine if the savings are worthwhile for you.
4. Once you have decided on your preferred plan, simply tap on it to select it. The chosen plan will be highlighted, and you will see the details of the plan, including the included services and the monthly price.
5. Take a moment to double-check the details of your chosen plan. Ensure that it includes all the services you want and that the price is within your budget. If everything looks good, proceed to the next step.
6. Confirm your selection by tapping on the “Choose” or “Confirm” button. This will finalize your chosen plan and enable the services included in the plan on your iPhone.
Congratulations! You have successfully chosen your preferred plan for your Apple One subscription. Now you can enjoy a seamless and integrated experience with the bundled services from Apple.
Remember, you can always change your Apple One plan or cancel your subscription at any time by accessing the Apple One settings on your iPhone.
Step 7: Confirm the Subscription
After selecting your desired Apple One subscription plan and reviewing the details, it’s time to confirm the subscription. This step ensures that you are ready to fully enjoy the benefits and services included in your chosen plan.
Once you have made your selection, you will be prompted to confirm the subscription. This is an important step, as it ensures that you will be billed accordingly for the services you have chosen.
If you are satisfied with your choice, simply tap on the “Confirm” button. By doing so, you are authorizing Apple to charge the payment method associated with your Apple ID for the monthly subscription fee.
It is worth noting that the subscription fee may vary depending on the plan you have selected. Be sure to double-check the monthly subscription cost before confirming your selection to avoid any surprises.
After confirming your subscription, you will receive a confirmation message indicating that your Apple One subscription is now active. This means that you can start enjoying the services and benefits immediately!
If you change your mind or wish to modify your subscription in the future, you can easily do so from the settings menu on your iPhone. Simply follow the steps outlined in this guide to make any necessary changes.
Remember, with an Apple One subscription, you gain access to a variety of Apple services at a bundled price, providing a convenient and cost-effective way to enjoy everything Apple has to offer.
So go ahead and confirm your Apple One subscription today, and unlock a world of exciting features and content!
Step 8: Enjoy Apple One Services on Your iPhone
Now that you have successfully enabled your Apple One subscription on your iPhone, it’s time to dive into the world of amazing services that it offers. With Apple One, you can enjoy a variety of services bundled together, including Apple Music, Apple TV+, Apple Arcade, Apple News+, Apple Fitness+, and iCloud storage. Here’s how you can make the most of these services:
1. Apple Music: Access a vast library of millions of songs ad-free and create your personalized playlists. Enjoy exclusive music releases and curated playlists from your favorite artists and genres.
2. Apple TV+: Discover a wide range of original TV shows and movies that are available only on Apple TV+. Binge-watch popular and critically acclaimed series or explore new and exciting content across various genres.
3. Apple Arcade: Immerse yourself in a world of fun and exciting games with Apple Arcade. Enjoy unlimited access to a collection of high-quality games that can be played across your iPhone, iPad, Mac, and Apple TV.
4. Apple News+: Stay updated with the latest news and articles across various publications with Apple News+. Access a wide range of magazines, newspapers, and online publications all in one convenient place.
5. Apple Fitness+: Get motivated and stay fit with Apple Fitness+, which offers a variety of workout classes led by world-class trainers. Whether you prefer HIIT, yoga, strength training, or dance, there’s a workout for everyone.
6. iCloud Storage: Keep your photos, videos, documents, and other files securely stored in iCloud. With Apple One, you get a generous amount of iCloud storage that can be shared across all your devices.
To access these services, simply open the respective app on your iPhone and sign in with your Apple ID. Once logged in, you’ll have full access to the features and content offered by each service.
Remember to explore the settings and customization options within each app to personalize your experience. You can also download content for offline viewing or listening, enabling you to enjoy your favorite music, shows, games, news, and workouts even when you’re not connected to the internet.
With Apple One, you can easily manage all your subscriptions and enjoy a seamless experience across multiple devices. So go ahead and make the most of your Apple One subscription, and get ready to be entertained, informed, and inspired!
Conclusion
In conclusion, enabling Apple One subscription on your iPhone is a convenient and cost-effective way to access a wide range of Apple services. With a single subscription, you can enjoy services like Apple Music, Apple TV+, Apple Arcade, and more, all bundled together for a discounted price.
By following the simple steps outlined in this article, you can easily set up and manage your Apple One subscription directly from your iPhone. Whether you’re a music lover, a movie enthusiast, or a gaming aficionado, Apple One provides a seamless and integrated experience that enhances your overall digital lifestyle.
So, why wait? Unlock the full potential of your iPhone and dive into a world of entertainment, productivity, and creativity by enabling Apple One subscription today.
FAQs
1. What is Apple One and how does it work?
Apple One is a subscription bundle offered by Apple that combines several Apple services into a single monthly or annual subscription. These services include Apple Music, Apple TV+, Apple Arcade, iCloud storage, Apple News+, and Apple Fitness+. With Apple One, you can access all these services at a discounted price compared to subscribing to them individually.
2. How can I enable Apple One on my iPhone?
To enable Apple One on your iPhone, follow these steps:
- Open the App Store on your iPhone.
- Tap on your profile picture at the top right corner of the screen.
- Select “Subscriptions” from the menu.
- Scroll down until you find the “Apple One” option.
- Tap on “Try it Free” or “Subscribe” to choose a plan.
- Follow the on-screen instructions to complete the subscription process.
3. Can I share an Apple One subscription with my family members?
Yes, Apple One allows you to share your subscription with up to five other family members through Family Sharing. Each family member will have their own personal access to the Apple services included in the subscription bundle, including iCloud storage and Apple Fitness+.
4. Can I customize the Apple One subscription to include only the services I want?
Unfortunately, Apple One does not currently offer the option to customize the subscription bundle by selecting specific services. However, the available Apple One plans offer a variety of services to suit different needs and preferences. You can choose the plan that includes the services you use the most to get the best value for your subscription.
5. Can I cancel or modify my Apple One subscription at any time?
Yes, you can cancel or modify your Apple One subscription at any time. To do so, follow these steps:
- Open the App Store on your iPhone.
- Tap on your profile picture at the top right corner of the screen.
- Select “Subscriptions” from the menu.
- Locate your Apple One subscription and tap on it.
- Choose “Cancel Subscription” to cancel it or select a different plan to modify your subscription.
- Follow the on-screen instructions to confirm your changes.