
Are you tired of being bombarded with subscriptions on your iPhone? Whether it’s a streaming service, a magazine, or even an app, sometimes we find ourselves subscribed to things we no longer need or want.
In this article, we will guide you through the process of removing those unwanted subscriptions on your iPhone. We understand the frustration of constantly being charged for services you no longer use, and we’re here to help you regain control of your subscriptions.
From canceling subscriptions through the App Store to managing recurring payments directly on your device, we’ve got you covered. So, if you’re ready to declutter and save some money along the way, keep reading to learn how to remove subscriptions on your iPhone.
Inside This Article
- Unsubscribing from App Store Subscriptions
- Cancelling Apple Music Subscriptions
- Managing Subscriptions through iPhone Settings
- Removing Subscriptions from Third-Party Apps
- Conclusion
- FAQs
Unsubscribing from App Store Subscriptions
Unsubscribing from App Store subscriptions on your iPhone is a relatively straightforward process. If you have subscribed to an app or service through the App Store and wish to cancel your subscription, follow these simple steps:
- Open the App Store on your iPhone by tapping on the App Store icon.
- Tap on your profile picture located in the top-right corner of the screen to access your Account page.
- Scroll down and tap on “Subscriptions” to view all active subscriptions linked to your Apple ID.
- From the list of subscriptions, select the one you wish to cancel by tapping on it.
- On the subscription details page, you will find the option to “Cancel Subscription.” Tap on it.
- Confirm your cancellation when prompted by tapping on “Confirm” or “Cancel Subscription” again.
That’s it! You have successfully unsubscribed from an App Store subscription on your iPhone. It is important to note that once you cancel a subscription, you will no longer be billed for it, and the access to the app or service will expire at the end of the subscription’s billing cycle.
Cancelling Apple Music Subscriptions
If you’re an avid music lover but have decided it’s time to cancel your Apple Music subscription, you’ve come to the right place. Whether you’re planning to switch to a different music streaming service or simply want to take a break from your subscription, cancelling Apple Music on your iPhone is a straightforward process.
To cancel your Apple Music subscription, follow these easy steps:
- Open the Music app on your iPhone.
- Tap on your profile picture or initials in the top left corner.
- Scroll down and select Manage Subscriptions.
- You will be redirected to the iTunes & App Store settings page.
- Tap on your Apple ID at the top of the screen and choose View Apple ID.
- Scroll down and tap Subscriptions.
- Under the Active section, you will find your Apple Music subscription.
- Tap on it to access the subscription settings.
- Finally, select the Cancel Subscription option and confirm your decision.
Once you’ve completed these steps, your Apple Music subscription will be successfully cancelled, and you will no longer be charged.
Remember that when you cancel your Apple Music subscription, you will lose access to all the exclusive content and features offered by the service. However, you can continue listening to any music you’ve purchased or downloaded during your subscription period.
It’s worth noting that if you’re on a free trial or in a promotional period, you can cancel your subscription before the trial ends to avoid being charged once the trial period is over. Similarly, if you want to reactivate your subscription in the future, you can do so by following the same steps and selecting the appropriate subscription plan.
Cancelling your Apple Music subscription doesn’t affect any other subscriptions you may have, such as Apple TV+ or iCloud storage. Those subscriptions need to be managed separately.
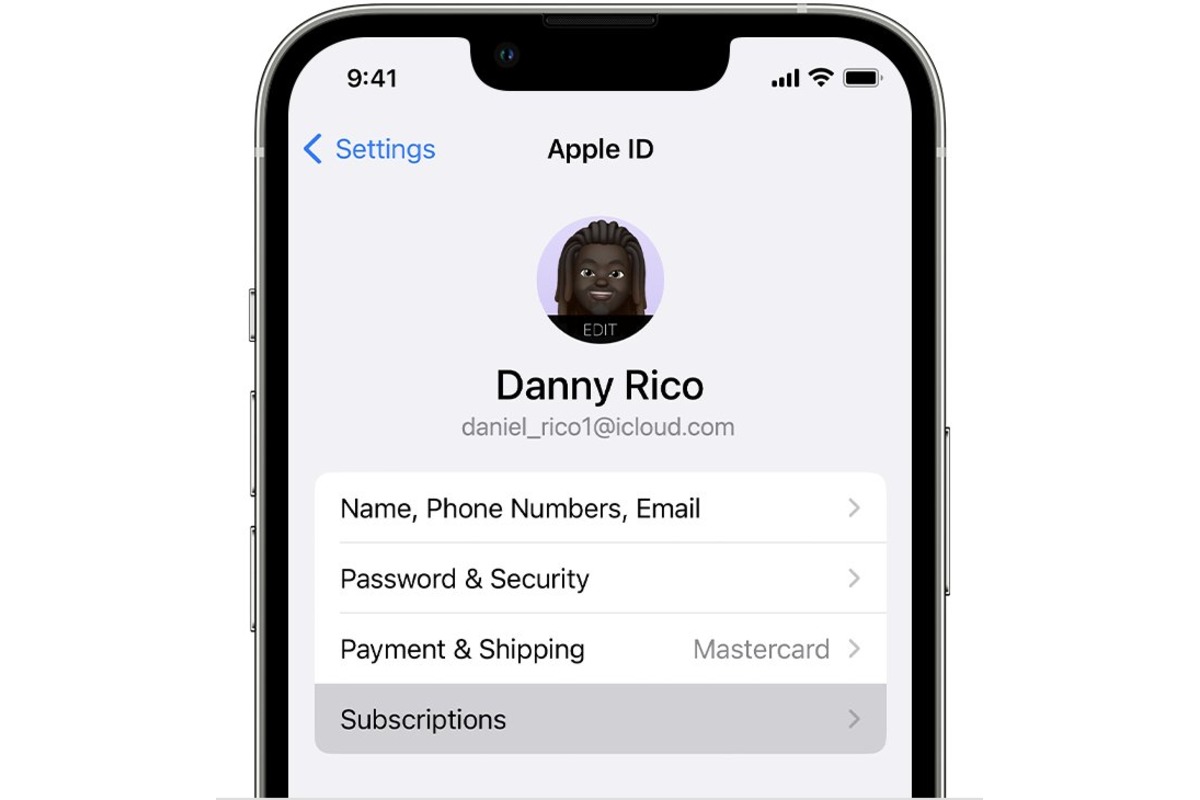
Managing Subscriptions through iPhone Settings
If you have subscribed to various services through your iPhone, you can easily manage and remove these subscriptions by accessing the settings on your device. Here are the steps to follow:
1. Open the Settings app on your iPhone. It can be found on your home screen, represented by a gear icon.
2. Scroll down and tap on your Apple ID, which is located at the top of the Settings menu. If you are using iOS 10.2 or earlier, you will see “iTunes & App Store” instead of your Apple ID.
3. From the Apple ID menu, tap on “Subscriptions.” This will take you to a list of all the subscriptions you have on your device.
4. Here, you will see a comprehensive list of all the active subscriptions associated with your Apple ID. Tap on the subscription that you want to manage or remove.
5. On the subscription page, you will have the option to change the subscription plan, cancel the subscription, or turn off its automatic renewal. You can choose the desired action based on your needs.
6. Follow the prompts to confirm your selection. If you choose to cancel the subscription, you will no longer be billed for it, and you will still have access to the service until the end of the current billing cycle.
7. To remove the subscription completely from your device, tap on the “Cancel Subscription” button. This will prevent any future charges and also terminate your access to the service immediately.
It’s important to note that managing subscriptions through iPhone Settings only applies to subscriptions that are linked to your Apple ID. If you have subscriptions through third-party apps, you may need to manage them directly within those apps.
By utilizing the settings on your iPhone, you can easily manage and remove subscriptions, ensuring that you have full control over your digital services and payments. Take advantage of this feature to maintain an organized and streamlined subscription experience on your iPhone.
Removing Subscriptions from Third-Party Apps
Subscriptions to third-party apps are becoming increasingly common, providing users with access to additional features or content. However, at times, you may find that you no longer need or want these subscriptions. In such cases, it’s important to know how to remove them from your iPhone.
The process of removing subscriptions from third-party apps varies depending on the app itself. Some apps allow you to manage your subscriptions directly within the app, while others require you to make changes through your iPhone settings. Here’s a step-by-step guide to help you navigate through both scenarios.
1. Open the App Store and tap on your profile picture at the top right corner of the screen. This will take you to your account settings.
2. Scroll down and tap on “Subscriptions.” Here, you’ll find a list of all active subscriptions associated with your Apple ID.
3. Find the third-party app subscription that you want to remove and tap on it. This will take you to the subscription details page.
4. On the subscription details page, you’ll see the option to cancel or modify your subscription. Tap on “Cancel Subscription” to remove it completely.
5. Follow the prompts to confirm the cancellation. Depending on the app, you may need to provide a reason for canceling the subscription.
6. Once the cancellation is confirmed, you will no longer be billed for the subscription, and the access to the app’s premium features or content will be revoked at the end of the current billing cycle.
For some apps, especially those with a complex subscription structure, you may need to follow additional steps or contact the app’s customer support for assistance. It’s always a good idea to carefully read the app’s documentation or FAQ section to understand the specific process for removing subscriptions.
Remember, removing a subscription from a third-party app does not delete the app itself from your iPhone. If you no longer want the app, you’ll need to separately uninstall it from your device by pressing and holding its icon on the home screen and selecting “Delete App.”
By following these steps, you can easily remove unwanted subscriptions from third-party apps on your iPhone, ensuring that you only pay for the services and content you truly need.
Conclusion
In conclusion, removing subscriptions on your iPhone is a straightforward process that can help you manage your expenses and declutter your device. By following the steps outlined in this guide, you can easily cancel unwanted subscriptions and regain control over your subscription list. Remember to review your subscriptions regularly to ensure that you are only paying for the services you truly need and enjoy. Taking the time to unsubscribe from unused or unnecessary subscriptions can save you money and keep your iPhone organized. With these tips, you can now confidently navigate the subscription landscape on your iPhone and optimize your device for a seamless and personalized experience.
FAQs
Q: How can I remove subscriptions on my iPhone?
A: Removing subscriptions on your iPhone is a straightforward process. Simply follow these steps:
- Open the Settings app on your iPhone.
- Scroll down and tap on “iTunes & App Store.”
- Tap on your Apple ID at the top of the screen, then select “View Apple ID” from the pop-up menu.
- Authenticate using Touch ID, Face ID, or your Apple ID password.
- Scroll down and tap on “Subscriptions.”
- You will see a list of all your active subscriptions. Select the subscription you want to remove.
- Tap on “Cancel Subscription” to stop the subscription from renewing at the next billing cycle.
- Confirm your cancellation when prompted.
Q: Will canceling a subscription on my iPhone delete the app?
A: Canceling a subscription on your iPhone will not automatically delete the app associated with that subscription. Removing a subscription only stops the renewal of the subscription at the end of the current billing cycle. The app will remain on your device unless you manually delete it.
Q: Can I get a refund if I cancel a subscription on my iPhone?
A: Whether or not you are eligible for a refund depends on various factors such as the app’s refund policy and the timing of your cancellation. To request a refund, you can contact the app developer directly or reach out to Apple support for further assistance.
Q: How can I manage my subscriptions on my iPhone?
A: To manage your subscriptions on your iPhone, you can follow these steps:
- Open the Settings app on your iPhone.
- Scroll down and tap on “iTunes & App Store.”
- Tap on your Apple ID at the top of the screen, then select “View Apple ID” from the pop-up menu.
- Authenticate using Touch ID, Face ID, or your Apple ID password.
- Scroll down and tap on “Subscriptions.”
- You will see a list of all your active subscriptions. From here, you can manage and make changes to your subscriptions.
Q: Can I re-subscribe to a canceled subscription on my iPhone?
A: Yes, you can re-subscribe to a canceled subscription on your iPhone. Once you have canceled a subscription, it will remain active until the end of the current billing cycle. After the cycle ends, you can choose to re-subscribe by going to the app or service’s page in the App Store and selecting the subscription option.