
Are you running out of storage on your iPhone and finding it frustrating to deal with the constant “storage full” notifications? Don’t worry, you’re not alone. With the ever-increasing file sizes of photos, videos, apps, and documents, it’s no surprise that our iPhones can quickly run out of space.
While many people are familiar with the option of using iCloud to expand their storage, it’s important to note that there is another solution: buying more iPhone storage directly. In this article, we will explore the benefits of purchasing additional storage for your iPhone and guide you on how to go about doing it.
Whether you simply want more room for your photos, videos, and apps, or you’re tired of relying on cloud storage solutions, buying more iPhone storage can significantly enhance your device’s capacity. So let’s dive in and discover how you can unlock more storage space on your iPhone without the need for iCloud!
Inside This Article
- Section 1: Understanding iPhone Storage
- Section 2: Options for Buying More iPhone Storage
- Section 3: Transferring Data and Managing Storage
- Section 4: Importance of Regular iPhone Backups
- Conclusion
- FAQs
Section 1: Understanding iPhone Storage
When it comes to your iPhone, understanding how storage works is crucial to effectively managing and optimizing your device. Let’s dive into the key aspects of iPhone storage.
iPhone storage refers to the amount of space available to store your apps, photos, videos, and other files on your device. It is essential for running apps smoothly and ensuring that you have ample space to store your personal data.
There is a distinction between internal storage and iCloud storage. Internal storage refers to the physical storage capacity built into your iPhone, while iCloud storage is cloud-based storage offered by Apple.
Internal storage is the space available directly on your iPhone and is where your apps, files, and media are stored. It is essential to note that the amount of storage you initially have may vary depending on the iPhone model you own.
iCloud storage, on the other hand, is a cloud-based storage solution provided by Apple. It allows you to store files, photos, videos, and app data remotely, freeing up space on your iPhone. iCloud storage can be purchased in various plans, providing you with additional storage capacity beyond your device’s internal storage.
Now that we understand the difference between internal storage and iCloud storage, let’s learn how to check your current iPhone storage usage.
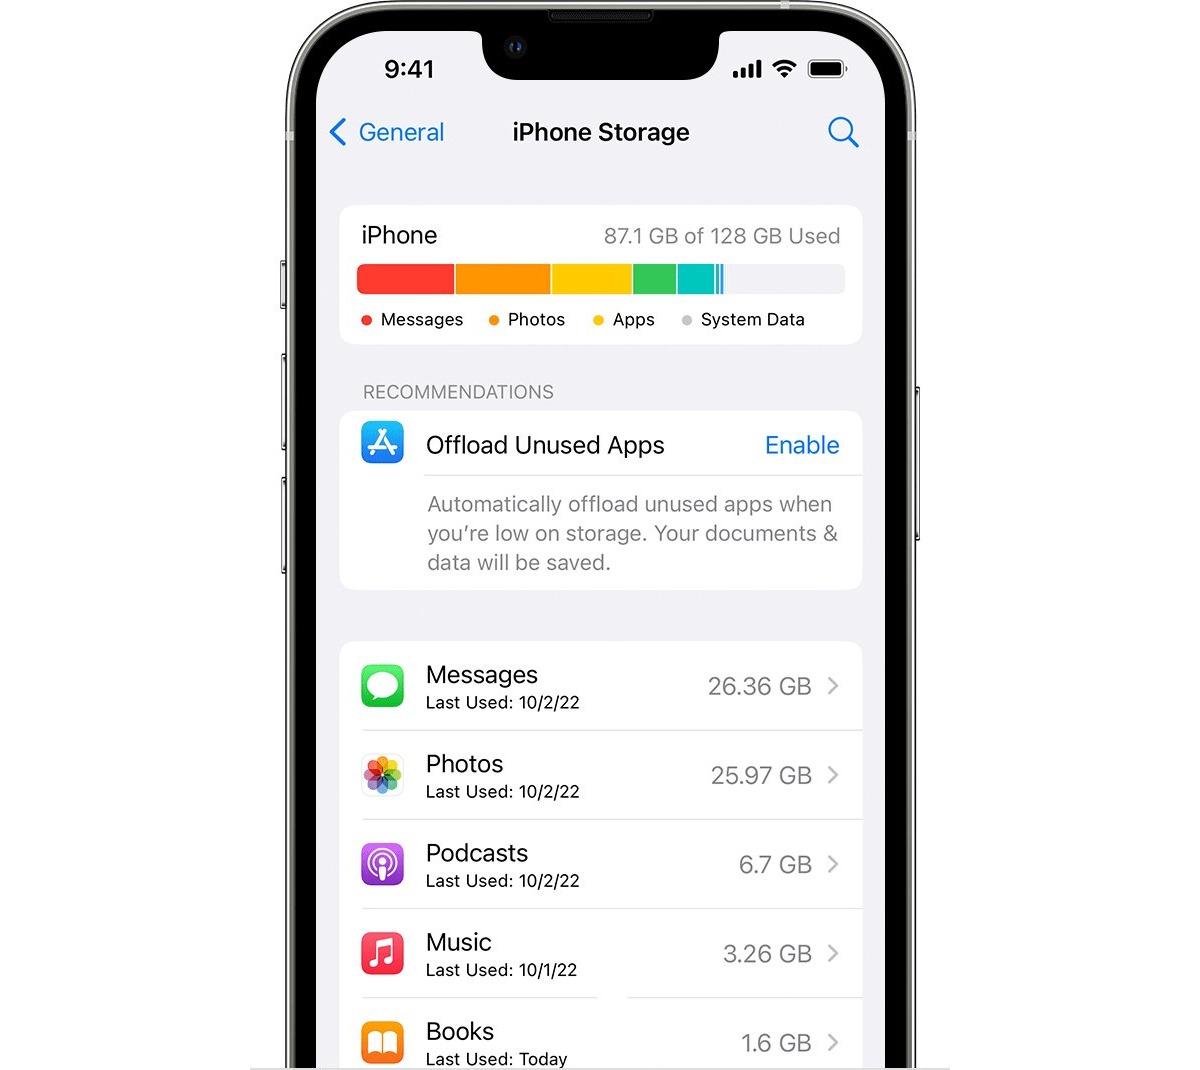
To check your iPhone storage usage, follow these steps:
- Open the “Settings” app on your iPhone.
- Scroll down and tap on “General”.
- Select “iPhone Storage”.
On the “iPhone Storage” screen, you’ll see a visual overview of your storage usage. It displays the total storage capacity, the amount of space used, and the available storage left on your iPhone. You can also see a breakdown of storage usage by different categories such as Apps, Photos, and System.
By regularly checking your iPhone storage usage, you can identify which apps or files are occupying the most space and take steps to manage and optimize your storage effectively.
Section 2: Options for Buying More iPhone Storage
When it comes to iPhone storage, having enough space to accommodate all your apps, photos, videos, and documents is crucial. If you find yourself running out of storage space on your iPhone, don’t worry. There are several options available to help you expand your iPhone storage capacity. In this section, we will explore different iPhone storage upgrade options and guide you through the process of purchasing additional iPhone storage directly from Apple or exploring third-party alternatives.
One of the most convenient ways to buy more iPhone storage is by purchasing it directly from Apple. By doing so, you can easily increase your iPhone’s built-in storage without the need for any external devices. To purchase additional iPhone storage from Apple, follow these simple steps:
- Open the Settings app on your iPhone.
- Tap on your Apple ID at the top of the screen.
- Select iCloud and then tap on “Manage Storage.”
- Under “Storage Plan,” choose the desired storage capacity you want to upgrade to (e.g., 50GB, 200GB, 2TB).
- Tap on “Buy” and follow the on-screen instructions to complete the purchase.
By purchasing additional storage directly from Apple, you not only get a seamless integration with your iPhone but also access to features like iCloud backup, iCloud Drive, and iCloud Photos, which can further enhance your iOS experience.
If you prefer exploring third-party alternatives for expanding your iPhone storage capacity, there are several options available in the market. These external storage solutions come in different forms, such as portable flash drives or wireless external hard drives, and offer varying storage capacities.
Some popular third-party alternatives for expanding iPhone storage include:
- Wireless external hard drives: These devices allow you to wirelessly stream or transfer files to and from your iPhone, providing a convenient way to free up space on your device.
- Flash drives with lightning connectors: These compact drives come with a lightning connector that directly plugs into your iPhone, enabling you to transfer files easily.
- iPhone-specific storage cases: These cases not only provide additional storage but also offer protection for your iPhone.
When choosing a third-party alternative, make sure to consider factors such as storage capacity, compatibility with your iPhone model, ease of use, and additional features offered by the device.
Before making a decision, it’s always a good idea to read reviews and compare different products to find the one that best suits your needs and budget. Keep in mind that while third-party alternatives can provide extra storage, they may not offer the same level of integration and convenience as Apple’s official storage options.
Whether you decide to purchase additional iPhone storage directly from Apple or explore third-party alternatives, expanding your iPhone storage capacity will ensure that you have ample space to store all your important files, media, and apps without worrying about running out of storage.
Section 3: Transferring Data and Managing Storage
Tips for transferring data to free up iPhone storage:
One of the most effective ways to create more space on your iPhone is by transferring data to another location. Here are some tips to help you manage your storage:
- Use cloud storage services: Consider using cloud storage services like Google Drive, Dropbox, or iCloud to store files, photos, and videos. This allows you to access your data from any device and free up valuable storage on your iPhone.
- Transfer photos and videos to a computer: Connect your iPhone to a computer and transfer your photos and videos using software like iTunes or the Photos app. This way, you can delete them from your iPhone while still keeping a backup on your computer.
- Delete unnecessary apps: Review the apps on your iPhone and delete any that you no longer use or need. This not only frees up storage space but also helps improve the overall performance of your device.
- Offload unused apps: In iOS, you can enable the “Offload Unused Apps” feature, which removes the app but keeps the data. If you reinstall the app, your data will be restored, but it helps save storage in the meantime.
How to manage and optimize your iPhone storage:
To efficiently manage and optimize your iPhone storage, try the following:
- Review and delete old messages: Messages can occupy a significant amount of storage, especially if you send or receive multimedia messages. Regularly delete old conversations or configure your settings to automatically delete messages after a certain period of time.
- Clear your cache: Apps and websites often cache data to improve performance. However, over time, this cache can accumulate and take up space. Clear app caches and browser data regularly to regain storage.
- Use the “Offload Unused Apps” feature: As mentioned earlier, enabling this feature can help manage your storage by removing unused apps while keeping your data intact.
- Enable “Optimize Storage” for Music: If you use Apple Music, enable the “Optimize Storage” option. This feature automatically removes downloaded songs you haven’t listened to in a while, freeing up storage space.
Deleting unnecessary files and apps to create more space:
To create more space on your iPhone, consider the following actions:
- Delete duplicate photos and videos: Over time, you may accumulate duplicate photos or multiple copies of videos. Use apps like Gemini Photos or similar tools to identify and delete duplicates.
- Remove old downloads: Clear your Downloads folder or remove downloaded files from apps like Safari or Files that you no longer need.
- Review and delete large files: Check for large files such as videos, movies, or documents that you no longer require. You can delete these files directly from the Files app or through other relevant apps.
- Manage your app storage: Some apps, like social media platforms, can consume a significant amount of storage due to cached data or downloaded content. Review and clear app storage regularly to free up space.
Section 4: Importance of Regular iPhone Backups
One of the most crucial aspects of owning an iPhone is regularly backing up your data. Backing up your iPhone ensures that your important files, photos, contacts, and other data are secure and can be easily restored in case of any mishap. Whether it’s a hardware failure, accidental damage, loss, or even upgrading to a new iPhone, having a backup ensures that you won’t lose valuable information.
There are two main methods to back up your iPhone: iCloud and iTunes.
1. Backing up your iPhone using iCloud:
iCloud is a cloud storage service provided by Apple that allows you to store your data remotely. To back up your iPhone using iCloud, follow these steps:
- Connect your iPhone to a Wi-Fi network.
- Go to “Settings” on your iPhone, tap on your name at the top of the screen, and then click on “iCloud”.
- Tap on “iCloud Backup”.
- Toggle the “iCloud Backup” switch to turn it on.
- Tap on “Back Up Now” to manually initiate a backup or enable “Automatic Backup” to schedule regular backups.
Make sure you have enough iCloud storage space to accommodate your backup. If you need more storage, you can upgrade your iCloud storage plan.
2. Backing up your iPhone using iTunes:
iTunes is a desktop application developed by Apple that allows you to manage and sync your iPhone with your computer. To back up your iPhone using iTunes, follow these steps:
- Connect your iPhone to your computer using a lightning or USB-C cable.
- Open iTunes on your computer.
- Select your iPhone icon in the iTunes interface.
- Under the “Backups” section, choose “This computer”.
- Click on “Back Up Now” to start the backup process.
It is recommended to encrypt your iTunes backup, as it will also save your passwords and Health data, providing a more comprehensive backup.
Best practices for ensuring your data is safely backed up:
Here are some tips to ensure that your iPhone backups are secure and reliable:
- Regularly check that your backups are successfully completed.
- Always use strong passwords and two-factor authentication for your iCloud account.
- Ensure that you have enough storage space in your iCloud account or computer for backups.
- Perform manual backups before major iOS updates or significant changes to your iPhone.
- Consider using third-party backup solutions for added flexibility and options.
By following these best practices, you can have peace of mind knowing that your iPhone data is always backed up and accessible whenever you need it.
Remember, regular backups are essential to protect your valuable data, so make it a habit to back up your iPhone regularly to avoid any potential data loss.
Conclusion
In conclusion, expanding the storage capacity of your iPhone can greatly enhance your mobile experience and give you more freedom to store and access your data without relying solely on iCloud. By following the steps outlined in this article, you can easily buy more storage for your iPhone and unlock its full potential. Whether you choose to avail yourself of Apple’s iCloud storage plans or invest in external storage options such as flash drives or wireless hard drives, the key is to assess your storage needs, explore different options, and make a decision that best suits your requirements and budget. Remember, having ample storage on your iPhone ensures that you can capture every special moment, download your favorite apps and games, and never run out of space to store your files. So, go ahead and expand your iPhone’s storage to enjoy a seamless and hassle-free mobile experience!
FAQs
Q: Can I buy more storage for my iPhone without using iCloud?
A: Yes, you can. While iCloud offers cloud-based storage, you can also purchase additional storage directly on your iPhone.
Q: How can I buy more iPhone storage?
A: To buy more storage for your iPhone, go to “Settings,” then tap on your name at the top of the screen. Next, select “iCloud” followed by “Manage Storage.” From there, tap “Change Storage Plan” and choose the desired plan you want to purchase. Follow the prompts to complete the payment process.
Q: What are the available storage plans for iPhone?
A: Apple offers various storage plans for iPhone users. The available plans include 50GB, 200GB, and 2TB. Choose the plan that suits your needs the best.
Q: Are there any monthly costs associated with buying more iPhone storage?
A: Yes, purchasing additional storage for your iPhone comes with a monthly cost. The pricing depends on the storage plan you choose and may vary based on your region.
Q: Can I cancel or change my iPhone storage plan?
A: Yes, you can cancel or change your iPhone storage plan. To do so, go to “Settings,” tap on your name, select “iCloud,” then “Manage Storage.” From there, tap on “Change Storage Plan” to modify or cancel your current plan.