
Is your Android phone experiencing slow performance or running out of storage space? One common solution to these issues is to clear the cache on your device. The cache is a temporary storage area where data from apps and websites is stored, allowing for faster access in the future. However, over time, the cache can become cluttered and cause performance issues. In this article, we will guide you through the process of clearing the cache on your Android phone, helping you improve performance and free up valuable space. Whether you’re a tech-savvy individual or a beginner, we’ve got you covered with easy-to-follow steps. So, let’s dive in and learn how to clear the cache on your Android phone!
Inside This Article
- Clearing App Cache
- Clearing System Cache
- Clearing browser cache
- Clearing Google Play Store cache
- Conclusion
- FAQs
Clearing App Cache
Is your Android phone feeling sluggish or running out of storage space? One simple solution to improve its performance and free up valuable memory is to clear the app cache. App cache is temporary data stored by apps to help them load faster and function smoothly. Over time, this cache can accumulate and become bloated, leading to slower performance and increased storage usage.
Fortunately, clearing the app cache on your Android phone is quick and easy. Here’s how you can do it:
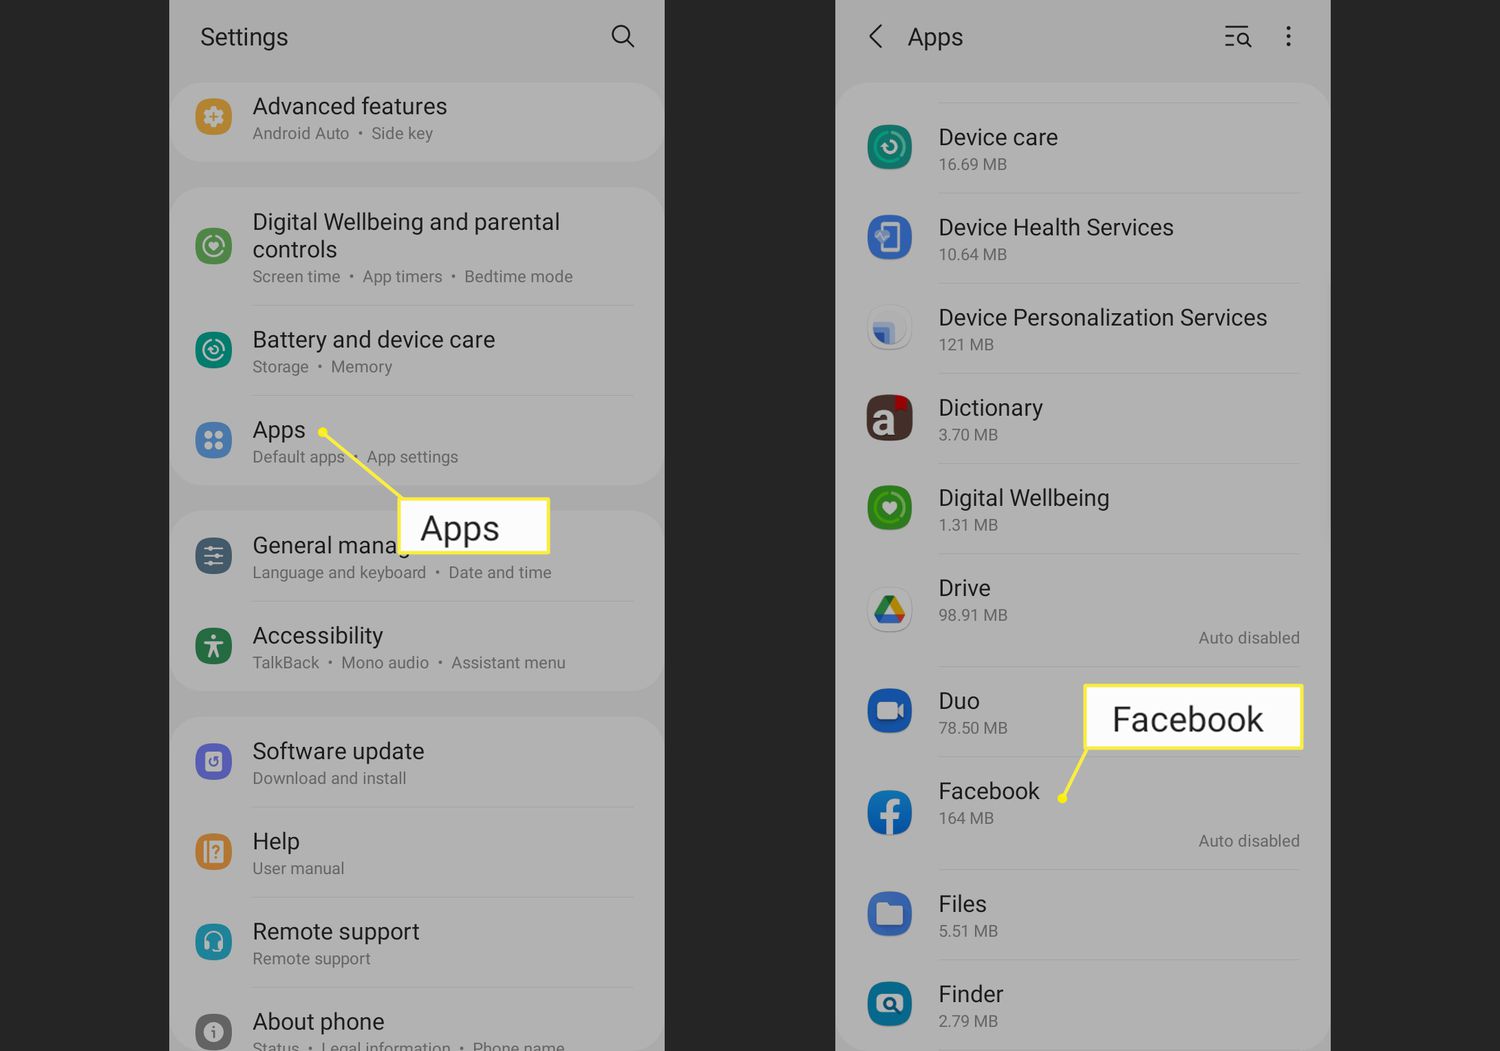
- Open Settings: Go to the main settings menu on your Android phone. You can usually find the settings app in the app drawer or by swiping down from the top of the screen and tapping on the gear icon.
- Select Apps: Look for the “Apps” or “Applications” option in the settings menu and tap on it. This will open a list of all the installed apps on your device.
- Choose the App: Scroll through the list and select the app for which you want to clear the cache. Tap on the app to open its settings page.
- Clear App Cache: Once you’re on the app’s settings page, you’ll see various options and information. Look for the “Storage” or “Storage & cache” section and tap on it. Here, you’ll find the option to clear the app cache. Tap on the “Clear cache” button to remove the temporary data associated with the app.
Clearing the app cache may vary slightly depending on the make and model of your Android phone or the version of the operating system you’re running. However, the general process remains the same across most phones.
By regularly clearing the app cache, you can improve the performance of your Android phone and free up valuable storage space. It’s a good practice to clear the cache of problematic apps, apps you no longer use, or if you’re experiencing issues like app crashes or freezing.
Remember, clearing the app cache will not delete any important data or settings from the app. It simply clears the temporary files and data that can accumulate over time. If you’re unsure whether to clear the cache for a specific app, you can always check the app’s settings or consult the app developer’s documentation.
So, the next time your Android phone starts to feel sluggish, don’t forget to clear the app cache and give it a boost!
Clearing System Cache
Over time, your Android phone accumulates temporary files and logs in its system cache, which can lead to decreased performance and storage space. Clearing the system cache can help resolve issues such as app crashes, slow performance, or even system glitches. Here’s how you can easily clear the system cache on your Android phone:
- Step 1: Start by turning off your Android phone.
- Step 2: Next, press and hold the Power button and Volume Down button simultaneously until the device enters the recovery mode.
- Step 3: In the recovery mode menu, use the Volume buttons to navigate and the Power button to select the desired option.
- Step 4: Look for an option called “Wipe cache partition” and select it. This option will clear the system cache on your Android phone.
- Step 5: After selecting the “Wipe cache partition” option, confirm your choice by selecting “Yes”.
- Step 6: Wait for the system cache to be cleared. This process usually takes a few seconds.
- Step 7: Once the cache is cleared, you will be taken back to the recovery mode menu. Select the “Reboot system now” option to restart your Android phone.
After rebooting your Android phone, you will notice that the system cache has been cleared, and your device should now perform better. It’s important to note that clearing the system cache does not delete any personal data or settings from your phone. It simply removes temporary system files, which can help improve overall performance.
Clearing the system cache is a useful troubleshooting step if you are experiencing problems with your Android phone. It’s recommended to perform this maintenance task periodically to keep your device running smoothly.
Clearing browser cache
If you’re experiencing slow loading times, website errors, or outdated content on your Android phone’s browser, it may be time to clear the browser cache. The browser cache is a temporary storage area that stores images, files, and website data to improve the loading speed of web pages you visit frequently. However, over time, the cache can become cluttered and cause issues with your browsing experience. Clearing the browser cache can help resolve these problems and ensure a smoother browsing experience.
To clear the cache on your Android phone’s browser, follow these simple steps:
- Open the browser app on your Android phone. This could be Google Chrome, Firefox, or any other browser you have installed.
- Tap on the three-dot menu icon located in the top-right corner of the browser screen. This will open a drop-down menu.
- From the drop-down menu, select “Settings” or “Preferences”, depending on the browser you are using.
- Within the settings menu, look for the “Privacy” or “Privacy & security” option.
- Tap on “Clear browsing data” or a similar option.
- You will be presented with a list of different types of data you can clear. Make sure the “Cache” option is selected.
- Optionally, you can also select other types of data you want to clear, such as cookies or browsing history.
- Tap on the “Clear” or “Clear data” button, depending on your browser.
Once you’ve cleared the browser cache, you may need to close and reopen your browser for the changes to take effect. After doing so, you should notice that the browser loads pages more quickly and that any display issues or outdated content have been resolved.
It’s worth noting that clearing the browser cache will also log you out of any websites you’re currently signed into. You will need to re-enter your credentials on those sites after clearing the cache.
Regularly clearing the cache on your Android phone’s browser is a good habit to get into. It helps keep your browsing experience smooth and can prevent any issues caused by a cluttered cache. If you regularly visit websites that frequently update their content, clearing the cache can ensure you always see the latest information.
Clearing Google Play Store cache
Google Play Store is the go-to app store for Android users, providing access to millions of apps, games, and digital content. Over time, the cache of Google Play Store can accumulate, causing the app to slow down or experience performance issues. Fortunately, clearing the cache can help resolve these issues and ensure a smoother experience. Here’s how you can clear the Google Play Store cache on your Android phone:
- Open the Settings app: On your Android phone, navigate to the Settings app. You can usually find it in the app drawer or by swiping down from the top of the screen and tapping the gear icon.
- Select Apps or Applications: Within the Settings app, locate and tap on the “Apps” or “Applications” option. This will display a list of all the apps installed on your device.
- Find Google Play Store: Scroll through the list of apps until you find “Google Play Store.” Tap on it to open the app’s settings.
- Clear the cache: Once you’re in the Google Play Store settings, look for the “Storage” or “Storage & cache” option. Tap on it to access the storage settings for the app. Within the storage settings, you should see an option to “Clear cache.” Tap on this option to clear the cache of the Google Play Store.
Clearing the cache of Google Play Store can help resolve issues such as slow loading times, app download errors, or update failures. It removes temporary files that may be causing conflicts or taking up unnecessary space on your device. After clearing the cache, you may need to re-enter your Google account information to access the Play Store.
It’s important to note that clearing the cache will not delete your apps, purchases, or settings within the Google Play Store. It simply removes temporary files and data that are stored locally on your device. If you’re experiencing persistent issues with the Google Play Store, you may also try clearing the data, but keep in mind that this will reset the app to its default settings and may require you to sign in again with your Google account.
By regularly clearing the cache of your Google Play Store app, you can help improve its performance, ensure smoother app downloads and updates, and provide a better overall user experience on your Android phone.
Conclusion
Clearing the cache on your Android phone is a simple yet effective way to maintain optimal performance and resolve potential issues. By removing temporary files and data accumulated over time, you can free up storage space and improve the overall speed and responsiveness of your device. Whether you’re experiencing slow app launches, frequent crashes, or running low on storage, clearing the cache can often provide a quick solution.
Remember to regularly clear the cache to prevent it from becoming bloated and potentially causing problems. You can choose to clear the cache individually for specific apps or clear it system-wide. Just keep in mind that clearing the cache will not delete any personal data, so you can perform this maintenance task without worrying about losing important files or settings.
With these step-by-step instructions and tips, you can confidently clear the cache on your Android phone and enjoy a smoother and more efficient mobile experience!
FAQs
1. Why should I clear the cache on my Android phone?
Clearing the cache on your Android phone can help improve its performance and free up storage space. Over time, cached files and data from apps can accumulate and take up valuable space, potentially slowing down your device. Clearing the cache can also help resolve issues like app crashes or freezing.
2. How do I clear the cache on an Android phone?
To clear the cache on your Android phone, you can follow these steps:
- Go to the “Settings” menu on your device.
- Select “Storage” or “Storage & USB” option.
- Tap on “Cached data” or “Cached data and files”.
- A confirmation message will appear. Confirm the action to clear the cache.
3. Will clearing the cache delete any of my personal data?
No, clearing the cache on your Android phone will not delete any of your personal data such as contacts, messages, or photos. It will only remove temporary files and data that have been stored by apps and can be safely deleted without affecting your personal information.
4. How often should I clear the cache on my Android phone?
The frequency of clearing the cache on your Android phone depends on your usage and the performance of your device. If you notice any sluggishness or issues with specific apps, it’s a good idea to clear the cache. In general, clearing the cache once every few months can help keep your phone running smoothly.
5. Do I need to clear the cache for every app on my Android phone?
You do not need to clear the cache for every app on your Android phone. Most apps have built-in mechanisms to manage their cache automatically. However, if you encounter any issues with a particular app or notice unusual behavior, you can try clearing the cache for that specific app to see if it resolves the problem.