
Are you tired of relying on Wi-Fi networks or data plans to connect your Nintendo Switch to the internet? Well, look no further! In this article, we will guide you on how to connect your Switch to your iPhone’s hotspot, giving you the freedom to play your favorite games online anytime, anywhere. Whether you’re on a road trip, sitting in a café, or simply away from a stable Wi-Fi connection, using your iPhone as a hotspot is a convenient solution. We’ll walk you through the step-by-step process, from enabling the hotspot feature on your iPhone to connecting your Switch seamlessly. So, grab your iPhone and get ready to enjoy uninterrupted gaming sessions on your Switch!
Inside This Article
- Connecting to iPhone Hotspot with Switch
- Step 1: Enable Personal Hotspot on iPhone
- Step 2: Turn on the Nintendo Switch
- Step 3: Access the Settings on the Switch
- Step 4: Connect to the iPhone Hotspot
- Troubleshooting Tips
- Conclusion
- FAQs
Connecting to iPhone Hotspot with Switch
Connecting your Nintendo Switch to your iPhone’s personal hotspot allows you to enjoy gaming on the go, even in areas without Wi-Fi. The iPhone hotspot feature allows you to share your cellular data connection with other devices, including the Nintendo Switch. In this article, we will guide you through the steps to connect your Switch to your iPhone hotspot and provide solutions for common connection issues.
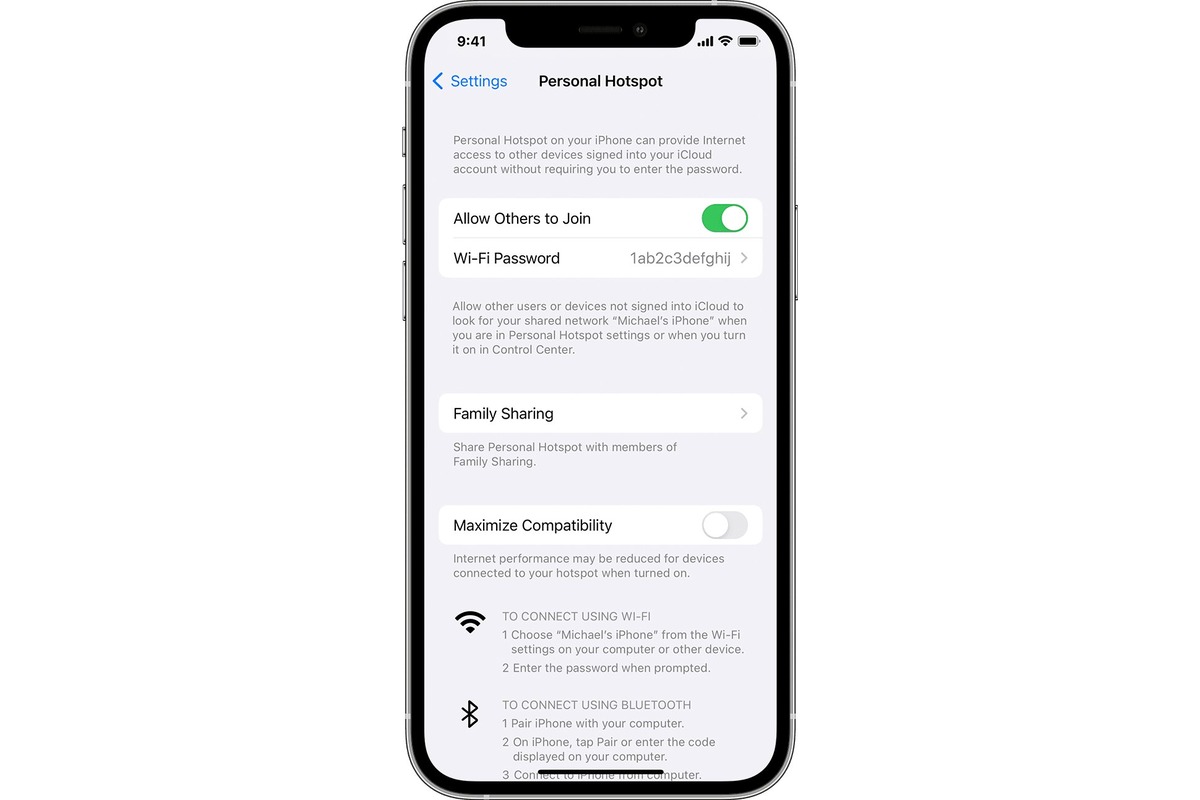
Step 1: Enabling Personal Hotspot on your iPhone
The first step is to make sure that the personal hotspot feature is enabled on your iPhone. To do this, go to the settings app on your iPhone and select “Personal Hotspot.” Enable the personal hotspot by toggling the switch on. You can also set a Wi-Fi password for added security.
Step 2: Connecting Switch to the iPhone Hotspot
Once you have enabled the personal hotspot on your iPhone, the next step is to establish the connection between your iPhone and the Nintendo Switch. Follow these steps:
- On your Nintendo Switch, go to the settings menu.
- Select “Internet” and choose “Internet Settings.”
- Select your Wi-Fi network from the list of available networks.
- Enter the password for your iPhone hotspot (if applicable) and connect.
Your Nintendo Switch should now be connected to your iPhone hotspot, allowing you to access online features and play multiplayer games that require an internet connection.
Step 3: Troubleshooting common connection issues
If you are experiencing difficulties connecting your Nintendo Switch to your iPhone hotspot, try the following troubleshooting steps:
- Restart your iPhone and Nintendo Switch.
- Ensure that you are within range of the iPhone hotspot.
- Double-check that the personal hotspot feature is enabled on your iPhone.
- Verify that your iPhone’s cellular data is active and working.
- Check for any software updates on your Nintendo Switch.
- Reset network settings on your iPhone and try connecting again.
Step 4: Maximizing the performance of the Switch on the iPhone Hotspot
To optimize the performance of your Nintendo Switch while connected to your iPhone hotspot, consider the following tips:
- Place your iPhone in an area with a stable cellular signal.
- Reduce network congestion by disconnecting other devices from the iPhone hotspot.
- Close any unused apps or games running in the background on your Nintendo Switch.
- Consider upgrading your cellular data plan for faster internet speeds.
By following these steps and troubleshooting tips, you should be able to connect your Nintendo Switch to your iPhone hotspot seamlessly. Enjoy gaming on the go with a reliable and convenient internet connection!
Step 1: Enable Personal Hotspot on iPhone
In order to connect your Nintendo Switch to your iPhone’s hotspot, you need to first enable the Personal Hotspot feature on your iPhone. This feature allows you to share your iPhone’s cellular data connection with other devices, such as your Nintendo Switch.
To enable Personal Hotspot on your iPhone, follow these steps:
- Open your iPhone’s Settings app.
- Tap on “Personal Hotspot”.
- If the “Personal Hotspot” option is not available, navigate to “Cellular” and then “Personal Hotspot”.
- Toggle the switch to enable Personal Hotspot. You may be prompted to set a Wi-Fi password for your hotspot.
Once you have enabled Personal Hotspot on your iPhone, it will broadcast a Wi-Fi network that your Nintendo Switch can connect to.
Step 2: Turn on the Nintendo Switch
Once you have successfully enabled the Personal Hotspot on your iPhone, it’s time to turn on your Nintendo Switch and connect it to the hotspot. Follow these simple steps to get started:
1. Press and hold the power button on the Nintendo Switch console. The power button is located on the top-left corner of the device. Hold it down until the Nintendo Switch logo appears on the screen.
2. Use the Joy-Con controllers or the touch screen to navigate through the initial setup process. Follow the on-screen instructions to set up your preferred language, time zone, and internet connection.
3. When you reach the internet connection screen, select “Set Up Internet Connection” and choose “Wi-Fi”. This option allows you to connect to your iPhone’s hotspot.
4. The Nintendo Switch will scan for available Wi-Fi networks. Wait for the list of networks to populate on the screen.
5. Locate and select your iPhone’s hotspot from the list of available networks. It should be listed with the name you previously set for your iPhone.
6. If necessary, enter the password for your Personal Hotspot when prompted. This is the same password you set up when enabling the hotspot on your iPhone.
7. Wait for the Nintendo Switch to establish a connection with your iPhone’s hotspot. Once connected, you will see a confirmation message on the screen.
8. Congratulations! Your Nintendo Switch is now connected to your iPhone’s hotspot. You can now access online features, download games, and play multiplayer games with other players.
Remember that connecting your Nintendo Switch to an iPhone hotspot consumes data from your cellular plan. It is advisable to keep track of your data usage to avoid exceeding your plan’s limits.
If you encounter any difficulties or connection issues during the process, refer to the troubleshooting section or consult the Nintendo Switch and iPhone user manuals for further assistance.
Step 3: Access the Settings on the Switch
Once you have successfully connected your Nintendo Switch to your iPhone hotspot, the next step is to access the settings on the Switch to optimize your gaming experience.
To access the settings on the Switch, you need to navigate to the Home Menu. To do this, press the home button on the right joy-con controller. This will take you to the main screen where you can customize various settings on your device.
From the Home Menu, locate and select the “System Settings” icon. It is represented by a cogwheel and is usually located at the bottom of the screen.
Next, scroll through the options on the left side of the screen and select “Internet”. This will open up the internet settings menu.
In the “Internet” menu, you have the option to connect to a wireless network, view network status, and manage internet settings. Since you have already connected your Switch to your iPhone hotspot, you don’t need to worry about connecting to a wireless network.
Instead, scroll down and select “Test Connection” to ensure that your Switch is properly connected to the internet through your iPhone hotspot. This test will verify the strength and stability of the connection, allowing you to identify any potential issues.
After running the connection test, you can further optimize your gaming experience by adjusting the internet settings. Depending on your preferences and the stability of your connection, you can change the MTU (Maximum Transmission Unit) value, adjust the DNS (Domain Name System) settings, or enable/disable proxy settings.
However, it is important to note that making changes to these settings without proper knowledge or guidance may affect the performance of your Switch. If you are not familiar with these settings, it is recommended to leave them at their default values.
Once you have ensured that your Switch is properly connected to the internet and made any necessary adjustments to the settings, you are ready to dive into your favorite games and enjoy seamless online gameplay on your Nintendo Switch!
Step 4: Connect to the iPhone Hotspot
Now that you have enabled Personal Hotspot on your iPhone, it’s time to connect your Nintendo Switch to the iPhone hotspot. Follow the steps below to get started:
1. On your Nintendo Switch, go to the System Settings by tapping the gear icon on the home screen.
2. In the System Settings menu, select “Internet” from the options.
3. Choose the “Internet Settings” option on the next screen.
4. Select the Wi-Fi network option when prompted to choose your internet connection type.
5. Your Nintendo Switch will now search for available Wi-Fi networks. Wait for the list of networks to load.
6. Locate the name of your iPhone hotspot in the list and select it. The name of your iPhone hotspot should be the same as the network name (SSID) you set earlier.
7. If prompted, enter the password for your iPhone hotspot. Make sure to enter the correct password to establish a successful connection.
8. Once the password is entered, your Nintendo Switch will attempt to connect to the iPhone hotspot. Wait for a moment as the connection is established.
9. Congratulations! You have successfully connected your Nintendo Switch to the iPhone hotspot. You can now enjoy online gaming, multiplayer battles, and access to various online features.
It is important to note that connecting your Nintendo Switch to an iPhone hotspot may consume a significant amount of data depending on your gaming activities. Ensure that you have a sufficient data plan to avoid any unexpected charges.
If you encounter any issues while connecting to the iPhone hotspot, please refer to the troubleshooting section below or contact your network provider for further assistance.
Troubleshooting Tips
Connecting your Nintendo Switch to your iPhone’s hotspot can sometimes encounter issues. However, with a few troubleshooting tips, you can quickly resolve any connectivity problems and enjoy gaming on your Switch without interruptions.
Here are some troubleshooting tips to help you get your Switch connected to your iPhone hotspot:
- Check your hotspot settings: Ensure that your iPhone’s hotspot is enabled and configured correctly. Verify that the Wi-Fi password is entered correctly and that the hotspot signal is stable.
- Restart your devices: Sometimes, a simple restart can resolve connectivity issues. Turn off both your iPhone and your Nintendo Switch. Then, power them back on, allowing them to establish a fresh connection.
- Update your devices: Ensure that your iPhone and Nintendo Switch are updated with the latest software versions. Outdated software can sometimes cause compatibility issues and connectivity problems.
- Remove and re-add the network: On your Nintendo Switch, go to the Wi-Fi settings and remove the iPhone hotspot network. Then, add it again by entering the correct Wi-Fi password. This can help refresh the connection and establish a stronger link.
- Move devices closer: If you’re experiencing a weak hotspot signal, try moving your iPhone closer to your Nintendo Switch. A stronger signal can result in improved connectivity and smoother gameplay.
- Disable Bluetooth: If you’re still having trouble connecting, disable Bluetooth on both your iPhone and Nintendo Switch. Sometimes, Bluetooth interference can impact Wi-Fi connections.
- Reset network settings: If all else fails, you can try resetting the network settings on your iPhone. Keep in mind that this will remove all Wi-Fi networks and passwords saved on your device, so you’ll need to reconnect to your Wi-Fi networks afterward.
By following these troubleshooting tips, you should be able to resolve most connectivity issues between your Nintendo Switch and your iPhone hotspot. If you continue to experience problems, it is advisable to seek further assistance from Nintendo support or your iPhone manufacturer for additional troubleshooting steps.
Conclusion
Connecting your Nintendo Switch to your iPhone’s hotspot can be a convenient way to enjoy online gaming on the go. By following the steps outlined in this guide, you can easily establish a connection between the two devices and start playing your favorite games wherever you are.
Remember to keep in mind your data usage and to have a stable cellular connection to ensure smooth gameplay. Additionally, using your iPhone’s hotspot may drain the battery quickly, so it’s a good idea to have a portable power bank handy.
With the Nintendo Switch and iPhone hotspot combo, you no longer have to rely on WiFi networks to enjoy multiplayer gaming or online features. Take your gaming experience to the next level and enjoy the freedom of playing your favorite Nintendo Switch titles wherever you go.
FAQs
Q: Can I connect my Nintendo Switch to my iPhone hotspot?
A: Yes, you can connect your Nintendo Switch to your iPhone hotspot and enjoy online gaming on the go! Connecting your Switch to your iPhone hotspot allows you to access online multiplayer features, download games, and stay connected while you’re away from a Wi-Fi network.
Q: How do I connect my Switch to my iPhone hotspot?
A: To connect your Nintendo Switch to your iPhone hotspot, follow these steps:
1. On your iPhone, go to “Settings” and tap on “Personal Hotspot”.
2. Enable the Personal Hotspot option and make note of the Wi-Fi password.
3. On your Nintendo Switch, go to “System Settings” and select “Internet”.
4. Choose “Internet Settings” and select your preferred Wi-Fi network.
5. Enter the Wi-Fi password that you obtained from your iPhone hotspot.
6. Once connected, you’ll be able to use your iPhone’s mobile data to access online multiplayer and download games on your Switch.
Q: Are there any limitations when using an iPhone hotspot with my Switch?
A: While using your iPhone hotspot with your Nintendo Switch is a convenient way to access online features, there are a few limitations to be aware of. Firstly, using your iPhone hotspot will consume mobile data, so keep an eye on your data usage to avoid exceeding your plan’s limit. Secondly, if you’re in an area with a weak cellular signal, it may affect your online gaming experience. Lastly, some carriers may have restrictions on hotspot functionality or charge additional fees, so it’s advisable to check with your carrier for any specific limitations or charges associated with using your iPhone hotspot.
Q: Can I use my iPhone hotspot to play online multiplayer games on my Switch?
A: Yes, connecting your Nintendo Switch to your iPhone hotspot allows you to play online multiplayer games. Once connected, you’ll be able to join multiplayer matches, compete with other players, and enjoy the full online gaming experience on your Switch, using your iPhone’s mobile data connection.
Q: Does connecting my Switch to my iPhone hotspot impact battery life?
A: Using your iPhone hotspot with your Nintendo Switch may have a slight impact on battery life, as connecting to a hotspot and utilizing mobile data consumes additional power. It is recommended to have your Switch plugged in or use it while it is charged to ensure a continuous and uninterrupted gaming experience.