
Are you a fan of U2 but found their album automatically added to your iPhone without your consent? Fret not, as we’ve got you covered with a simple guide on how to delete U2 from your iPhone. While U2’s music is undoubtedly fantastic, personal preferences can vary, and if you’re not a fan or simply want to free up some storage space, deleting the U2 album can be the way to go. In this article, we’ll provide you with step-by-step instructions on how to remove the U2 album from your iPhone, ensuring that your music library is customized to your liking. So, let’s dive in and learn how to bid farewell to U2 on your iPhone!
Inside This Article
- Solution 1: Hiding the U2 Album
- Solution 2: Removing the U2 Album
- Solution 3: Disabling Automatic Downloads
- Solution 4: Contacting Apple Support
- Conclusion
- FAQs
Solution 1: Hiding the U2 Album
If you are one of the iPhone users who found the U2 album automatically downloaded onto your device and want it out of sight, don’t worry! There is a simple solution to hide the U2 album from your iPhone.
To hide the U2 album, follow these steps:
- Open the Music app on your iPhone.
- Select the “Library” tab at the bottom of the screen.
- Scroll down until you find the “Albums” section and tap on it.
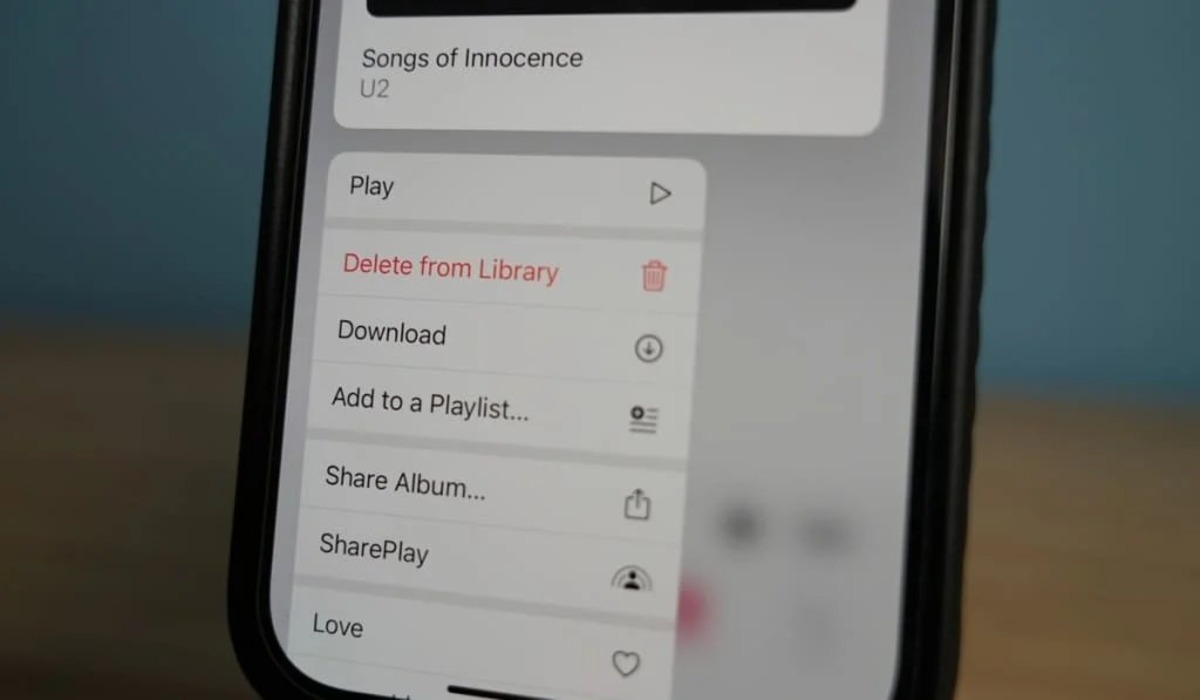
- Look for the “Songs of Innocence” album. It should appear at the top of the list.
- Swipe left on the album to reveal the “Hide” button and tap on it.
By following these steps, you will hide the U2 album from your iPhone, effectively removing it from your visible library.
Note: Hiding the album does not delete it from your device. It simply removes it from your visible library, allowing you to keep your Music app organized to your preference.
If you ever want to restore the U2 album to your library, follow these steps:
- Open the Music app on your iPhone.
- Tap on the “Library” tab at the bottom of the screen.
- Scroll down and tap on “Hidden” under the “Library” section.
- Locate the “Songs of Innocence” album.
- Swipe left on the album and tap on the “Unhide” button.
Following these steps will restore the U2 album to your library, making it visible in your Music app once again.
Now you can easily hide and unhide the U2 album on your iPhone, keeping your music library free of any unwanted clutter.
Solution 2: Removing the U2 Album
If you are not a fan of U2 or simply do not want the album taking up space on your iPhone, you can remove it completely. Here’s how:
1. Open the Music app on your iPhone. Tap on the “Library” tab at the bottom.
2. Navigate to the “Songs” section. Scroll through the list until you find the U2 album.
3. Swipe from right to left on any song from the U2 album. This will reveal a “Delete” button. Tap on it to remove the song.
4. Repeat step 3 for each song in the U2 album until they are all deleted.
5. To remove the U2 album from your iPhone completely, go back to the “Library” tab in the Music app.
6. Scroll down to the “Albums” section and find the U2 album. Swipe from right to left on the album and tap on the “Delete” button to remove it.
Once you have followed these steps, the U2 album and all its songs will be successfully removed from your iPhone. The space previously occupied by the album will now be available for your own music or other media files.
Solution 3: Disabling Automatic Downloads
If you’re still having trouble deleting the U2 album from your iPhone, you may want to consider disabling automatic downloads. By doing so, you can prevent any unwanted downloads, including the U2 album, from appearing on your device again in the future.
To disable automatic downloads on your iPhone, follow these simple steps:
- Open the “Settings” app on your iPhone.
- Scroll down and tap on “iTunes & App Store”.
- Under the “AUTOMATIC DOWNLOADS” section, toggle off the switch next to “Music”.
By turning off the automatic downloads for music, any future albums or songs will not be automatically downloaded to your device without your consent. This will prevent unwanted tracks, such as the U2 album, from showing up on your iPhone.
Keep in mind that disabling automatic downloads for music will not remove any existing downloaded tracks from your iPhone. You will need to manually delete them by following the steps mentioned in Solution 2.
Once you have disabled automatic downloads, you can now enjoy a clutter-free music library on your iPhone without the U2 album or any other undesired tracks.
Solution 4: Contacting Apple Support
If the previous solutions didn’t work for you or if you’re facing any other issues related to the U2 album on your iPhone, it’s advisable to contact Apple Support for further assistance. Apple Support has a team of experts who can provide guidance and help resolve any problems you may be experiencing with removing the U2 album from your device.
To contact Apple Support, you have a few different options. One option is to visit the Apple Support website and navigate to the “Contact Us” section. From there, you can choose to initiate a live chat with a support representative, schedule a call back at a convenient time, or request email support. This allows you to communicate directly with Apple’s knowledgeable support staff and receive personalized assistance tailored to your specific issue.
If you prefer to seek support in person, you can visit an Apple Store and speak with a Genius Bar technician. The Genius Bar is a dedicated area within Apple Stores where you can receive expert advice, troubleshooting, and product support. They can assess your situation and provide guidance on how to remove the U2 album or address any other concerns you have with your iPhone.
Remember to provide the support team with all relevant information about your device and the issue you’re facing. This includes details such as the model and iOS version of your iPhone, any error messages you’ve encountered, and the specific steps you’ve taken to try and delete the U2 album. The more information you can provide, the easier it will be for the support team to assist you effectively.
Apple Support is committed to providing excellent customer service and helping users make the most of their devices. Whether you need assistance with removing the U2 album or any other iPhone-related issue, reaching out to the Apple Support team can provide you with the guidance and solutions you need to resolve the problem.
In conclusion, deleting U2 from your iPhone is a simple and straightforward process. Whether you found their album automatically downloaded onto your device or you simply want to remove it for personal preference, you have several methods at your disposal. You can manually delete the album from your music library, turn off automatic downloads for music, or even hide the album from your purchases. Regardless of the method you choose, following the steps outlined in this article will help you successfully remove U2 from your iPhone.
FAQs
Q: How do I delete U2 from my iPhone?
A: To delete the U2 album from your iPhone, you can follow these steps:
- Go to the Music app on your iPhone.
- Select the “Library” tab.
- Find the U2 album or songs that you want to delete.
- Swipe left on the album or song to reveal the “Delete” option.
- Tap on “Delete” to remove the U2 content from your iPhone.
Q: Will deleting U2 from my iPhone remove it from my iTunes account?
A: No, deleting the U2 album from your iPhone will only remove it from your device. The album will still be available to download or stream from your iTunes account if you wish to access it again in the future.
Q: Can I permanently remove the U2 album from my iTunes account?
A: Yes, if you want to permanently remove the U2 album from your iTunes account, you can follow these steps:
- Open iTunes on your computer.
- Click on “Account” in the menu bar and select “View My Account”.
- Scroll down to the “iTunes in the Cloud” section and click on “Manage” next to “Hidden Purchases”.
- Locate the U2 album and click on the “Unhide” button next to it.
- The U2 album will now be permanently removed from your iTunes account.
Q: Why was the U2 album automatically added to my iPhone?
A: The U2 album, titled “Songs of Innocence”, was automatically added to the libraries of millions of iTunes users as part of a promotional campaign by Apple and U2. This decision sparked controversy, as some users were surprised to find the album on their devices without their consent.
Q: Can I prevent automatic downloads in the future?
A: Yes, you can prevent automatic downloads by adjusting your iTunes settings. Here’s how:
- On your iPhone, go to “Settings”.
- Scroll down and tap on “iTunes & App Store”.
- Under the “Automatic Downloads” section, toggle off the options for “Music” and “Updates”.
- This will prevent any future automatic downloads from occurring on your iPhone.