
Welcome to the world of iPhones, where communication and connectivity are at your fingertips. One essential aspect of staying connected is having the ability to send and receive emails right from your device. If you’re wondering how to make an email on your iPhone, you’ve come to the right place. In this article, we will guide you through the process of setting up and creating emails on your iPhone, whether you’re using the default Mail app or a third-party email client. From configuring your email account to composing and sending messages, we’ll cover it all. With our expert tips and step-by-step instructions, you’ll be composing emails on your iPhone like a pro in no time. Get ready to experience the convenience and efficiency of having your email right at your fingertips!
Inside This Article
- Setting up an Email Account on iPhone
- Configuring Email Settings on iPhone
- Composing and Sending Emails on iPhone
- Managing Email Accounts on iPhone
- Conclusion
- FAQs
Setting up an Email Account on iPhone
Setting up an email account on your iPhone is a simple and straightforward process. With just a few steps, you can start sending and receiving emails right from your device. Whether you use Gmail, Yahoo Mail, or any other email service provider, here’s how to set up your email account on your iPhone:
- Open the “Settings” app on your iPhone. It’s represented by a gear icon.
- Scroll down and tap on “Mail”.
- Tap on “Accounts”.
- Tap on “Add Account”.
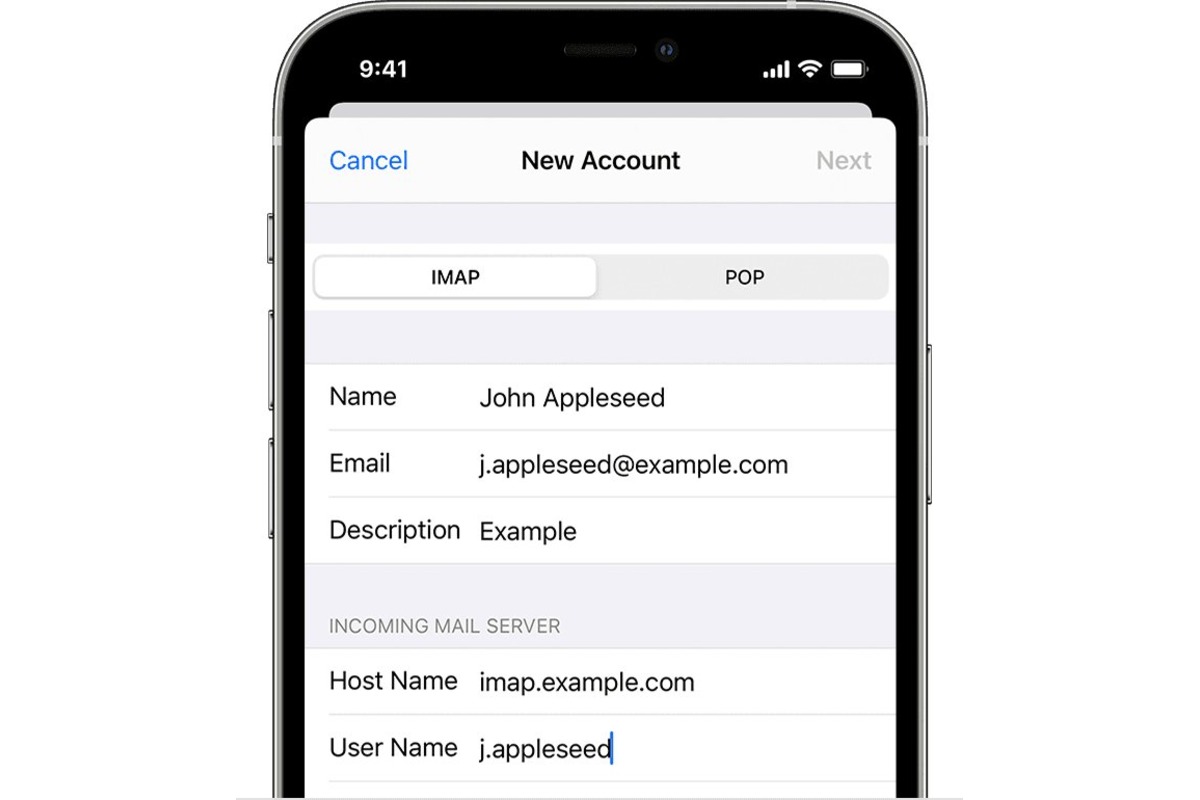
- Select the email provider you use. If you don’t see your provider listed, tap “Other”.
- Enter your email address and password, then tap “Next”.
- Follow the on-screen instructions to complete the setup process.
Once you’ve entered your email address and password, your iPhone will attempt to automatically configure the email account settings. In most cases, this process is seamless, and your email account should be set up and ready to use.
If your email provider is not recognized automatically, you may need to manually enter the incoming and outgoing email server information. You can usually find this information on your email provider’s website or by contacting their support team.
After you’ve completed these steps, your email account will be added to the default Mail app on your iPhone. You can access your inbox, send emails, and manage your email settings all from one convenient location on your device.
Setting up an email account on your iPhone allows you to stay connected and on top of your emails while on the go. With just a few taps, you can have your email account set up and ready to use, ensuring that you never miss an important message.
Configuring Email Settings on iPhone
Configuring your email settings on your iPhone is essential to ensure a seamless and efficient email experience. Whether you use Gmail, Yahoo Mail, Outlook, or any other email service, customizing your email settings allows you to personalize your email experience and optimize your productivity. Here’s a step-by-step guide on configuring email settings on your iPhone.
1. Go to the “Settings” app on your iPhone and scroll down to find the “Mail” option. Tap on it to access the mail settings.
2. Under the “Accounts” section, you’ll see a list of all the email accounts associated with your iPhone. Tap on the account you want to configure.
3. In the account settings, you will find options such as “Mail,” “Contacts,” “Calendars,” and “Notes.” Tap on “Mail” to access the email settings for that specific account.
4. In the “Mail” settings, you can adjust various options according to your preferences. Some of the important settings you can customize include:
- Fetch New Data: Here, you can choose how frequently your iPhone checks for new email messages. You can set it to automatically fetch new data manually, or at specific intervals.
- Mail Folders to Push: If your email service supports push notifications, you can select the specific mail folders that you want to receive instant notifications for.
- Signature: Add a personalized signature to your outgoing emails. This can include your name, contact information, or any other relevant details.
- Threaded Email Conversations: Enable or disable the threaded email view. This allows you to group related emails together, making it easier to follow conversations.
5. Apart from these settings, you may also find additional options specific to the email service you are using. For example, if you are configuring a Gmail account, you will have options to enable or disable features like “Archive Messages” or “Swipe Actions.”
6. Once you have customized all the necessary settings, exit the email settings by tapping on the back button or simply closing the settings app.
With your email settings now configured on your iPhone, you can start enjoying a more personalized and productive email experience. Take some time to explore the different settings and customize them according to your preferences to make the most out of your email on your iPhone.
Composing and Sending Emails on iPhone
One of the key functions of any smartphone is the ability to compose and send emails on the go. With an iPhone, this process is quick and convenient, allowing you to stay connected and productive wherever you are. Whether you’re drafting a business proposal or sending a casual message to a friend, here’s how you can compose and send emails on your iPhone.
1. Open the Mail app: Begin by tapping on the Mail app on your iPhone’s home screen. The Mail app comes pre-installed on all iPhones and is represented by a white envelope icon.
2. Select the compose button: Once the Mail app is open, look for the “+” or “Compose” button located in the bottom right corner of the screen. Tap on it to start a new email.
3. Enter recipient’s email address: In the “To” field, enter the email address of the person you want to send the email to. You can either type the address manually or select it from your contacts by tapping on the “+” icon next to the field.
4. Add a subject line: Tap on the “Subject” field to add a subject line to your email. A meaningful and concise subject line helps the recipient understand the purpose of your email at a glance.
5. Compose your email: Tap on the body of the email to start typing your message. You can use the on-screen keyboard to enter your text or even use the voice dictation feature to dictate your message. Add any attachments, such as photos or documents, by tapping on the “Attach” icon at the bottom of the screen.
6. Format your email: You can enhance the appearance of your email by applying formatting options. To make text bold, italicized, or underlined, select the desired text and tap on the “B”, “I”, or “U” buttons that appear above the keyboard.
7. Review and send: Once you have composed your email, take a moment to review it for any errors or omissions. Tap on the “Send” button located at the top right corner of the screen to send your email.
8. Check the Sent folder: After sending the email, you can find a copy of it in the Sent folder within the Mail app. This allows you to refer back to the email if needed.
And that’s it! You have successfully composed and sent an email on your iPhone. With these simple steps, you can stay connected and communicate effectively, no matter where you are.
Managing Email Accounts on iPhone
Once you have set up your email account on your iPhone, you may need to manage it from time to time. Whether you want to add more accounts, delete existing ones, or make changes to your settings, managing email accounts on iPhone is a breeze.
To manage your email accounts on iPhone, follow these simple steps:
- Open the Settings app on your iPhone. It looks like a gear icon.
- Scroll down and tap on “Mail.”
- Under the “Accounts” section, you will see a list of all the email accounts associated with your iPhone. Tap on the account you want to manage.
- Here, you will find various options to manage your email account. Let’s explore some of the key ones:
- Mail Settings: This option allows you to configure email-specific settings for the selected account. You can enable or disable features like Push Mail, Fetch New Data, and Signature. You can also set the number of recent messages to sync and choose notification preferences.
- Account Settings: This option lets you make changes to your account information, such as your name, email address, and password. You can also update the description of the account.
- Delete Account: If you want to remove the selected email account from your iPhone, tap on this option and confirm your decision. Please note that deleting an account will remove all associated emails from your device.
- Add Account: If you want to add another email account to your iPhone, tap on this option. Follow the on-screen prompts to enter the account details and complete the setup process.
- Default Account: If you have multiple email accounts on your iPhone, this option allows you to set a default account for sending new emails. Simply select the desired account from the list.
By managing your email accounts on iPhone, you can keep your inbox organized and ensure that your email settings are configured to meet your needs. Whether you want to make changes to your account settings, delete an account, or add a new one, the process is simple and intuitive.
In conclusion, creating an email on your iPhone is a simple and straightforward process. With just a few steps, you can set up your email account and start sending and receiving messages on the go. The iPhone’s user-friendly interface and intuitive email app make it convenient to manage your emails right from your pocket.
Remember to double-check your account settings and ensure that you have a stable internet connection for seamless email communication. With the iPhone’s advanced features and powerful functionality, staying connected and organized has never been easier.
So, whether you’re a business professional, a student, or simply someone who wants to stay in touch, the iPhone offers a reliable and efficient platform to create and manage your emails. Get started today and experience the convenience of having your email at your fingertips with your iPhone!
FAQs
1. How do I set up an email account on my iPhone?
To set up an email account on your iPhone, follow these steps:
- Go to the “Settings” app on your iPhone’s home screen.
- Scroll down and tap on “Mail.”
- Select “Accounts” and then “Add Account.”
- Choose the type of email account you want to add, such as Gmail or Yahoo.
- Enter your email address and password, then tap “Next.”
- Follow the on-screen instructions to complete the setup process.
2. How do I delete an email account from my iPhone?
To delete an email account from your iPhone, follow these steps:
- Go to the “Settings” app on your iPhone.
- Scroll down and tap on “Mail.”
- Select “Accounts.”
- Tap on the email account you want to delete.
- Scroll to the bottom and choose “Delete Account.”
- Confirm the deletion by tapping “Delete from My iPhone.”
3. How do I change the email signature on my iPhone?
To change the email signature on your iPhone, follow these steps:
- Go to the “Settings” app on your iPhone.
- Scroll down and tap on “Mail.”
- Select “Signature.”
- Tap on the email account for which you want to change the signature.
- Enter your desired signature in the text field.
- Tap “Mail” in the top-left corner to save the changes.
4. How do I sync my email across multiple devices?
To sync your email across multiple devices, such as your iPhone, iPad, and computer, you can use an email service that supports synchronization, such as Gmail or Outlook. Here’s how to set it up:
- Ensure that you have added your email account to all the devices you want to sync.
- On each device, go to the email settings and enable synchronization. This might be labeled as “Sync,” “Push,” or “Account Sync.”
- Make sure that your devices are connected to the internet, either through Wi-Fi or cellular data.
- Once synchronization is enabled, your emails, folders, and settings should be automatically updated across all devices.
5. How do I organize my email on my iPhone?
To organize your email on your iPhone, try these tips:
- Create email folders: In the Mail app, go to the desired email account, tap “Edit” in the top-right corner, then tap “New Mailbox” to create a folder.
- Move emails to folders: Open an email, tap the folder icon (usually located at the bottom), and select the folder you want to move the email to.
- Use email filters: In the Mail app, go to the desired email account, tap “Edit” in the top-right corner, then tap “Filter” to set up filters based on sender, subject, or keywords.
- Mark emails as unread: In the Mail app, swipe right on an email to mark it as unread.
- Archive or delete emails: Swipe left on an email to reveal the options to archive or delete it.