
Have you ever struggled with a cluttered voicemail inbox on your iPhone? Well, you’re not alone. Many iPhone users find themselves overwhelmed with countless voicemail messages, making it difficult to stay organized and find the messages that matter most. But fear not! In this article, we’ll guide you through the process of deleting voicemails on your iPhone, helping you regain control over your inbox and create space for new and important messages. Whether you’re new to the iPhone or a seasoned user, our step-by-step instructions will make deleting voicemails a breeze. So, let’s dive in and learn how to declutter your voicemail on your iPhone!
Inside This Article
- Method 1: Deleting voicemail directly from the Phone app
- Method 2: Deleting voicemail using the Visual Voicemail feature
- Method 3: Deleting voicemail using the carrier’s voicemail system
- Method 4: Deleting voicemail using a third-party app
- Conclusion
- FAQs
Method 1: Deleting voicemail directly from the Phone app
If you’re looking to delete voicemail on your iPhone, you can easily do so using the Phone app. This method allows you to quickly remove any unwanted voicemail messages from your device. Here’s how to do it:
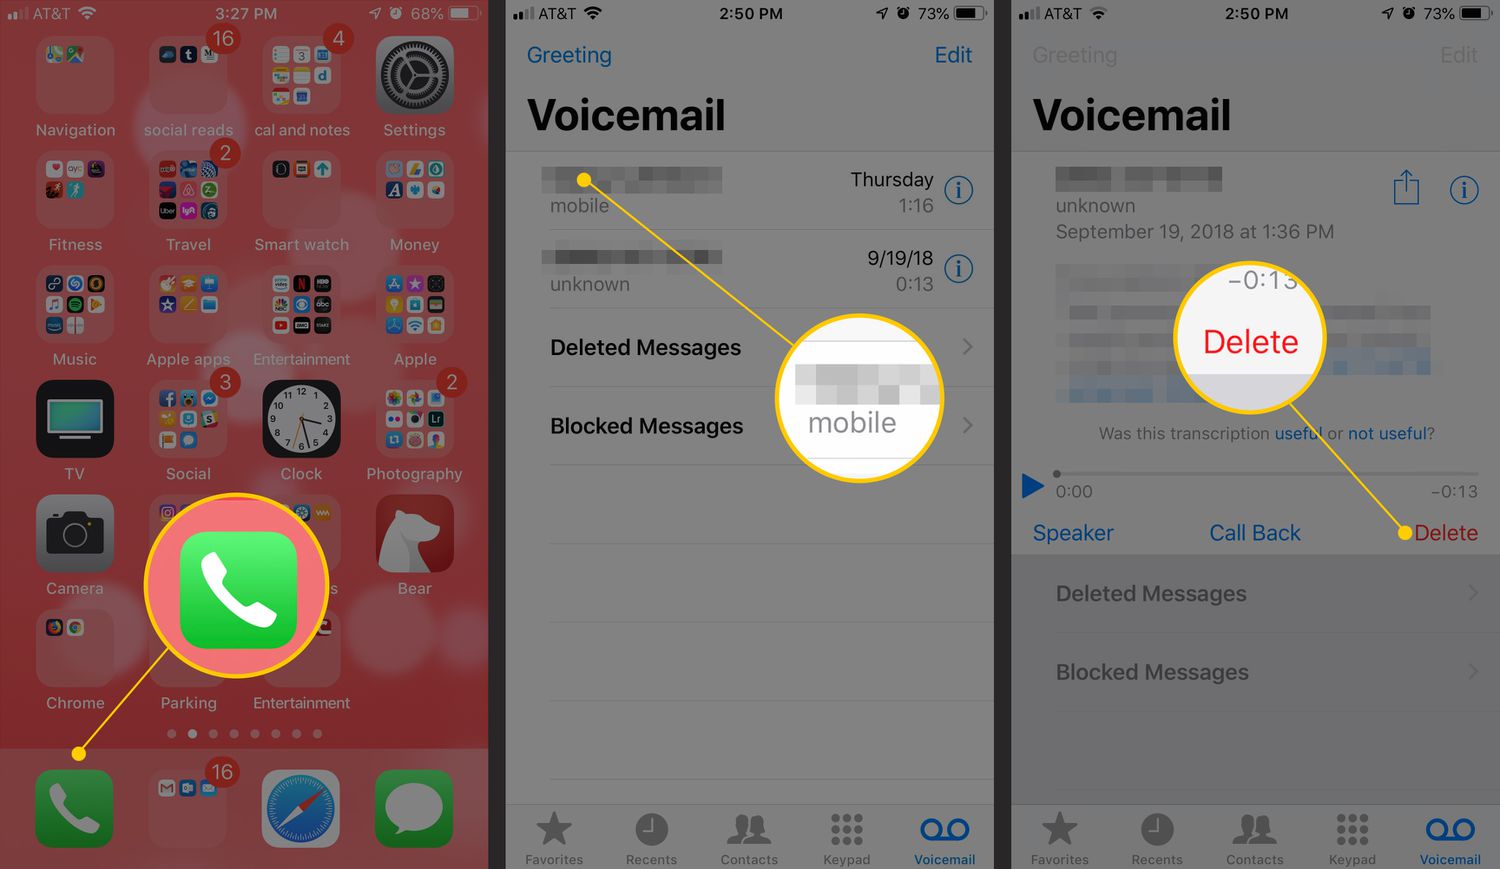
1. Open the Phone app on your iPhone by tapping the green phone icon on your home screen.
2. Navigate to the “Voicemail” tab located at the bottom right corner of the screen. It is represented by an icon resembling a tape recorder.
3. You will see a list of all your voicemail messages, with the most recent ones displayed at the top. Scroll through the list to find the voicemail message you want to delete.
4. Once you’ve located the voicemail message you wish to remove, swipe left across it. A “Delete” button will appear on the right side of the message.
5. Tap the “Delete” button to delete the voicemail message. A confirmation popup will appear asking you to confirm the deletion. Tap “Delete Voicemail” to confirm.
6. The voicemail message will be deleted from your iPhone and cannot be recovered. Repeat the process to delete any other voicemail messages you no longer need.
By following these simple steps, you can easily delete voicemail messages directly from the Phone app on your iPhone. This method is convenient and ensures that your voicemail inbox remains clutter-free.
Method 2: Deleting voicemail using the Visual Voicemail feature
Another convenient way to delete voicemail messages on your iPhone is by using the Visual Voicemail feature. This feature allows you to view and manage your voicemails in a visual and intuitive way.
To delete a voicemail using Visual Voicemail, follow these steps:
- Launch the Phone app on your iPhone.
- Tap on the “Voicemail” tab located at the bottom right corner of the screen.
- You will see a list of voicemails that you have received. Scroll through the list and find the voicemail message you want to delete.
- Swipe left on the voicemail message you wish to delete.
- A red “Delete” button will appear. Tap on it to delete the voicemail.
- Confirm the deletion by tapping on “Delete Voicemail” in the pop-up window.
By using the Visual Voicemail feature, you can quickly delete unwanted voicemail messages without having to listen to them. This method is especially useful when you have a large number of voicemails to go through and want to save time.
Note that deleting voicemail messages using Visual Voicemail permanently removes them from your iPhone, so make sure you no longer need the message before deleting it.
Method 3: Deleting voicemail using the carrier’s voicemail system
If you’re unable to delete voicemail messages using the methods mentioned earlier, you can try deleting them from your carrier’s voicemail system. Here’s how you can do it:
- Open the Phone app on your iPhone.
- Dial the voicemail number provided by your carrier. It is usually a specific phone number that you can find on their website or by contacting their customer support.
- Follow the prompts to access your voicemail inbox.
- Listen to the voicemail messages and select the option to delete them. The exact steps may vary depending on your carrier’s voicemail system.
- Once you have deleted the voicemail messages, hang up the call.
This method allows you to directly access your carrier’s voicemail system and delete the messages from there. It can be useful if you are facing any issues with deleting voicemail messages using the phone app or visual voicemail feature.
Remember that when you delete voicemail messages from your carrier’s voicemail system, they will be permanently removed and cannot be recovered. So make sure you are certain about deleting them before proceeding.
Now that you know how to delete voicemail messages using various methods, you can easily manage and declutter your voicemail inbox on your iPhone. Choose the method that works best for you and enjoy a clean and organized voicemail experience.
Method 4: Deleting voicemail using a third-party app
If the built-in options for deleting voicemail on your iPhone are not sufficient for your needs, you can consider using a third-party app specifically designed to manage and delete voicemail messages. These apps provide additional features and customization options that can enhance your voicemail management experience.
Step 1: Begin by downloading and installing a voicemail management app from the App Store. There are several options to choose from, such as YouMail or Google Voice.
Step 2: Launch the voicemail app and follow the setup instructions to connect it to your voicemail service. This typically involves entering your voicemail account information or granting access permissions.
Step 3: Once the app is set up, you will be able to view and manage your voicemail messages directly within the app’s interface. Look for the option to delete voicemail messages.
Step 4: Select the voicemail message you want to delete and tap on the delete button. Some apps may also offer additional options, such as archiving or marking messages as unread.
Step 5: Confirm the deletion when prompted. Remember that once a voicemail message is deleted, it cannot be recovered, so make sure to double-check before confirming the deletion.
Step 6: Repeat the process for any other voicemail messages you want to delete.
Using a third-party app can offer a more streamlined and feature-rich experience when managing your voicemail messages. These apps often provide additional functionality, such as transcription services, spam filtering, or the ability to save voicemails as audio files for later reference.
Make sure to explore the features of the chosen app to maximize your voicemail management capabilities. Check for regular updates and keep the app up to date to ensure optimal compatibility with your iPhone’s operating system.
Conclusion
Deleting voicemail on your iPhone is a simple and straightforward process. Whether you want to clear your voicemail inbox to free up space or remove unwanted voicemails, you can easily do so using the native Voicemail feature on your iPhone.
By following the step-by-step guide provided in this article, you can confidently manage your voicemail messages and keep your inbox organized. Remember to always listen to your voicemails before deleting them, as important information or messages may be saved there.
Keeping your voicemail inbox clean and regularly deleting unwanted messages not only helps you stay organized but also ensures that you have sufficient storage for new messages. Maintaining an organized voicemail inbox is essential for optimal phone functionality and productivity.
So, if you ever find yourself needing to delete voicemails on your iPhone, refer back to this article for guidance. Maintain control over your voicemail inbox and enjoy a clutter-free experience on your iPhone.
FAQs
1. How do I delete voicemail on iPhone?
To delete voicemail on iPhone, follow these steps:
- Open the Phone app on your iPhone.
- Tap on the “Voicemail” tab at the bottom right corner of the screen.
- Scroll through your voicemail messages and find the one you want to delete.
- Swipe left on the voicemail message, and a red “Delete” button will appear.
- Tap on the “Delete” button to remove the voicemail from your iPhone.
2. Can I retrieve deleted voicemail on iPhone?
Once you delete a voicemail on iPhone, it cannot be retrieved directly from the device. However, if you have a backup of your iPhone, you can restore your device from the backup to retrieve the deleted voicemail. Alternatively, you may be able to contact your phone carrier and ask if they can assist in retrieving the deleted voicemail. It’s always a good idea to regularly backup your iPhone to avoid losing important data.
3. How can I clear all my voicemails at once?
To clear all your voicemails at once on iPhone, you can follow these steps:
- Open the Phone app on your iPhone.
- Tap on the “Voicemail” tab at the bottom right corner of the screen.
- Tap on the “Edit” button in the top right corner.
- Select the voicemails you want to delete by tapping the circle next to each message.
- Once you have selected all the voicemails you want to delete, tap on the “Delete” button at the bottom of the screen.
4. Can I permanently delete voicemails on iPhone?
When you delete a voicemail on iPhone, it is moved to the “Deleted Messages” folder, where it will be stored for a limited time. After a certain period, usually 30 days, the deleted voicemail will be automatically removed from the “Deleted Messages” folder. This means that the voicemail is permanently deleted from your iPhone and cannot be recovered. It’s important to be mindful of this if you have any voicemails that you may need to keep for future reference.
5. Does deleting voicemails free up storage space on my iPhone?
Yes, deleting voicemails can help free up storage space on your iPhone. Voicemail messages, especially those with accompanying voice recordings, can take up a significant amount of space. By regularly deleting unwanted voicemails, you can optimize your iPhone’s storage capacity and ensure that you have enough space for other important data such as apps, photos, and videos.