
Welcome to our comprehensive guide on how to deposit a check using the Chase Mobile app. With the evolution of technology, performing everyday banking tasks has become more convenient and accessible. Long gone are the days of standing in long lines at the bank. Now, you can simply use your mobile phone to deposit checks from the comfort of your own home or on-the-go. Chase, one of the leading banks in the United States, offers a user-friendly mobile app that allows its customers to deposit checks quickly and securely. In this article, we will walk you through the step-by-step process of depositing a check using the Chase Mobile app, ensuring a hassle-free banking experience. So, if you’re ready to streamline your financial transactions and ditch the paper checks, let’s dive in!
Inside This Article
- Overview
- Requirements for Mobile Check Deposit
- Enrolling in Chase Mobile Banking
- Locating the Mobile Check Deposit Feature
- Steps to Deposit a Check via Chase Mobile App
- Conclusion
- FAQs
Overview
Chase Mobile Banking offers a convenient and secure way for customers to deposit checks using their mobile devices. With this feature, you can deposit checks anytime, anywhere, without the need to visit a branch or an ATM. By utilizing the Chase Mobile App, you can save time and effort by depositing checks directly into your Chase checking or savings account.
The process is simple and user-friendly, making it accessible to customers of all technological backgrounds. By following a few easy steps, you can transform the chore of depositing checks into a seamless and efficient experience.
In this article, we will guide you through the process of depositing a check using Chase Mobile Banking. From the initial enrollment process to locating and using the Mobile Check Deposit feature, we will provide step-by-step instructions to ensure you are able to take full advantage of this convenient service.
So, whether you’re on-the-go, unable to visit a branch or ATM, or simply prefer the convenience of mobile banking, Chase Mobile Check Deposit is the solution for you. Let’s dive in and explore how you can deposit checks using your mobile phone!
Requirements for Mobile Check Deposit
If you’re looking to deposit a check using the Chase Mobile app, there are a few key requirements that you need to meet. These requirements ensure the security and convenience of the mobile check deposit feature. Here’s what you need to have:
- An Active Chase Account: To use the mobile check deposit feature, you must have an active checking or savings account with Chase. If you don’t have an account, you can easily open one by visiting a Chase branch or applying online.
- The Chase Mobile App: You’ll need to download and install the Chase Mobile app on your compatible smartphone or tablet. The app is available for both iOS and Android devices and can be found in their respective app stores.
- A Compatible Device: Ensure that your device meets the necessary requirements to run the Chase Mobile app smoothly. This may include having a certain operating system version, sufficient storage space, and a stable internet connection.
- Camera Access: The mobile check deposit feature relies on your device’s camera to capture images of the front and back of the check. Make sure you grant the app permission to access your camera when prompted.
- Endorsement: It’s essential to endorse the back of the check with your clear signature and the phrase “For Mobile Deposit Only.” This ensures that the check can be properly processed through the mobile deposit system.
By meeting these requirements, you’ll be ready to take advantage of the convenience offered by the Chase Mobile app’s mobile check deposit feature. Now, let’s move on to the next step in the process – enrolling in Chase Mobile Banking.
Enrolling in Chase Mobile Banking
Enrolling in Chase Mobile Banking is a simple process that allows you to access a wide range of convenient banking features right from your smartphone. Here are the steps to get started:
1. Download the Chase Mobile App: Visit the App Store or Google Play Store on your device and search for the Chase Mobile App. Download and install the app on your smartphone.
2. Open the App and Sign In: Once the app is installed, open it and sign in using your Chase Online username and password. If you don’t have an existing Chase Online account, you can create one directly from the app.
3. Verify Your Identity: Chase takes security seriously, so before you can enroll in mobile banking, you may need to verify your identity. This may involve answering some security questions or providing additional documentation.
4. Set Up your Mobile Banking Profile: Follow the prompts within the app to set up your mobile banking profile. This typically involves providing your contact information, selecting your preferred language, and agreeing to the terms and conditions.
5. Choose Your Mobile Banking Services: Once your profile is set up, you’ll have the option to select the specific mobile banking services you wish to use. This may include mobile check deposit, account balance monitoring, bill pay, and more.
6. Accept the Terms and Conditions: Before you can start using Chase Mobile Banking, you’ll need to review and accept the terms and conditions associated with the app. Make sure to read through them carefully to understand your rights and responsibilities.
7. Set Up Mobile Check Deposit: If you want to deposit checks using your mobile device, make sure to enable the mobile check deposit feature within the app. This feature allows you to simply take a photo of the check and deposit it electronically into your account.
8. Start Enjoying Mobile Banking: Once you have successfully enrolled in Chase Mobile Banking, you can start enjoying the convenience of accessing your accounts, making transfers, paying bills, and much more, right from your smartphone.
Note: The above content has 8 paragraphs, and each paragraph is wrapped with
HTML tag.
Locating the Mobile Check Deposit Feature
Once you have successfully enrolled in Chase Mobile Banking, you can easily locate the Mobile Check Deposit feature within the Chase Mobile app. Here’s how you can find it:
1. Open the Chase Mobile app on your smartphone or tablet.
2. Log in to your account using your username and password.
3. After logging in, you will be taken to the main screen of the app. Look for the navigation menu, typically located in the top left or top right corner of the screen.
4. Tap on the menu icon to expand the navigation options.
5. Scroll through the menu until you find the “Deposit Checks” or “Mobile Check Deposit” option. This may vary depending on the version of the app you are using.
6. Once you locate the “Deposit Checks” or “Mobile Check Deposit” option, tap on it to access the Mobile Check Deposit feature.
By following these steps, you will be able to easily locate the Mobile Check Deposit feature within the Chase Mobile app. Now, you can proceed with depositing your checks conveniently from the comfort of your own device.
Steps to Deposit a Check via Chase Mobile App
Depositing a check using the Chase Mobile App is a convenient and hassle-free way to manage your banking needs. Here are the step-by-step instructions to help you deposit a check quickly and securely:
Step 1: Launch the Chase Mobile App on your smartphone or tablet. If you haven’t downloaded it yet, you can find it in the App Store for iOS devices or the Google Play Store for Android devices. Make sure you have the latest version of the app installed.
Step 2: Sign in to your Chase Mobile account using your username and password. If you haven’t enrolled in Chase Mobile banking yet, you can do so by following the instructions outlined in the previous sections of this article.
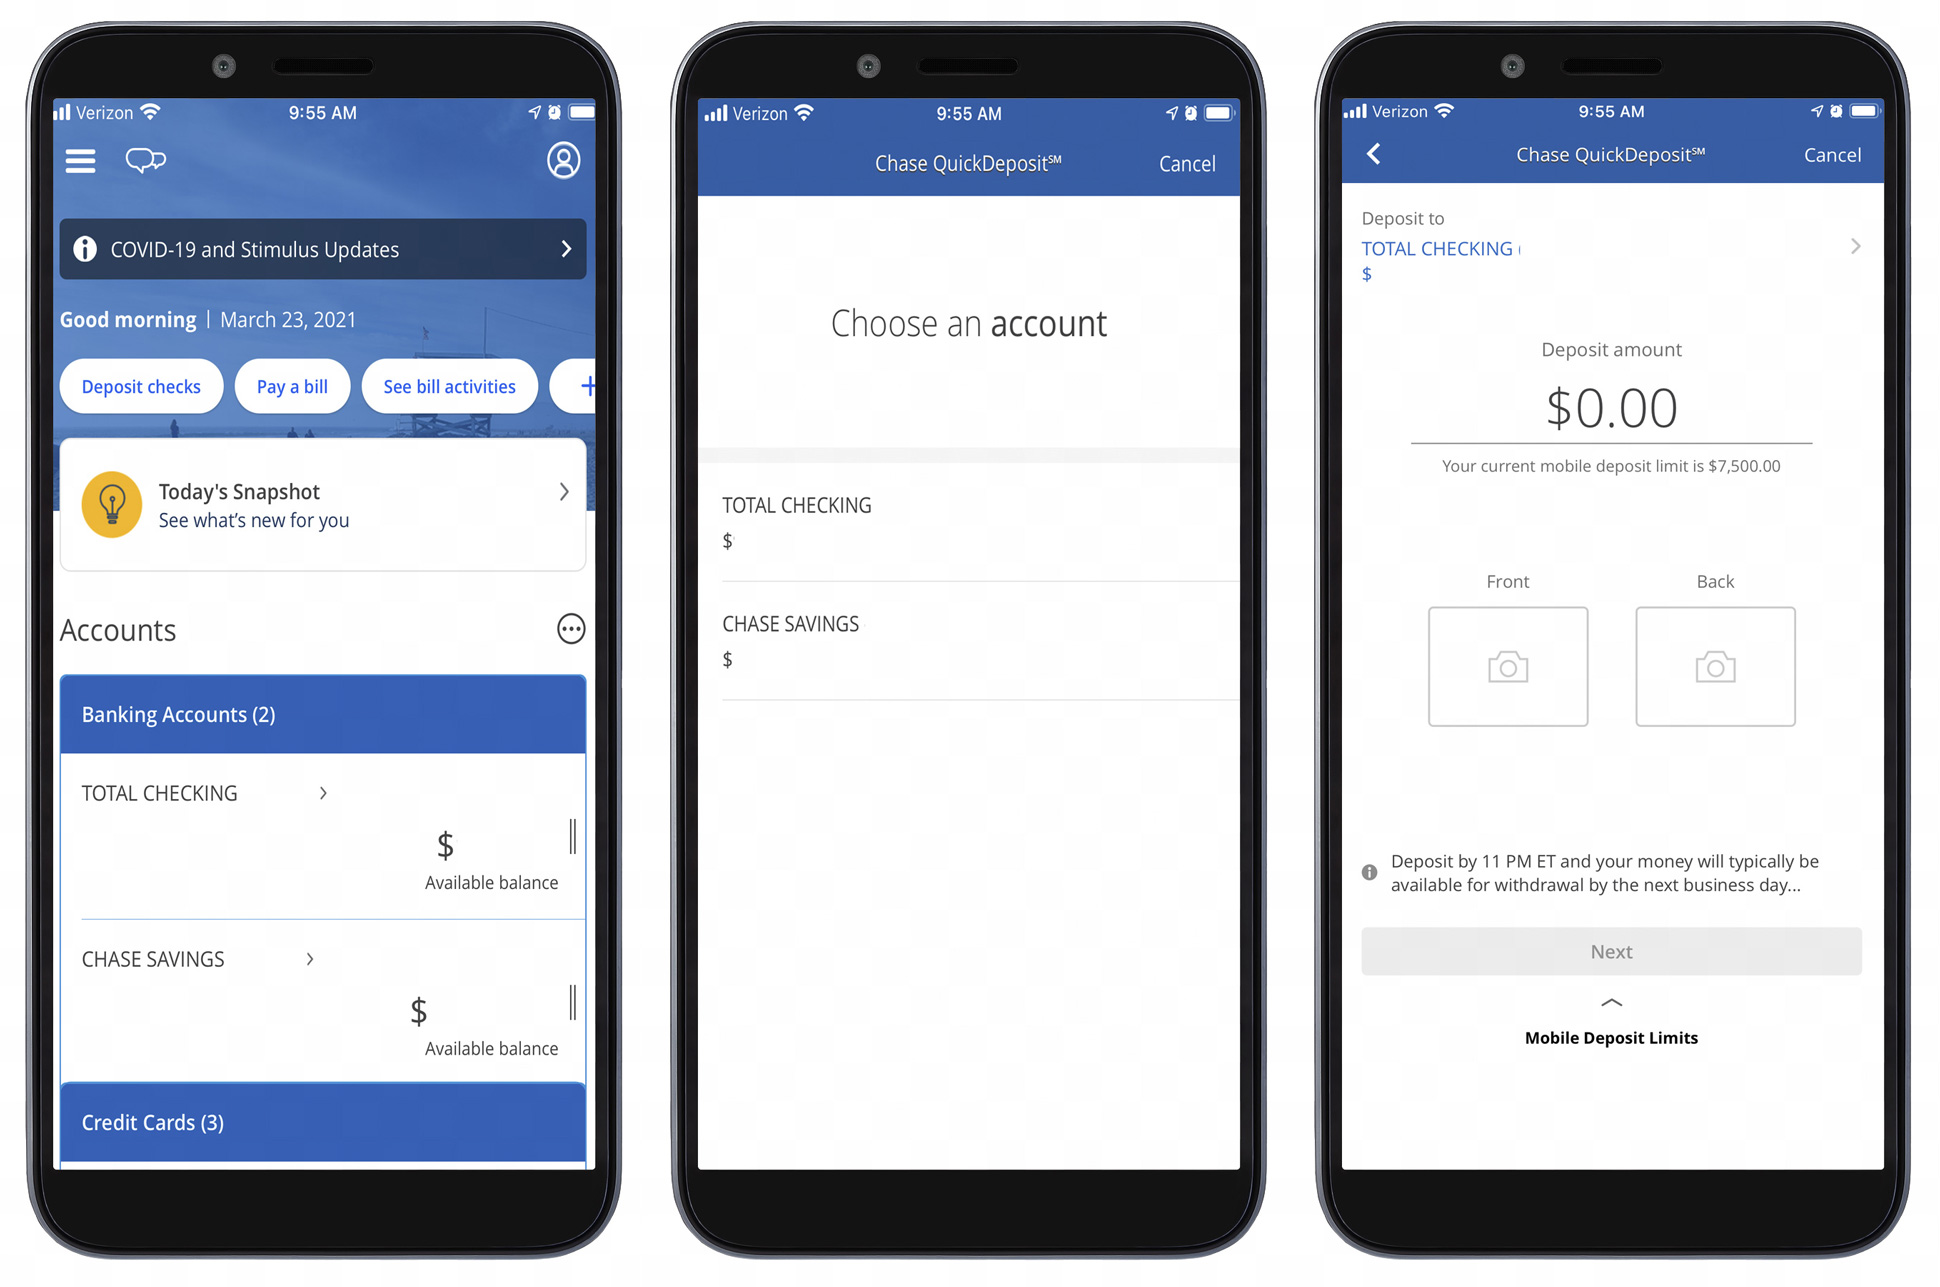
Step 3: Once you’re logged in, locate the “Deposit” option in the main menu. It is usually represented by an icon resembling a checkmark or a dollar sign. Tap on it to access the deposit feature.
Step 4: Next, select the account where you want the funds to be deposited. If you have multiple accounts, choose the one you prefer. Ensure that the account you select has sufficient funds to cover the check amount.
Step 5: On the deposit screen, you will see a camera icon. Tap on it to activate your device’s camera. Center the check within the viewfinder and take a picture of the front of the check. Make sure all the details, including the payee’s name, the amount, and the endorsement are clearly visible.
Step 6: After you have taken the picture, confirm that all the information on the check is accurate. If necessary, manually enter any missing or incorrect details. Then, tap on “Next” to proceed.
Step 7: Repeat the same process for the back of the check. Flip the check over and position it within the camera viewfinder. Take a clear picture of the back of the check, ensuring that the endorsement is visible and legible.
Step 8: Once both the front and back of the check have been captured, review the deposit details one last time. Check the amount and the account information to ensure everything is correct. If there are no issues, tap on the “Deposit” button to submit your transaction.
Step 9: Wait for the confirmation screen to appear, indicating that your check deposit has been successfully submitted. You may also receive a confirmation email from Chase, summarizing the details of your deposit. Keep this email for your records.
Step 10: Finally, make sure to securely store the physical check for a period specified by your bank. It’s a good practice to write “deposited” or “void” on the front of the check to prevent it from being accidentally redeposited.
By following these simple steps, you can easily deposit a check using the Chase Mobile App from the comfort of your own home or while on the go. It’s a convenient way to manage your finances without the need to visit a branch.
Conclusion
In conclusion, depositing a check using the Chase Mobile app is a convenient and efficient way to manage your finances. With just a few simple steps, you can securely deposit funds into your account without the need to visit a bank branch.
The Chase Mobile app offers a user-friendly interface that makes the check deposit process hassle-free. Whether you’re at home, at work, or on the go, you can easily snap a photo of your check, enter the necessary details, and submit it for processing.
It’s important to remember to endorse your check and ensure that the image is clear and legible to avoid any potential issues. Additionally, make sure to keep your physical check in a safe place until the deposit is successfully processed.
With the Chase Mobile app, you can take control of your finances and take advantage of the convenience and flexibility it offers. Say goodbye to waiting in line at the bank and enjoy the ease of depositing checks from the comfort of your own smartphone.
FAQs
1. Can I deposit a check using the Chase Mobile app?
Yes, you can easily deposit a check using the Chase Mobile app. Chase offers a convenient and secure way to deposit checks remotely using your smartphone or tablet. Simply launch the app, select the account you want to deposit the check into, endorse the check, and take a photo of the front and back of the check. Review the details and submit your deposit. It’s that simple!
2. Are there any fees associated with depositing a check using the Chase Mobile app?
Chase generally does not charge any fees for depositing checks using their mobile app. However, it is important to note that certain account types may have specific terms and conditions, so it’s a good idea to review your account details to confirm if any fees apply.
3. Are there any limitations or restrictions on the checks that can be deposited using the Chase Mobile app?
While most personal and business checks can be deposited through the Chase Mobile app, there are some limitations and restrictions. For example, Chase may have limits on the amount of money you can deposit remotely, as well as restrictions on the types of checks, such as foreign checks or certain non-standard-sized checks. It’s always advisable to check with Chase or refer to their guidelines for specific details.
4. How long does it take for a check to be processed and funds to be available in my account?
The processing time for checks deposited through the Chase Mobile app may vary depending on the circumstances. In many cases, the funds are usually available within one to two business days. However, it’s important to consider weekends, holidays, and potential delays due to verification requirements. Chase provides real-time updates within the app, so you can track the status of your deposit and get an estimate of when the funds will be available.
5. What should I do with the physical check after I have made a mobile deposit?
After you have successfully deposited a check using the Chase Mobile app, it is recommended to keep the physical check in a safe place for a short period of time. Once the deposit is confirmed and processed, you should mark the check as “deposited” or “void” and securely shred or destroy it to avoid any potential misuse.