
Have you ever taken a screenshot on your iPhone and wished you could make some quick edits before sharing it with others? Well, you’re in luck! Editing screenshots on an iPhone has never been easier, allowing you to add annotations, crop, or even highlight specific areas of interest. In this article, we will guide you through the various methods you can use to edit screenshots on your iPhone effortlessly. Whether you want to emphasize a certain portion of a webpage, add text to explain an image, or simply crop out unnecessary elements, we’ve got you covered. Say goodbye to the days of sharing unedited screenshots and say hello to a more professional and polished approach. Let’s dive in and explore the world of screenshot editing on your iPhone!
Inside This Article
- Opening the Screenshots Folder
- Viewing and Selecting the Screenshot
- Using the Editing Tools
- Saving and Sharing the Edited Screenshot
- Conclusion
- FAQs
Opening the Screenshots Folder
Editing screenshots on your iPhone is a simple process that begins with opening the dedicated “Screenshots” folder. This folder automatically organizes all the screenshots you capture on your device, making it convenient to access and edit them.
To open the Screenshots folder, follow these steps:
- Locate the “Photos” app on your iPhone’s home screen and tap to open it.
- In the Photos app, navigate to the “Albums” tab at the bottom of the screen and tap on it.
- Scroll through the list of albums until you find the “Screenshots” folder.
- Tap on the “Screenshots” folder to open it, and you will be presented with a grid view of all the screenshots you have taken.
Once you have successfully opened the Screenshots folder, you can proceed to view and select the screenshot you wish to edit.
Viewing and Selecting the Screenshot
Once you’ve taken a screenshot on your iPhone, it’s time to view and select the screenshot for further editing. Here’s how you can easily locate and access your screenshots:
1. Go to the Photos app on your iPhone. It’s the app with a multicolored flower icon.
2. In the Photos app, look for the “Albums” tab at the bottom of the screen and tap on it.
3. Scroll down until you see the “Screenshots” album. Tap on it to open.
4. Inside the “Screenshots” album, you’ll find all the screenshots you’ve taken on your iPhone. Scroll through the list to locate the specific screenshot you want to edit.
5. Once you’ve found the desired screenshot, tap on it to open it in full screen mode. You can now proceed to the next step of using the editing tools to enhance your screenshot.
Pro Tip: If you want to quickly access your most recent screenshot, you can also swipe right from the camera or home screen to access the “Today View” page. Scroll down to the “Screenshots” section and tap on the screenshot you want to edit.
With these simple steps, you can effortlessly view and select the screenshot you want to edit on your iPhone. Now that you have your screenshot open in full screen mode, let’s move on to the next section to learn how to use the editing tools.
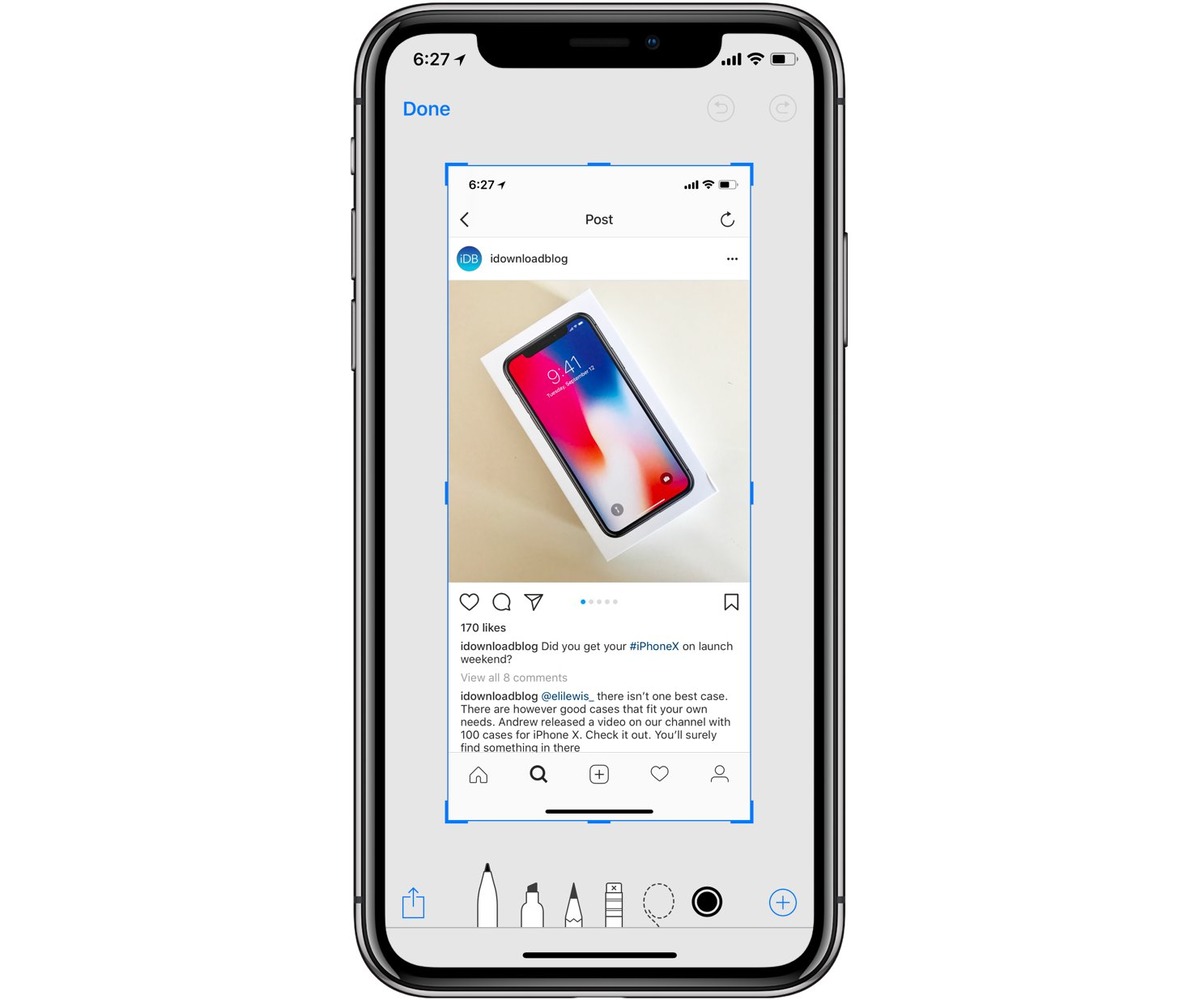
Using the Editing Tools
Editing screenshots on an iPhone is a breeze with the powerful built-in tools provided by iOS. Whether you want to annotate, crop, add text, or highlight specific areas, these tools have got you covered. Let’s explore how you can make the most out of them:
1. Markup: Markup is the star of the editing show, allowing you to add annotations, drawings, and text to your screenshots. To access Markup, open the screenshot you want to edit and tap the small thumbnail that appears at the bottom left corner of the screen.
2. Drawing and Highlighting: Once you’re in Markup, you can tap on the pencil icon to access the drawing tools. From there, you can choose different brush styles, colors, and sizes to draw, doodle, or highlight important parts of your screenshot.
3. Text: If you need to add text to your screenshot, Markup has got you covered as well. Simply tap on the text icon and start typing. You can adjust the font style, size, alignment, and even add a background color to make the text stand out.
4. Crop: Sometimes, you might want to focus on a specific area of your screenshot. In that case, tap on the crop icon in Markup to bring up the cropping tool. You can resize and move the frame to select the desired portion, and then tap “Done” to apply the crop.
5. Undo and Redo: Made a mistake or changed your mind? Don’t worry! Markup provides the option to undo or redo any edits you’ve made. Simply tap on the back arrow to undo and the forward arrow to redo.
6. Save and Share: Once you’re satisfied with your edits, tap on the “Done” button in the top right corner of the screen. You will be prompted with options to save the edited screenshot to your Photos app or share it directly via various platforms such as Messages, Mail, or social media.
Using the editing tools on your iPhone can transform simple screenshots into visually appealing and informative images. Whether you want to highlight important information, add context to your screenshots, or simply get creative, the editing tools have everything you need to make your screenshots stand out.
Saving and Sharing the Edited Screenshot
Once you are satisfied with your edits, it’s time to save and share your masterpiece. Follow these steps to save and share the edited screenshot on your iPhone:
- Save the Edited Screenshot: To save the edited screenshot, click on the “Done” button in the top right corner of the screen. This will prompt a pop-up menu with various options.
- Select “Save to Photos”: From the pop-up menu, choose “Save to Photos.” This action will save the edited screenshot to your iPhone’s Photos app.
- View Saved Screenshot: Open the Photos app on your iPhone and navigate to the “Screenshots” album. Here, you will find the saved edited screenshot.
- Share the Edited Screenshot: To share the edited screenshot with others, open the screenshot in the Photos app and tap on the Share button, which looks like a box with an arrow pointing upward. This will open a menu of available sharing options.
- Choose a Sharing Method: Select the desired sharing method from the menu. You can share the edited screenshot via various platforms, such as Messages, Mail, social media apps, or even save it to your iCloud Drive or Google Drive.
- Customize Sharing Settings: Depending on the sharing method you choose, you may have the option to customize settings, such as adding a caption, selecting recipients, or choosing the image format. Follow the prompts provided by the selected sharing platform.
- Send or Publish: After customizing the sharing options, click on the send or publish button. This will instantly share the edited screenshot with the selected recipients or publish it on the chosen platform.
Remember to consider the privacy and sensitivity of the content in the edited screenshot when deciding on the sharing method. It’s always a good practice to double-check the recipients or sharing platform before sending or publishing.
By following these simple steps, you can save and share your edited screenshots effortlessly and showcase your creativity to others.
Conclusion
The ability to edit screenshots on your iPhone provides a convenient way to enhance and personalize your captured images. Whether you want to crop out unnecessary elements, highlight specific details, or add captions or effects, the built-in editing tools on your iPhone give you the power to do so with ease. By accessing the Markup and Editing features, you can unleash your creativity and transform your screenshots into visually appealing and meaningful visuals.
From cropping and rotating to adding text and shapes, the possibilities for editing your screenshots are virtually endless. By mastering these editing techniques, you can take your screenshots to the next level and create stunning visuals that are tailored to your needs.
So, the next time you capture a screenshot on your iPhone, don’t just let it sit idly in your photo library. Take advantage of the editing capabilities and make your screenshots stand out with your personal touch. With a few taps and swipes, you can bring your screenshots to life and share them with the world in a more meaningful and engaging way.
FAQs
1. Can I edit screenshots on my iPhone?
Yes, you can edit screenshots on your iPhone. Apple offers a built-in editing tool that allows you to make various adjustments and annotations to your screenshots.
2. What editing options are available for screenshots on iPhone?
When editing a screenshot on iPhone, you can crop, rotate, add text, draw or doodle, and even use the magnifier feature to highlight certain areas of the screenshot. You can also use the Instant Markup feature to add shapes, arrows, and other graphical elements to your screenshot.
3. How do I access the editing features for screenshots on iPhone?
To access the editing features for screenshots on iPhone, simply take a screenshot by pressing the Volume Up and Side (or Power) button simultaneously. Once the screenshot is captured, a thumbnail will appear in the bottom left corner of the screen. Tap on the thumbnail to open the editing interface.
4. Can I undo any changes I make while editing a screenshot on iPhone?
Yes, you can easily undo any changes you make while editing a screenshot on iPhone. Simply shake your device, and a pop-up will appear asking if you want to undo the changes. Tap “Undo” to revert back to the original screenshot.
5. Can I save my edited screenshot as a separate image on iPhone?
Yes, you can save your edited screenshot as a separate image on iPhone. After making the desired edits, tap on the “Done” button in the top left corner of the screen. A menu will appear with various options, including “Save to Photos.” Select this option to save the edited screenshot as a separate image in your Photos app.