
Are you someone who loves personalizing your belongings? Do you want to add a unique touch to your iPhone by turning your favorite picture into a sticker? Look no further! In this article, we will guide you through the process of making a sticker from a picture on your iPhone. Whether it’s a memorable photograph, a favorite artwork, or a sweet moment captured, transforming it into a sticker can be a fun and creative way to personalize your iPhone, making it truly one-of-a-kind. We will explore the simple steps you need to follow to create a custom sticker directly from your iPhone’s photo gallery, allowing you to express your creativity and show off your style. Let’s dive in and discover how to turn your cherished memories into fabulous stickers with just a few taps!
Inside This Article
- Step 1: Select a picture
- Step 2: Edit the picture
- Step 3: Convert the picture into a sticker
- Step 4: Save and use the sticker on iPhone
- Conclusion
- FAQs
Step 1: Select a picture
When it comes to making a sticker from a picture on your iPhone, the first step is to select the perfect picture. The picture you choose will be the foundation of your sticker, so it’s essential to pick something that represents what you want to convey.
You can use any picture saved on your iPhone, whether it’s a photo you’ve taken or an image you’ve downloaded from the internet. Consider the purpose of your sticker and choose a picture that aligns with it. It could be a personal photo, a logo, a meme, or any visual that you find interesting and suitable for conversion into a sticker.
Remember, the quality of the picture plays a crucial role. High-resolution images with clear details tend to make better stickers. If you want to take a new picture using your iPhone, ensure good lighting and focus to capture the desired image quality.
Once you have selected the picture, keep it handy, as we will move on to the next step of editing.
Step 2: Edit the picture
Once you have selected a picture for your sticker, it’s time to edit it to make it more suitable for use as a sticker on your iPhone. Editing your picture can help enhance its visual appeal and make it stand out. Luckily, there are several editing tools available on the iPhone that can help you achieve the desired results.
Here are a few editing options you can consider:
- Adjustments: Use the built-in adjustment tools to modify the brightness, contrast, saturation, and other aspects of your picture. This allows you to enhance the colors and overall look of the image.
- Cropping and resizing: If your picture has unnecessary elements or doesn’t fit well within the dimensions of a sticker, you can crop or resize it. This ensures that the focus remains on the main subject and that the sticker fits perfectly on your iPhone.
- Filters and effects: Apply filters or effects to add a unique touch to your sticker. Experiment with different styles and effects to achieve the desired aesthetic.
- Text and stickers: Add text or stickers to personalize your image further. You can include a catchy phrase, a funny caption, or even your brand logo to make the sticker more special.
Remember to play around with these editing features until you achieve the look you desire. Don’t be afraid to get creative and experiment with different options. The goal is to make your picture stand out and become an eye-catching sticker.
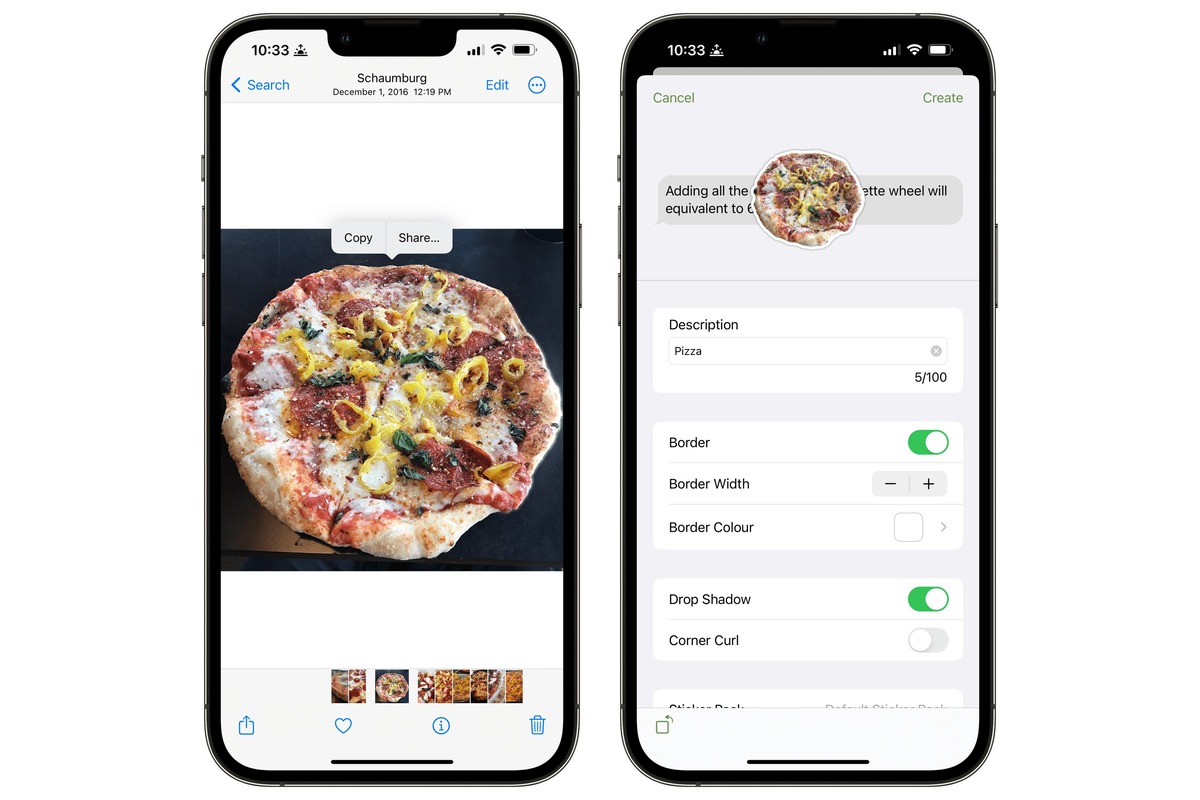
Step 3: Convert the picture into a sticker
Now that you have selected and edited the picture, it’s time to convert it into a sticker on your iPhone. Follow these steps to bring your picture to life as a fun and personalized sticker:
- Open the picture editing app or the messaging app where you would like to create the sticker.
- Tap on the picture you want to convert.
- In the top-right corner, look for the options menu (usually represented by three dots or a pencil icon) and tap on it.
- From the menu that appears, select the “Create Sticker” or “Convert to Sticker” option.
- The app will then prompt you to refine the sticker by cropping or removing any unwanted parts of the picture. Use your finger to adjust the boundaries of the sticker and crop it according to your preferences.
- Once you are satisfied with the cropping, tap on the “Save” or “Done” button to save the sticker.
- The app will automatically save the sticker to your sticker library or sticker pack.
- Go back to your messaging app or keyboard and find the sticker icon (usually located next to the emoji icon).
- Tap on the sticker icon to access your sticker library or pack.
- Locate the newly created sticker and simply tap on it to send it in a conversation or use it in your messages.
That’s it! You have successfully converted your picture into a sticker on your iPhone. Now you can add a personal touch to your messages and express yourself in a fun and unique way.
Step 4: Save and use the sticker on iPhone
After creating and customizing your sticker, the next step is to save it and start using it on your iPhone. Follow these simple steps to save and use your newly created sticker:
1. Save the sticker:
Tap on the Save button or the Export button (depending on the app you are using). This will save your sticker to your iPhone’s camera roll or sticker library.
2. Access the sticker:
Open your messaging app, such as iMessage or WhatsApp. Now when you want to use your sticker, simply tap on the sticker icon in the messaging app.
3. Choose the sticker:
Scroll through the available stickers until you find the one you want to use. Tap on the sticker to select it.
4. Send the sticker:
After selecting the sticker, you can send it by tapping on the send button or by tapping on the chat bubble where you want to place it. The sticker will then be sent to the recipient as part of your message.
5. Use the sticker in other apps:
Some apps, like Snapchat or Instagram, allow you to use stickers in their interfaces. To use your sticker in these apps, follow their specific instructions for adding stickers to your photos or videos.
That’s it! You have successfully saved and started using your sticker on your iPhone. Enjoy expressing yourself in a fun and creative way with your personalized stickers.
Conclusion
In conclusion, iPhone users have a variety of options and methods to make stickers from their pictures. The built-in features and third-party apps offer convenient ways to personalize messaging and social media platforms.
By utilizing the Markup tool in the iPhone’s Photos app, users can easily create custom stickers with their favorite images. Additionally, third-party sticker maker apps provide advanced editing options and additional creative tools for a more personalized sticker-making experience.
Whether it’s adding fun elements to your conversations or showcasing your creativity, making stickers from pictures on your iPhone allows you to express yourself in a unique and engaging way. So go ahead, get creative and start making your own stickers to add a touch of fun to your messages!
FAQs
1. Can I make a sticker from a picture on my iPhone?
Yes, you can make a sticker from a picture on your iPhone. There are several apps available in the App Store that allow you to create custom stickers using your own photos.
2. Which app should I use to make a sticker from a picture on iPhone?
There are many apps available for creating stickers on iPhone, but one popular option is the “Sticker Maker Studio” app. It is user-friendly and offers a wide range of features to help you turn your pictures into stickers.
3. How do I use the Sticker Maker Studio app to create a sticker from a picture?
To create a sticker using the Sticker Maker Studio app, follow these steps:
- Download and install the Sticker Maker Studio app from the App Store.
- Open the app and tap on “Create a New Sticker Pack”.
- Select the picture you want to turn into a sticker from your iPhone’s photo library.
- Use the app’s editing tools to crop and enhance the image.
- Once you are satisfied with the result, tap on “Save Sticker” and give your sticker a name.
- Your sticker will now be available in the Sticker Maker Studio app and can be used in messaging apps like WhatsApp and iMessage.
4. Can I use the stickers I create on other messaging apps?
Yes, in most cases, the stickers you create using apps like Sticker Maker Studio can be used in various messaging apps. However, it is best to check the specific instructions or limitations of the app you are using.
5. Can I share the stickers I create with others?
Yes, you can share the stickers you create with others. Most sticker creation apps allow you to export your stickers as a pack, which can then be shared with your friends or uploaded to platforms like WhatsApp or iMessage for others to download and use.