
Are you looking to personalize your iPhone with your own custom stickers? Well, you’re in luck because with the advancements in technology, it is now easier than ever to make stickers from your favorite photos right on your iPhone! Custom stickers can add a touch of uniqueness and personality to your device, allowing you to showcase your creativity and style. Whether you want to create stickers of your loved ones, your pets, or even your favorite landmarks, the process is simple and enjoyable. In this article, we will guide you through the steps of making stickers from photos on your iPhone, giving you the power to transform your cherished memories into fun and personalized mobile accessories. So, let’s dive in and learn how to bring your photos to life as stickers on your iPhone!
Inside This Article
- Why Make Stickers from Photos on iPhone?
- Steps to Make Stickers from Photos on iPhone
- Step 1: Choose a Photo
- Step 2: Edit the Photo
- Step 3: Access the Sticker App
- Step 4: Create the Sticker Pack
- Step 5: Add Stickers to the Pack
- Step 6: Customize Sticker Properties
- Step 7: Export and Share the Sticker Pack
- Tips and Tricks for Making Stickers on iPhone
- Conclusion
- FAQs
Why Make Stickers from Photos on iPhone?
Stickers have become a popular form of expression in today’s digital world, allowing users to add a touch of creativity and personalization to their conversations. With the advent of smartphones, particularly the iPhone, creating and sharing stickers has become easier than ever before. So, why should you make stickers from photos on your iPhone? Let’s explore some compelling reasons.
1. Personalization: By making stickers from your own photos, you can personalize your conversations and add a unique touch to your messages. Whether it’s a selfie, a picture of your pet, or a beautiful landscape, turning these images into stickers allows you to express yourself in a more personalized way.
2. Creativity: Making stickers from photos unleashes your creative side. You can experiment with different editing techniques, filters, and effects to transform your ordinary photos into fun and eye-catching stickers. The possibilities are endless, and you can truly let your imagination run wild.
3. Fun and Entertainment: Stickers can inject a sense of fun and entertainment into your conversations. Creating custom stickers allows you to add humor, emotions, and expressions that go beyond what traditional text messages can convey. It’s a great way to engage with your friends and make your conversations more enjoyable.
4. Sharing and Connecting: When you make stickers from photos on your iPhone, you have the option to share them with others. Whether it’s through messaging apps or social media platforms, sharing your custom stickers can help you connect with friends, family, and even a wider audience who resonate with your creations.
5. Stand Out: Using stickers created from your own photos can make your conversations stand out from the rest. Instead of relying on generic stickers available to everyone, having unique and personalized stickers lets you express yourself in a way that is true to your personality and style.
Steps to Make Stickers from Photos on iPhone
If you’re looking to add a personal touch to your conversations, creating custom stickers from your favorite photos on your iPhone is a fantastic way to do it. With just a few simple steps, you can turn any memorable moment or funny snapshot into a fun and expressive sticker pack. Let’s dive into the process and have some fun creating your very own stickers!
Step 1: Choose a Photo
The first step in making stickers from photos on your iPhone is to select the perfect image. You can choose from your camera roll, albums, or even snap a new photo using your iPhone’s camera. Look for an image that is well-defined and has a clear subject to ensure that your sticker will stand out.
Step 2: Edit the Photo
After selecting the photo, it’s time to give it some extra flair and make your sticker truly unique. Use the built-in editing tools on your iPhone to crop, adjust brightness and contrast, add filters, or apply any other desired enhancements. Get creative and experiment with different effects to make your sticker even more eye-catching.
Step 3: Access the Sticker App
Next, you’ll need to access the sticker app on your iPhone. Open the Messages app and tap on the App Store icon located next to the text input box. From there, you can browse through various sticker apps or access the sticker store to find the perfect sticker app that suits your style.
Step 4: Create the Sticker Pack
Once you have chosen a sticker app, it’s time to create your sticker pack. Follow the on-screen instructions to create a new pack, and give it a catchy and descriptive name. This will help you easily identify your collection of custom stickers.
Step 5: Add Stickers to the Pack
Now comes the exciting part – adding stickers to your pack! Simply tap the “Add Sticker” or “Create New Sticker” button within the sticker app and select the edited photo from your camera roll. You can repeat this process to add multiple stickers to your pack, each representing a different photo or variation of the same image.
Step 6: Customize Sticker Properties
To make your stickers even more interesting, you can customize their properties. This includes adding text, adjusting size, rotating, or even applying animated effects. Take advantage of these options to make your stickers more dynamic and interactive.
Step 7: Export and Share the Sticker Pack
Once you’re satisfied with your sticker pack, it’s time to export and share your creations with friends and family. Tap the “Export” or “Send” button within the sticker app, choose your preferred sharing method, such as messaging or email, and spread the joy of your unique stickers to the world.
Tips and Tricks for Making Stickers on iPhone
– Experiment with different photos and editing techniques to create a diverse collection of stickers.
– Create themed sticker packs based on holidays, special events, or inside jokes with your friends.
– Consider adding text or captions to your stickers to further express your message.
– Keep your stickers organized by creating different packs for different themes or categories.
– Don’t be afraid to get creative and have fun with your stickers!
Now that you know how to make stickers from photos on your iPhone, it’s time to get creative and start expressing yourself in a whole new way. Grab your favorite photos and turn them into memorable stickers that will add a personal touch to your conversations. Have fun and happy sticker-making!
Step 1: Choose a Photo
Choosing the right photo is the first step in creating your own custom stickers on iPhone. Your chosen photo will be transformed into a sticker, so it’s important to select one that is clear, vibrant, and represents the concept or theme you have in mind. Whether it’s a picture of your pet, a beautiful landscape, or a memorable moment with friends, the possibilities are endless.
When choosing a photo, keep in mind the size and orientation of the sticker you want to create. Square or rectangular photos work well for most sticker designs. Also, consider the resolution of the photo. Higher-resolution images will result in clearer and sharper stickers.
If you’re not sure which photo to choose, don’t worry! You can select multiple photos and experiment with different designs to see what works best. This will allow you to unleash your creativity and make stickers that truly reflect your personality and style.
Once you have chosen the perfect photo, you’re ready to move on to the next step in the process of making stickers on your iPhone.
Step 2: Edit the Photo
Once you’ve selected the photo you want to turn into a sticker, it’s time to edit and customize it. Editing the photo allows you to enhance its appearance and make it even more eye-catching as a sticker.
There are various editing options available on the iPhone that you can use to transform your photo. Here are some common editing tools and techniques to consider:
Adjustments: Use the various adjustment options such as brightness, contrast, saturation, and sharpness to fine-tune the colors and overall look of the photo.
Filters: Apply filters to add different effects and styles to the photo. Experiment with different filters to find the one that suits your sticker design the best.
Cropping: Crop the photo to remove any unnecessary elements and focus on the main subject. You can use the crop tool to create a custom shape for your sticker.
Retouching: Use the retouching tools to remove any blemishes, unwanted objects, or imperfections from the photo. This will ensure that your sticker looks clean and professional.
Text and Graphic Overlay: If you want to add text or graphics to your sticker, use the overlay tools to add captions, quotes, or decorative elements. This can add a personal touch to your sticker design.
Remember to experiment and be creative while editing the photo. Play around with different options and settings to achieve the desired effect for your sticker.
Once you are satisfied with the edits, it’s time to move on to the next step and access the sticker app on your iPhone.
Step 3: Access the Sticker App
Now that you have edited your photo to perfection, it’s time to access the sticker app on your iPhone. The sticker app is where you can create, customize, and organize your stickers before sharing them with others.
To access the sticker app, follow these simple steps:
1. Open the iMessage app on your iPhone.
2. Tap on the App Store icon located next to the text input field.
3. In the App Store, tap on the “Manage” tab at the bottom of the screen.
4. Scroll through the list of available apps and look for the one with a sticker icon.
5. Once you find the sticker app, tap on the “+” button next to it to add it to your iMessage app drawer.
6. After adding the sticker app, you can access it by tapping on the ‘App Store’ icon in iMessage and swiping left or right to find the sticker app.
7. Tap on the sticker app to open it and start creating your stickers.
It’s important to note that the process of accessing the sticker app may vary slightly depending on the version of iOS you are using and the sticker app you have installed. However, the general steps mentioned above should apply to most sticker apps on the iPhone.
Step 4: Create the Sticker Pack
Once you have customized your stickers to perfection, it’s time to create your sticker pack. Follow these simple steps to bring your stickers to life:
- Open the sticker app on your iPhone. This can be done by tapping on the app icon from your home screen.
- Look for the option that allows you to create a new sticker pack. It might be labeled as “Create Pack” or something similar.
- Give your sticker pack a catchy and memorable name. This will make it easier for users to find and identify your stickers in the App Store.
- Choose an appealing icon for your sticker pack. This icon will represent your pack in the iMessage App Drawer, so make sure it reflects the theme or style of your stickers.
- Decide on the size of your sticker pack. You can choose to include a limited number of stickers or go all out and create an extensive pack with a variety of options.
- Organize your stickers within the pack. You can create different categories or arrange them in a specific order to make browsing and selecting stickers more convenient for users.
- Preview your sticker pack to ensure everything looks as intended. Check for any errors or inconsistencies and make necessary adjustments.
- Save your sticker pack. Once you’re satisfied with the design and organization, tap on the “Save” or “Publish” button to finalize your creation.
Creating a sticker pack is an exciting step in the process, as it brings all your hard work together into a cohesive collection. Pay attention to the details and make sure your pack is visually appealing and user-friendly.
Step 5: Add Stickers to the Pack
Now that you have created your sticker pack, it’s time to add stickers to it. Adding stickers is a fun and creative process that allows you to personalize your pack with unique and eye-catching designs.
To add stickers to your pack, follow these simple steps:
- Open the Sticker Pack: Launch the sticker app that you’re using to create your stickers.
- Select the Sticker Pack: Choose the pack you want to add stickers to from the available options. This will open the sticker pack editor.
- Tap on the “Add Sticker” Button: Look for the “Add Sticker” button or a similar option within the editor. Tap on it to begin adding stickers.
- Choose the Sticker Source: Depending on the app you’re using, you may have different options for adding stickers. You can either select an existing sticker from your device’s photo library or draw a new one using the built-in drawing tools.
- Add the Sticker: Once you’ve chosen the source, follow the app’s instructions to add the sticker to your pack. You may need to crop, resize, or adjust the sticker’s position within the designated area.
- Repeat the Process: Continue adding stickers to your pack, using different sources or creating new ones for a diverse and engaging sticker collection.
It’s important to note that each sticker pack has a limit on the number of stickers it can contain. Make sure to stay within the allowed limit to avoid any issues with your pack’s functionality.
As you add stickers to your pack, you can also arrange their order within the pack by dragging and dropping them. This allows you to create a visually appealing sequence of stickers that flows well when used in conversations.
Once you’re satisfied with the stickers you have added to your pack, you can move on to the next step: customizing their properties. This includes adding titles, assigning categories, and defining emoji keywords for each sticker to improve searchability and user experience.
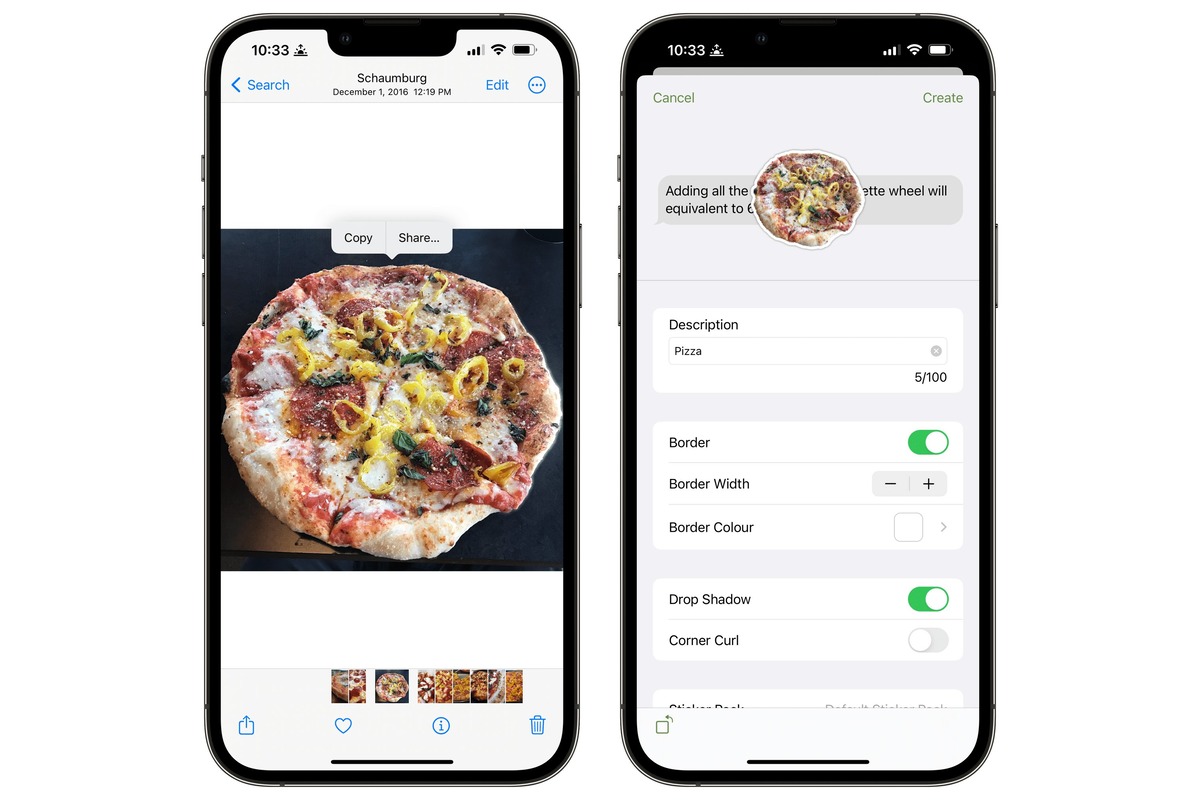
Step 6: Customize Sticker Properties
Once you have added stickers to your pack, it’s time to customize their properties to make them unique and eye-catching. The customization options allow you to add additional effects, adjust colors, and modify the size and position of the stickers.
1. Adding Effects: You can enhance your stickers by applying effects such as shadows, outlines, and gradients. These effects can add depth and dimension to your stickers, making them more visually appealing.
2. Adjusting Colors: With the sticker customization options, you can change the color of your stickers to match your creative vision. You can choose from a wide range of colors or even create your own custom color using the color picker.
3. Modifying Size and Position: You have the flexibility to resize and reposition your stickers within the sticker pack. This allows you to create variations of the same sticker or place stickers in different positions to create a more engaging effect.
4. Adding Text and Emojis: To further personalize your stickers, you can add text or emojis to them. This can be a fun way to include a catchy phrase or a witty message in your sticker pack.
5. Creating Animated Stickers: If you want to make your stickers more dynamic, you can create animated stickers. By adding animation frames to your stickers, you can bring them to life and make them stand out from the crowd.
Remember to save your changes after customizing the properties of your stickers. This ensures that your stickers retain the modifications you made when you export and share your sticker pack.
Pro tip: Experiment with different combinations of effects, colors, and sizes to create unique and visually appealing stickers!
Step 7: Export and Share the Sticker Pack
Once you have created and customized your sticker pack, it’s time to export and share it with others. Follow these simple steps on your iPhone to export and share your sticker pack:
1. Open the sticker app on your iPhone. You should see the sticker pack you have created.
2. Tap on the sticker pack to open it. You will find all the stickers you have added to the pack.
3. Look for the export option, which is usually represented by a square box with an arrow pointing upward. Tap on it to open the export menu.
4. In the export menu, you will have different options to choose from. If you want to share the sticker pack directly with others, tap on the “Messages” app icon to open a new message with the sticker pack preloaded.
5. If you prefer to save the sticker pack as a file and share it later, tap on the “Save to Files” option. You can choose the destination folder where you want to save the file, such as iCloud Drive or any other file storage service you have on your iPhone.
6. Once the sticker pack is saved, you can share it through various platforms. For example, you can send it as an email attachment, share it on social media, or transfer it to another device using a file-sharing app.
7. If you want to share the sticker pack with other iPhone users who don’t have the app installed, you can also share it through the App Store. Tap on the “App Store” option in the export menu and follow the prompts to create a custom page for your sticker pack in the App Store.
8. Remember to add catchy descriptions and screenshots to entice users to download your sticker pack from the App Store.
By following these steps, you can easily export and share your sticker pack with friends, family, and even a wider audience through the App Store. Enjoy spreading fun and creativity with your personalized iPhone stickers!
Tips and Tricks for Making Stickers on iPhone
Creating stickers from photos on your iPhone can be a fun and creative way to express yourself. To help you make the most out of this process, here are some tips and tricks to keep in mind:
- Choose high-quality photos: To ensure that your stickers come out crisp and clear, it’s important to start with high-resolution images. This will help preserve the details and make your stickers visually appealing.
- Experiment with editing tools: Don’t be afraid to play around with the editing tools available on your iPhone. Adjust the brightness, contrast, and saturation to enhance the overall look of your stickers.
- Crop creatively: Instead of sticking to the traditional square shape, try experimenting with different cropping techniques. Use the rule of thirds or experiment with diagonal lines to create visually interesting and unique stickers.
- Add text and shapes: Consider adding text or shapes to your stickers to make them more engaging. Use a variety of fonts and colors to match the theme or mood of your stickers.
- Use layers: If your sticker app supports layering, take advantage of it. This allows you to create multi-dimensional stickers by layering different elements on top of each other.
- Keep it simple: Remember that stickers are meant to be small and simple. Avoid cluttering them with too many details, as it may make them hard to decipher when used in messaging apps.
- Test your stickers: Before finalizing your sticker pack, make sure to test them out in different messaging apps. Ensure that they are visible and recognizable on different backgrounds and in various sizes.
- Take inspiration: If you’re feeling stuck or in need of inspiration, browse through existing sticker packs on the App Store. Take note of the design elements and themes that resonate with you and incorporate them into your own creations.
- Stay organized: If you plan on creating multiple sticker packs, it’s essential to stay organized. Create a folder system to store your sticker assets, including the original photos, edited versions, and any additional elements you use.
- Engage with your audience: Once your sticker pack is ready, don’t hesitate to engage with your audience. Encourage them to use and share your stickers, and consider taking feedback to further improve your creations.
By keeping these tips and tricks in mind, you’ll be able to create stunning stickers from photos on your iPhone. Let your creativity run wild and have fun expressing yourself through this unique digital art form!
In conclusion, being able to make stickers from photos on your iPhone opens up a whole new world of creativity and personalization. Whether you want to add a personal touch to your messages, customize your social media posts, or simply have fun with digital stickers, the process is simple and accessible to anyone with an iPhone. By using apps like Sticker Maker Studio or WhatsApp Stickers, you can easily convert your favorite photos into unique stickers that reflect your personality and interests.
With a few simple steps, you can crop, edit, and create sticker packs to share with friends and family. The ability to personalize your conversations and digital content with custom stickers adds a layer of fun and uniqueness that can truly make your messages stand out. So why not try making your own stickers from photos on your iPhone today and let your creativity shine?
FAQs
1. Can I use any photo to create stickers on my iPhone?
Yes, you can use any photo stored in your iPhone’s photo library to create stickers. Simply select the photo you want to use and follow the steps outlined in the article to turn it into a sticker.
2. Are there any apps that can help me create stickers from photos?
Yes, there are several apps available in the App Store that can assist you in creating stickers from photos. Some popular options include Sticker Maker Studio, Sticker.ly, and PicsArt Photo Editor.
3. Can I customize the size and shape of the stickers?
Yes, many sticker creation apps offer options to customize the size and shape of the stickers. You can resize, crop, and even add borders or other effects to make your stickers look exactly how you want them to.
4. Can I use the stickers I create in messaging apps?
Yes, most sticker creation apps allow you to export the stickers you create and use them in messaging apps like iMessage or WhatsApp. You can send them to your friends and family to bring a personal touch to your conversations.
5. Will creating stickers affect the quality of my original photos?
No, creating stickers from your photos should not affect the quality of the original images. The apps and tools used for sticker creation generally preserve the quality of the photos while converting them into stickers.