
Every one of us loves to take pictures wherever we are. We used to keep these pictures on our phones or post them on social media. However, there are times that we can’t be satisfied with how our pictures look like. With that, we tend to edit most of it. Adobe Photoshop Express is one of the most popular editing apps. Using this app makes it easy for us to edit our pictures. Moreover, we can also showcase our creativity and be able to share our pictures without any flaws. We can even stand out from others by having the satisfying quality of pictures that we share.
In this article, we will discuss Adobe Photoshop Express, its features, how to use it, and how to download it on iOS, Android, and Windows phones.
Related: 15 Best Lightroom Alternatives for Mobile Photo Editing
Inside This Article
- What Is Adobe Photoshop Express?
- Adobe Photoshop Express Functions
- Adobe Photoshop Express Features
- How To Use The Adobe Photoshop Express To Edit Photos
- How To Download And Install Adobe Photoshop Express On Android Devices
- Adobe Photoshop Express: Pros And Cons
- Have Amazing Photos With Adobe Photoshop Express
What Is Adobe Photoshop Express?
Adobe Photoshop Express is a free image editing and collage-making mobile app. It lets you make quick, powerful, and easy editing of photos and create collages that will satisfy you. Moreover, it helps you to make adjustments and filters to your photos and make the most out of them. You can use this to touch up and improve your photos with its features. These include crop, rotate, straighten, flip, contrast, red-eye removal, and many more.
This app also includes the Auto-fix function. Using that, you can instantly adjust the brightness, exposure, and shadow. Also, it offers sliders, which can be used in adjusting colors, contrast, vibrance, and more. The wide range of easy-to-use adjustment tools and filters makes it easy for you to make unique creations out of your photos. Furthermore, even complete beginners will be able to produce amazing pictures.
This app is available on Android, iOS, and Windows phones and tablets. It can also be installed on Windows desktops and laptops with Windows 8 and up via the Microsoft store.
Download Adobe Photoshop Express for Android
Download Adobe Photoshop Express for iOS
Adobe Photoshop Express Functions
Adobe Photoshop Express makes it easy for us to edit our pictures, be creative enough, and share our amazing photos on social media. It serves as a one-touch transforming app for our photos. Among its functions are the following:
- Helps in auto-fixing photos. We can adjust the contrast and exposure in just one click.
- Provides great looks. It makes us creative by using eye-catching effects.
- Collages and extras. We can add different styles with impressive borders, layouts, and backgrounds. Also, we can add stickers, tattoos, and text styles.
- Provides intelligent edits. Photoshop helps in transforming shots.
- Transfer and apply styles. You can apply the style you used in one image to all images in a collage.
- Spot healing. It is easy to remove or erase spots or imperfections.
Adobe Photoshop Express Features
Adobe Photoshop Express offers an extensive and robust set of features creatives can exploit. Imagine your regular Adobe Photoshop but only on steroids and you’ll get the picture. To give you an idea, here are some of the best features this photo editing app has.
Personalize Your Photos With Style |
You can customize the images by adding stickers, memes, and captions. Also, you can style your photos by adding text with different fonts and layouts. Moreover, you can create vignette effects, apply borders and photo frames, and stamp creations with watermarks. |
Crop |
You can freely and quickly fix your photos. Moreover, you can crop, straighten, rotate clockwise or anticlockwise, and flip photos horizontally and vertically. You can use the special crop presets. Also, crop provides easy one-touch default aspect ratios. |
One-Touch Adjustments, New Corrections, and Slider Controls |
It provides adjustments for exposure, brightness, contrast, highlights, and shadows. Also, it has added whites, blacks, sharpen, saturation, and de-haze to make your photos more appealing. Dehazing pictures are removing the fog in the scene and applying filters to pictures. The slider controls help to have fine-tuned color temperature, tint, and other color effects. |
Edit Photos |
You can quickly open your photos from your device. Also, you can take or snap photos within the app. The app’s easy-to-use interface provides flawless switching between different edits. Moreover, the comprehensive photo editor helps in polishing the photos for you to turn your imagination into reality. |
Importing and Sharing Photos |
You can upload images from different sources and formats. Also, you can post your beautiful photos to Facebook, Instagram, Twitter, Flickr, and other social media platforms. Moreover, you can share these photos in e-mail WhatsApp, Facebook Messenger, Line, Photoshop, Lightroom, Creative Cloud, Google Photos, Dropbox, Facebook, or the camera roll to inspire others. |
Correction of Perspective |
You can instantly fix crooked images, fix horizontal and vertical perspective distortions, and correct distorted camera angles. |
Remove Red-Eye and Fix Pet Eye |
You just need to tap to remove the red-eye of people or pets from your favorite photos. There’s a red-eye tool that helps desaturates the red pixels on the target area and lessens the effect. |
Apply Blur |
You can apply a radial or full blur to your photo. The radial blur is for blending out the background and shifting the focus to your specific subjects. On the other hand, the full blur helps in creating movements. |
Assemble Amazing Pic Collages |
You can create the best-quality compilations of photos by adding photo grid layouts that are ready to use. Also, it provides different borders and colors for modifications and creating collages. |
Creative looks |
Choose from a selection of 45 effects when you use Adobe Photoshop Expres. These are called Looks, and they have different categories which include Black and White, portrait, nature, pop color, and duotones. The categories will help you to get the right effect that you can apply. Besides, you can control the intensity of your looks. |
Looks Pack and Noise Reduction Pack |
These are available for free when you sign in with an Adobe ID. The Adobe Looks Pack gives photos of the fun, fresh looks with other one-touch filters. On the other hand, the Adobe Noise Reduction Packs help in smoothening unwanted grains and speckling, reducing color noise, and sharpening details making your photos look their best. |
Spot Healing |
You can remove pimples, scars, dirt, and dust from your photos, and it is very easy with just one touch. |
How to Use Adobe Photoshop Express to Edit Photos
Now that you have an idea of what features you can access in Adobe Photoshop Express, it’s time to get into the nitty-gritty of it all.
1. Open an Image
- When you open Adobe Photoshop Express, you will see the images/photos from your photo library. You will see two options at the top of the screen, the “Edit Images” and “Make Collage.”
- Be sure that you select “Edit Images.”
- Select the photo that you prefer to edit.
- You can also open an image from another photo album. Just tap the arrow found at the top of the photo library screen then select “Albums.”
- When you open an image, you will see a row of icons in the toolbar found at the bottom of the screen. These icons will give you access to different categories of editing tools.
- Tap the icon that you want to use to access the editing tools for the particular category.
- If you want to return to your photo library and select another image, tap the arrow found at the top left of the screen
2. Use Auto-Enhance Tool

You can see this tool at the top of the screen. This tool applies automatic light and color adjustments to improve your photo. It is switched on by default once you open a photo to edit. It means that Photoshop Express tries to automatically fix your photo even before you start editing it. In some cases, this can be useful. However, it is not always that the app can make the edits that you want.
With that, it is advisable to make your adjustments using the filters and adjustments tools. To turn off the automatic enhancement, you need to tap the “Auto-Enhance” icon, on the blue wand so it will turn white. Doing that, your photo will revert to its original unedited version.
Related: How To Edit Photos On Your Phone: 10 Amazing Apps To Use
3. Choose Filters
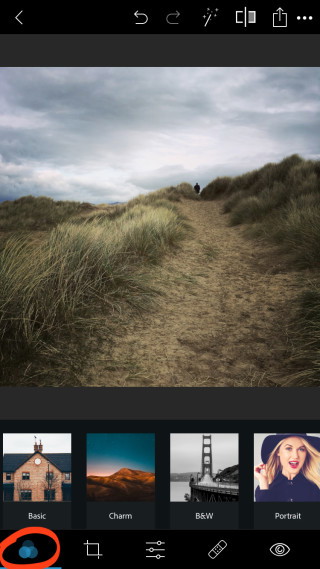
If you want to change the look and mood of your photo quickly, the one-tap filters Photoshop Express offers are an easy solution. Using filters gives a particular set of pre-defined edits to your photo. These help to change colors, brightness, and sharpness. Moreover, filters help to quickly turn your photo into black and white. You can also add a certain color tone that you prefer. You can warm up, cool down, and make the colors more vibrant or muted to change the mood of your photo.
Additionally, you can apply a filter to your photo. They are called “Looks” in the Photoshop Express app. You need to tap the “Looks” icon found at the bottom left of the screen to access the filters. You will then see the list of filter categories beneath your photo. The categories are basic, charm, black and white, portrait, nature, pop color, duotone, and premium. You need to tap on the filter category and scroll across for you to view the individual filters. You can then tap a filter that you want to apply to your photo. To adjust the intensity of the filter, you can use the slider beneath your photo. To increase the filter strength, drag to the right, and vice versa.
4. Crop Your Photo
:max_bytes(150000):strip_icc()/002_how-to-crop-in-photoshop-4690942-3621ee803e96409faceb710d3ed778cd.jpg)
The Aspect Ratio options help you to crop your photo. Cropping helps remove unwanted distractions at the edges of the frame. Also, it is useful in improving the composition of your photo.
- Choose the aspect ratio that can be found at the bottom of the screen. This gives you the option of a predefined shape and size.
- You can choose from Original, Square, 4:3, 7:5, and many others.
- Also, you can crop to a particular aspect ratio if you will use the photo for your Facebook profile and cover photos.
- To crop without restrictions to a particular aspect ratio, choose “Unconstrained.”
- Drag the corner handles to crop the image after selecting the aspect ratio.
5. Rotate and Straighten Your Photo
The “Rotate” option includes Straighten, Rotate, Flip Horizontal, and Flip Vertical tools. They are useful in changing the orientation of your photo. On the other hand, the “Straighten” tools help in leveling the horizon in landscape photos. It is also useful in ensuring that the lines are straight in your photo.
- Tap “Auto” to the left of the slider. The app will analyze and will attempt to straighten your photo.
- If you are not satisfied, you can drag the slider to tilt your photo.
- You can use the grid to help you to make the lines straight.
- Use the “Rotate” tool to rotate your photo 90 degrees at a time. This can change to orientation of your photo.
- You can also flip the image to improve the composition of your photo.
6. Adjustment Tools
These tools help in adjusting the settings such as light, color, and sharpness. Also, these tools are organized into Light, Color, Effects, Details, and Blur. To view the tools in different categories, you just need to scroll across them.
- When using the app’s filters, make sure that the adjustment tools won’t ruin your photo.
- Use the sliders carefully.
- Making small changes in your photo is better.
- Subtle changes will help in creating amazing photo edits.
7. Light Adjustments
The light sliders control the following;
- Exposure brightens or darkens the entire image.
- Contrast changes the difference between the brightness of light and dark areas.
- Highlights adjust the brightness of the highlights (bright areas).
- Shadows adjust the brightness of the shadows (dark areas).
- Whites adjust the brightness of the brightest areas.
- Blacks adjust the brightness of the darkest areas.
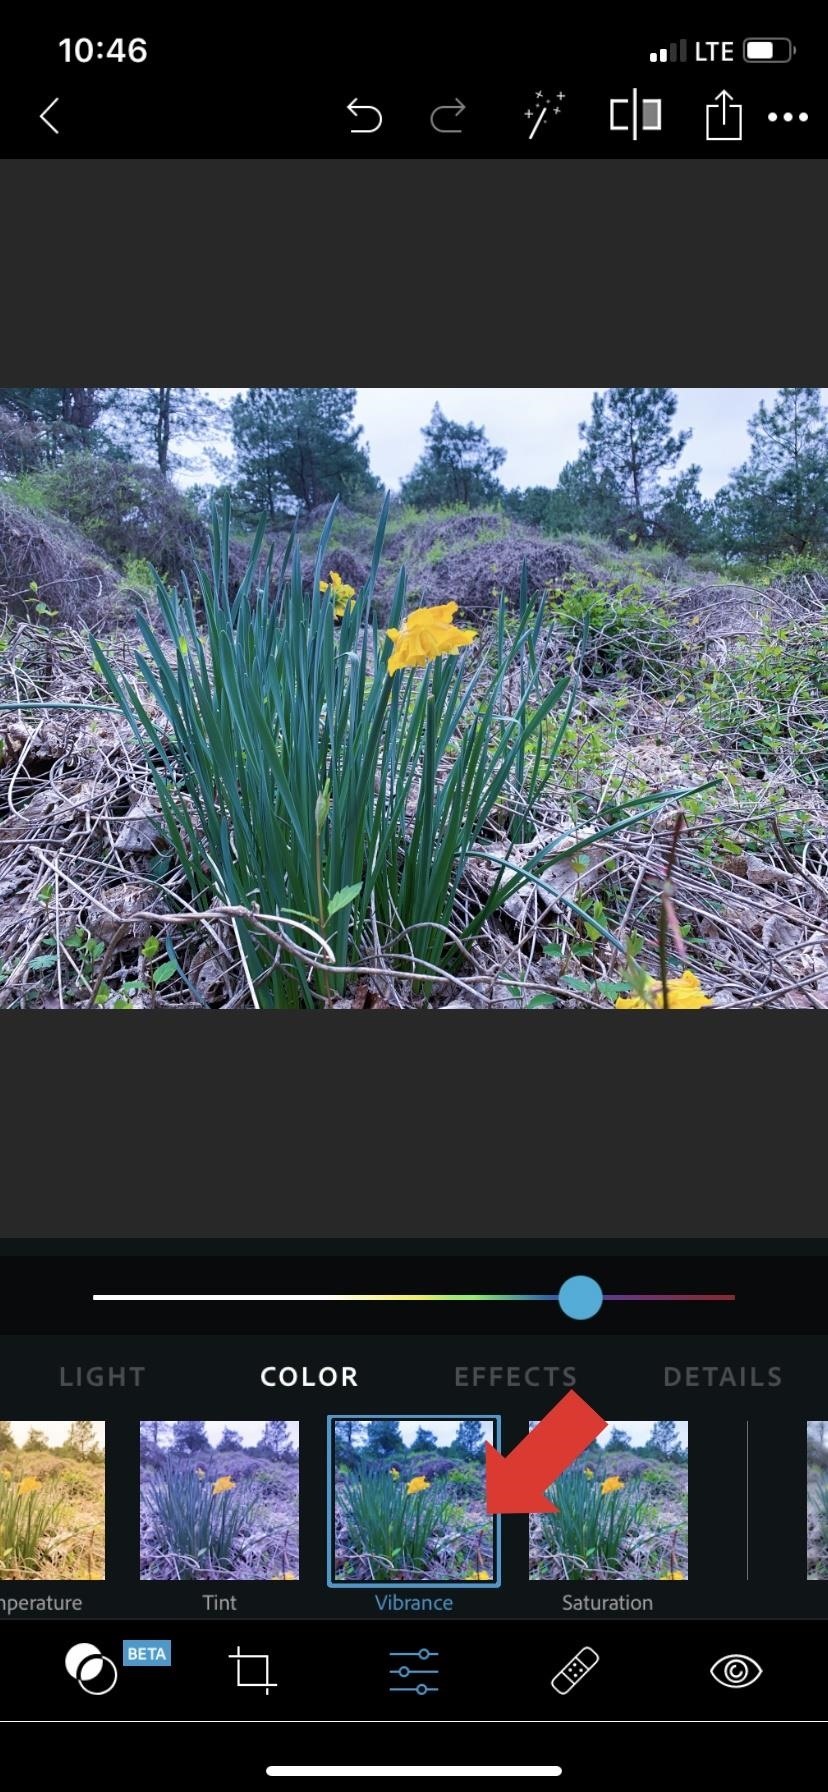
8. Enhance Colors
- The sliders in the “Color” category let you control the color settings.
- Temperature makes the colors warmer or cooler.
- Tint adds a green or purple tint to your photo.
- Vibrance helps to adjust the lower-saturated colors without affecting the higher-saturated colors too much. Also, this helps to boosts the colors in your photo without making it look harsh.
- Saturation helps to adjust the intensity of all colors in your photo.
9. Use Effects
The sliders in the “Effects” category help to adjust the following:
- Clarity is used to bring out the details and textures.
- Dehaze to adjust the amount of atmospheric haze in your photo.
- Fade helps in fading the colors in your photo.
- Grain helps to add grain for you to create an old-fashioned film or vintage look.
- Vignette helps in adding a black or white vignette around the edges of your photo.
10. Spot Removal Tool
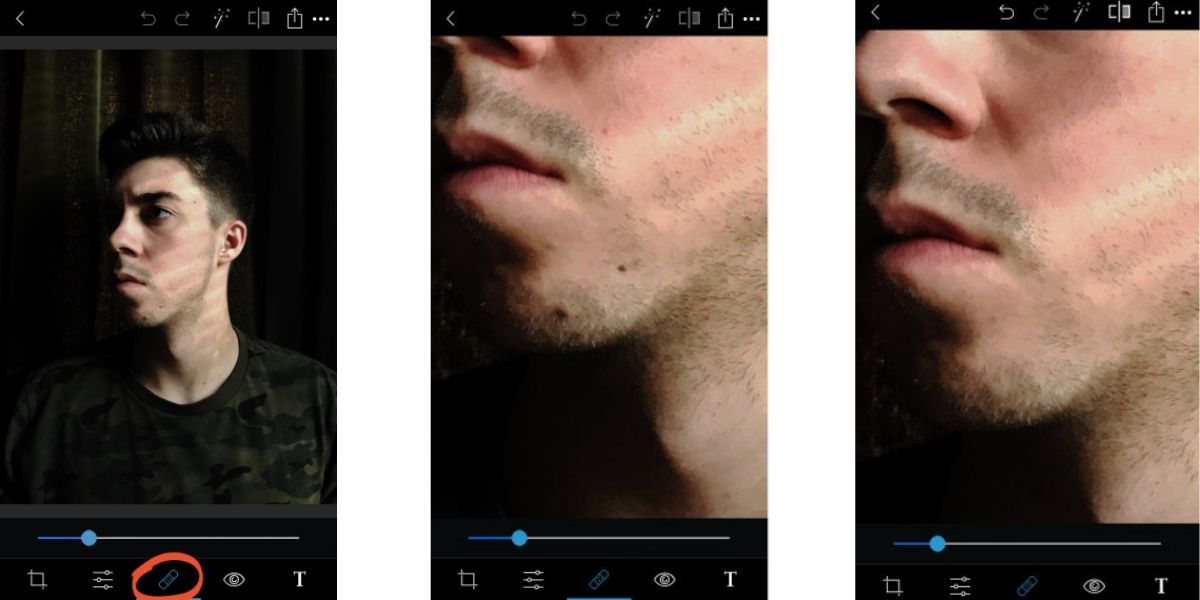
This helps in erasing small objects. With just a single tap, spots, blemishes, dirt, and other small distractions will be removed from your photo.
- Tap the “Spot Removal” icon (bandaid icon) found at the bottom of the screen.
- To set the size of the tool, use the slider. If you want to have the best result, choose the size that is slightly bigger than the blemish that you want to remove.
- After that, tap on the small object to remove it. It will be replaced by the pixels from its surroundings.
- To remove it completely, you may need to tap on it a few times.
11. Eye Tool on Adobe Photoshop Express
The “Eye Tool” in Adobe Photoshop Express helps to fix red-eye problems or eyes in the photo that look too bright or shiny. To fix this problem, all you have to do is to follow these steps:
- Tap on the “Eye” icon found at the bottom of the screen.
- Select between “Red Eye” or “Pet Eye.”
- Tap on the eyes that you want to fix.
- This tool includes an option that automatically detects and corrects red eyes.
12. Add Text to Your Photo
/howtoaddtextimage203-0a93d2c1dc2e4b5a8b3d0dacf7267676.jpg)
You can add text captions to your photo and leave a message on it. It can also tell your story.
- Tap the“Text” icon (T) found at the bottom toolbar to add text to your photo.
- You may need to scroll across the icons to find the “Text” icon. The “Text” tool has four categories namely: Styles, Font, Color, and Alignment.
- To select a style, you can browse through the “Styles” and tap the style of text that you prefer.
- You can either keep the default text or keep it. You also have the option to create one yourself.
- To add your text, you have to tap the “Pencil” icon found at the top left corner of the text box.
- You will see a screen where you can type your text.
- After adding a text to your photo, tap “Done.”
- You can resize, rotate, or put your text in different positions using your fingers.
- Also, you can customize your text by using the options that you will see beneath your photo.
- Tap “Font” to choose a different font style, “Color” to change the color of the test, and “Alignment” to align your text to the left, right, or center.
13. Add Stickers on Adobe Photoshop Express
The “Stickers” tool helps you to add attractive and fun graphics to your photo. They are grouped by mood and content
- Tap the “Stickers” icon, the circle with a heart that can be found at the bottom of the screen.
- You can view the different stickers by swiping across.
- You can tap any category beneath your photo.
- Tap the sticker that suits your preference. It will then be added to your photo. Use your fingers to move, resize, or rotate the sticker.
14. Add a Border to Your Photo
- Tap the “Borders” icon, the stacked rectangles that you will find at the bottom toolbar.
- You will see three categories beneath your photo. These are Basic, Edges, and Frames.
- To view the available borders, you can swipe across. To select a category, tap on it.
- You can also change the color of some available borders. Use the colored dots that you will see at the bottom of your photo.
How to Download and Install Adobe Photoshop Express on Android Devices
You can download and install the Adobe Photoshop Express app via the app store or through different links. To download and install this app, follow these steps:
- You need to turn off the Google Play Protect mode from Google. To do this, you need to access “Play Store,” then “Settings,” “Security,” and “Turn off Play Protect.”
- Go to your trusted website where you can download the APK file.
- Install the APK file like the usual way of installing it. This process may take some time depending on your connection.
- You have now successfully installed the app on your Android device. You can now open the application and experience its wonders.
- For the first time accessing the app, you need to log in. You can use your Facebook or Google account to log in if you do not have an Adobe account.
Adobe Photoshop Express: Pros and Cons
While Adobe Photoshop Express might give off a superior vibe for an app, it does come with its own faults.
PROS
- Simple and easy to navigate
- User-friendly interface
- A quite good set of tools for basic photo editing
- Interacts well with other Adobe products
- Completely free and lightweight
- Keeps the original image intact
- Well-designed, user-friendly UI
- Offers full-screen option
CONS
- Does not support photos of more than 16 megapixels
- Doesn’t support RAW files
- Not suitable for professional photo retouching
- Supports one file format only
Have Amazing Photos with Adobe Photoshop Express
We are all having fun taking pictures wherever we are. We used to keep these photos on our phones or share them on different social media platforms. However, there are a few who want to show off their photos but can’t do that because of some flaws that they see in the photo. Adobe Photoshop Express is the answer to fixing these flaws. This app helps many people to edit their photos and make them flawless and somewhat elegant. Also, this app makes people prouder and more satisfied with the photos that they keep and share. Moreover, it also lets people be more creative and bring out the talent of an artist in them.
If you are on the hunt for the best free photo collage maker apps or the best photo book apps, we have articles that can help you out. Lastly, here is a step-by-step guide on how to edit photos using Snapseed.