
Are you tired of constantly losing track of your iPhone? Frustrated with its elusive hiding spots and the endless minutes spent searching for it? Well, fret no more! In this article, we will reveal the secret to effortlessly locating your iPhone with just a simple pin drop. Whether your iPhone has fallen between the couch cushions or has gone astray in a crowded room, the pin drop feature is the ultimate solution to your predicament. Say goodbye to frantic searches and say hello to the convenience of pinpoint accuracy. Stick around to discover how to master the art of pin dropping on your iPhone, and bid farewell to the days of losing your phone in a black hole of forgetfulness.
Inside This Article
- Enabling and Disabling Do Not Disturb Mode
- Customizing Sounds and Alerts
- Managing Notifications for Individual Apps
- Using Siri to Set and Manage Alarms
- Conclusion
- FAQs
Enabling and Disabling Do Not Disturb Mode
Do Not Disturb mode is a helpful feature on iPhones that allows you to silence all incoming calls, messages, and notifications, ensuring you won’t be disturbed during important moments or while sleeping. Here’s how you can enable or disable Do Not Disturb mode:
Method 1: Control Center
1. Swipe up from the bottom of your iPhone screen to open the Control Center.
2. Look for the crescent moon icon. This icon represents the Do Not Disturb mode. Tap on it to enable or disable the feature. When the icon is white, it means Do Not Disturb mode is active.
Method 2: Settings
1. Open the Settings app on your iPhone.
2. Scroll down and tap on “Do Not Disturb.”
3. To enable or disable Do Not Disturb mode, simply toggle the switch next to “Manual.”
4. You can also schedule Do Not Disturb mode to activate automatically at specific times by setting the “Scheduled” option. Customize the start and end times according to your preference.
Method 3: Siri
1. Activate Siri by saying “Hey Siri” (if enabled) or by pressing and holding the side or home button.
2. Tell Siri to “turn on Do Not Disturb” or “turn off Do Not Disturb” to quickly enable or disable the mode.
By using any of these methods, you can easily enable or disable Do Not Disturb mode on your iPhone, allowing you to enjoy uninterrupted moments or focus on important tasks without disturbances.
Customizing Sounds and Alerts
One of the great advantages of owning an iPhone is the ability to personalize your device according to your preferences. Among the many customization options, customizing sounds and alerts allows you to add an extra touch of personalization to your iPhone experience. Whether it’s assigning unique ringtones to specific contacts or setting a different sound for each type of notification, let’s dive into the world of customizing sounds and alerts on your iPhone.
The first step to customizing sounds and alerts on your iPhone is to open the Settings app. Once you’re in the Settings menu, scroll down and tap on “Sounds & Haptics.” Here, you’ll find a wide range of settings that you can tweak to your liking.
One of the most commonly customized sounds on an iPhone is the ringtone. To change your ringtone, tap on “Ringtone” and browse through the extensive list of built-in options. If none of the pre-installed ringtones catches your fancy, you can tap on “Download All Purchased Tones” to access any previously purchased or downloaded ringtones from the App Store.
If you want to go a step further and set a unique ringtone for a specific contact, navigate to the “Contacts” app, select the contact you wish to customize, and tap on “Edit” in the top right corner. From there, tap on “Ringtone” and choose the desired ringtone for that contact. This way, you’ll always know who’s calling without even looking at your phone.
Aside from ringtones, you can also customize the sound for your text messages, emails, and other notifications. To do this, go back to the “Sounds & Haptics” settings menu and select the desired sound option. You can choose from a variety of pre-installed sound options or even select a custom sound from your own library.
For those who prefer not to be disturbed during certain times, the iPhone offers a Do Not Disturb feature. This feature allows you to customize how your phone behaves when you don’t want to be interrupted. You can set it up to only allow calls from specific contacts, or even set a schedule for when Do Not Disturb mode is enabled automatically.
Another option for customizing sounds and alerts on your iPhone is by using third-party apps. These apps offer a wide range of additional sounds, wallpapers, and themes that can further personalize your device. Simply search the App Store for “ringtones” or “notification sounds” to explore the many options available.
Remember that sound and alert customization is not limited to ringtones and notification sounds. You can also customize the vibrations, LED flash alerts, and even enable or disable vibrations for specific types of notifications. The level of customization available on the iPhone ensures that you can tailor your device to suit your preferences and make it truly your own.
So, go ahead and explore the various settings and options to make your iPhone sound and alert exactly how you want it to. Customize your device to match your personality and enjoy a more personalized and unique iPhone experience.
Managing Notifications for Individual Apps
Managing notifications for individual apps is a great way to customize your smartphone experience and ensure that you only receive notifications that are important to you. Here’s how you can do it:
1. Open the Settings app on your iPhone.
2. Scroll down and tap on “Notifications.”
3. You’ll see a list of all the apps installed on your iPhone. Tap on the app for which you want to manage notifications.
4. On the next screen, you’ll find various options to customize the app’s notification settings. These options may include:
- Show in Notification Center: This determines if the app’s notifications will appear in the Notification Center when you swipe down from the top of your screen.
- Show on Lock Screen: This determines if the app’s notifications will be displayed on your lock screen.
- Banners: This determines how the app’s notifications appear when you’re using your iPhone.
- Badge App Icon: This determines if the app’s icon will display a badge with the number of unread notifications.
- Sound: This determines if the app will play a sound when a notification is received.
5. Customize these options according to your preference. You can turn them on or off, choose different alert styles, and even select a specific sound for each app’s notifications.
6. Once you have made the desired changes, simply exit the Settings app. Your changes will be saved automatically.
By managing notifications for individual apps, you can limit interruptions and get rid of unnecessary distractions. This way, you’ll only receive notifications that truly matter to you.
Keep in mind that some apps will have additional notification settings within their own settings menu. So, if you can’t find the customization options you’re looking for in the main notifications settings, make sure to check the settings within the specific app.
Take control of your notifications and streamline your smartphone experience by managing notifications for individual apps on your iPhone. Enjoy a more personalized and focused user experience!
Using Siri to Set and Manage Alarms
Setting and managing alarms on your iPhone can be a breeze when you utilize the power of Siri, Apple’s virtual assistant. With just a few simple voice commands, you can create, delete, and modify alarms effortlessly. Let’s explore how to make the most of Siri when it comes to alarms.
To set an alarm using Siri, simply summon Siri by pressing and holding the home button or using the “Hey Siri” command if it’s enabled. Then, say something like “Set an alarm for 7:30 AM” or “Wake me up at 6:00 AM tomorrow.” Siri will confirm the alarm time and add it to the Clock app.
If you need to specify additional details for the alarm, such as the alarm label, you can do so by saying something like “Set an alarm called ‘Morning Workout’ for 8:00 AM.” Siri will create the alarm with the provided label, making it easier for you to identify it later.
Managing existing alarms is also a breeze with Siri. You can ask Siri to show you a list of all your alarms by saying “Show me my alarms” or “What alarms do I have set?” Siri will display a list of your alarms, complete with their labels and settings.
To delete an alarm using Siri, simply say something like “Delete my 8:00 AM alarm” or “Remove the alarm called ‘Morning Workout’.” Siri will promptly remove the specified alarm from your list, ensuring that you only have the alarms you need.
If you want to modify an existing alarm, Siri has got you covered. You can ask Siri to change the time of an alarm by saying “Change my 7:30 AM alarm to 8:00 AM” or “Move my ‘Morning Workout’ alarm to 6:00 AM.” Siri will promptly adjust the alarm settings according to your command.
In addition to setting and managing individual alarms, Siri can also perform smart actions with alarms. For example, you can ask Siri to enable or disable all your alarms at once by saying “Turn on/off all my alarms.” This can be especially useful when you want to temporarily silence all your alarms.
Using Siri to set and manage alarms on your iPhone not only saves you time and effort but also adds a touch of convenience to your daily routine. With Siri’s voice recognition capabilities and integration with the Clock app, you can easily stay organized and on schedule every day.
Conclusion
Pin dropping on your iPhone is a handy feature that allows you to mark specific locations for future reference. Whether you want to remember a favorite restaurant, a memorable hiking spot, or simply keep track of important places for work or personal reasons, pin dropping can be a useful tool. By following the simple steps outlined in this article, you can easily pin drop on your iPhone and access the saved locations whenever you need them.
Remember to utilize this feature responsibly and respect privacy when pin dropping on public or private locations. With the ability to share pinned locations and access them across multiple devices, pin dropping is a versatile feature that can enhance your navigation and organization experience. So go ahead and start pin dropping on your iPhone today!
FAQs
1. How do I pin drop on iPhone?
To pin drop on your iPhone, follow these steps:
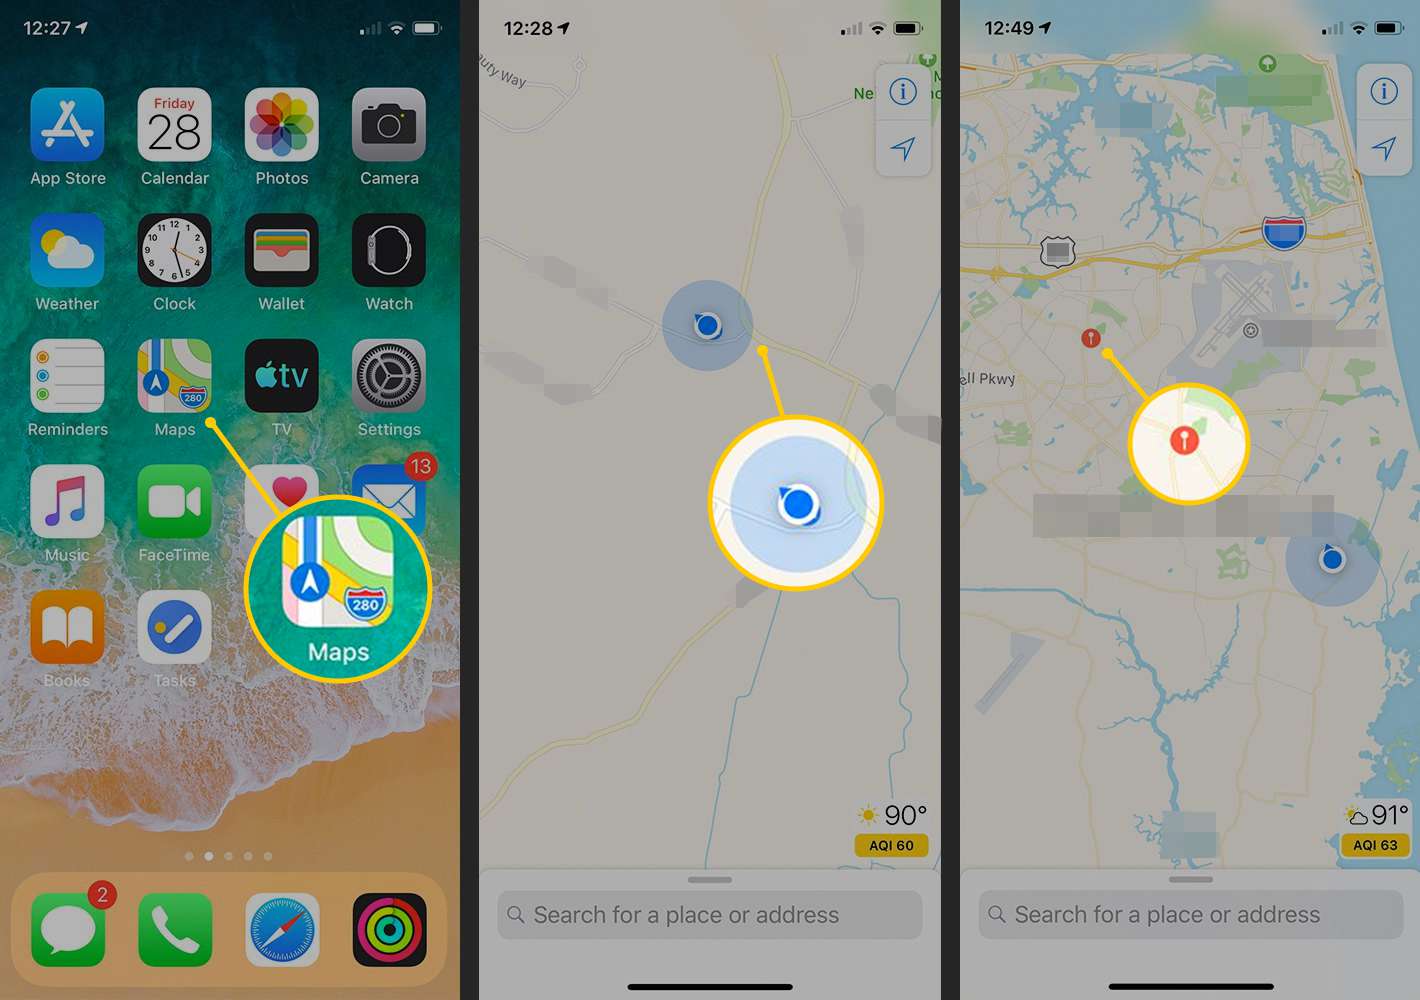
- Open the Maps app on your iPhone.
- Search for the location you want to drop the pin on.
- Once the location is displayed, tap and hold on the desired spot on the map.
- A red pin will appear at that location.
- You can then label the pin by tapping on the “i” icon that appears next to the pin.
- Enter a name or description for the pin if desired.
- Tap “Done” to save the pin drop.
2. Can I customize the pin drop icon on my iPhone?
Yes, you can customize the pin drop icon on your iPhone. To do so, follow these steps:
- Open the Maps app on your iPhone.
- Tap on the “i” icon at the bottom right corner of the screen.
- Tap on the “Edit” button next to the “Favorites” section.
- Tap on the “+” button to add a new favorite location.
- Choose a specific location from the Favorites list or enter the address manually.
- Tap on the “Add a photo” option to customize the pin drop icon with a picture from your photo library or camera.
- Once you have selected a photo, tap “Done” to save the customized pin drop icon.
3. Is it possible to share a pin drop on iPhone?
Yes, you can share a pin drop on your iPhone by following these steps:
- Open the Maps app on your iPhone.
- Drop a pin on the desired location by tapping and holding on the map.
- Tap on the pin to reveal the additional information.
- Swipe up on the information panel to access more options.
- Tap on the “Share” icon.
- Select the desired method of sharing, such as Message, Mail, or social media platforms.
- Choose the recipient and send the shared pin drop.
4. How do I remove a pin drop from my iPhone?
To remove a pin drop from your iPhone, follow these steps:
- Open the Maps app on your iPhone.
- Tap on the “i” icon at the bottom right corner of the screen.
- Scroll down to the “Favorites” section.
- Tap on the Edit button next to the Favorites section.
- Swipe left on the pin drop you want to remove.
- Tap on the “Delete” button that appears.
- Confirm the removal by tapping “Remove” in the popup window.
5. Can I navigate to a pin drop on my iPhone?
Yes, you can navigate to a pin drop on your iPhone by following these steps:
- Open the Maps app on your iPhone.
- Tap on the pin drop you want to navigate to.
- Tap on the “Directions” button.
- Choose the desired method of transportation, such as driving, walking, or public transit.
- Follow the directions provided by the Maps app to reach the pin drop location.