
When it comes to managing storage space on your iPhone, deleting unnecessary photos is a great way to free up valuable memory. However, you may be hesitant to remove photos from your iPhone if you’re worried about losing them permanently from your iCloud storage. The good news is, there’s a way to delete photos from your iPhone but keep them safely stored in iCloud.
In this article, we will guide you through the step-by-step process of removing photos from your iPhone while ensuring they remain in your iCloud storage. Whether you’re looking to declutter your device or simply organize your photo library, we’ve got you covered with all the information you need to safely manage your iPhone’s photo storage without losing any precious memories.
Inside This Article
- How to Remove Photos from iPhone But Not iCloud
- Disable iCloud Photos
- Use the Photos App’s “Delete Device Copy” Feature
- Utilize Third-Party Apps or Software
- Transfer Photos to a Computer or External Storage Device
- Conclusion
- FAQs
How to Remove Photos from iPhone But Not iCloud
Do you have a cluttered photo library on your iPhone that you want to clean up without losing your precious memories stored in iCloud? Removing photos from your iPhone without deleting them from iCloud can be a tricky task, but with the right approach, you can achieve it. In this article, we will explore different methods that allow you to remove photos from your iPhone while keeping them safely stored in iCloud. Let’s get started!
1. Disable iCloud Photos
The first method to remove photos from your iPhone but not iCloud is by disabling the iCloud Photos feature. By doing this, your iPhone will no longer sync with iCloud, and any changes you make to your photo library on your iPhone will not affect your iCloud storage. Here’s how to disable iCloud Photos:
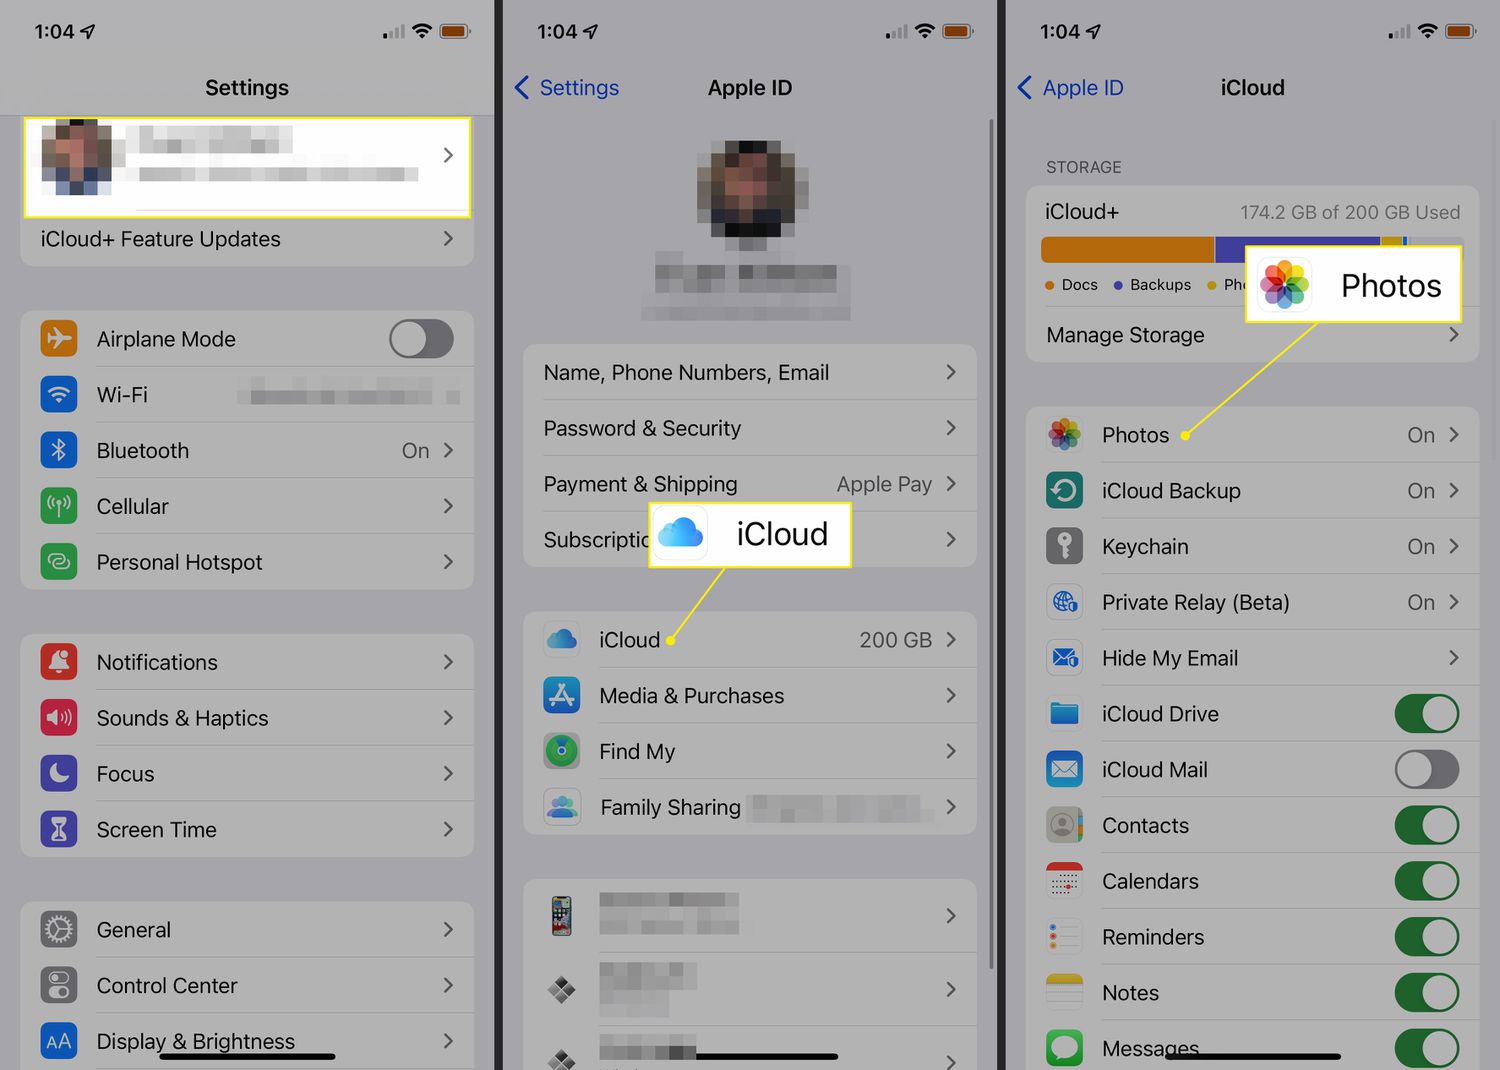
- Go to your iPhone’s Settings.
- Tap on your Apple ID at the top of the screen.
- Select “iCloud” from the list of options.
- Scroll down and tap on “Photos”.
- Toggle off the “iCloud Photos” switch.
By disabling iCloud Photos, you can now freely delete photos from your iPhone without worrying about them being removed from iCloud.
2. Use the Photos App’s “Delete Device Copy” Feature
If you want to remove photos from your iPhone but keep them in iCloud, you can utilize a handy feature within the Photos app called “Delete Device Copy”. This feature allows you to remove the photos from your iPhone while retaining them in your iCloud library. Here’s how you can use it:
- Open the Photos app on your iPhone.
- Select the photo or photos you want to remove.
- Tap on the trash can icon at the bottom right corner of the screen.
- A pop-up will appear, asking if you want to “Delete [number] Photos” or “Cancel”.
- Choose “Delete [number] Photos”.
By using the “Delete Device Copy” feature, you can easily free up space on your iPhone without losing your photos stored in iCloud.
3. Utilize Third-Party Apps or Software
If you have a large number of photos that you want to remove from your iPhone but not iCloud, you can consider using third-party apps or software. These tools offer advanced features and flexibility for managing your photo library. Some examples include:
- Google Photos: This app allows you to back up your photos to the cloud and remove them from your device without affecting your iCloud library.
- iMazing: This software offers comprehensive iPhone management features, including the ability to delete photos from your device while preserving them in iCloud.
Using third-party apps or software gives you more control over your photo library and allows you to remove photos selectively from your iPhone.
4. Transfer Photos to a Computer or External Storage Device
If you want to remove photos from your iPhone but keep them in a safe location outside of iCloud, you can transfer them to a computer or external storage device. Here’s how you can do it:
- Connect your iPhone to your computer using a USB cable.
- Open the Photos app or File Explorer on your computer.
- Select the photos you want to remove from your iPhone.
- Drag and drop the photos to a folder on your computer or external storage device.
By transferring the photos to a computer or external storage device, you can free up space on your iPhone while keeping them accessible whenever you need them.
Removing photos from your iPhone without deleting them from iCloud is possible by following the methods outlined above. Whether you disable iCloud Photos, use the “Delete Device Copy” feature, utilize third-party apps or software, or transfer photos to a computer or external storage device, you can declutter your iPhone while preserving your valuable memories stored in iCloud. Choose the method that suits your needs and start organizing your photo library today!
Disable iCloud Photos
If you want to remove photos from your iPhone but keep them in iCloud, you can start by disabling iCloud Photos. Disabling this feature will prevent your iPhone from automatically syncing and storing photos in iCloud.
To disable iCloud Photos, follow these steps:
- Open the Settings app on your iPhone.
- Tap on your name at the top of the screen to access your Apple ID settings.
- Scroll down and tap on “iCloud.”
- Tap on “Photos.”
- Toggle off the switch next to “iCloud Photos.”
By disabling iCloud Photos, you can delete photos from your iPhone without deleting them from your iCloud storage. However, keep in mind that any changes you make to your iCloud Photos settings will apply to all devices connected to your iCloud account.
Remember to regularly check your iCloud storage to ensure that you have enough space to store all your photos and other data.
Disabling iCloud Photos is a straightforward method to remove photos from your iPhone while keeping them safely stored in iCloud. However, it’s important to note that this method only prevents the automatic syncing of photos between your iPhone and iCloud. It does not remove the photos from your iPhone’s storage entirely.
Use the Photos App’s “Delete Device Copy” Feature
One of the easiest ways to remove photos from your iPhone without deleting them from iCloud is by utilizing the Photos app’s “Delete Device Copy” feature. This feature allows you to delete the photos from your device while keeping them safely stored in your iCloud account. Here’s how you can do it:
1. Open the Photos app on your iPhone.
2. Select the photo or photos you want to remove from your device but not from iCloud. You can do this by tapping on the “Select” button in the top right corner of the screen and then choosing the photos you want to delete.
3. Once you have selected the photos, tap on the trash can icon at the bottom right corner of the screen.
4. A prompt will appear asking if you want to delete the selected photos from your device or from iCloud. Choose the option to “Delete from My iPhone” or “Delete [number] Photos” depending on the version of iOS you are using.
5. Confirm your selection by tapping on “Delete [number] Photos” in the pop-up prompt.
By following these steps, you will remove the selected photos from your iPhone while keeping them intact in your iCloud account. This way, you can free up storage space on your device without losing access to your cherished memories stored in the cloud.
However, it is important to note that this feature only works if you have iCloud Photos enabled on your iPhone. If you have manually disabled iCloud Photos, the “Delete Device Copy” option may not be available.
Additionally, bear in mind that deleted photos will still be visible in your “Recently Deleted” album within the Photos app. These photos will remain in the album for 30 days before being permanently deleted. So, if you change your mind or accidentally delete a photo, you can easily recover it from the “Recently Deleted” album within the specified timeframe.
Using the Photos app’s “Delete Device Copy” feature is a convenient way to manage storage on your iPhone while preserving your precious photos in iCloud. It provides an efficient solution for freeing up space without the fear of losing your backed-up photos.
Utilize Third-Party Apps or Software
If you’re looking for more control and flexibility in removing photos from your iPhone without affecting your iCloud storage, utilizing third-party apps or software is a great option. These tools provide additional features and functionality to manage your photos effectively. Here are a few popular options:
1. Google Photos: Google Photos is a cloud-based photo storage service that offers unlimited storage for high-quality photos. You can install the app on your iPhone and enable the “Backup & Sync” feature. Once your photos are backed up, you can safely delete them from your device without worrying about losing them.
2. Dropbox: Dropbox is a popular cloud storage solution that also allows you to back up and sync your photos. By installing the Dropbox app on your iPhone and enabling the “Camera Upload” feature, your photos will automatically be uploaded to your Dropbox account. You can then delete the photos from your iPhone while still having access to them on Dropbox.
3. Microsoft OneDrive: Similar to Google Photos and Dropbox, Microsoft OneDrive offers cloud storage for your photos. By using the OneDrive app on your iPhone and enabling automatic photo backup, you can safely remove the photos from your device while keeping them securely stored in your OneDrive account.
4. iMazing: iMazing is a powerful iPhone management tool that allows you to directly access and manage your photos on your device. With iMazing, you can selectively delete photos from your iPhone without affecting your iCloud photos. It also offers features like photo transfer to your computer and batch deletion.
It’s important to note that when using third-party apps or software, ensure that you have properly backed up your photos before deleting them. Also, read and understand the terms and conditions, privacy policies, and storage limitations of the service you choose.
Utilizing third-party apps or software gives you more control over managing your photos on your iPhone while keeping your iCloud storage separate. Choose the option that best suits your needs and preferences, and enjoy a clutter-free iPhone with all your precious photos safely stored.
Transfer Photos to a Computer or External Storage Device
If you want to remove photos from your iPhone but keep them stored externally, transferring them to a computer or an external storage device is a reliable option. This method allows you to free up space on your iPhone while retaining access to your precious memories.
To transfer photos to a computer, you can connect your iPhone to the computer using a USB cable. Once connected, your computer should detect your iPhone, and you can then access the device’s storage through a file explorer. Navigate to the DCIM (Digital Camera Images) folder, where your photos are stored, and copy them to your computer’s hard drive or a preferred folder.
If you prefer to use cloud-based storage, you can upload your photos to platforms like Google Drive or Dropbox. These services offer free storage options with limited space, or you can choose to upgrade to a paid plan for more storage if needed. Simply install the respective app on your iPhone, create an account, and follow the prompts to upload your photos.
Alternatively, you can also utilize external storage devices such as USB flash drives or external hard drives. These devices offer convenient and portable options for storing your photos. Connect the storage device to your computer, create a folder for your photos, and then copy and paste the photos from your iPhone’s storage to the external device.
Remember to keep your transferred photos securely backed up and accessible in case of any data loss or device malfunctions. Regularly check and update your backup to ensure your cherished memories are safe and easily retrievable.
Conclusion
In conclusion, removing photos from your iPhone but not iCloud is a simple and straightforward process. By following the steps outlined in this article, you can free up valuable storage space on your device without worry about losing your precious memories stored in iCloud. Remember to use the “Optimize iPhone Storage” feature to ensure that your iCloud Photo Library is efficiently managing your photo storage. Additionally, utilizing third-party cloud storage options like Google Photos or Dropbox can also provide you with extra flexibility when it comes to managing your photos. With these techniques, you can seamlessly manage your photos between your iPhone and iCloud, allowing you to enjoy a clutter-free device and peace of mind knowing that your memories are safely stored in the cloud.
FAQs
Here are some frequently asked questions about removing photos from the iPhone but not iCloud:
Q: Can I delete photos from my iPhone without deleting them from iCloud?
A: Yes, it is possible to remove photos from your iPhone without deleting them from iCloud. By disabling the iCloud Photo Library feature on your iPhone, you can manage your device’s storage while keeping your photos stored safely in iCloud.
Q: How do I delete photos from my iPhone but not iCloud?
A: To delete photos from your iPhone without deleting them from iCloud, you can follow these steps:
- Open the Photos app on your iPhone.
- Select the photo(s) you want to remove.
- Tap the trash can icon to delete the selected photo(s).
- Confirm the deletion by tapping “Delete [number] Photos”.
By doing this, the photos will be removed from your iPhone but will remain in your iCloud Photo Library.
Q: Will deleting photos from my iPhone affect the photos stored on iCloud?
A: No, deleting photos from your iPhone will not affect the photos stored on iCloud if you have iCloud Photo Library enabled. The photos will still be accessible on other devices connected to your iCloud account.
Q: Can I temporarily remove photos from my iPhone without deleting them from iCloud?
A: Yes, you can temporarily remove photos from your iPhone without deleting them from iCloud by using the “Offload Unused Apps” feature. This feature allows you to free up space on your device by removing unused apps but keeps the app data, including photos, intact in iCloud. To enable this feature, go to Settings > General > iPhone Storage and tap on “Offload Unused Apps”.
Q: How can I delete photos from my iPhone permanently?
A: If you want to permanently delete photos from your iPhone, you can follow these steps:
- Open the Photos app on your iPhone.
- Select the photo(s) you want to delete permanently.
- Tap the trash can icon to delete the selected photo(s).
- Open the Albums tab in the Photos app.
- Scroll down and select the “Recently Deleted” album.
- Tap “Select” in the top right corner.
- Select the photo(s) you want to permanently delete.
- Tap “Delete [number] Photos” to remove the photos permanently.
This will ensure that the photos are permanently deleted from both your iPhone and iCloud storage.