
Welcome to our comprehensive guide on how to delete all photos from your iPhone. As smartphones have become an integral part of our lives, capturing and storing countless photos has become second nature. But as time goes on, our photo libraries can become cluttered and overwhelming, leading to a need for a fresh start. Whether you’re looking to free up storage space, protect your privacy, or simply tidy up your photo collection, we’ve got you covered. In this article, we’ll provide you with step-by-step instructions on how to delete all photos from your iPhone, ensuring that the process is hassle-free and efficient. So, let’s dive in and get rid of those unnecessary pictures!
Inside This Article
- Step 1: Open the Photos App
- Step 2: Select All Photos
- Step 3: Delete All Photos
- Step 4: Confirm Deletion
- Additional Tips and Considerations
- Conclusion
- FAQs
Step 1: Open the Photos App
Deleting all photos from your iPhone is a simple process that starts by opening the Photos app. This app allows you to manage and organize your photo library with ease. To begin the deletion process, follow the steps below:
1. Locate the Photos app on your iPhone’s home screen. It is represented by a multicolored pinwheel icon.
2. Tap on the Photos app icon to launch it. This will take you to the main interface of the app, where you can view all the photos and videos stored on your iPhone.
3. Once the Photos app is opened, you will be presented with different options and views. By default, the app displays your photos in the “Photos” tab, which organizes them based on the date and location they were taken.
4. Feel free to explore the other tabs such as “Albums” and “For You” to familiarize yourself with the various features and options available in the app.
5. Now that you have successfully opened the Photos app, you are ready to proceed to the next step of deleting all photos from your iPhone.
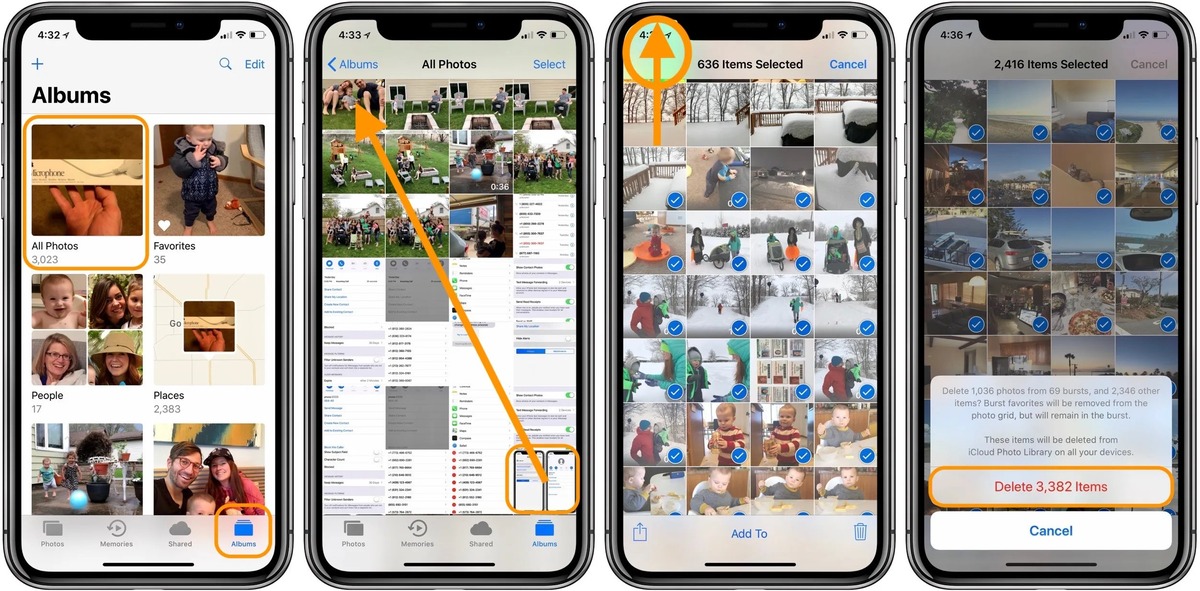
Step 2: Select All Photos
Once you have opened the Photos app on your iPhone, it’s time to select all the photos you want to delete. Follow these simple steps to make the selection process quick and hassle-free:
- Tap on the “Select” button located in the top right corner of the Photos app. It will allow you to choose multiple photos at once.
- Now, you can either swipe through your photo library to manually select the images one by one or use a shortcut to select all photos in just a few clicks.
- To select photos individually, simply tap on each picture you want to delete. You will notice a blue checkmark appearing on the selected photos.
- However, if you want to select all the photos on your iPhone, you can easily do so by tapping on the first photo and then sliding your finger to the last photo. This action will automatically select all the photos within that range.
- If you have a large number of photos and want to select them all, you can quickly achieve this by tapping and holding on any photo until a menu pops up, then selecting the “Select All” option.
- Once you have followed one of these methods, you will see that all the selected photos are marked with the blue checkmarks. Now, it’s time to move on to the next step and delete them.
By selecting all the photos you want to delete, you can simplify the process and avoid the need to individually select each photo. Whether you have a few images or a large collection, these steps will help you quickly make your selection and move on to deleting them.
Step 3: Delete All Photos
Once you have selected all the photos you want to delete, it’s time to clear up your iPhone’s precious storage space. Follow these steps to delete all photos on your iPhone:
1. With the selected photos still highlighted, tap on the trash can icon located at the bottom right corner of the screen. This will bring up the delete confirmation dialog box.
2. In the delete confirmation dialog box, you will be presented with two options: “Delete X Photos” or “Cancel”. The number of photos you have selected will be displayed in place of the ‘X’.
3. To delete all the selected photos, tap on the “Delete X Photos” option. This will permanently remove all the photos from your iPhone.
4. A progress bar will appear to indicate the deletion process. This may take a few moments depending on the number of photos you are deleting. Once the process is complete, you will be redirected to the main Photos app screen.
5. After deleting the photos, it’s a good idea to double-check your Recently Deleted album to ensure that the photos have been permanently deleted. This album acts as a recycle bin where deleted photos are stored for 30 days before being automatically removed.
Remember, once the photos are deleted from the Recently Deleted album, they cannot be recovered. So make sure you double-check before confirming the deletion.
Note: Deleting photos from your iPhone this way will remove them from all your devices if you have iCloud Photos enabled. However, if you only want to delete the photos from your iPhone and keep them backed up in iCloud, you can use the “Optimize iPhone Storage” option in your iCloud settings.
Now that you know how to delete all photos on your iPhone, you can easily clear up space and keep your device running smoothly. It’s a great way to declutter and make room for new memories!
Step 4: Confirm Deletion
After selecting all the photos you want to delete, it’s important to take one last step to ensure that you confirm the deletion. This step is crucial to prevent accidental deletion of your precious memories.
When you’re ready to proceed with deleting all the photos, tap on the “Delete” button. This button is usually located at the bottom right corner of the screen, indicated by a trash can icon.
Upon tapping the “Delete” button, a confirmation message will pop up on the screen. The message will typically ask if you are sure you want to delete all the selected photos.
Read the confirmation message carefully to ensure that you understand the consequences of deleting the photos. Consider double-checking that you have selected the correct photos before proceeding.
If you are certain that you want to delete all the selected photos, tap on the “Confirm” or “Delete All” button to begin the deletion process.
Keep in mind that once you confirm the deletion, the selected photos will be permanently removed from your iPhone. Therefore, it’s crucial to make sure you have backed up any photos you want to keep before proceeding with this step.
After confirming the deletion, the photos will be moved to the “Recently Deleted” folder in the Photos app. These photos will remain in this folder for a period of 30 days, during which you have the option to recover them if needed.
It’s important to note that if you have enabled the iCloud Photo Library feature, deleting photos from your iPhone will also delete them from all your synced devices. This includes other iPhones, iPads, Mac computers, and iCloud.com.
By following these steps and confirming the deletion, you will be able to successfully delete all your iPhone photos and free up valuable storage space on your device.
Additional Tips and Considerations
When deleting all photos from your iPhone, there are a few additional tips and considerations to keep in mind. Following these suggestions will help you ensure a smooth deleting process and avoid any unwanted consequences:
1. Backup Your Photos: Before you proceed with deleting all your iPhone photos, it’s highly recommended to create a backup. This way, you can have a copy of your valuable memories in case anything goes wrong during the deletion process. You can backup your photos using iCloud or by connecting your iPhone to a computer and transferring them to a backup folder.
2. Double-check Your Selection: Once you have selected all the photos you want to delete, take a moment to review your selection. Make sure you haven’t accidentally included any photos that you want to keep. It’s always better to be safe than sorry.
3. Consider Alternative Storage Options: If you find yourself running out of storage space on your iPhone frequently, consider utilizing cloud storage services or external storage devices. These options will allow you to store your photos without taking up valuable space on your device.
4. Recovering Deleted Photos: If you realize that you have mistakenly deleted a photo or a batch of photos that you want to keep, don’t panic. You may be able to recover them. iPhones have a “Recently Deleted” album where deleted photos are temporarily stored for up to 30 days. Simply open the Photos app, go to the Albums tab, and look for the “Recently Deleted” album. From there, you can select and recover any deleted photos.
5. Managing Photos in Batches: If you don’t want to delete all your photos at once, you have the option to manage them in smaller batches. By using the “Select” function in the Photos app, you can choose specific groups of photos to delete, making the process more manageable and less overwhelming.
6. Deleting Photos from iCloud: If you have enabled iCloud Photo Library and have it synced across your devices, deleting photos from your iPhone will also delete them from your iCloud account. This can help free up storage space across your devices, but it’s important to ensure you have a backup of your photos before proceeding.
7. Be Mindful of Shared Albums and iCloud Photo Sharing: If you have shared albums with other iCloud users or are part of an iCloud Photo Sharing group, be aware that deleting photos from your iPhone will also remove them from these shared albums. Make sure to communicate with other members if you plan to delete photos that are part of a shared album.
By following these additional tips and considerations, you can confidently delete all the photos from your iPhone, freeing up storage space and organizing your device. Just remember to back up your photos, review your selection, and be cautious with shared albums and iCloud storage.
Conclusion
Deleting all iPhone photos can be a simple and efficient process when you have the right knowledge and tools at your disposal. Whether you’re looking to declutter your photo library or protect your privacy by removing sensitive images, the methods discussed in this article offer viable solutions for achieving your goal.
Utilizing the built-in Photos app, you can quickly and easily delete multiple photos at once, whether it’s through selecting them individually or using the “Select All” function. Additionally, the iCloud Photo Library provides a convenient way to delete photos across multiple devices, ensuring that your photo deletion is synced across your Apple ecosystem.
For those who want a more comprehensive approach, third-party apps like Gemini Photos can help you identify and delete unwanted duplicates, similar photos, and even blurry images. With their advanced algorithms, these tools can save you valuable time and storage space.
Remember, before deleting any photos, make sure to back up important images to avoid any accidental loss. Plus, always double-check your selection before confirming the deletion, as irreversible actions can result in permanent data loss.
With these methods and precautions in mind, you can confidently streamline your photo collection, freeing up space and ensuring that your iPhone remains organized and optimized for better performance.
FAQs
1. Can I delete all my iPhone photos at once?
Yes, you can delete all your iPhone photos at once. There are several methods you can use to accomplish this, including using the Photos app, iTunes, or iCloud. We will walk you through step-by-step instructions for each method in this article.
2. Will deleting all my iPhone photos delete them from iCloud as well?
If you have iCloud Photos enabled on your iPhone, deleting photos from your iPhone will also delete them from iCloud. However, if you have iCloud Photos disabled and only use iCloud for backup purposes, deleting photos from your iPhone will not remove them from iCloud. It’s essential to understand your iCloud settings before proceeding with deleting photos.
3. Is there a way to recover my deleted iPhone photos?
Yes, there are options available to recover deleted iPhone photos. If you have recently deleted photos from your iPhone, you can check the “Recently Deleted” album in the Photos app. Deleted photos are stored there for 30 days before being permanently erased. Additionally, if you have an iCloud or iTunes backup, you can restore your iPhone from the backup to recover the deleted photos.
4. Can I select specific photos to delete instead of deleting all of them?
Absolutely! You don’t have to delete all your iPhone photos if you only want to remove certain ones. Using the Photos app, you can select individual photos or multiple photos at once and delete them. This gives you greater control over which photos you want to keep and remove.
5. Will deleting all my iPhone photos free up storage space on my device?
Yes, deleting all your iPhone photos will free up storage space on your device. Photos and videos can take up a significant amount of space, especially if you have a large photo library. By removing all your photos, you can reclaim that storage space and use it for other apps, files, or media on your iPhone.