
Are you struggling to remove the SD card from your Android phone? Well, you’ve come to the right place! Removing an SD card from an Android phone is a straightforward process, but it can be a bit tricky if you’re not familiar with the steps involved. Whether you want to upgrade your SD card or transfer data to a different device, learning how to properly remove the SD card is essential.
In this article, we will guide you through the step-by-step process of safely removing the SD card from your Android phone. We will also cover some common questions and concerns related to SD card removal, ensuring that you have all the information you need to accomplish this task successfully.
Inside This Article
- Checking Compatibility
- Preparing For Removal – Backing up your SD card data – Unmounting the SD card safely
- Removing the SD Card
- Post-Removal Steps – Storing the SD Card Safely – Re-inserting the SIM Tray
- Conclusion
- FAQs
Checking Compatibility
Before proceeding with the removal of your SD card on an Android phone, it is important to ensure compatibility. Here are two crucial steps to check compatibility:
Checking if your phone has an SD card slot:
First, you need to determine whether your phone has an SD card slot. Most Android phones, especially those in the mid-range and high-end categories, come with an SD card slot that allows for expandable storage. To check if your phone has an SD card slot, you can refer to the user manual or visit the manufacturer’s website for specifications.
If your phone does not have an SD card slot, it means that it does not support external storage and removing an SD card is not applicable.
Verifying if your phone supports external storage:
Even if your phone has an SD card slot, it is essential to confirm whether your phone supports external storage. Some Android phones have limitations on the maximum storage capacity allowed, or they may only support specific types or versions of SD cards.
To verify external storage support, you can again refer to the user manual or online specifications provided by the manufacturer. Additionally, you can search online forums or contact the manufacturer’s customer support for further assistance.
By checking the compatibility, you ensure that your phone has an SD card slot and supports external storage, making the removal process relevant and safe.
Preparing For Removal – Backing up your SD card data – Unmounting the SD card safely
Before removing your SD card from your Android phone, it is essential to take a few preparatory steps to ensure the safety of your data and prevent any potential issues. The following steps will guide you through the process:
Backing up your SD card data:
The first step you should take before removing the SD card is backing up your data. By doing so, you will ensure that you don’t lose any important files or data during the removal process. There are several different methods you can use to back up your SD card:
- Using a file transfer app: You can download a file transfer app from the Google Play Store, such as Google Drive or Dropbox. These apps allow you to upload your SD card data to the cloud, keeping it safe and easily accessible.
- Connecting your phone to a computer: Use a USB cable to connect your Android phone to a computer. Once connected, you can simply copy and paste the files from your SD card to your computer’s hard drive or an external storage device.
- Using an SD card reader: If your computer has an SD card reader, you can remove the SD card from your phone and insert it into the card reader. This will allow you to directly transfer the data from the card to your computer.
Choose the method that is most convenient for you and back up all the files and data stored on your SD card. Remember to double-check and ensure that all your important files are successfully backed up before proceeding.
Unmounting the SD card safely:
Once you have backed up your data, it is crucial to properly unmount the SD card to avoid any potential data corruption. Here’s how to safely unmount the SD card from your Android phone:
- Open the Settings app on your phone.
- Scroll down and tap on the “Storage” or “Memory” option.
- Find the “Unmount” or “Eject” option next to the SD card storage.
- Tap on the “Unmount” or “Eject” option. A confirmation dialog may appear.
- Confirm the unmounting process. Once the process is complete, a notification will appear indicating that it is safe to remove the SD card.
It is important to note that some smartphones may have slightly different menu options or settings names. However, the overall process of unmounting the SD card should be similar.
By following these steps and ensuring that your data is backed up and the SD card is safely unmounted, you can proceed to the next phase of removing the SD card from your Android phone.
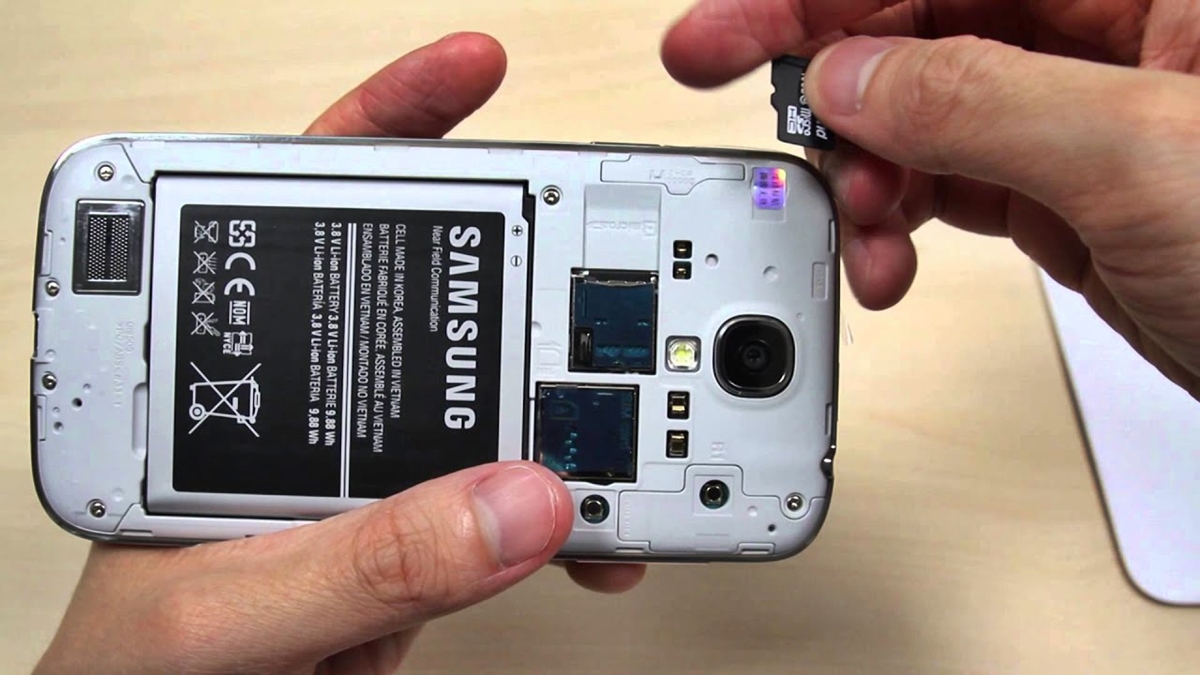
Removing the SD Card
When it comes time to remove the SD card from your Android phone, there are a couple of steps you need to follow. Let’s go through the process together.
First, you’ll need to locate the SD card slot on your Android phone. The location of the slot may vary depending on the device model. In most cases, you can find it on the side or back of your phone. Some phones may also have the SD card slot located under the battery cover.
Once you’ve identified the SD card slot, it’s time to eject the card. To do this, you can use either the SIM tray ejector tool that came with your phone or your fingers. If your phone has a removable back cover, you may need to remove it to access the SD card slot.
If you’re using the SIM tray ejector tool, you’ll notice a small pinhole next to the SD card slot. Insert the tool into the pinhole and apply gentle pressure until the SD card tray pops out. Carefully pull the tray out using your fingers or the tool.
If you don’t have the SIM tray ejector tool, don’t worry. You can still remove the SD card using your fingers. Simply press down on the SD card gently until you feel it spring out of the slot. You can then pull it out the rest of the way using your fingers.
Remember to handle the SD card with care while removing it. Avoid touching the metal contacts on the card to prevent any damage or interference with data transfer. If you notice any resistance or difficulty in removing the card, double-check that you’ve properly unmounted it in the settings menu before proceeding.
Now that you’ve successfully removed the SD card from your Android phone, you can proceed to the next step of safely storing it or transferring it to another device.
Post-Removal Steps – Storing the SD Card Safely – Re-inserting the SIM Tray
Once you have successfully removed the SD card from your Android phone, there are a couple of important post-removal steps to take. These steps will ensure that your SD card is stored safely and that your phone is ready to function properly again.
Storing the SD Card Safely:
It is crucial to store your SD card safely to prevent any damage or loss of data. Follow these guidelines to keep your SD card in optimal condition:
- Use a protective case or sleeve: Consider investing in a protective case or sleeve specifically designed to hold SD cards. This will protect it from dust, moisture, and physical damage.
- Avoid extreme temperatures: Store your SD card in a cool and dry place, away from direct sunlight or excessive heat. Extreme temperatures can cause damage to the card and potentially corrupt your data.
- Label your SD card: To easily identify your SD card, label it with a permanent marker or use a label sticker. This will help you differentiate it from other cards and prevent confusion.
- Keep it away from magnets: Magnets can negatively affect the data stored on your SD card. Keep it away from any magnetic objects, such as speakers or magnetic phone cases.
Re-inserting the SIM Tray:
If you removed the SD card by accessing the SIM tray, you will need to re-insert the SIM tray back into your Android phone. Follow these steps to ensure proper re-insertion:
- Locate the SIM tray slot: The SIM tray slot is usually located on the side or top of your Android phone, depending on the model.
- Align the SIM tray: Insert the SIM tray back into the slot, aligning it correctly. Make sure it fits securely and flush with the phone’s body.
- Push the SIM tray in: Gently push the SIM tray back into the slot until you hear a click or feel that it is securely in place.
- Power on your phone: Once the SIM tray is properly re-inserted, power on your Android phone and wait for it to boot up.
Following these steps will ensure that your SD card is safely stored and that your Android phone is ready to utilize external storage again. Take the time to handle your SD card and SIM tray with care to avoid any damage or issues.
Conclusion
Removing the SD card on your Android phone is a relatively simple process that can greatly enhance your device’s storage capabilities and allow for seamless data transfer. With just a few steps, you can safely remove the SD card from your phone and either replace it with a new one or access the stored content on a computer or other device.
Remember to always follow the proper procedures for removing the SD card to avoid any potential data loss or damage to the card or your device. By safely ejecting the card and handling it with care, you can enjoy the benefits of expanded storage and keep your Android phone running smoothly.
FAQs
Q: How do I remove the SD card from my Android phone?
A: To remove the SD card from your Android phone, follow these steps:
1. Power off your phone.
2. Locate the SD card slot, which is usually located on the side or back of the phone.
3. Gently insert the eject tool or a paperclip into the small hole next to the SD card slot.
4. Push the tool in until you hear a click or feel the card pop out slightly.
5. Carefully pull the SD card out of the slot.
It is important to power off your phone before removing the SD card to avoid any data loss or damage to the card.
Q: Can I remove the SD card while my Android phone is still powered on?
A: It is recommended to power off your Android phone before removing the SD card. This ensures that any ongoing processes or data transfers to or from the SD card are properly completed. Removing the SD card while the phone is still powered on may lead to data corruption or damage to the card.
Q: What happens if I remove the SD card without unmounting it first?
A: Removing the SD card without unmounting it first can lead to data corruption or loss. When an SD card is mounted, the operating system ensures that all read and write operations are safely completed before allowing the card to be removed. If you remove the card without unmounting it, data may not be properly written or synced, leading to potential data corruption or loss.
Q: How do I unmount the SD card on my Android phone?
A: To unmount the SD card on your Android phone, follow these steps:
1. Go to the Settings menu of your phone.
2. Find the Storage or Storage & USB option.
3. Look for the SD card section and tap on it.
4. Tap on the “Unmount” or “Eject” option to safely unmount the SD card.
Once the SD card is successfully unmounted, you can safely remove it from your phone.
Q: Can I remove the SD card while my Android phone is transferring files?
A: It is generally not recommended to remove the SD card while your Android phone is transferring files to or from it. This can interrupt the file transfer process and potentially lead to data loss or corruption. It is best to wait for the file transfer to complete before removing the SD card to ensure the data is properly synced and saved.