
Have you ever come across an image on your iPhone and wanted to find more information about it or trace its origin? Well, you’re in luck because there’s a handy feature called reverse image search that allows you to do just that. With reverse image search, you can easily find similar images, related content, and even identify objects or landmarks in the picture.
Whether you stumbled upon a captivating photograph, need to verify the authenticity of an image, or want to track down the source of a picture, reverse image search on your iPhone can be a powerful tool. In this comprehensive guide, we will walk you through the steps to perform reverse image searches on your iPhone, using both built-in features and third-party apps. So let’s dive in and unlock the potential of reverse image search on your iPhone!
Inside This Article
- Method 1: Using Safari Browser
- Method 2: Using Google Images
- Method 3: Using Third-Party Apps
- Method 4: Using Social Media Platforms
- Conclusion
- FAQs
Method 1: Using Safari Browser
When it comes to reverse image searching on your iPhone, one of the easiest and most convenient methods is to use the built-in Safari browser. Safari allows you to use popular search engines like Google to perform a reverse image search with just a few taps.
Here’s how you can use Safari to reverse image search on your iPhone:
- Open the Safari browser on your iPhone.
- Go to the search engine of your choice. For example, you can go to www.google.com.
- Tap on the search bar and you will see an option to enter text or take a photo. Tap on the camera icon.
- You will be prompted to either take a photo or choose an existing photo from your gallery. Select the image you want to reverse search.
- Safari will upload the image and perform a reverse image search using the search engine you selected.
- You will then see the search results, which may include similar images, websites featuring the image, or information related to the image.
Using Safari for reverse image searching is straightforward and doesn’t require any additional apps or tools. It’s a quick and efficient method to find more information about an image directly from your iPhone.
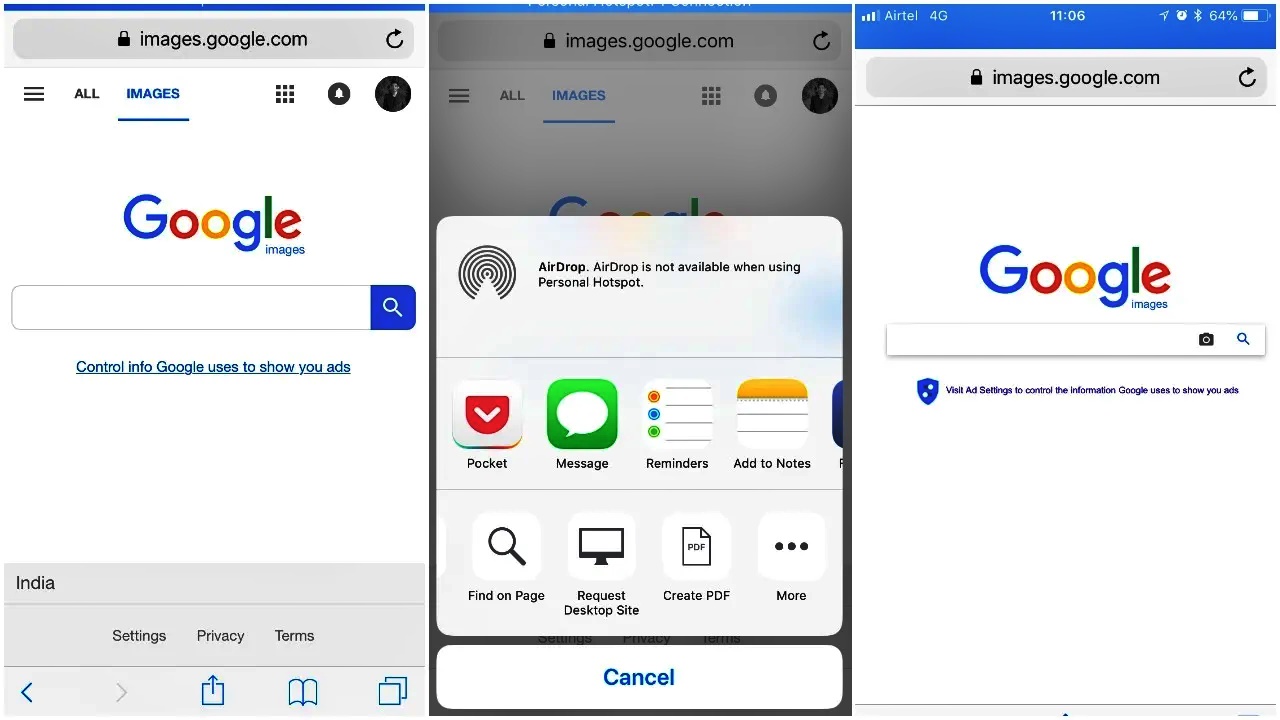
Method 2: Using Google Images
If you prefer using the Google Chrome app on your iPhone, you can easily perform a reverse image search using Google Images. Follow these simple steps to get started:
- Launch the Google Chrome app on your iPhone and navigate to the Google Images website.
- Tap on the camera icon located in the search bar. This will prompt you to either take a photo or upload an image from your photo library.
- If you want to search using an existing photo, tap on “Choose File” and select the image you want to search.
- Alternatively, you can tap on the camera icon and take a photo using your iPhone’s camera.
- Once the image is uploaded or taken, Google Images will perform a reverse image search and display relevant results.
- Browse through the search results to find information about the image, similar images, or related websites.
Using Google Images on your iPhone is a convenient way to conduct a reverse image search. Whether you want to find the source of an image, learn more about a particular object, or identify a landmark, Google Images can provide you with helpful results.
Remember, it is important to respect copyright and usage rights when using images found through a reverse image search. Always check the licensing information and obtain proper permission before using any images for commercial or personal purposes.
Method 3: Using Third-Party Apps
If you want to expand your options for reverse image searching on your iPhone, you can rely on third-party apps specifically designed for this purpose. These apps offer additional features and a more seamless experience compared to using a browser or search engine directly. Here are a few popular third-party apps that you can use:
1. TinEye
TinEye is a well-known reverse image search app available for iOS devices. It allows you to upload an image or enter the URL of an image you want to search. TinEye then scans its extensive image database to find visually similar or identical images. The app also provides information about the image’s source, if available, and where it has appeared online.
2. Veracity
Veracity is another powerful reverse image search app that you can use on your iPhone. It not only searches for similar images, but it also analyzes the metadata of the images, such as Exif data, to provide you with more detailed information. Veracity also integrates with popular social media platforms, allowing you to search for images from specific accounts or hashtags.
3. CamFind
If you prefer a more visually focused approach to reverse image searching, CamFind is an excellent option. This app allows you to take a photo or upload an image, and it uses visual recognition technology to identify objects, landmarks, and other details within the image. CamFind then provides you with relevant search results based on the visual content.
4. Google Lens
Google Lens is not specifically a reverse image search app, but it offers reverse image search functionality within its features. You can access Google Lens through the Google app or Google Photos app on your iPhone. With Google Lens, you can take a photo or select an existing image from your gallery, and it will provide you with various information related to the image, including reverse image search results.
These are just a few examples of the many third-party apps available for reverse image searching on your iPhone. Explore the App Store for more options and choose the one that best suits your needs and preferences.
Remember to install and update these apps from a trusted source to ensure their credibility and security.
Method 4: Using Social Media Platforms
Another method to perform a reverse image search on your iPhone is by using social media platforms. Some popular social media platforms like Facebook, Instagram, and Twitter offer their own image search functionalities. Here’s how you can use them:
- Facebook: Open the Facebook app on your iPhone and tap on the search bar at the top. Next, tap on the camera icon on the right side of the search bar. You can now either take a photo or choose an existing photo from your iPhone’s gallery. Once you select the photo, Facebook will search for similar images and display the results.
- Instagram: Launch the Instagram app and tap on the magnifying glass icon at the bottom. On the search page, tap on the camera icon next to the search bar. You can then either take a photo or select one from your gallery. Instagram will then show you similar images and related content based on the image you provided.
- Twitter: Open the Twitter app and tap on the search bar at the top. Next, tap on the camera icon at the bottom left corner. You can take a photo or select an existing image from your gallery. Once you choose the image, Twitter will search for similar images and show you the results.
Using social media platforms for reverse image searches can be helpful, especially if you want to identify the source of an image or find visually similar images. However, keep in mind that the search results may vary depending on the platform and the availability of indexed images.
It’s important to note that while these social media platforms have reverse image search capabilities, their algorithms and databases might not be as extensive as dedicated reverse image search engines. Therefore, if you require more accurate and comprehensive image search results, it’s recommended to use the previously mentioned methods or dedicated reverse image search apps.
In conclusion, learning how to reverse image search on iPhone can greatly enhance your online experience and help you uncover valuable information. Whether you’re trying to find the source of an image, identify a celebrity, or locate similar images, the reverse image search feature is a powerful tool at your disposal.
By following the steps outlined in this article, you can easily perform a reverse image search using popular methods such as Google Images or third-party apps. This opens up a world of possibilities for research, verification, and discovery on your iPhone.
So, the next time you come across an interesting or unfamiliar image, don’t hesitate to use the reverse image search feature on your iPhone. It’s a simple yet effective way to delve deeper into the digital realm and gain a better understanding of the visual content that surrounds us.
FAQs
-
What is reverse image search?
Reverse image search is a technique that allows you to search for images using an image rather than text. It helps you find similar images, identify the source of an image, or gather information about an image’s content. -
How do I perform a reverse image search on my iPhone?
To perform a reverse image search on your iPhone, you can use the Google Chrome app. Open the app, go to the website containing the image you want to search, tap and hold the image, and select “Search Google for This Image” from the options that appear. -
Are there any alternative apps for reverse image search on iPhone?
Yes, apart from Google Chrome, there are other apps available for reverse image search on iPhone. Some popular alternatives include the Bing Search app and the Reverse Image Search app, both of which offer similar functionality and can be downloaded from the App Store. -
Can I perform reverse image search on images in my Camera Roll?
Yes, you can perform a reverse image search on images in your Camera Roll. Simply open the Google Chrome app, tap the three-dot menu, select “Desktop Site” to get the desktop version of Google Images, tap the camera icon, and choose whether to upload an image or paste the URL of an image from your Camera Roll. -
What are the benefits of using reverse image search on iPhone?
Using reverse image search on your iPhone can have several benefits. It can help you identify the original source or owner of an image, verify the authenticity of an image, find similar images for inspiration or research purposes, and even uncover cases of image plagiarism or copyright infringement.