
Are you excited to bring the world of streaming entertainment to your television? Look no further than Chromecast! This nifty device allows you to wirelessly cast your favorite movies, TV shows, and music from your phone, tablet, or computer to your TV screen. Whether you’re a tech-savvy guru or a novice in the world of streaming, setting up Chromecast is a breeze. In this article, we will guide you through a quick and easy setup process to help you unleash the power of Chromecast with your TV. Say goodbye to tangled cables and hello to endless entertainment possibilities. So, grab your remote and get ready to get started!
Inside This Article
- Prerequisites for Setting Up Chromecast
- Step 1: Unboxing the Chromecast
- Step 2: Connecting the Chromecast to Your TV
- Step 3: Downloading and Installing the Google Home App
- Step 4: Setting Up Chromecast via the Google Home App
- Step 5: Connecting Chromecast to Wi-Fi
- Step 6: Customizing Chromecast Settings
- Step 7: Casting Content to Your TV with Chromecast
- FAQ and Troubleshooting
- Conclusion
- FAQs
Prerequisites for Setting Up Chromecast
Before you begin setting up your Chromecast, there are a few prerequisites you need to have in place. These requirements will ensure a smooth and hassle-free installation process. Here’s what you need:
- A Compatible TV: Chromecast is designed to work with most modern TVs, including those with HDMI ports. Make sure your TV has an available HDMI input that you can connect your Chromecast to. Additionally, if you have an older TV without an HDMI port, you may need an HDMI to RCA converter.
- A Stable Wi-Fi Connection: Chromecast requires internet connectivity to stream content. Ensure that you have a reliable Wi-Fi network accessible in the same room as your TV. It’s recommended to have at least a 2.4 GHz Wi-Fi network for optimal performance.
- A Smartphone, Tablet, or Computer: You will need a device to set up and control your Chromecast. This can be a smartphone, tablet, or computer that is compatible with the Google Home app, which is used to configure Chromecast.
- Chromecast Device: Of course, you will need the Chromecast device itself. Chromecast comes in different models, so make sure you have purchased the one that suits your needs. There’s the standard Chromecast, Chromecast Ultra for 4K streaming, and Chromecast with Google TV for a more enhanced streaming experience.
- A Power Source: Chromecast requires power to function. It comes with a USB cable and a power adapter. Ensure that you have an available power outlet near your TV to connect the power adapter. If your TV has a USB port, you can also use it to power your Chromecast.
Having these prerequisites in place before setting up your Chromecast will ensure a smooth and seamless installation process. Once you have everything ready, you can move on to the actual setup process, which we will guide you through in the following steps.
Step 1: Unboxing the Chromecast
Before you can start enjoying all the amazing features of Chromecast, you need to unbox it. The unboxing process is simple and straightforward. Here’s how you can do it:
1. Begin by carefully removing the Chromecast device from its packaging. Ensure that you handle it gently to avoid any damage.
2. Inside the box, you will find the Chromecast device, a USB power cable, and a power adapter. Take these out and set them aside.
3. Depending on the model you have, you might also find an HDMI extender in the box. This can be used if you have trouble fitting the Chromecast into the HDMI port on your TV.
4. Take a moment to admire the sleek and compact design of the Chromecast. Its minimalistic style allows it to seamlessly blend into any home entertainment setup.
5. Now, carefully plug one end of the USB power cable into the Chromecast device and the other end into the power adapter or directly into a USB port on your TV. This will provide the necessary power to the device.
6. If you have an HDMI extender, you can connect it to the Chromecast to make it easier to fit into your TV’s HDMI port. Plug the Chromecast into the HDMI port on the extender, and then connect the extender to your TV’s HDMI port.
7. Congratulations! You have successfully unboxed your Chromecast. Now you can move on to the next step, which is connecting it to your TV.
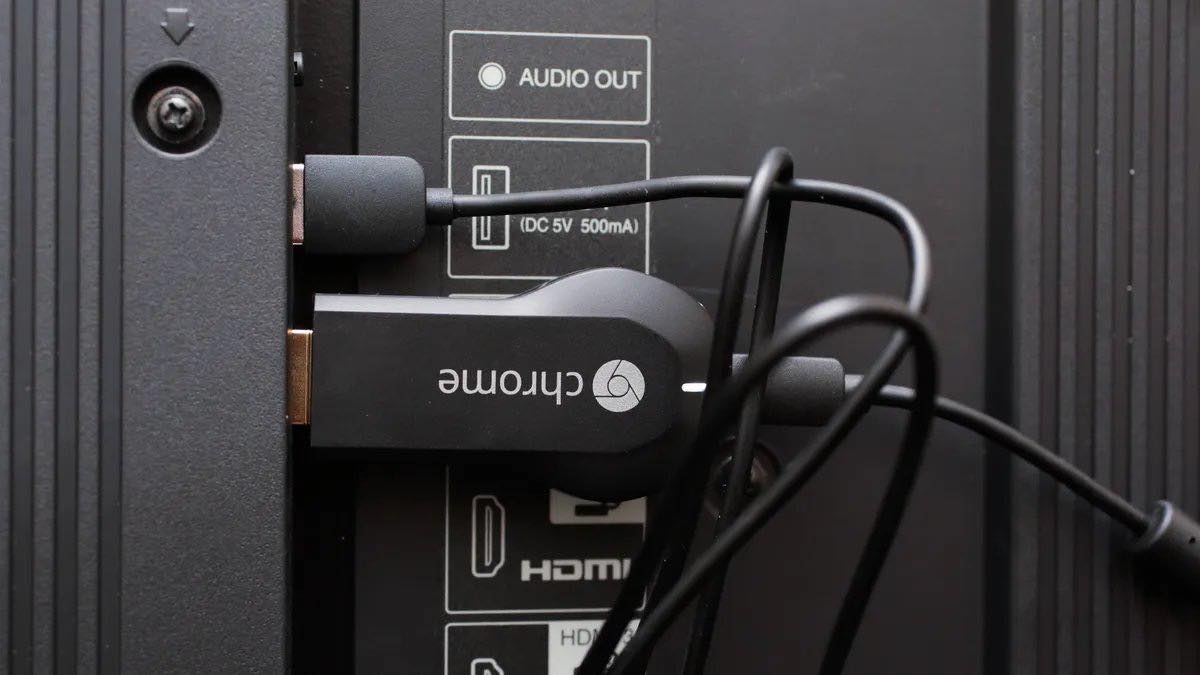
Step 2: Connecting the Chromecast to Your TV
Once you have unboxed your Chromecast, it’s time to connect it to your TV. Follow these simple steps to get started:
1. Begin by identifying an available HDMI port on your TV. The Chromecast device plugs directly into this port.
2. Insert one end of the Chromecast’s HDMI cable into the HDMI port on your TV and the other end into the Chromecast device.
3. Next, use the provided power cable and connect one end to the Chromecast and the other end to a power outlet.
4. If your TV supports USB ports, you can alternatively use the USB cable included with the Chromecast to power the device by plugging it into a USB port on your TV.
5. Once the Chromecast is connected to both the HDMI port and power source, switch on your TV and select the corresponding HDMI input.
6. You will now see the Chromecast setup screen displayed on your TV. The screen will guide you through the remaining steps to complete the setup process.
7. Follow the on-screen instructions, such as selecting your preferred language and connecting the Chromecast to your Wi-Fi network.
8. Once you have completed the setup process, your Chromecast is ready to use. You can cast content from your smartphone, tablet, or computer directly to your TV.
It’s important to note that you may need to switch the input source on your TV remote to the HDMI input where the Chromecast is connected. This will ensure you can view the content being cast to your TV.
Enjoy streaming your favorite shows, movies, and videos on the big screen with your newly connected Chromecast!
Step 3: Downloading and Installing the Google Home App
Once you have unboxed and connected your Chromecast to your TV, the next step is to download and install the Google Home app. This app is essential for setting up and managing your Chromecast device. Here’s how you can download and install it:
1. Open the app store on your mobile device. The Google Home app is available for both Android and iOS users, so make sure to search for it in the respective app stores.
2. Once you have found the Google Home app, tap on the “Download” or “Get” button to initiate the download process. The app is free to download and won’t take up much space on your device.
3. Wait for the app to finish downloading and then tap on the “Install” button. The installation process may take a few moments, depending on your device’s performance.
4. Once the app is installed, locate the Google Home app icon on your home screen or app drawer and tap on it to launch the app. If prompted, grant the necessary permissions for the app to function properly.
5. After opening the app, you will be prompted to sign in to your Google account. If you already have a Google account, enter your credentials and sign in. If not, you can create a new account by tapping on the “Create account” option.
6. Once you have successfully signed in, the app will search for any Chromecast devices nearby. Make sure your Chromecast is powered on and connected to the same Wi-Fi network as your mobile device. Once the app detects your Chromecast, it will prompt you to set it up.
7. Follow the on-screen instructions in the Google Home app to complete the setup process for your Chromecast. This may include connecting your Chromecast to your Wi-Fi network, naming your device, and customizing preferences.
8. Congratulations! You have now downloaded and installed the Google Home app on your mobile device and are ready to proceed with the setup of your Chromecast.
Step 4: Setting Up Chromecast via the Google Home App
Setting up Chromecast via the Google Home app is a straightforward process that allows you to customize your Chromecast settings and connect it to your Wi-Fi network. Follow these simple steps to get started:
1. After downloading and installing the Google Home app on your mobile device, open the app and sign in with your Google account.
2. Ensure that your Chromecast device is connected to the same Wi-Fi network as your mobile device. This is crucial for the setup process.
3. On the Home screen of the Google Home app, tap on the “+” icon located at the top-left corner to add a new device.
4. In the “Add and set up devices” section, tap on “Set up device” and then select “Set up new devices” from the options.
5. The app will search for Chromecast devices on your network. When your Chromecast is detected, tap on it to proceed with the setup.
6. A code will be displayed on your TV screen and in the Google Home app. Verify that the codes match and tap on “Yes” to continue.
7. Next, you will be prompted to choose a location for your Chromecast device. Select the room where your Chromecast is placed or choose “Custom” to provide a unique name for your device.
8. The app will then ask you to connect your Chromecast to your Wi-Fi network. Select your Wi-Fi network from the list and enter the password when prompted. Wait for the connection to be established.
9. Once the connection is established, you can choose to enable Guest Mode, which allows guests to cast to your Chromecast without being on the same Wi-Fi network. Alternatively, you can skip this step by tapping on “Skip”.
10. Finally, you will be prompted to link your Chromecast with your Google account. This step is optional but allows you to access personalized recommendations and content on your Chromecast. Follow the on-screen instructions to complete the setup process.
That’s it! You have successfully set up your Chromecast via the Google Home app. Now you can start casting your favorite content to your TV with ease.
Step 5: Connecting Chromecast to Wi-Fi
After unboxing your Chromecast and setting up the physical connection with your TV, the next step is to connect it to your Wi-Fi network. This is an essential step as it allows your Chromecast to access the internet and stream content to your TV.
Follow these simple steps to connect your Chromecast to Wi-Fi:
- Launch the Google Home App: Open the Google Home app on your mobile device or tablet. If you haven’t installed it yet, make sure to download it from the App Store or Google Play Store.
- Select Your Chromecast Device: From the list of available devices, tap on your Chromecast device to start the setup process.
- Tap on ‘Set Up’ > ‘Continue’ > ‘Continue’ > ‘Yes’: Follow the on-screen instructions to proceed with the setup.
- Select Your Wi-Fi Network: On the next screen, you will see a list of available Wi-Fi networks. Tap on your network name to select it.
- Enter Your Wi-Fi Password: If your Wi-Fi network is password-protected, you will be prompted to enter the password. Make sure to enter it correctly.
- Wait for Connection: Once you enter the password, your Chromecast will attempt to connect to the Wi-Fi network. This process may take a few moments.
- Confirm Connection: Once the connection is established, you will see a confirmation message on your screen, indicating that your Chromecast is successfully connected to Wi-Fi.
That’s it! Your Chromecast is now connected to your Wi-Fi network, and you can start enjoying streaming content on your TV.
Step 6: Customizing Chromecast Settings
Now that you have successfully set up your Chromecast and connected it to your TV, it’s time to customize its settings. Customization allows you to personalize your Chromecast experience and make the most out of its features. Here are some key settings you can tweak:
1. Display and Theme: With Chromecast, you have the option to change the screensaver images displayed when your TV is idle. You can choose from a variety of beautiful pictures or use your own photos. Additionally, you can customize the ambient mode theme to match your preferences.
2. Backdrop: Chromecast’s backdrop feature allows you to turn your TV into a digital picture frame. You can select specific albums from your Google Photos library or choose from curated artwork collections. This way, you can enjoy personalized and artistic visuals on your TV screen.
3. Guest Mode: If you frequently have guests over, enabling the guest mode can be convenient. This feature lets your friends or family members cast content to your Chromecast without needing to connect to your Wi-Fi network. It’s a great way to share entertainment with others easily.
4. Audio Settings: Chromecast also allows you to adjust audio settings to suit your preferences. Whether it’s changing the audio output, adjusting volume levels, or enabling audio equalizer, you have the flexibility to enhance your audio experience while streaming content.
5. Privacy and Notifications: It’s important to manage your privacy settings on Chromecast. You can review and control which apps have access to your Chromecast device. Additionally, you can enable or disable notifications to receive updates about new features, device updates, and more.
6. Customize Ambient Mode: Chromecast’s ambient mode can display useful information such as weather, time, and headlines on your TV when it’s in standby mode. You can choose the specific details you want to see and even add your own personal photos as a slideshow.
By customizing the settings of your Chromecast, you can truly make it your own and tailor it to your preferences. Take some time to explore the various options available and personalize your streaming experience.
Step 7: Casting Content to Your TV with Chromecast
Now that you have successfully set up your Chromecast, it’s time to start enjoying all the fantastic features it offers. One of the most exciting capabilities of Chromecast is the ability to cast content from your smartphone, tablet, or computer directly to your TV screen. Whether it’s streaming movies and TV shows, playing music, or even displaying photos, Chromecast allows you to effortlessly share your favorite content with friends and family on a larger display.
To cast content to your TV with Chromecast, follow these simple steps:
- Ensure that your Chromecast and the device you want to cast from are connected to the same Wi-Fi network.
- Open the app or website you want to cast from, such as Netflix, YouTube, Spotify, or Google Photos, on your device.
- Look for the cast icon, which is usually located in the top-right corner of the app or website. The icon resembles a rectangle with three curved lines on the bottom.
- Tap or click on the cast icon, and a list of available devices will appear on your screen.
- Select your Chromecast from the list of devices.
- The content you selected will start playing on your TV screen, while your device acts as a remote control.
It’s important to note that not all apps and websites support casting. However, the number of supported apps continues to grow, so you will have a wide range of options to choose from. Additionally, some apps may offer additional casting features, such as the ability to cast specific tabs from your computer’s web browser or mirror your entire device’s screen.
If you want to stop casting, simply locate the cast icon again and tap or click on it. Then, select “Stop casting” or “Disconnect” from the list of devices. Alternatively, you can also control playback and volume directly from the app or website you are casting from.
With Chromecast, you’ll never have to huddle around a small screen again. The ability to cast content to your TV enhances your viewing experience and brings entertainment to a whole new level. So sit back, relax, and enjoy your favorite shows, movies, and music on the big screen with Chromecast.
FAQ and Troubleshooting
In this section, we will address some frequently asked questions and common troubleshooting issues that users may encounter while setting up and using Chromecast.
1. How do I reset Chromecast to its factory settings?
If you ever need to reset your Chromecast to its original factory settings, simply locate the small reset button on the device. Using a paperclip or a similar tool, press and hold the button for about 20 seconds until the LED light on the device begins flashing. Once the light stops flashing, your Chromecast has been reset to its factory settings.
2. Why isn’t my Chromecast connecting to Wi-Fi?
If you’re having trouble connecting your Chromecast to Wi-Fi, there are a few things you can try. First, ensure that your Wi-Fi network is functioning properly and that you have entered the correct network credentials. Additionally, make sure your Chromecast is within range of your Wi-Fi router and that there are no physical obstructions blocking the signal. If the issue persists, try restarting both your Chromecast and router. If all else fails, consider contacting Chromecast support for further assistance.
3. Can I use Chromecast without a smartphone or tablet?
Yes, you can still use Chromecast without a smartphone or tablet. While it is most commonly used with these devices, you can also cast content to your TV using a computer or laptop with the Google Chrome browser installed. Simply open the browser, click on the three-dot menu in the top-right corner, select “Cast,” and choose the Chromecast device you want to use.
4. Why is my video streaming quality poor?
If you’re experiencing poor video streaming quality on your TV through Chromecast, several factors may be causing the issue. First, ensure that your internet connection is stable and have sufficient bandwidth for streaming. If your Wi-Fi signal is weak, consider moving your Chromecast closer to your router or using an Ethernet adapter for a wired connection. Additionally, check if your streaming app or source has any quality settings that you can adjust. Finally, restart your Chromecast and try playing the video again.
5. Can I use Chromecast with multiple devices simultaneously?
Yes, Chromecast supports multiple devices casting to the same TV simultaneously. However, keep in mind that some streaming apps may have limitations, and not all content providers allow simultaneous streaming on multiple devices. Check the specific app’s documentation or support website for more details.
6. My Chromecast is not being detected by the Google Home app. What should I do?
If your Chromecast is not being detected by the Google Home app, try the following troubleshooting steps:
- Ensure that your phone or tablet is connected to the same Wi-Fi network as your Chromecast.
- Check if your phone or tablet meets the minimum requirements for running the Google Home app.
- Restart your phone or tablet and launch the Google Home app again.
- If the issue persists, restart your Chromecast and try setting it up again.
- If none of the above steps work, consider performing a factory reset on your Chromecast and setting it up from scratch.
If you continue to have problems, reach out to the Chromecast support team for further assistance.
7. Can I stream local media files from my device to Chromecast?
Yes, you can stream local media files from your device to Chromecast. With the help of specific apps or by using the Google Chrome browser on your computer, you can cast videos, photos, and music stored on your device to your TV. Simply open the app or browser, select the media file you want to cast, and choose your Chromecast device as the streaming destination.
Remember that not all media file formats may be supported, and the quality of playback may depend on various factors, including network connectivity and the performance of your device.
By addressing these common questions and troubleshooting issues, you should now be equipped with the knowledge to set up and use Chromecast without any hindrances. Enjoy streaming your favorite content seamlessly to your TV with this incredible device!
In conclusion, setting up Chromecast with your TV is a quick and easy process that can greatly enhance your entertainment experience. Whether you’re streaming your favorite shows and movies or casting videos and photos from your mobile device, Chromecast allows you to enjoy content on the big screen with just a few simple steps. By following our comprehensive guide, you can have your Chromecast up and running in no time, enabling seamless streaming and casting capabilities. Say goodbye to cumbersome cables and enjoy the convenience and versatility of Chromecast. So go ahead, connect your Chromecast to your TV, and unlock a whole new world of entertainment possibilities right at your fingertips.
FAQs
Here are some frequently asked questions regarding setting up Chromecast with your TV:
- 1. Can I set up Chromecast with any TV?
- 2. Do I need a separate internet connection for Chromecast?
- 3. Can I use Chromecast with my phone or tablet?
- 4. Do I need to have a Google account to set up Chromecast?
- 5. Can I stream content from apps other than Netflix and YouTube?
Yes, Chromecast is compatible with most modern TVs. However, please ensure that your TV has an available HDMI port.
Yes, you will need an existing Wi-Fi network for the initial setup and to stream content to Chromecast. Make sure your Chromecast is within range of the Wi-Fi signal.
Yes, Chromecast works seamlessly with both Android and iOS devices. Simply download the Google Home app on your smartphone or tablet to set up and control Chromecast.
Yes, you will need a Google account to set up Chromecast. This is necessary for accessing the Google Home app and utilizing the full features of Chromecast.
Absolutely! Besides Netflix and YouTube, Chromecast supports a wide range of streaming platforms including Hulu, Disney+, Spotify, and many more. Simply open the compatible app on your device and cast it to your TV via Chromecast.