
Are you struggling with understanding text in a foreign language on your iPhone? Look no further! In this article, we will explore various methods for translating text on your iPhone, so you can easily communicate and comprehend content in different languages. With the advancements in technology, language barriers are no longer a hindrance, and your iPhone can become your personal language assistant. Whether you are traveling, communicating with friends from different parts of the world, or simply trying to decipher a foreign article, these translation methods will make your life easier. From built-in features to third-party apps, we will guide you step-by-step on how to translate text effortlessly on your iPhone. So, let’s dive in and unlock the power of translation at your fingertips!
Inside This Article
- Overview
- Step 1: Open the Translate App
- Step 2: Choose Input and Output Languages
- Step 3: Enter and Translate Text
- Step 4: Use Additional Features
- Conclusion
- FAQs
Overview
Translating text on an iPhone can be incredibly useful, whether you’re traveling in a foreign country or trying to communicate with someone who speaks a different language. Fortunately, the iPhone offers a built-in solution: the Translate app. This powerful tool allows you to easily translate text from one language to another with just a few taps.
The Translate app is available on iOS 14 or later versions, and it supports a wide range of languages including English, Spanish, French, German, Chinese, and many more. With its user-friendly interface and robust features, it’s an indispensable tool for international travelers, language enthusiasts, and anyone in need of quick and accurate translations.
In this article, we will guide you through the process of translating text on your iPhone using the Translate app. We will cover how to open the app, choose input and output languages, enter and translate text, and explore additional features that make the Translate app even more versatile and convenient.
Step 1: Open the Translate App
Translating text on your iPhone has never been easier with the Translate app. Whether you’re trying to communicate with someone in a different language or simply want to understand a piece of foreign text, this app has got you covered.
To start, locate the Translate app on your iPhone. It usually comes pre-installed with the latest iOS updates, eliminating the need for any additional downloads. If you can’t find the app on your home screen, try swiping down from the middle of the screen and using the search function to locate it.
Once you’ve located the app, tap on its icon to open it. This will take you to the main interface of the Translate app, where you can begin the process of translating text.
The Translate app interface is user-friendly and intuitive, making it easy for anyone to navigate. Whether you’re a tech-savvy individual or a beginner, you’ll find it simple to get started.
Now that you’ve successfully opened the Translate app, it’s time to move on to the next step: choosing the input and output languages.
(6 sentences)
Step 2: Choose Input and Output Languages
Once you have opened the Translate app on your iPhone, you will need to choose the input and output languages for your translation. This step is crucial as it determines the languages you want to translate from and to.
To choose the input and output languages, you will find two drop-down menus at the top of the app interface. The first menu represents the input language, which is the language of the text you want to translate. Tap on it, and a list of supported languages will appear.
Scroll through the list and find the language you want to translate from. The languages are listed alphabetically, making it easy to find your desired language. For example, if you want to translate text from English, scroll down and tap on “English” from the list.
Once you have selected the input language, proceed to the second drop-down menu. This menu represents the output language, which is the language you want the text to be translated into. Tap on it, and a similar list of supported languages will appear.
Scroll through the list and find the language you want to translate to. Again, the languages are listed alphabetically for easy navigation. For instance, if you want to translate text into Spanish, scroll down and tap on “Spanish” from the list.
After choosing both the input and output languages, the Translate app is now ready to convert your text from one language to another.
Note: Some languages may have multiple variants or dialects available. The Translate app allows you to specify the particular variant you want to translate to or from. This ensures accurate and contextually appropriate translations.
Step 3: Enter and Translate Text
Once you have selected the input and output languages in the Translate app, it’s time to enter the text you want to translate. Follow these simple steps to get your text translated instantly:
1. Tap on the text input field located at the top of the screen. This will bring up the keyboard.
2. Use the keyboard to enter the text that you want to translate. You can either type it manually or use the voice-to-text feature for hands-free input.
3. As you enter the text, you will see it displayed in the input field. Make sure to double-check for any errors or typos before proceeding.
4. Once you have entered the text, the Translate app will automatically detect the input language. However, if it fails to recognize the correct language, you can manually select it from the list of available options.
5. After inputting the text and selecting the language, the app will immediately begin the translation process. You will see the translated text appear in the output field below.
6. If you want to make any changes to the translated text, you can edit it directly in the output field. The Translate app allows you to make modifications before sharing or copying the translated text.
7. To translate more text, simply repeat the process by tapping on the input field again and entering the new text.
With these easy steps, you’ll be able to enter and translate text quickly and effortlessly using the Translate app on your iPhone.
Step 4: Use Additional Features
Along with the basic text translation feature, the Translate app on your iPhone offers a few additional features to enhance your translation experience. These features can help you communicate more effectively and easily when dealing with language barriers. Let’s take a look at some of the useful additional features:
1. Conversation Mode: One of the standout features of the Translate app is its Conversation Mode. This mode allows you to have seamless real-time conversations with someone who speaks a different language. You can simply tap the microphone icon and start speaking in your language, and the app will translate your words into the selected output language. The other person can respond in their language, and the app will translate their response back to you in your language. It makes having conversations across language barriers incredibly convenient!
2. Favorites and History: The Translate app allows you to add frequently used translations to your Favorites list for quick access. This feature comes in handy when you need to refer to specific translations regularly. Additionally, the app keeps a history of your recent translations, allowing you to easily access and review them. You can find your Favorites and History by tapping the star icon at the bottom of the app interface.
3. Text to Speech: Sometimes, it’s not enough to just see the translated text; you may also need to hear how the words are pronounced. The Translate app offers a built-in Text to Speech feature that lets you listen to the translated text being spoken aloud. This can be especially helpful for learning correct pronunciation or when you’re trying to communicate with someone who is visually impaired.
4. Auto-Detection: If you’re not sure which language you’re trying to translate, the Translate app can automatically detect the source language for you. This feature is useful when you come across text in an unfamiliar language and you’re not sure how to identify it. Simply tap the “Detect Language” button and the app will do the rest.
With these additional features, the Translate app on your iPhone becomes a powerful tool for overcoming language barriers. Whether you’re traveling to a foreign country or communicating with someone from another language background, the app provides you with the necessary tools to bridge the gap and facilitate understanding.
Conclusion
In conclusion, the iPhone offers a convenient and efficient way to translate text whenever you need it. With the built-in translation features and the availability of third-party apps, you can easily overcome language barriers and communicate effectively with people from different parts of the world. Whether you’re traveling, learning a new language, or simply need to understand foreign text, the translation capabilities of the iPhone are invaluable.
By following the steps outlined in this article, you can easily translate text on your iPhone using various methods. From using the built-in translation options in apps like Safari and Messages, to utilizing third-party translation apps, you have a range of choices to suit your needs.
So next time you find yourself puzzling over a foreign phrase or struggling to understand a piece of text, remember that your iPhone can be your trusty language companion. Just a few taps, and those language barriers will be broken down, opening up a world of communication possibilities.
FAQs
1. Can I translate text on my iPhone without using any third-party apps?
Yes, you can translate text on your iPhone without using any third-party apps. iOS devices come with a built-in translation feature called “Translate” that allows you to translate text between different languages. It offers support for various languages, and you can easily access it from the App Library or add it to your home screen for quicker access.
2. How do I use the built-in Translate feature on my iPhone?
To use the built-in Translate feature on your iPhone:
- Open the Translate app or add it to your home screen for quick access.
- Select the languages you want to translate between.
- Enter or paste the text you want to translate into the provided text field.
- Tap the “Translate” button to get the translated text.
You can also use the conversation mode for real-time translation during a conversation.
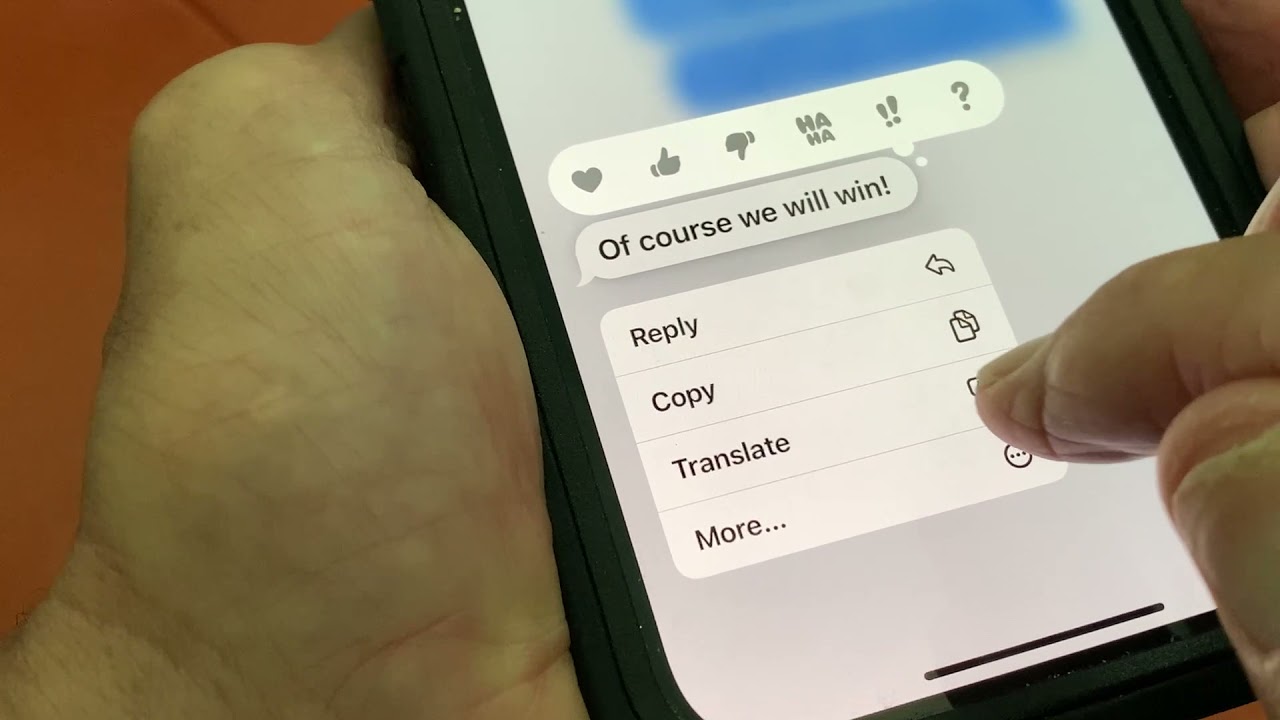
3. Can I translate text in images using my iPhone?
Yes, you can translate text in images using your iPhone. The Translate app has a built-in feature called “Live Text” that can recognize and extract text from images. Simply take a photo or import an image containing the text you want to translate, and the app will automatically detect the text and provide you with the translation.
4. Are there any offline translation options available on the iPhone?
Yes, the Translate app on your iPhone offers offline translation capabilities. You can download specific language packs for offline use, allowing you to translate text even when you don’t have an internet connection. This is particularly useful when traveling to areas with limited or no internet access.
5. Can I save and access my translation history on my iPhone?
Yes, the Translate app on your iPhone allows you to save and access your translation history. It automatically keeps track of all the translations you make, making it easy for you to refer back to them later. You can find your translation history by tapping on the “History” tab within the Translate app.