
In this digital age, smartphones have become an integral part of our lives. One such popular device is the iPhone 13, known for its sleek design, advanced features, and vibrant display. However, some users might find the auto rotate feature on the iPhone 13 a bit bothersome. Whether you’re reading a long article, browsing through photos, or playing a game, the screen constantly flipping between portrait and landscape mode can be frustrating. Fortunately, there is a way to turn off auto rotate on the iPhone 13 and enjoy a more stable viewing experience. In this article, we will guide you through the simple steps to disable auto rotate on your iPhone 13, allowing you to lock the screen orientation to your preferred mode.
Inside This Article
- Method 1: Using the Control Center
- Method 2: Accessing the Settings App
- Method 3: Using the Side Button Shortcut
- Method 4: Disabling Auto Rotate within Apps
- Conclusion
- FAQs
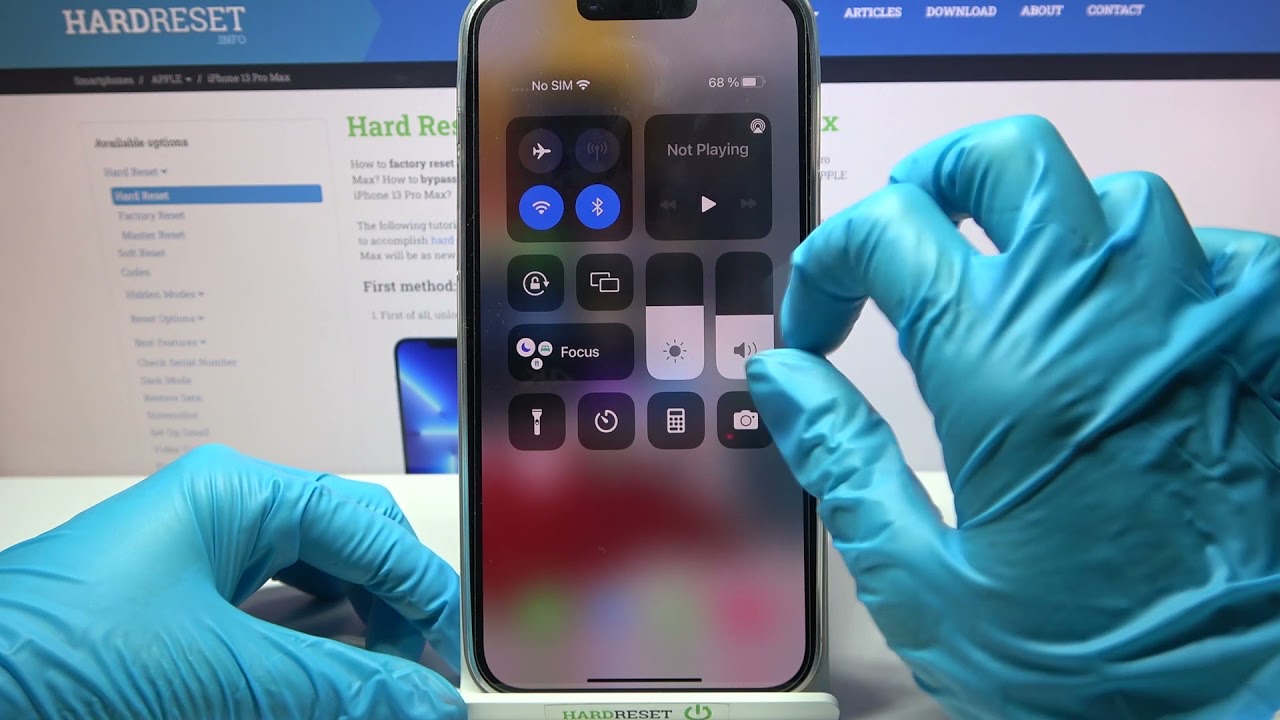
Method 1: Using the Control Center
If you’re an iPhone user and want to temporarily disable the auto rotate feature, you’re in luck. Apple provides a convenient way to do this right from the Control Center. The Control Center is a set of quick access controls that can be accessed by swiping up or down on the home screen, depending on the iPhone model you have. Here’s how you can turn off auto rotate using the Control Center:
1. Begin by unlocking your iPhone and navigating to the home screen.
2. Swipe up from the bottom edge of the screen (on models without a home button) or swipe down from the top-right corner of the screen (on models with a home button) to access the Control Center.
3. Within the Control Center, you will see a range of different control options. Look for the icon that resembles a padlock with an arrow around it. This is the orientation lock button.
4. Tap on the orientation lock button to enable it. The button will turn white or gray, indicating that auto rotate has been turned off.
5. To turn auto rotate back on, simply tap the orientation lock button again. The button will return to its original color, indicating that auto rotate is now enabled.
That’s it! You have successfully used the Control Center to turn off auto rotate on your iPhone. This method provides a quick and easy way to control the screen orientation without having to dig through the settings app.
Method 2: Accessing the Settings App
If you prefer to customize your iPhone 13’s auto rotate settings through the device’s native Settings app, you’re in luck! This method allows for more granular control over the auto rotate feature, giving you the ability to toggle it on or off with just a few taps.
To access the Settings app, start by locating the app icon on your iPhone’s home screen. It resembles a gear wheel and is usually found in the main folder labeled “Utilities.”
Once you have located the Settings app, tap on it to open the application. You will be greeted with various categories and options to configure your iPhone’s settings according to your preferences.
Navigate through the different sections until you find the “Display & Brightness” option. It is usually listed near the top, but you can also use the search feature within the Settings app to quickly find it.
Tap on “Display & Brightness” to access the display settings. Within this section, you will find the controls for adjusting the brightness, text size, and other display-related options.
Scroll down the page until you come across the “Auto Rotate” toggle switch. By default, it is enabled, indicated by a green color next to the toggle. Tap on the switch to turn off the auto rotate feature.
Afterwards, exit the Settings app by pressing the home button or swiping up from the bottom on devices without a physical home button like the iPhone 13. Your auto rotate settings will now be adjusted based on your preferences.
If you ever wish to re-enable the auto rotate feature, simply follow the same steps and toggle the switch back to the enabled position.
This method provides a straightforward way to access the auto rotate feature through the Settings app, allowing you to control it with ease based on your needs.
Method 3: Using the Side Button Shortcut
Did you know that you can also turn off auto rotate on your iPhone 13 using a simple shortcut? With just a few quick taps of the side button, you can easily switch between portrait and landscape orientation. Here’s how:
1. Locate the side button on your iPhone 13. It’s typically found on the right-hand side of the device.
2. Press and hold the side button until the power menu appears on the screen. This menu typically includes options like “Slide to power off” and “Emergency SOS.”
3. Look for the “Rotation Lock” icon, which resembles a circular arrow. It’s usually located near the top of the power menu.
4. Tap on the “Rotation Lock” icon to toggle the auto rotate feature on or off. When the feature is enabled, the icon will be highlighted or have a lock symbol on it. When disabled, the icon will appear grayed out.
5. Once you have made your selection, simply exit the power menu by tapping anywhere outside of it or by pressing the home button.
That’s it! You’ve successfully used the side button shortcut to turn off auto rotate on your iPhone 13. Now, you can enjoy a more stable viewing experience without the screen constantly rotating.
Do keep in mind that this method only temporarily disables auto rotate. If you want to permanently disable the feature, you can explore the other methods mentioned in this article.
Now that you know how to use the side button shortcut, you have another handy option for controlling the screen orientation on your iPhone 13. Whether you’re reading an e-book, browsing the web, or watching videos, you can easily switch between portrait and landscape modes at your convenience.
Method 4: Disabling Auto Rotate within Apps
Auto Rotate is a convenient feature on the iPhone that automatically adjusts the screen orientation based on how you hold your device. However, there may be instances when you want to disable this feature within specific apps. Fortunately, there is a way to do that. Here’s how:
1. Open the app where you want to disable the Auto Rotate feature.
2. Once the app is open, hold your iPhone in the desired orientation.
3. Now, carefully press and hold the Side/Power button until the power off screen appears.
4. Instead of sliding the power off slider, locate and firmly press and hold the Volume Up or Down button on the opposite side of the iPhone.
5. Continue holding the Volume Up or Down button until the message “Rotate Left to Lock, Rotate Right to Unlock” appears on the top of the screen.
6. At this point, you can release the Volume Up or Down button and the screen orientation will be locked in the current position, preventing any automatic rotation.
It’s important to note that this method is app-specific and will only disable the Auto Rotate feature for the app you are currently using. Once you exit the app, the Auto Rotate feature will return to its default settings.
Disabling Auto Rotate within specific apps can be particularly useful when watching videos or using certain applications that require a specific orientation. This method gives you more control over how your iPhone’s screen behaves within these apps.
Now that you know how to disable Auto Rotate within apps, you can enjoy a more customized and controlled viewing experience on your iPhone.
Conclusion
In conclusion, the auto-rotate feature on the iPhone 13 is a convenient tool that enhances the user experience by adjusting the screen orientation based on the device’s positioning. Whether you want to disable auto-rotate temporarily for a specific task or permanently to suit your preferences, this article has provided you with easy-to-follow steps to achieve that.
By turning off auto-rotate, you have the freedom to lock the screen orientation in either portrait or landscape mode, depending on your needs. This can be particularly useful during activities such as reading, browsing, or watching videos.
Remember, if you ever wish to re-enable auto-rotate on your iPhone 13, you can always revisit the settings and toggle the feature back on. It’s all about personalizing your device to suit your preferences and optimize your mobile experience.
So, take control of your iPhone 13’s screen orientation and enjoy a more customized and efficient user experience!
FAQs
**Q: How do I turn off auto rotate on iPhone 13?**
A: To turn off auto rotate on iPhone 13, simply swipe down from the top right corner of the screen to access Control Center. Look for the lock icon with a circular arrow around it. Tap on the icon to enable or disable auto rotate.
**Q: Why would I want to turn off auto rotate on my iPhone 13?**
A: There are a few reasons why you might want to turn off auto rotate on your iPhone 13. Firstly, it can be annoying when the screen constantly switches orientation, especially when you’re lying down or using certain apps that are designed to be used in a specific orientation. Secondly, disabling auto rotate can help conserve battery life as the sensor responsible for detecting the device’s orientation consumes some power.
**Q: Can I use landscape orientation even if I have auto rotate turned off on my iPhone 13?**
A: Yes, you can still use landscape orientation even if auto rotate is turned off on your iPhone 13. By simply rotating your device to landscape mode manually, the display will adjust accordingly. Keep in mind that the landscape orientation will only be maintained until you rotate your device back to the portrait position.
**Q: Will turning off auto rotate affect other features or functionalities of my iPhone 13?**
A: No, turning off auto rotate on your iPhone 13 will not affect any other features or functionalities of your device. All other aspects of your iPhone, such as the ability to make calls, access apps, and use different settings, will remain unaffected.
**Q: Can I customize the auto rotate settings on my iPhone 13?**
A: Unfortunately, the auto rotate feature on iPhone 13 does not come with customizable settings. It is a simple toggle switch that turns the feature on or off. If you wish to enable or disable auto rotate, you can do so via the Control Center as mentioned earlier.