
Are you tired of your smartphone’s screen constantly rotating when you least expect it? Well, you’re not alone. Auto-rotate can be useful in some situations, but it can also become frustrating when you’re trying to read or watch something in a specific orientation.
Thankfully, Android devices offer a simple solution to this common issue. In this article, we will guide you step-by-step on how to turn off auto-rotate on your Android phone. Whether you want to keep your screen locked to portrait or landscape mode, we’ve got you covered. So, let’s dive in and reclaim control over your screen’s orientation!
Inside This Article
- Why Auto-Rotate On Android can be a Problem
- How to Turn Off Auto-Rotate on Android
- Method 1: Using Quick Settings
- Method 2: Using Device Settings
- Method 3: Using Rotation Control Apps
- Method 4: Using Developer Options
- Conclusion
- FAQs
Why Auto-Rotate On Android can be a Problem
Auto-rotate on Android can be both a convenience and a nuisance. While it can be helpful in certain situations, such as when you’re watching videos or exploring photos, it can also be a source of frustration. Here are some reasons why auto-rotate on Android can become problematic:
1. Disorienting user experience: Constantly switching orientations can lead to a disorienting user experience. You may find yourself having to constantly adjust your grip on your device or reposition yourself to accommodate the changing screen orientation. This can be particularly bothersome when you’re in the middle of an important task or trying to read something.
2. Battery drain: Auto-rotate relies on sensors in your device to detect the orientation of your screen. These sensors require power to function, which can contribute to battery drain. If you’re trying to preserve battery life or extend your usage time, disabling auto-rotate can be a wise choice.
3. Disturbance during gaming: When playing games on your Android device, sudden rotation changes can be disruptive. It can cause your controls or user interface to shift unexpectedly, potentially affecting your gameplay and causing frustration.
4. Inconveniences in certain apps: Some apps do not handle screen rotation well or may not offer a seamless transition between different orientations. This can result in awkward user experiences, such as overlapping text or distorted layouts. Disabling auto-rotate can help alleviate these issues.
5. Privacy concerns: Another potential concern with auto-rotate is privacy. If you’re in a public setting and your device automatically rotates while viewing sensitive information, it may expose content to prying eyes. By disabling auto-rotate, you can maintain better control over the privacy of your screen content.
Overall, while auto-rotate can be useful in certain situations, it is not without its drawbacks. Understanding the potential issues can help you decide whether to keep it enabled or turn it off on your Android device.
How to Turn Off Auto-Rotate on Android
Auto-rotate is a nifty feature that automatically adjusts the screen orientation on your Android device whenever you rotate it. While this can be handy for certain tasks like watching videos or playing games, it can also be a nuisance when you’re simply trying to read a text message or browse the web.
If you find yourself constantly battling with unwanted screen rotations, don’t worry! Turning off auto-rotate on your Android device is a straightforward process. In this article, we’ll explore several methods to help you regain control over your screen orientation.
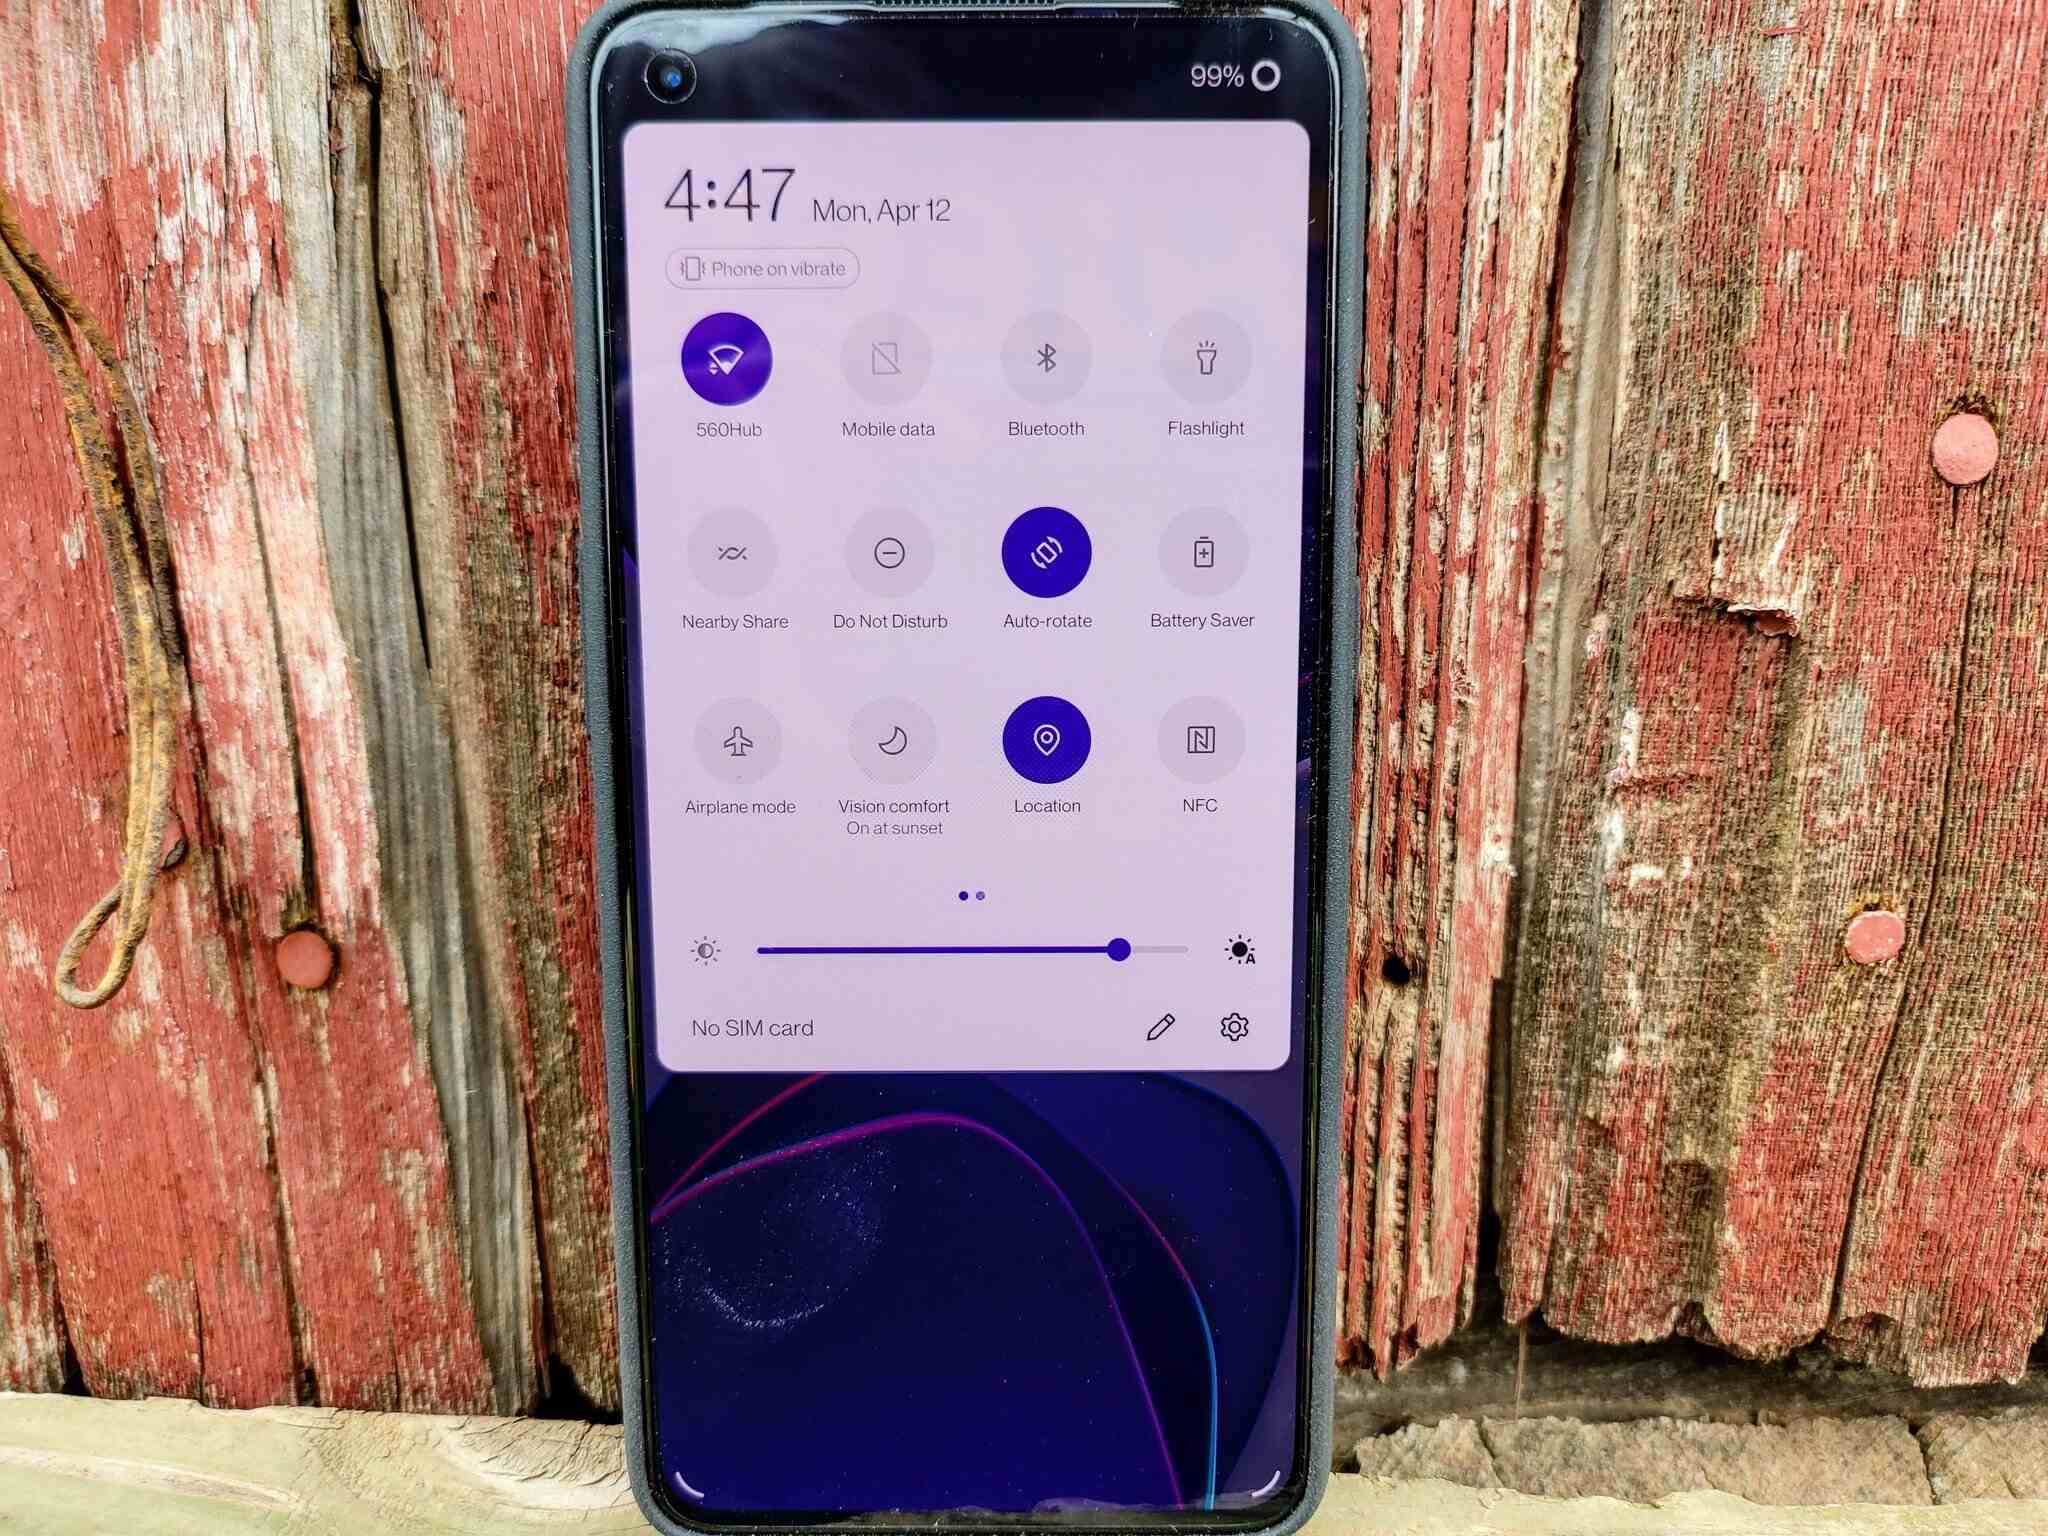
Method 1: Using Quick Settings
One of the simplest ways to turn off auto-rotate on your Android device is through the quick settings menu. Here’s how:
- Swipe down from the top of your screen to open the notification panel.
- Locate the “Auto-Rotate” icon, which typically looks like a circular arrow or a lock symbol.
- Tap on the “Auto-Rotate” icon to toggle the feature off. You’ll know it’s deactivated when the icon appears grayed out.
Method 2: Using Device Settings
If your device doesn’t have a quick settings toggle or you prefer accessing settings directly, you can turn off auto-rotate through the device settings. Here’s how:
- Open the “Settings” app on your Android device.
- Scroll down and tap on “Display” or “Display & Brightness”.
- Look for “Auto-Rotate Screen” or “Screen Rotation” within the display settings.
- Toggle the switch or checkbox next to “Auto-Rotate Screen” to turn off the feature. It may be labeled differently based on your device model or Android version.
Method 3: Using Rotation Control Apps
If you want more control over your screen orientation or need to temporarily disable auto-rotate for specific apps, you can consider using rotation control apps from the Play Store. These apps allow you to customize the screen rotation settings and even set per-app rotation preferences.
Method 4: Using Developer Options
If you’re comfortable diving into the device’s developer options, you can also disable auto-rotate from there. Keep in mind that developer options are meant for advanced users, so be cautious when making changes in this section.
- Open the “Settings” app on your Android device.
- Scroll down and tap on “About phone” or “About device”.
- Look for the “Build number” or “Software information” section.
- Tap on “Build number” or “Software version” several times until you see a notification that says you are now a developer.
- Return to the main “Settings” page and scroll down to find “Developer options”.
- Tap on “Developer options” and look for “Auto-rotate screen” or a similar option.
- Toggle the switch next to “Auto-rotate screen” to turn off the feature.
Turning off auto-rotate on your Android device can significantly improve your user experience, especially if you prefer a fixed screen orientation. By following the methods described in this article, you can regain control over your device’s screen rotation and enjoy a more seamless browsing and reading experience.
So go ahead and try these methods to put an end to those pesky screen rotations once and for all!
Method 1: Using Quick Settings
If you’re looking for a quick and convenient way to turn off auto-rotate on your Android device, the built-in Quick Settings can be your best friend. It allows you to toggle the auto-rotate feature with just a few taps, giving you full control over your screen orientation.
Here’s how you can access and use Quick Settings to disable auto-rotate:
- Swipe down from the top of your device’s screen to open the notification panel.
- Look for the Quick Settings icon, which is usually represented by a gear or settings icon. Tap on it to open the Quick Settings menu.
- Scroll through the available tiles until you find the “Auto-rotate” option. It’s usually represented by an icon depicting a phone with arrows circling around it.
- Tap on the “Auto-rotate” icon to toggle the feature off. You’ll know it’s disabled when the icon changes to a locked position or when the text “Auto-rotate” becomes grayed out.
And that’s it! You have successfully turned off auto-rotate on your Android device using Quick Settings. This method is quick, easy, and doesn’t require any additional apps or settings adjustments.
However, do keep in mind that the exact steps to access Quick Settings and the appearance of icons may vary slightly depending on your device’s manufacturer and Android version.
Method 2: Using Device Settings
If you’re not a fan of using quick settings or prefer to make changes through the device settings, you can easily turn off auto-rotate on your Android phone or tablet through the system settings. Here’s how:
1. Open the “Settings” app on your Android device. You can usually find this app in your app drawer or by swiping down from the top of the screen and tapping the gear icon.
2. Scroll down and tap on “Display” or “Display & Brightness”, depending on your Android version.
3. Look for the “Auto-rotate screen” option and toggle it off. This will disable the automatic rotation of your screen when you change the orientation of your device.
4. If desired, you can also change the screen orientation to portrait or landscape mode manually. Simply tap on “Screen rotation” or “Orientation” and select your preferred mode.
And that’s it! By following these simple steps, you can turn off auto-rotate on your Android device and customize the screen orientation to your preference.
Please note that the exact steps may vary slightly depending on your device model and Android version. If you’re having trouble finding the specific settings mentioned above, refer to your device’s user manual or search online for instructions tailored to your specific device.
Method 3: Using Rotation Control Apps
If you’re looking for a more advanced and flexible way to control the auto-rotate feature on your Android device, using rotation control apps is the way to go. These apps offer a range of options and customization settings to fine-tune the auto-rotate behavior according to your preferences. Here’s how you can use rotation control apps to turn off auto-rotate on Android:
1. Open the Google Play Store on your Android device and search for “rotation control apps”. There are several options available, such as “Rotation Control” by CrapeMyrtle, “Ultimate Rotation Control” by FaMe IT, and “Rotation Lock Adaptive” by BRAVOYS.
2. Choose the rotation control app that you prefer and tap on the “Install” button to download and install it on your device.
3. Once the app is installed, open it from your app drawer or the notification panel.
4. The rotation control app will provide you with various options to manage auto-rotate. You can choose to disable auto-rotate completely or set specific rules for certain apps or screen orientations.
5. Explore the app’s settings and customize the auto-rotate behavior according to your preferences. Some rotation control apps even offer additional features like gesture control and automatic rotation based on device orientation.
6. After configuring the settings, exit the rotation control app. The changes you made will now take effect, and auto-rotate will be turned off or customized according to your preferences.
Rotation control apps give you more control over the auto-rotate feature on your Android device, allowing you to tailor the behavior to better suit your needs. Whether you want to completely disable auto-rotate or set specific rules for certain apps, these apps provide a simple and effective solution.
Note that some rotation control apps may require additional permissions or accessibility settings to function properly. Make sure to review and grant the necessary permissions if prompted.
Method 4: Using Developer Options
If you’re familiar with the technical side of your Android device and want more control over the auto-rotate feature, you can utilize the Developer Options. Developer Options is a hidden menu that contains advanced settings and features typically intended for app developers and advanced users. To access Developer Options:
- Open the Settings app on your Android device.
- Scroll down and tap on “About phone” or “About device”.
- Locate the “Build number” or “Build version” option (this may vary depending on your device).
- Tap on the build number repeatedly (approximately 7 times) until you see a message stating that you are now a developer.
- Now, go back to the main Settings menu and you should see a new option called “Developer Options”.
Once you’ve enabled Developer Options, follow these steps to turn off auto-rotate:
- Open the Settings app and tap on “Developer Options”.
- Scroll down and locate the “Force activities to be resizable” option and toggle it off.
- Next, find the “Override force dark” option and make sure it is switched off.
- Scroll further and find the “Don’t keep activities” option. Tap on it to enable it.
- Now, go back to the main Settings menu, and the Developer Options will be automatically disabled (this is to prevent accidental changes to critical settings).
By following these steps, you have successfully turned off auto-rotate on your Android device using the Developer Options. Keep in mind that accessing and modifying the Developer Options menu can have unintended consequences if you’re not familiar with the settings. Therefore, it’s recommended that you only make changes if you are confident in what you are doing.
In conclusion, turning off auto-rotate on your Android device can be a simple and effective way to customize your user experience. Whether you want to prevent unintended screen rotations, conserve battery life, or improve privacy, disabling auto-rotate gives you more control over how you use your device. With the step-by-step methods mentioned in this article, you can easily turn off auto-rotate on your Android device and enjoy a more personalized and streamlined experience.
FAQs
1. Can I turn off auto-rotate on my Android device?
Yes, you can easily turn off auto-rotate on your Android device. Auto-rotate is a feature that automatically adjusts the screen orientation based on the device’s physical orientation. Sometimes, this feature can be disruptive or unnecessary, especially when you want to lock the screen orientation in a particular mode. In such cases, disabling auto-rotate can be quite helpful.
2. How do I disable auto-rotate on my Android phone?
To disable auto-rotate on an Android phone, you can follow these steps:
- Swipe down from the top of the screen to access the notification shade.
- Look for the ‘Auto-rotate’ or ‘Screen rotation’ icon and tap on it to enable or disable the feature. The icon typically looks like a circular arrow or a portrait/landscape orientation icon.
- Alternatively, you can go to the device’s settings by tapping on the gear-shaped icon in the notification shade, then locate and tap on ‘Display’ or ‘Display & Brightness’.
- In the display settings, look for the ‘Auto-rotate screen’ option and toggle it off to disable auto-rotate.
3. Why would I want to turn off auto-rotate on my Android device?
There are several reasons why you may consider turning off auto-rotate on your Android device. Some common reasons include:
- Preventing unintentional screen rotation when using the device in bed or while lying down.
- Locking the screen orientation to a specific mode for better reading or watching videos.
- Conserving battery life by reducing unnecessary screen rotations.
- Avoiding distractions or disruptions caused by frequent screen orientation changes.
4. Can I disable auto-rotate for specific apps only?
By default, turning off auto-rotate on your Android device will disable it for all apps and the system interface. However, there are some third-party apps available on the Google Play Store that allow you to customize auto-rotate settings for specific apps. These apps provide fine-grained control over screen orientation preferences for individual applications, giving you the flexibility to enable or disable auto-rotate on a per-app basis.
5. Will disabling auto-rotate affect other features or functionalities on my Android device?
Disabling auto-rotate will not affect other features or functionalities on your Android device. It will only disable the automatic screen rotation based on the device’s physical orientation. All other functions, such as touchscreen capabilities, app performance, camera functionality, and connectivity, will remain unaffected. You can still use your device as usual, but the screen orientation will no longer change automatically.