
In a world where digital transactions have become increasingly popular, Apple Pay Cash offers a convenient and secure way to send and receive money right from your iPhone or Apple Watch. Whether you need to split a bill with friends, pay your share of the rent, or simply reimburse someone for a favor, Apple Pay Cash makes managing your finances effortless.
With Apple Pay Cash, you can bypass the hassle of using traditional payment methods like cash or checks. The service allows you to send money to others through iMessage, making it a seamless and integrated part of your messaging experience.
In this article, we will explore the ins and outs of using Apple Pay Cash. From setting it up on your device to sending and requesting money, we’ll guide you through the entire process. So, grab your iOS device and get ready to take advantage of this convenient payment solution.
Inside This Article
- Prerequisites for Using Apple Pay Cash
- How to Set Up Apple Pay Cash
- Sending Money with Apple Pay Cash
- Receiving Money with Apple Pay Cash
- Managing Apple Pay Cash Transactions
- Additional Tips and Troubleshooting for Apple Pay Cash
- Conclusion
- FAQs
Prerequisites for Using Apple Pay Cash
Before you can start using Apple Pay Cash to send and receive money, there are a few prerequisites you need to meet. These requirements ensure that you have the necessary devices and settings to use this convenient feature seamlessly. Here are the key prerequisites to be aware of:
1. Compatible Device: First and foremost, you need to have a compatible device that supports Apple Pay Cash. This feature is available on devices running iOS 11.2 or later, including iPhone 6 or later models, iPhone SE, iPad Pro, iPad (5th generation or later), iPad Air 2, and iPad mini 3 or later.
2. iCloud Account: To use Apple Pay Cash, you must have an iCloud account. This is essential for securely storing your funds and ensuring a seamless experience across your Apple devices. If you don’t have an iCloud account, you can easily create one for free.
3. Apple ID with Two-Factor Authentication: It is necessary to have an Apple ID with two-factor authentication enabled. This provides an extra layer of security for your transactions and ensures that only you can access and authorize payments with your Apple Pay Cash account.
4. Supported Country or Region: Currently, Apple Pay Cash is available only for users in the United States. Ensure that your device is set to the appropriate country or region to access and utilize this feature.
5. Linked Debit or Credit Card: You need to have a valid debit or credit card linked to your Apple Pay Cash account. This card will be used for funding your Apple Pay Cash balance and making payments to others.
6. Internet Connection: Finally, make sure you have a stable internet connection to use Apple Pay Cash seamlessly. This is necessary for transaction processing and syncing your account across devices.
By meeting these prerequisites, you can ensure that you have everything in place to start using Apple Pay Cash. Once you fulfill these requirements, you can move on to setting up Apple Pay Cash on your device and enjoying the convenience of sending and receiving money with just a few taps.
How to Set Up Apple Pay Cash
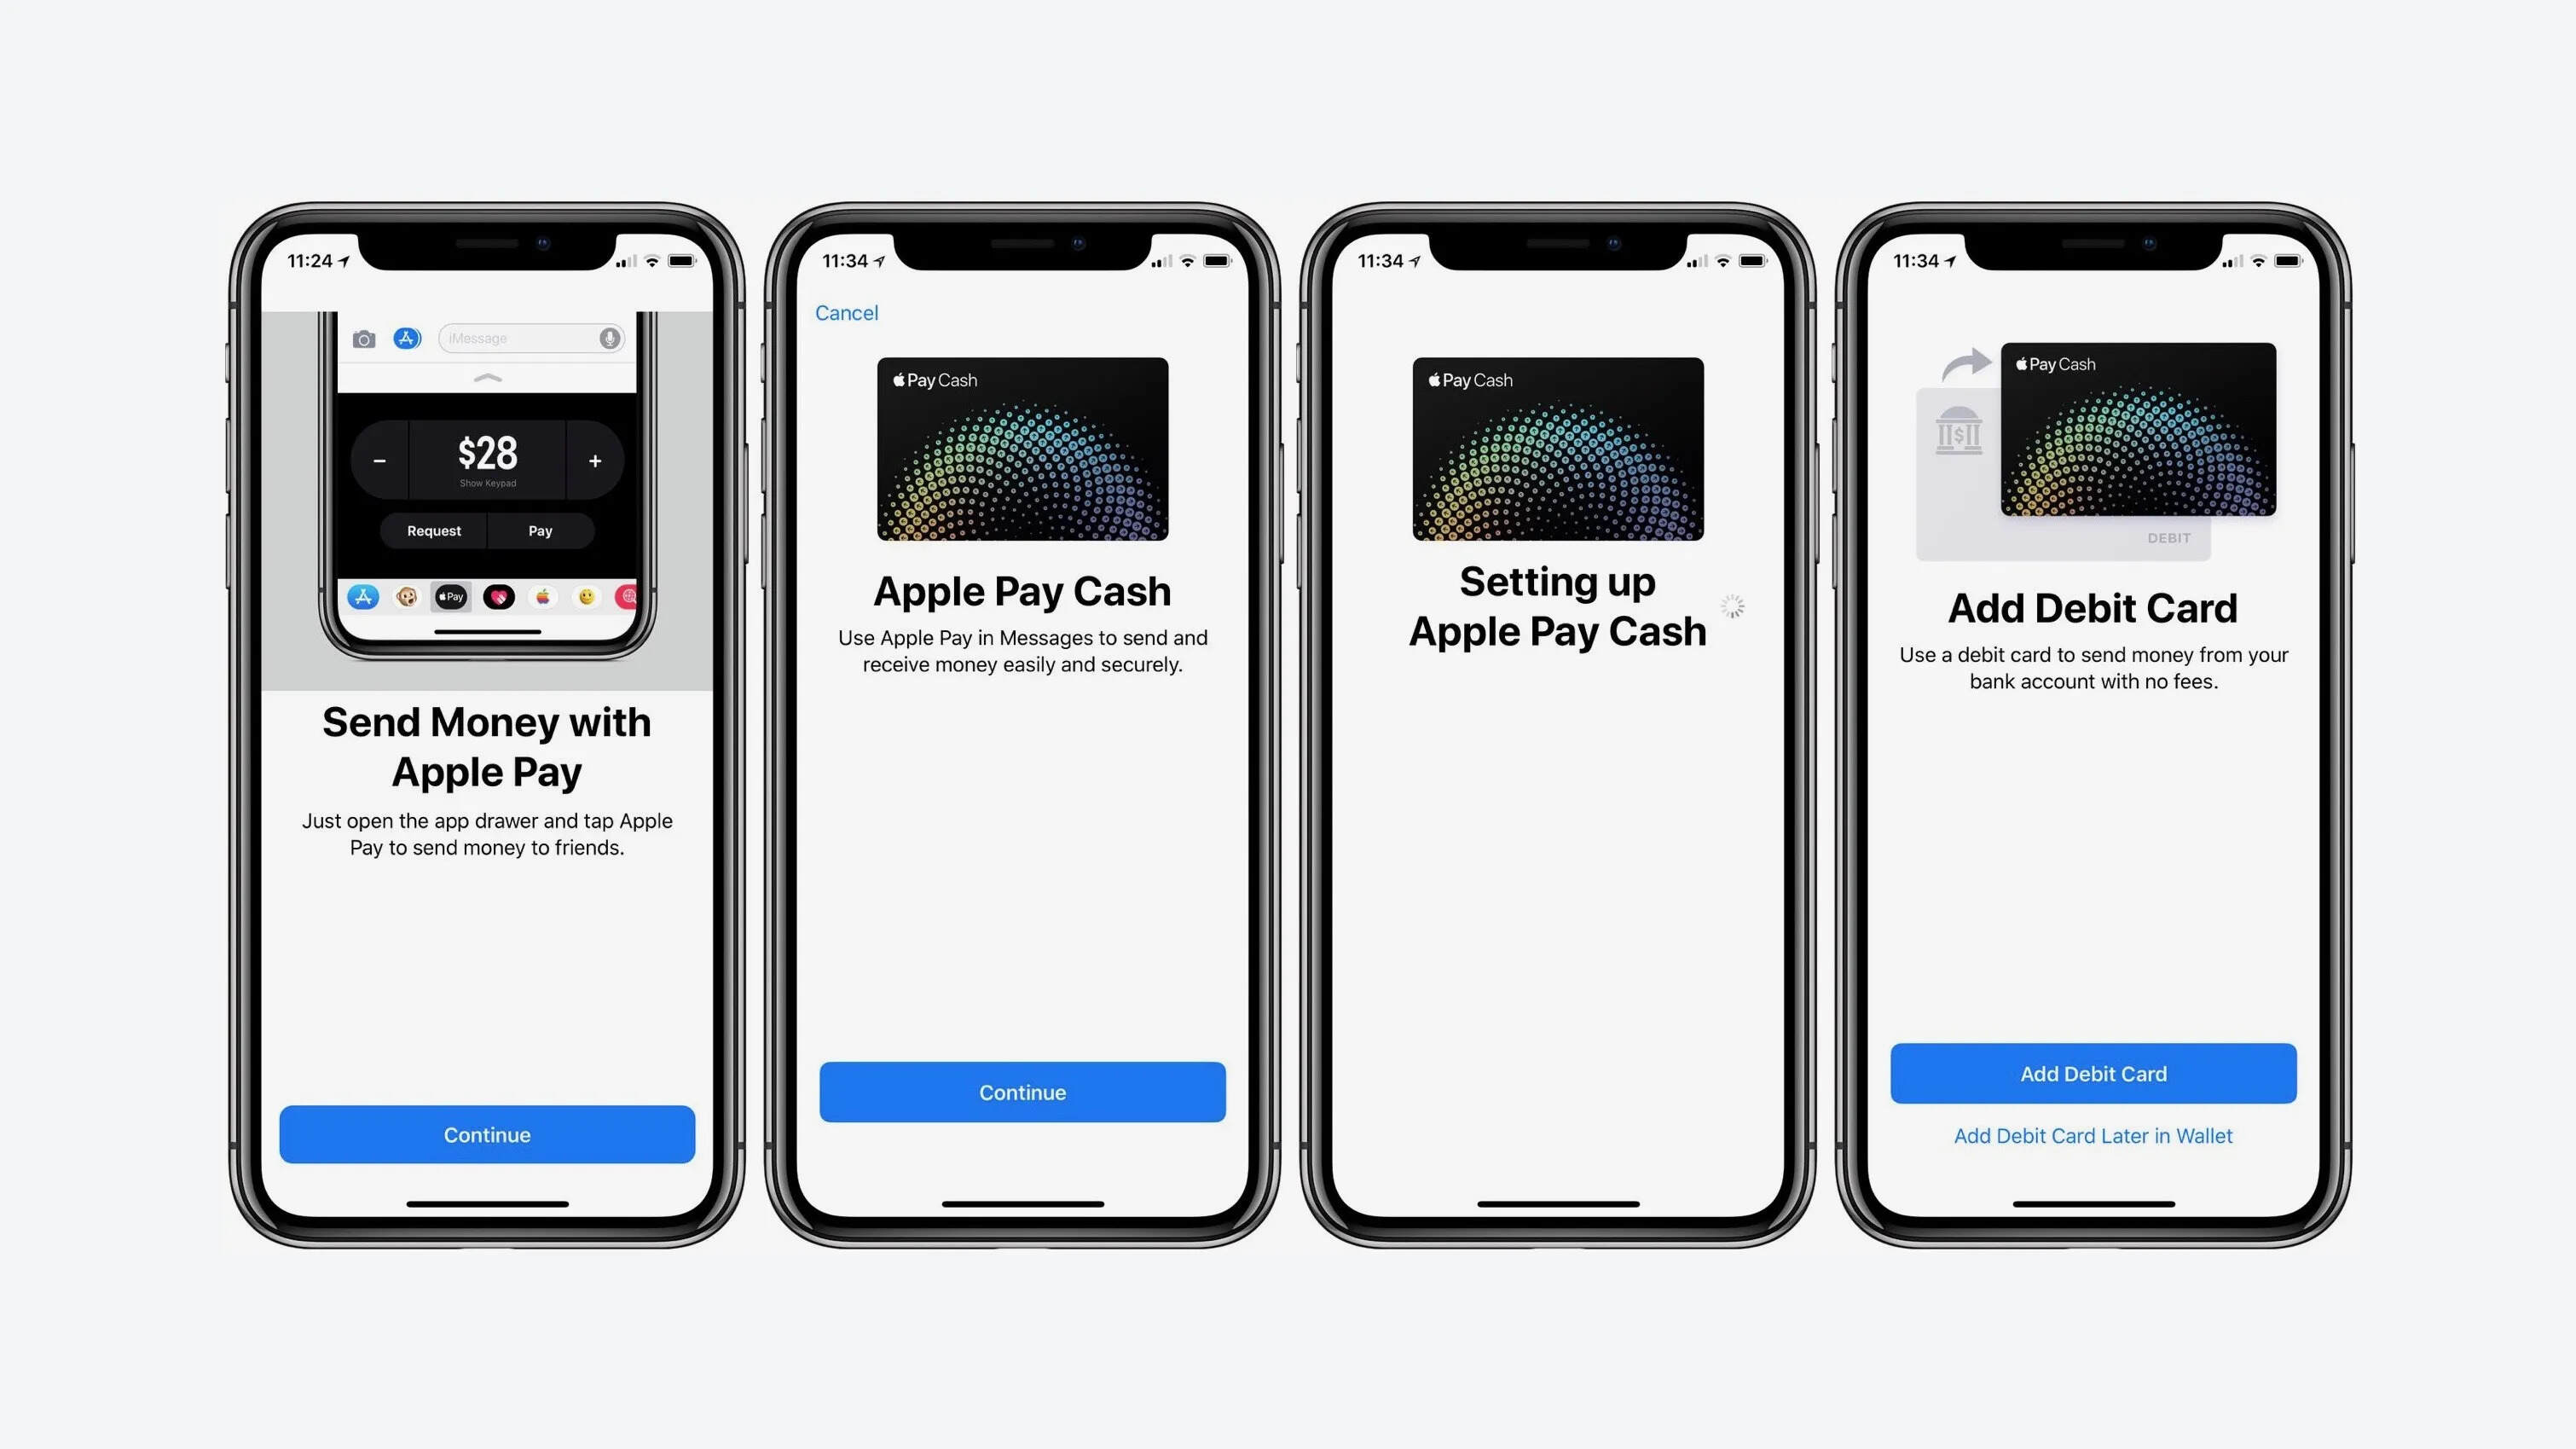
Apple Pay Cash is a convenient way to send and receive money using your iPhone or Apple Watch. Before you can start using Apple Pay Cash, you need to set it up on your device. Here’s a step-by-step guide on how to set up Apple Pay Cash:
- Open the Wallet app on your iPhone or the Apple Watch app on your Apple Watch.
- Tap on the Apple Pay Cash card under your Apple Pay cards.
- Tap on the “Set Up Apple Pay Cash” option.
- You will be asked to sign in with your Apple ID. Enter the necessary details to proceed.
- Next, you need to link a debit or credit card to your Apple Pay Cash account. Tap on the “Add Card” option.
- Follow the prompts to add your card details, including the card number, expiration date, and security code.
- You may be asked to verify your card by providing additional information or receiving a verification code.
- Once your card is added and verified, you can set your preferences for receiving and sending money. You can choose to manually accept payments or have them automatically transferred to your linked bank account.
That’s it! You have successfully set up Apple Pay Cash on your device. Now, you can easily send and receive money with just a few taps.
Sending Money with Apple Pay Cash
Sending money with Apple Pay Cash is a convenient and seamless way to transfer funds to your friends and family. Whether you want to split a bill, pay back a loan, or simply send a gift, Apple Pay Cash makes it easy to send money directly from your iPhone.
Before you start sending money with Apple Pay Cash, ensure that both you and the recipient have the following prerequisites:
- Both parties need to have compatible devices, such as an iPhone, iPad, or Apple Watch, running the latest iOS or watchOS.
- Both individuals need to have a valid Apple ID and iCloud account.
- Make sure you have added your payment card to your Apple Wallet. This can be done through the Wallet app or by going to Settings, selecting Wallet & Apple Pay, and adding your card details.
Now that your prerequisites are met, follow these simple steps to send money with Apple Pay Cash:
- Open the Messages app on your iPhone, iPad, or Apple Watch.
- Start a new conversation or select an existing conversation with the person you want to send money to.
- Tap on the “i” icon in the top-right corner of the screen.
- Select the Apple Pay button.
- Use the “+” or “-” buttons to input the amount of money you want to send.
- Verify the amount and tap “Pay” to confirm the transaction using your Touch ID or Face ID.
- A message with the transaction details will be sent to the recipient, and the money will be deducted from your Apple Pay Cash balance or your selected payment card.
It’s important to note that sending money with Apple Pay Cash is free when using a debit card, but there may be fees associated with using a credit card for the transaction. Additionally, there may be limits on the amount you can send or receive per day, so make sure to check your settings if you encounter any issues.
With Apple Pay Cash, sending money becomes fast, secure, and hassle-free. Say goodbye to the inconvenience of cash or traditional bank transfers and embrace the future of digital payments.
Receiving Money with Apple Pay Cash
Apple Pay Cash not only allows you to send money to others but also enables you to receive money from friends and family with ease. Whether you’re splitting a dinner bill, paying back a loan, or receiving a monetary gift, Apple Pay Cash makes it simple to receive funds directly into your Apple Pay balance.
To receive money using Apple Pay Cash, follow these steps:
- Make sure you have a compatible device: Before you can receive money with Apple Pay Cash, you need to ensure that you have a compatible iPhone, iPad, or Apple Watch. You can check the Apple website for a list of devices that support Apple Pay.
- Set up Apple Pay Cash: If you haven’t already done so, you’ll need to set up Apple Pay Cash by linking a debit or credit card to your Apple Pay account. This can be done through the Wallet app on your device or in the Settings app under “Wallet & Apple Pay.”
- Authorize payments: By default, Apple Pay Cash automatically accepts payments sent to you. However, for added security, you can enable the option to manually accept payments. This way, you can review each transaction before it gets added to your Apple Pay balance.
- Receive money: When someone sends you money using Apple Pay Cash, you’ll receive a notification on your device. You can tap on the notification to open the message thread, or you can access it through the Messages app.
- Confirm the transaction: Once you’ve opened the message thread, you’ll see the transaction details, including the amount of money received. To confirm the transaction and add the funds to your Apple Pay balance, simply tap on the “Accept” button.
- Use your funds: Once the money has been added to your Apple Pay balance, you can use it to make purchases at participating stores, online platforms, and within apps that accept Apple Pay. You can also transfer the funds to your linked bank account or send money to others using Apple Pay Cash.
Receiving money with Apple Pay Cash is a convenient and secure way to quickly access funds sent to you by friends and family. With just a few simple steps, you can receive money directly into your Apple Pay balance and use it for a variety of transactions. Whether you’re splitting expenses or receiving gift money, Apple Pay Cash makes the process seamless and hassle-free.
Managing Apple Pay Cash Transactions
Once you have set up Apple Pay Cash and started sending and receiving money, it’s important to know how to manage your transactions effectively. Here are some tips and techniques to help you stay organized:
1. Keep track of your transactions: Apple Pay Cash provides a detailed transaction history that allows you to view all of your past transactions. This can be accessed through the Wallet app on your iPhone or iPad. It’s a good practice to regularly review your transaction history to ensure everything is accounted for.
2. Categorize your transactions: To make it easier to track your expenses, you can categorize your Apple Pay Cash transactions. This can be done by adding a note or a category tag to each transaction. For example, you can label a transaction as “groceries,” “entertainment,” or “utilities.” This way, you can quickly identify where your money is being spent.
3. Set spending limits: If you want to control your spending, you can set up spending limits for your Apple Pay Cash account. This feature allows you to set a maximum amount that can be spent in a given time frame. Once the limit is reached, Apple Pay Cash will prevent any further transactions until the specified time frame elapses.
4. Review and dispute transactions: In case you come across any unauthorized or incorrect transactions, you have the option to review and dispute them. If you notice a transaction that you don’t recognize or believe to be fraudulent, you can contact Apple Pay Cash support to report the issue. They will assist you in resolving any disputes and ensuring the security of your account.
5. Add money to your Apple Pay Cash account: If your Apple Pay Cash balance is running low, you can easily add money to your account. You can link a debit card or a bank account to transfer funds to your Apple Pay Cash balance. This ensures that you always have funds available to send or spend through Apple Pay Cash.
6. Update your payment preferences: Apple Pay Cash allows you to choose your preferred payment source for transactions. You can select a default payment method, such as your Apple Cash balance, a debit card, or a credit card. This allows for flexibility in managing your transactions and ensuring that the appropriate payment method is used for each transaction.
7. Stay vigilant with security: To protect your Apple Pay Cash account, it’s essential to take security measures. Enable two-factor authentication for your Apple ID, use a strong and unique password, and avoid sharing your account or transaction details with anyone. Regularly check for any suspicious activity and report it immediately to Apple Pay Cash support.
By following these steps and staying proactive in managing your Apple Pay Cash transactions, you can ensure a secure and efficient money transfer experience through Apple Pay Cash.
Additional Tips and Troubleshooting for Apple Pay Cash
Using Apple Pay Cash to send and receive money is a convenient and efficient way to handle your transactions. However, like any digital payment system, there may be instances where you encounter issues or need some additional guidance. Here are some tips and troubleshooting steps to help you navigate Apple Pay Cash:
- Ensure you have a compatible device: Before using Apple Pay Cash, make sure your device is eligible. Apple Pay Cash is available on devices running iOS 11.2 or later.
- Verify your payment information: Double-check that your payment information, such as credit or debit card details, are up to date in your Apple ID settings. This ensures smooth transactions when using Apple Pay Cash.
- Check your network connection: Apple Pay Cash requires a stable internet connection. If you’re experiencing issues, ensure that you’re connected to a reliable Wi-Fi network or have a stable cellular data connection.
- Update to the latest software: Keeping your device’s software up to date is crucial for optimal performance. Check for any available system updates and install them to ensure you have the latest version of Apple Pay Cash.
- Verify recipient information: When sending money, double-check the recipient’s details, such as their phone number or email address, to ensure the transfer goes to the intended recipient. Mistakenly sending money to the wrong person can be challenging to rectify.
- Review transaction history: Regularly review your Apple Pay Cash transaction history to track your expenses and ensure accuracy. This helps you keep a record of your transfers and ensures that there are no unauthorized transactions.
- Resolve transaction issues: If you encounter any issues with a specific transaction, such as a failed transfer or incorrect amount, you can contact Apple Support for assistance. They can help you troubleshoot and resolve any problems you may experience.
- Be cautious of scams: As with any online payment method, it’s crucial to be vigilant and aware of potential scams or fraudulent activities. Avoid sharing your Apple ID password or personal information with anyone and be cautious of unsolicited requests for money.
- Enable two-factor authentication: Adding an extra layer of security to your Apple Pay Cash account by enabling two-factor authentication can help protect your funds and personal information. It adds an extra step of verification when signing in or making transactions.
- Stay updated with Apple Pay Cash features: Apple regularly updates its features and functionality, so stay informed about any changes or new additions to Apple Pay Cash. This ensures you stay up to date with the latest enhancements and improvements.
By following these tips and troubleshooting steps, you can make the most of your Apple Pay Cash experience. Enjoy the convenience and simplicity of transferring money with ease, securely, and with peace of mind.
Conclusion
Apple Pay Cash is a convenient and secure way to send and receive money right from your iPhone or Apple Watch. With its seamless integration into the Apple ecosystem, you can easily split bills, reimburse friends, or pay for goods and services without the need for cash or credit cards.
By linking your Apple Pay Cash to your bank account or adding funds directly, you can have instant access to your money whenever you need it. The ability to send and receive payments through iMessage makes the process quick and effortless, eliminating the need for third-party apps or exchanges. Plus, the added layer of security ensures your financial information remains private and protected.
Whether you’re going out for dinner with friends, paying your share of rent, or simply treating someone to a cup of coffee, Apple Pay Cash streamlines the transaction process and simplifies money management in the digital age. It’s the reliable and efficient solution for all your payment needs.
FAQs
- Can I use Apple Pay Cash on my Android phone?
- Do both the sender and recipient need to have Apple Pay Cash?
- Is there a limit to how much money I can send or receive with Apple Pay Cash?
- How long does it take for money to transfer with Apple Pay Cash?
- Is Apple Pay Cash secure?
No, Apple Pay Cash is exclusive to Apple devices. It is only available on iPhones, iPads, and Apple Watch.
Yes, both the sender and recipient need to have Apple Pay Cash set up on their Apple devices in order to send and receive money using this service.
Yes, there are limits to the amount of money you can send and receive with Apple Pay Cash. The maximum amount you can send or receive in a single transaction is $3,000, and the maximum amount you can send or receive within a 7-day period is $10,000.
Typically, money transfers with Apple Pay Cash are instant. However, in some cases, it may take up to 1-3 business days for the recipient to receive the funds.
Yes, Apple Pay Cash is secure. It uses advanced security measures like device authentication, encryption, and tokenization to protect your financial information. Additionally, you can choose to add an extra layer of security by enabling Touch ID or Face ID for authorization.