
Are you tired of the same old alarm tones on your iPhone? Have you ever wished you could personalize your wake-up experience with your favorite songs or sounds? Well, with the release of iOS 16, Apple has introduced a groundbreaking feature that allows users to create their own sound recognition alarms. This innovative feature harnesses the power of artificial intelligence to identify specific sounds and trigger alarms accordingly.
Now, you can wake up to the sound of your pet’s meow, a babbling brook, or even your favorite movie quote. The possibilities are endless! In this article, we will guide you through the process of creating your own sound recognition alarms on iOS 16. Whether you want a gentle wake-up call or a burst of energy to start your day, this feature gives you the flexibility to customize your alarm experience like never before.
Inside This Article
- Setting Up Xcode and Creating a New Project
- Importing the Required Sound Recognition Framework
- Designing the Alarm Interface
- Implementing Sound Recognition Functionality
- Testing and Debugging the Sound Recognition Alarms
- Conclusion
- FAQs
Setting Up Xcode and Creating a New Project
When it comes to developing iOS applications, Xcode is the go-to development environment. To get started with creating your own sound recognition alarms, the first step is to set up Xcode and create a new project.
Since Xcode is exclusively available for macOS, make sure you have a Mac computer before proceeding. If you don’t have Xcode installed on your Mac, you can download it for free from the Mac App Store. Once you have Xcode installed, follow these steps:
- Launch Xcode: Open the Applications folder on your Mac and find Xcode.
- Create a New Project: In the Xcode welcome window, click on “Create a new Xcode project” or go to the File menu and select “New” and then “Project”.
- Choose a Project Template: Select the appropriate project template based on your application requirements. For the purpose of creating sound recognition alarms, a Single View App template would be suitable.
- Fill in Project Details: Provide a name for your project, select the Team, Organization Identifier, and Language. Make sure to choose Swift as the programming language.
- Select Project Location: Choose a location on your Mac where you want to save your project files.
- Create the Project: Click on “Create” to create your new Xcode project.
Once you have completed these steps, Xcode will create a new project with the necessary files and folders. You are now ready to proceed with importing the required Sound Recognition framework and designing the alarm interface.
Importing the Required Sound Recognition Framework
Importing the required Sound Recognition framework is a crucial step in creating your own Sound Recognition alarms on iOS 16. The Sound Recognition framework is a powerful tool that allows your app to detect and classify sounds in real-time.
To import the Sound Recognition framework, follow these steps:
- Open Xcode and navigate to your project.
- Right-click on your project folder in the Project Navigator.
- Select “Add Files to [Your Project Name]”.
- In the file browser, locate and select the “SoundRecognition.framework” file.
- Click “Add” to import the framework into your project.
Once you have successfully imported the Sound Recognition framework, you can begin utilizing its features to implement sound recognition functionality in your app.
It’s worth noting that the Sound Recognition framework is available on iOS 14 or later, which includes iOS 16. Therefore, make sure you have the latest version of Xcode and iOS installed to access this framework.
Designing the Alarm Interface
Now that we have set up our project and imported the necessary frameworks, it’s time to design the interface for our sound recognition alarms. The interface should be intuitive and user-friendly, allowing users to easily set and manage their alarms.
Here are a few key considerations to keep in mind when designing the alarm interface:
- Visual Clarity: Ensure that the alarm interface is visually clear and easy to understand. Use clear labels and icons to indicate alarm settings and actions.
- Alarm Trigger: Provide an option for users to select the sound they want to use as the trigger for the alarm. This could be a pre-defined sound or the option to record a custom sound.
- Alarm Settings: Allow users to customize the alarm settings, such as the alarm time, repeat frequency, and snooze duration. Provide intuitive controls like sliders or drop-down menus to make it easy for users to adjust these settings.
- Alarm Display: Display the set alarm time and any other relevant information clearly on the interface. This will help users quickly identify their active alarms.
- Alarm Management: Include features to manage alarms, such as the ability to enable, disable, and delete alarms. Users should be able to easily access and modify their alarm settings as needed.
- Alarm Notifications: Implement visual and auditory notifications to inform users when the alarm is triggered. This could include a vibrating alert and a customizable alarm sound.
Remember to keep the design minimalistic, with a focus on usability. Avoid cluttering the interface with unnecessary elements and prioritize the most essential features for a streamlined user experience.
Once you have finalized the design of the alarm interface, it’s time to move on to implementing the sound recognition functionality. In the next section, we will explore how to add sound recognition capabilities to your alarm app.
Implementing Sound Recognition Functionality
Now that we have set up our Xcode project and imported the required Sound Recognition framework, it’s time to dive into the implementation of the actual sound recognition functionality for our alarms.
The first step is to configure the sound recognition request. This involves specifying the type of sounds you want your app to recognize. You can choose from a predefined set of sound types or create your own custom sound classification model. For example, you may want to detect the sound of a doorbell or a specific musical instrument.
Once you have configured the sound recognition request, you can start the sound analysis. This is done by creating an instance of the `SRAudioSession` class and setting its delegate to receive the audio data for analysis. The `SRAudioSession` class provides methods to start and stop the audio analysis.
During the audio analysis, the sound recognition engine continuously listens to the recorded audio and compares it with the configured sound types. When a match is found, the engine triggers a delegate method that you can implement to perform a specific action such as triggering an alarm.
To implement the delegate method, you need to conform to the `SRAudioSessionDelegate` protocol. This protocol defines the `audioSession(_:didDetectSound:)` method, which is called when a sound match is detected. Inside this method, you can handle the logic of triggering the alarm or any other desired functionality.
Additionally, you can customize the sound recognition experience by adjusting various parameters such as the detection threshold, analysis duration, and noise tolerance. Experimenting with these parameters can help fine-tune the accuracy and reliability of your sound recognition alarms.
It’s worth noting that sound recognition functionality requires the user’s permission to access the microphone. Therefore, it’s essential to handle the microphone permission request and guide the user through the necessary steps to grant permission to your app.
Once you have implemented the sound recognition functionality, don’t forget to thoroughly test your alarms in various scenarios to ensure their effectiveness and reliability. Test different sounds, background noise levels, and distance from the sound source to verify the accuracy of the recognition and the triggers of the alarms.
Implementing sound recognition functionality opens up exciting possibilities for creating personalized and innovative alarm experiences. Whether you want to wake up to the sound of nature or be alerted by a specific sound, sound recognition alarms can make your iOS device an even more versatile companion.
Testing and Debugging the Sound Recognition Alarms
Once you have implemented the sound recognition functionality for your alarm app, it’s crucial to thoroughly test and debug it to ensure its accuracy and reliability. Here are some steps you can follow to test and debug your sound recognition alarms:
1. Test with Different Sound Samples: Collect a variety of sound samples that your alarm should be able to recognize. This can include different types of alarms, doorbells, or any other relevant sounds. Play these samples and observe how effectively your app detects and responds to them. Tweak the recognition settings if needed to improve accuracy.
2. Test in Different Environments: Test your sound recognition alarms in different environments to account for various background noises. Try testing it in a quiet room, a noisy street, or even a crowded cafe. This will help you fine-tune the algorithms and ensure your app can perform consistently in real-life situations.
3. Analyze False Positives and False Negatives: Pay attention to any false positives (incorrectly recognizing a sound as an alarm) or false negatives (failing to detect an actual alarm sound). Use the debugging tools in Xcode to analyze the audio waveform and identify any issues with the recognition algorithm.
4. Implement Error Handling: When an alarm is triggered, make sure your app handles any errors or exceptions gracefully. Provide appropriate error messages to the user in case of any issues with sound recognition or other technical problems.
5. Gather User Feedback: Release a beta version of your app to a select group of users and gather their feedback on the sound recognition feature. This will help you identify any usability issues or improvements that can be made to enhance the overall user experience.
6. Monitor Performance: Continuously monitor the performance of your sound recognition alarms once your app is live. Keep track of any performance metrics such as accuracy, response time, and resource usage. This will help you identify any potential improvements or optimizations that can be made.
By thoroughly testing and debugging your sound recognition alarms, you can ensure that your app delivers reliable and accurate results to users, enhancing their overall experience and satisfaction.
Conclusion
Creating your own sound recognition alarms using iOS 16 is a remarkable feature that adds a new level of convenience and personalization to your iPhone experience. By harnessing the power of machine learning, iOS 16 allows you to train your device to recognize specific sounds and set up custom alerts for them.
Whether you want to be alerted when your baby starts crying, your favorite song comes on the radio, or a doorbell rings, the possibilities are endless. This feature not only enhances the accessibility of your device but also empowers you to tailor your iPhone to your unique needs and preferences.
With just a few simple steps, you can train your iPhone to recognize the sounds that matter most to you and receive notifications in real-time. Say goodbye to generic alerts and make your iPhone truly yours with sound recognition alarms in iOS 16.
FAQs
Q: Can I create my own sound recognition alarms on iOS 16?
A: Yes, with the latest iOS 16 update, Apple has introduced the ability to create your own sound recognition alarms. This feature allows you to personalize your alarms by choosing specific sounds that will trigger them.
Q: How do I enable sound recognition alarms on my iOS device?
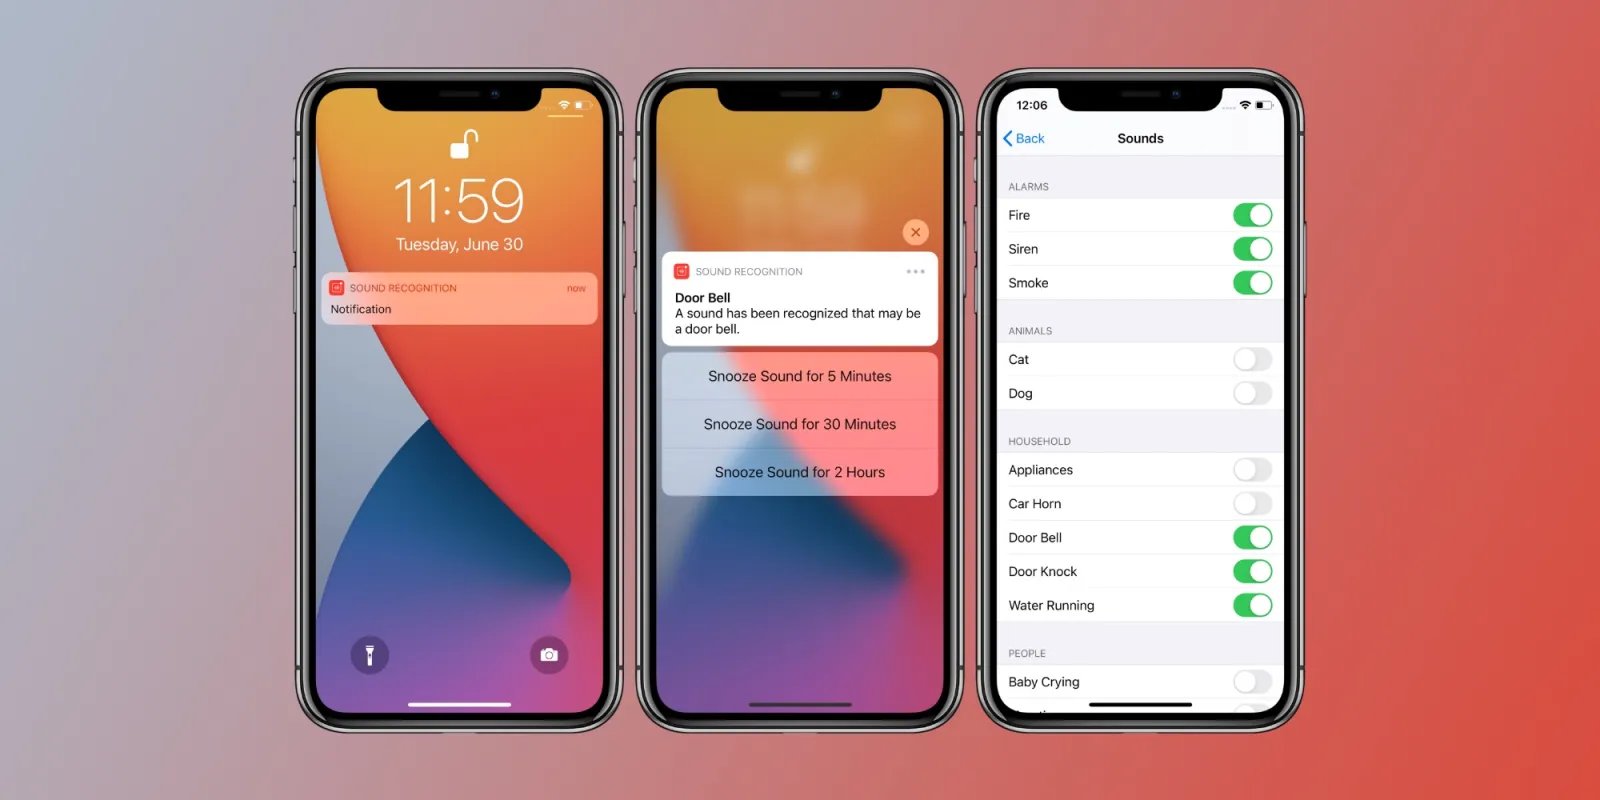
A: To enable sound recognition alarms on your iOS device, go to the Settings app and select “Sounds & Haptics”. From there, scroll down to “Sound Recognition” and toggle it on. You can then customize the recognized sounds and set them as triggers for your alarms.
Q: What sounds can I use for sound recognition alarms?
A: Apple has provided a wide range of sound options that you can use for sound recognition alarms. These include everyday sounds such as doorbells, sirens, water running, and more. You can also add custom sounds if you have particular audio files you want to use as triggers.
Q: Can I set different sound recognition alarms for different purposes?
A: Absolutely! With iOS 16, you can set different sound recognition alarms for various purposes. For example, you can have a specific sound trigger an alarm for waking up in the morning, while another sound can be set to remind you of important tasks throughout the day. The possibilities are endless!
Q: Are sound recognition alarms accessible for users with hearing impairments?
A: Yes, sound recognition alarms are designed to be inclusive and accessible for users with hearing impairments. The feature provides an alternative way of receiving alerts and notifications by recognizing sounds instead of relying solely on audible alarms. This allows users to customize their alarm experience based on their needs and preferences.