
Do you ever find yourself squinting at your iPhone screen, trying to get a better view of something? Well, the good news is that you can easily zoom out on your iPhone to see more of what’s on your screen. Whether you’re reading a long article, browsing through photos, or exploring a map, zooming out can make your experience more comfortable and enjoyable.
In this article, we will guide you through the simple steps to zoom out on your iPhone. Whether you own the latest iPhone model or an older version, these instructions will work for all iPhones running on iOS (insert compatible iOS versions). So, no matter the age of your device, you’ll be able to master the art of zooming out in no time. Let’s get started!
Inside This Article
- Adjusting the Zoom Level on iPhone
- Changing Zoom Settings in the Accessibility Menu
- Zooming Out Using the Zoom Region Feature
- Using the Pinch Gesture to Zoom Out
- Conclusion
- FAQs
Adjusting the Zoom Level on iPhone
One of the great features of the iPhone is its ability to adjust the zoom level to suit your needs. Whether you want to zoom in for a closer look at a picture or zoom out to see more content on your screen, the iPhone offers various methods to adjust the zoom level.
Here are a few ways to zoom out on your iPhone:
1. Zoom Out Using a Pinching Gesture: To quickly zoom out on your iPhone, simply use a pinching gesture on your screen. Place two fingers together on the screen and then slowly spread them apart. As you do so, the content on your screen will zoom out, allowing you to see more of it.
2. Zoom Out Using Control Center: Another way to adjust the zoom level on your iPhone is through the Control Center. Swipe down from the top-right corner of your iPhone screen to access Control Center. Tap on the magnifying glass icon labeled “Zoom” to activate the zoom feature. Once activated, you can adjust the zoom level by dragging the slider left or right.
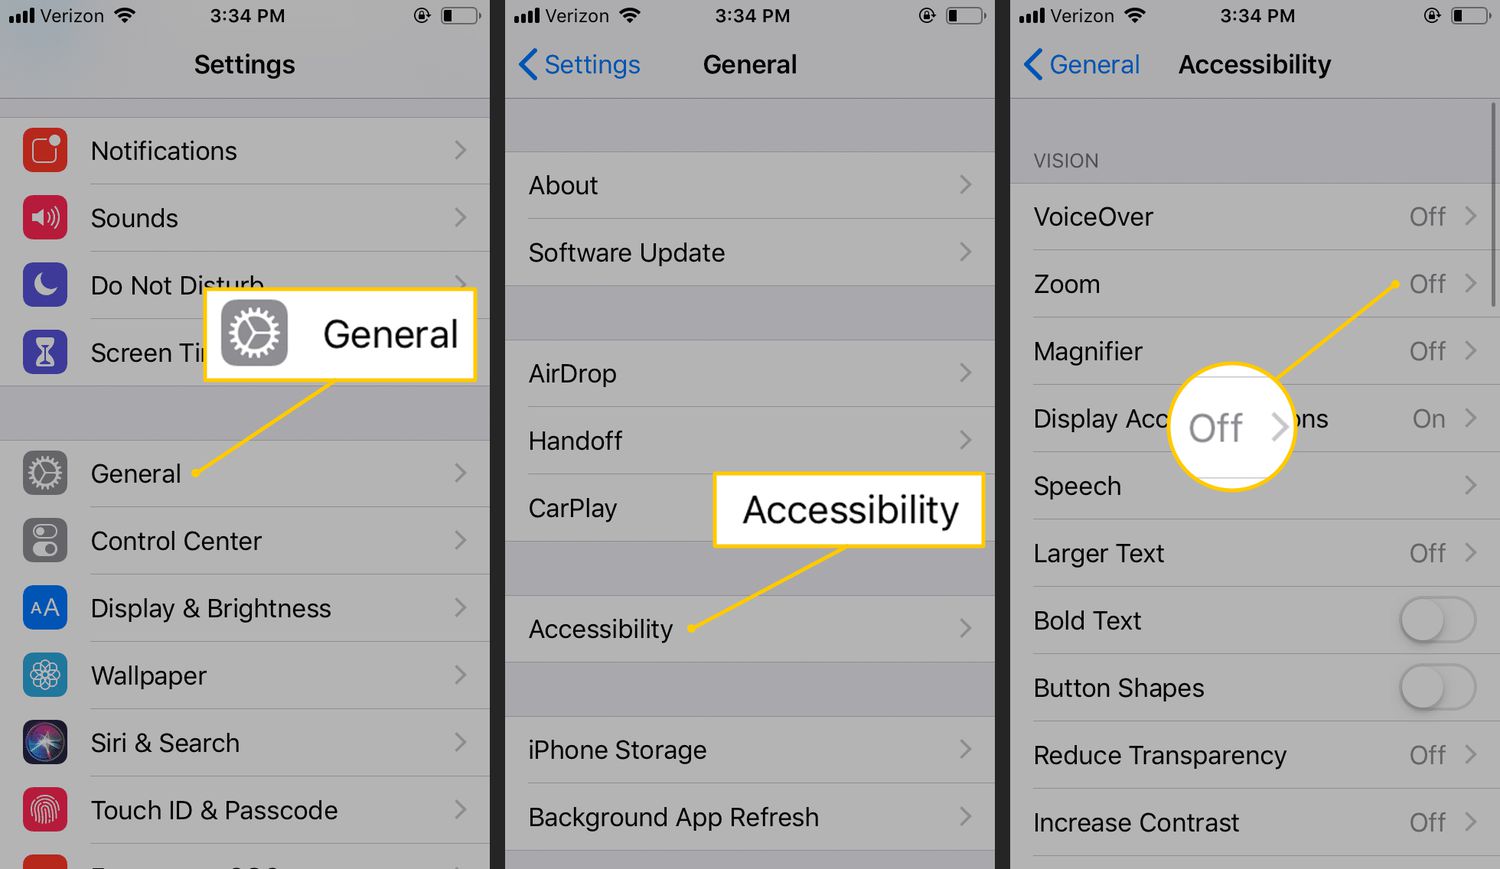
3. Zoom Out Using the Settings App: You can also adjust the zoom level on your iPhone by accessing the Settings app. Go to “Settings” > “Accessibility” > “Zoom”. Toggle the switch next to “Zoom” to turn it on. You can then adjust the zoom level by using the slider provided.
4. Zoom Out Using Accessibility Shortcut: The Accessibility Shortcut is another convenient way to adjust the zoom level on your iPhone. By default, triple-clicking the side or home button will activate the Accessibility Shortcut. To set it up, go to “Settings” > “Accessibility” > “Accessibility Shortcut”. From here, select “Zoom” as your preferred accessibility feature. Once set up, you can triple-click the side or home button to quickly toggle the zoom feature and adjust the zoom level.
With these simple methods, you can easily adjust the zoom level on your iPhone and customize your viewing experience. Whether you need to zoom out to view more content or simply prefer a smaller zoom level, the iPhone provides the flexibility to suit your preferences.
So go ahead, try out these methods and find the perfect zoom level for your iPhone!
Changing Zoom Settings in the Accessibility Menu
If you’re looking to change the zoom settings on your iPhone, you can easily do so through the Accessibility menu. This feature is particularly useful for users who have visual impairments or prefer to have larger text and interface elements on their device. Here’s how you can change the zoom settings in the Accessibility menu:
1. Open the Settings app on your iPhone and tap on “Accessibility.”
2. Scroll down and select “Zoom” under the “Vision” section.
3. In the Zoom menu, you’ll find various options to customize the zoom settings to your liking. Here are some of the key settings you can adjust:
– Zoom Region: Choose between “Full Screen Zoom” or “Window Zoom.” Full Screen Zoom zooms the entire screen, while Window Zoom allows you to zoom in on specific areas when using the zoom feature.
– Zoom Filter: Adjust the appearance of the zoomed content by selecting from options like “None,” “Inverted,” or “Greyscale.” This can help make the zoomed content easier to read or more visually comfortable for you.
– Zoom Maximum: Set the maximum level of zoom that you want to achieve. You can choose a preset zoom level or customize it to your preference.
– Zoom Controller: Enable or disable the zoom controller, which appears as a small circular button on the screen that allows you to control the zoom level with a single touch.
4. Once you’ve made your desired changes, you can exit the Accessibility menu by pressing the Home button or swiping up from the bottom on newer iPhone models. The changes you’ve made will take effect immediately.
By changing the zoom settings in the Accessibility menu, you can personalize your iPhone’s display to suit your needs and improve the overall user experience. Whether you prefer a larger font size, zoomed-in content, or specific visual adjustments, the Accessibility menu provides the flexibility to customize your device to your liking. Explore the various options and find the perfect zoom settings that make your iPhone more accessible and visually comfortable for you.
Zooming Out Using the Zoom Region Feature
Zooming in on your iPhone’s screen can be quite useful, especially when you want to get a closer look at a photo or text. However, there are times when you might find yourself zoomed in too far and need to zoom out to view the entire screen again. Luckily, the iPhone offers the Zoom Region feature, which allows you to easily zoom out with just a few taps.
To zoom out using the Zoom Region feature, follow these simple steps:
- Open the Settings app on your iPhone.
- Scroll down and tap on “Accessibility”.
- Next, tap on “Display & Text Size”.
- Under the Vision section, you’ll find the “Zoom” option. Tap on it.
- On the Zoom screen, you’ll see the “Zoom Region” option. Tap on it.
- Here, you can choose between three zoom region options: “Full Screen Zoom”, “Window Zoom”, or “Zoomed App”.
- To zoom out, select the “Full Screen Zoom” option.
- Once you’ve selected the desired zoom region, press the back button on the top left corner of the screen to exit the settings.
Now, when you need to zoom out, simply double-tap the screen with three fingers. The screen will instantly zoom out and fit the entire display within the selected zoom region.
This feature is particularly useful for those who frequently zoom in on their iPhone screens and need a quick way to zoom out without having to manually pinch and zoom.
So, the next time you find yourself zoomed in too far on your iPhone, remember to use the Zoom Region feature to easily zoom out and view the entire screen again.
Using the Pinch Gesture to Zoom Out
One of the most intuitive and straightforward ways to zoom out on your iPhone is by using the pinch gesture. This gesture involves using two fingers to pinch the screen, effectively reducing the magnification level and allowing you to see more content on your device.
To perform the pinch gesture to zoom out, follow these simple steps:
- Open the app or view that you want to zoom out in.
- Place your thumb and index finger lightly on the screen, ensuring that they are not too close together or too far apart.
- Gently spread your fingers apart, moving them away from each other while maintaining contact with the screen.
- Continue spreading your fingers apart until you have achieved the desired level of zoom out.
- Release your fingers from the screen to lock in the zoom level.
By using the pinch gesture, you can quickly and effortlessly zoom out on your iPhone, allowing you to view more content at once. This is especially useful when reading long articles, browsing websites, or viewing maps where you need to see a larger area.
Remember that you can also use the pinch gesture to zoom back in if you have zoomed out too much. Simply reverse the motion by placing your thumb and index finger on the screen and pinching them together to zoom back in.
In conclusion, being able to zoom out on your iPhone is a handy feature that can greatly enhance your mobile experience. Whether you’re viewing a webpage, reading a document, or even exploring a map, zooming out allows you to see more content on your screen and get a better overview of the information presented. By following the simple steps outlined in this article, you can easily zoom out on your iPhone and make the most out of its capabilities. Remember to experiment with different zoom levels and adjust them to suit your specific needs. Enjoy the freedom of zooming out and exploring a wider perspective on your iPhone!
FAQs
Q: How do I zoom out on my iPhone?
A: To zoom out on your iPhone, you can use a simple gesture. Place two fingers on the screen and move them apart, spreading your fingers outwards. This will zoom out and make the content on the screen appear smaller.
Q: Can I adjust the zoom level on my iPhone?
A: Yes, you can adjust the zoom level on your iPhone to suit your preferences. Simply go to the “Settings” app, tap on “Accessibility”, and select “Display & Text Size”. From there, you can adjust the zoom level by using the slider under “Zoom”.
Q: Why would I need to zoom out on my iPhone?
A: There are several reasons why you might want to zoom out on your iPhone. For example, if you are reading a long webpage or document and want to see more content on the screen at once, zooming out can help. It can also be useful when viewing maps or photos, allowing you to see more of the surrounding area or details.
Q: Is there a way to quickly return to the default zoom level?
A: Yes, there is a simple way to quickly return to the default zoom level on your iPhone. Simply double-tap on the screen with three fingers to zoom back out to the default zoom level. This gesture works in most apps and can be a handy shortcut to quickly adjust the zoom level.
Q: Can I adjust the zoom level for specific apps only?
A: Yes, you can adjust the zoom level for specific apps on your iPhone. To do this, go to the “Settings” app, tap on “Accessibility”, and select “Zoom”. From there, you can enable the “Zoom on Apps” feature and choose which apps you want to apply the zoom level to. This allows you to have different zoom levels for different apps based on your preferences.