
Are you struggling to add a wireless printer on your Windows 10 computer? Well, fret not! In this comprehensive guide, we will walk you through the step-by-step process of adding a wireless printer on Windows 10. With the advancements in technology, wireless printers have become the go-to choice for convenience and flexibility. Gone are the days of messy cables and limited mobility. With a wireless printer, you can print your documents from anywhere within your network range. Whether you are a student, a working professional, or a small business owner, knowing how to add a wireless printer on Windows 10 will undoubtedly make your printing tasks much more efficient and hassle-free. So, let’s dive in and get your printer up and running in no time!
Inside This Article
- Step 1: Turn on the wireless printer
- Step 2: Connect the printer to your Wi-Fi network
- Step 3: Add the printer to your Windows 10 device
- Step 4: Test the wireless printer connection
- Troubleshooting common issues
- Conclusion
- FAQs
Step 1: Turn on the wireless printer
Turning on the wireless printer is the first step in the process of setting it up on your Windows 10 device. Here’s how you can do it:
1. Locate the power button or switch on your printer. It is usually located on the front or side panel of the device.
2. Press the power button or toggle the switch to turn on the printer. You may need to hold the button for a few seconds until you see the printer’s display screen light up.
3. Once the printer is turned on, you can check the LED lights or display screen for any status indicators. This will confirm that the printer is powered on and ready to be connected wirelessly.
4. Make sure that the printer is properly connected to a power source. Ensure that the power cord is securely plugged into both the printer and a functioning power outlet.
5. Allow the printer a few moments to warm up and initialize its internal processes. This may take a few seconds or minutes, depending on the model and brand of your wireless printer.
6. Once the printer is powered on and initialized, it is ready to be connected to your Wi-Fi network for wireless printing.
By following these simple steps, you have successfully turned on your wireless printer, and you are now ready to proceed to the next step of connecting it to your Wi-Fi network.
Step 2: Connect the printer to your Wi-Fi network
Once you have turned on your wireless printer, the next step is to connect it to your Wi-Fi network. This will allow your printer to receive print jobs wirelessly from any device connected to the same network. Follow these simple steps to establish a connection:
- Check if your printer has a built-in Wi-Fi capability. Most modern printers come with this feature, but if your printer does not have Wi-Fi, you may need to use a USB cable to connect it to your computer.
- Access the settings or setup menu on your printer. Depending on the printer model, this can usually be done by pressing the Setup or Options button.
- Select the Wi-Fi setup or wireless setup option in the printer settings menu.
- Choose your Wi-Fi network from the list of available networks. Make sure you select the correct network that you want your printer to connect to.
- If your Wi-Fi network is password protected, enter the password when prompted. Use the on-screen keyboard, if available, to type in the password accurately.
- Once you have entered the correct Wi-Fi password, confirm the settings and wait for your printer to establish the connection with your Wi-Fi network. This process may take a few moments.
- Once the connection is established, your printer will display a confirmation message. You can also check the network settings on your printer to verify if it is connected to the Wi-Fi network.
It is important to note that the steps mentioned above may vary slightly depending on the make and model of your printer. Therefore, it is always a good idea to refer to the user manual or online documentation provided by the printer manufacturer for detailed instructions specific to your device.
By connecting your printer to your Wi-Fi network, you can enjoy the convenience of printing documents wirelessly from any device connected to the same network. This eliminates the need for physical connections and allows for flexible printer placement within your home or office.
Step 3: Add the printer to your Windows 10 device
Once your wireless printer is connected to your Wi-Fi network, the next step is to add it to your Windows 10 device. Here’s a step-by-step guide to help you:
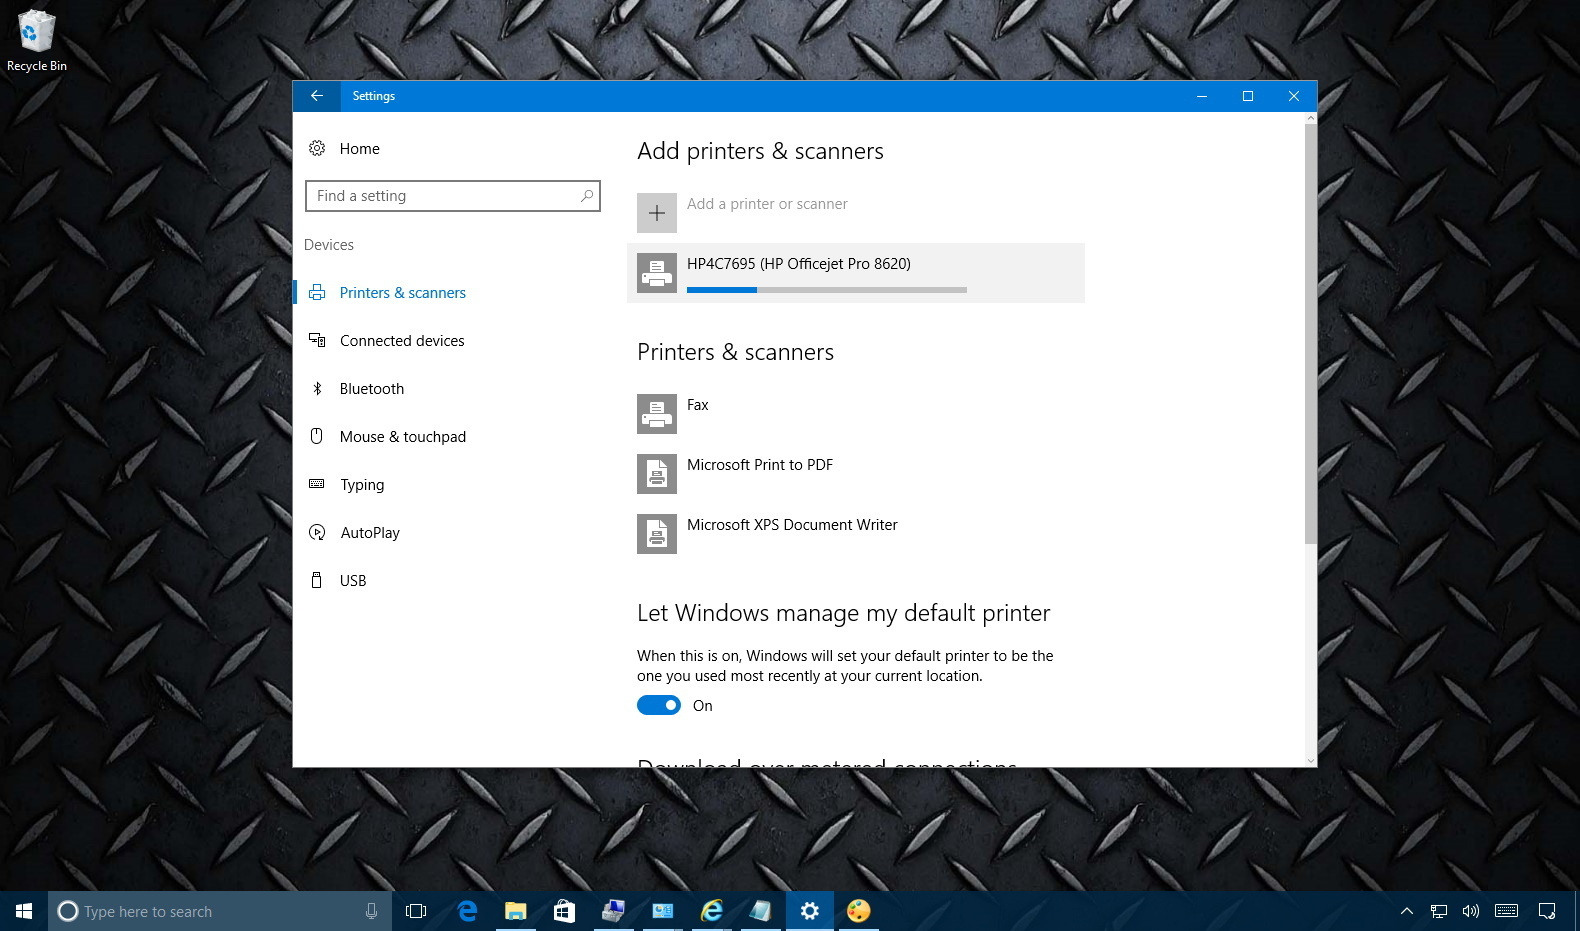
1. Open the Settings: Click on the “Start” button in the bottom-left corner of your screen, and then select the “Settings” gear icon.
2. Go to Devices: In the Settings window, click on the “Devices” option.
3. Select Printers & scanners: In the Devices menu, click on the “Printers & scanners” tab on the left-hand side.
4. Add a printer or scanner: Under the “Printers & scanners” tab, click on the “Add a printer or scanner” button.
5. Wait for the system to detect the printer: Windows 10 will now start automatically detecting any available printers or scanners on your network. Wait for the process to complete.
6. Select your printer: Once the detection process is complete, a list of available printers will be displayed. Select your wireless printer from the list by clicking on it.
7. Install the printer: Windows 10 will now install the necessary drivers and software for your printer. Follow the on-screen prompts to complete the installation process.
8. Test the printer: After the installation is complete, you can test the printer by printing a test page or a document to ensure that it is working properly.
That’s it! You have successfully added your wireless printer to your Windows 10 device. You can now conveniently print documents wirelessly from your Windows 10 computer.
Step 4: Test the wireless printer connection
Now that you have successfully added the wireless printer to your Windows 10 device, it’s time to test the connection and ensure everything is working smoothly. Follow the steps below to perform a test print:
- Open a document or image that you want to print.
- Click on the “File” option in the top left corner of the application you are using.
- Select “Print” from the drop-down menu. This will open the print dialog box.
- In the print dialog box, make sure that the wireless printer you added is selected as the default printer.
- Check the print settings and make any necessary adjustments, such as the paper size, orientation, and quality.
- Click on the “Print” button to start the printing process.
- Wait for the printer to receive the print job and begin printing.
- Verify that the printout is of high quality, with no smudges, streaks, or missing parts.
If the test print is successful and the document or image prints out correctly, then congratulations! Your wireless printer connection is working perfectly.
However, if you encounter any issues during the test print, such as blank pages, error messages, or poor print quality, there may be a problem with the wireless connection or printer settings. In such cases, refer to the troubleshooting section for assistance in resolving common printer issues.
It’s important to regularly test the wireless printer connection to ensure optimal performance. This will help you avoid any unexpected printing problems and ensure that your documents and images are produced with the highest quality.
Troubleshooting common issues
While adding a wireless printer to your Windows 10 device is generally a straightforward process, there can be certain issues that may arise. Here are some common problems you may encounter and how to troubleshoot them:
No available Wi-Fi networks: If you’re unable to see any available Wi-Fi networks when trying to connect your printer, make sure that your printer is within range of your Wi-Fi router. Check if your Wi-Fi connection is working properly and try restarting both your printer and router.
Incorrect Wi-Fi password: If you are prompted to enter a Wi-Fi password and the connection fails, double-check that you have entered the correct password. Wi-Fi passwords are case-sensitive, so ensure that you are using the correct upper and lower case characters. If you’re unsure about your Wi-Fi password, you can find it on your router’s settings or contact your Internet service provider.
Firewall or antivirus blocking the printer connection: Sometimes, your firewall or antivirus software can prevent your printer from establishing a connection. Temporarily disable your firewall or antivirus software and try adding the printer again. Remember to enable your security software once the printer is successfully added.
Printer driver compatibility issues: Windows 10 comes with a wide range of printer drivers pre-installed. However, if your printer model is relatively new or uncommon, it may not have a compatible driver included. Visit the manufacturer’s website and download the latest driver for your specific printer model. Install the driver and then try adding the printer again.
Network connection disruptions: Sometimes, network connection disruptions can cause issues with adding a wireless printer. Restart your printer, router, and Windows 10 device to reset the network connection. Ensure that your devices are on the same Wi-Fi network and try adding the printer again.
Outdated Windows 10 version: It’s important to keep your Windows 10 device up to date to ensure compatibility with different hardware, including wireless printers. Go to your Windows Update settings and check for any available updates. Install any pending updates and then try adding the printer again.
Printer firmware update required: Some printers may require firmware updates for improved compatibility and performance. Visit the manufacturer’s website and check if there are any firmware updates available for your printer model. Follow the instructions provided to update the firmware and then try adding the printer again.
If you continue to experience issues when adding a wireless printer to your Windows 10 device, you may want to consult the printer’s user manual or contact the manufacturer’s customer support for further assistance. They are equipped with the expertise to help you troubleshoot specific issues related to your printer model.
Conclusion
Adding a wireless printer to your Windows 10 computer is a simple and convenient way to enhance your printing experience. With the advancements in technology, wireless printing has become more accessible, allowing you to print documents from anywhere within your home or office. By following the steps mentioned in this article, you can easily connect your wireless printer to your Windows 10 computer and start printing wirelessly. Whether you need to print important documents, photos, or even labels, wireless printing offers flexibility and convenience.
Remember to ensure that your printer is connected to your Wi-Fi network and that the correct drivers are installed on your computer. Troubleshooting any connection issues and checking for software updates will ensure smooth and uninterrupted printing. With a wireless printer connected to your Windows 10 computer, you can enjoy hassle-free printing, saving time and increasing productivity.
So, why wait? Go ahead and add a wireless printer to your Windows 10 computer and experience the convenience and flexibility of wireless printing.
FAQs
1. Can I add a wireless printer on Windows 10?
Yes, you can add a wireless printer on Windows 10. The operating system provides built-in features and drivers that allow you to connect and set up a wireless printer easily.
2. How do I add a wireless printer on Windows 10?
To add a wireless printer on Windows 10, follow these steps:
- Make sure your wireless printer is turned on and connected to your Wi-Fi network.
- On your Windows 10 PC, go to Settings and then select Devices.
- Click on Printers & scanners and then select Add a printer or scanner.
- Windows will search for available printers. Select your wireless printer from the list.
- Follow the on-screen instructions to complete the setup process.
3. Do I need any additional drivers for my wireless printer?
In most cases, Windows 10 will automatically install the necessary drivers for your wireless printer. However, if Windows doesn’t have the drivers or if you want to use specific features, you may need to download and install the drivers from the printer manufacturer’s website.
4. Can I print from my Windows 10 laptop to a wireless printer?
Yes, you can print from your Windows 10 laptop to a wireless printer as long as both devices are connected to the same Wi-Fi network. Simply add the wireless printer to your laptop’s list of available printers and select it when you want to print.
5. Is there a way to troubleshoot wireless printer connection issues on Windows 10?
If you encounter any connection issues with your wireless printer on Windows 10, try the following troubleshooting steps:
- Restart your printer and make sure it is connected to the Wi-Fi network.
- Restart your Windows 10 PC and check if the issue persists.
- Update the printer drivers to the latest version.
- Check if there are any firewall or security settings blocking the printer connection.
- If all else fails, consult the printer manufacturer’s support documentation or contact their customer support for further assistance.