
Are you struggling to add a wireless printer to your Windows 8 computer? Don’t worry, we’ve got you covered! In this article, we’ll walk you through the step-by-step process of adding a wireless printer on Windows 8. Whether you’re using a home or office network, the process is straightforward and doesn’t require any technical expertise. By the end of this guide, you’ll be able to easily connect your Windows 8 computer to a wireless printer and enjoy the convenience of printing wirelessly from any room in your home or office. So, let’s get started and make printing a breeze on your Windows 8 system!
Inside This Article
- How to Add a Wireless Printer on Windows 8
- Step 1: Ensure your printer is compatible with Windows 8
- Step 2: Connect the printer to your network
- Step 3: Install the printer driver software
- Step 4: Add the wireless printer to your Windows 8 device
- Conclusion
- FAQs
How to Add a Wireless Printer on Windows 8
Are you struggling to add a wireless printer to your Windows 8 device? Don’t worry, we’ve got you covered! Adding a wireless printer on Windows 8 is a straightforward process that can be done in just a few simple steps. In this article, we will guide you through each step to ensure a seamless installation.
Step 1: Ensure your printer is compatible with Windows 8
The first thing you need to do is check if your printer is compatible with Windows 8. Most newer printers are designed to work with Windows 8, but it’s always a good idea to verify this before proceeding. Check the manufacturer’s website or user manual for compatibility information.
Step 2: Connect the printer to your network
Next, you need to connect your printer to the same Wi-Fi network as your Windows 8 device. This can usually be done through the printer’s control panel or settings. Make sure the printer is turned on and follow the manufacturer’s instructions for connecting it to your network.
Step 3: Install the printer driver software
Once your printer is connected to the network, you’ll need to install the printer driver software on your Windows 8 device. The driver software enables communication between your computer and the printer. You can usually find the driver software on the manufacturer’s website. Download the appropriate driver for Windows 8 and follow the installation instructions.
Step 4: Add the wireless printer to your Windows 8 device
With the printer driver software installed, it’s time to add the wireless printer to your Windows 8 device. Go to the Control Panel, click on “Devices and Printers”, and then select “Add a printer”. Windows will search for any available printers on the network. Once your wireless printer is detected, select it and click on “Next” to complete the setup process.
That’s it! You have successfully added a wireless printer to your Windows 8 device. Now you can enjoy the convenience of printing wirelessly from any application on your computer.
Frequently Asked Questions
-
How do I know if my wireless printer is connected to my Windows 8 device?
To check if your wireless printer is connected, go to the Control Panel and click on “Devices and Printers”. Your printer should appear in the list of installed devices. You can also try printing a test page to confirm the connection.
-
What should I do if my wireless printer is not detected by Windows 8?
If your wireless printer is not detected, make sure it is turned on and connected to the same Wi-Fi network as your Windows 8 device. You can also try restarting your printer and computer to refresh the network connections. If the issue persists, refer to the manufacturer’s troubleshooting guide or contact their support for further assistance.
-
Can I add multiple wireless printers to my Windows 8 device?
Yes, you can add multiple wireless printers to your Windows 8 device. Simply repeat the steps mentioned above for each printer you want to connect. Windows will list all the installed printers in the “Devices and Printers” section for easy access.
With these simple steps, you can easily add a wireless printer to your Windows 8 device and enjoy hassle-free printing. Whether you need to print documents, photos, or other files, having a wireless printer makes the process much more convenient. Take advantage of this technology and enhance your printing experience on Windows 8.
Step 1: Ensure your printer is compatible with Windows 8
Before adding a wireless printer to your Windows 8 device, it is crucial to verify its compatibility with the operating system. This ensures that the printer will work seamlessly and you will be able to leverage all its features.
To determine if your printer is compatible with Windows 8, you can start by checking the manufacturer’s website. Most printer manufacturers provide a list of compatible operating systems for each model. Look for the Windows 8 or Windows 8.1 compatibility information specific to your printer.
If you cannot find compatibility information on the manufacturer’s website, you can also check the documentation that came with your printer. Look for any mentions of Windows 8 or Windows 8.1 in the system requirements section.
Another option is to consult online forums or communities where users discuss printer compatibility. Often, you can find valuable insights from other users who have already tested the printer with Windows 8. This can give you a good indication of whether the printer is likely to work with your operating system.
Remember, compatibility is crucial in ensuring a smooth and hassle-free printing experience. By verifying the compatibility of your printer with Windows 8, you can avoid any potential issues and ensure optimal performance.
Step 2: Connect the printer to your network
After ensuring that your wireless printer is compatible with Windows 8, the next step is to connect it to your network. This will allow your Windows 8 device to communicate with the printer wirelessly.
First, locate the network settings on your printer. This can usually be found in the printer’s control panel or settings menu. Look for options such as “Network settings,” “Wi-Fi settings,” or “Wireless setup.”
Once you’ve accessed the network settings, you will need to select your wireless network from the list of available networks. This list will typically display the names (also known as SSIDs) of nearby Wi-Fi networks.
Choose your network from the list and enter the password, if prompted. Make sure to enter the correct password, as it must match the password set for your wireless network.
Once you’ve entered the password, the printer will begin connecting to your network. This process may take a few moments, so be patient. As the printer establishes a connection, you may see a status message on the printer’s display or a blinking indicator light.
Once the connection is established, your printer will be successfully connected to your wireless network. You can verify this by printing a network configuration page or by checking the printer’s display for a network connection status.
Now that your wireless printer is connected to your network, you can proceed to the next step: installing the printer driver software on your Windows 8 device.
Step 3: Install the printer driver software
Once you have connected your wireless printer to your network, the next step is to install the necessary printer driver software on your Windows 8 device. The printer driver acts as a bridge between your computer and the printer, allowing them to communicate and print documents seamlessly. Follow the steps below to install the printer driver software:
1. Start by inserting the installation CD that came with your wireless printer into your computer’s CD/DVD drive. If your printer did not come with an installation CD, you can usually download the necessary software from the manufacturer’s website.
2. After inserting the installation CD, the printer driver software should automatically start the installation process. Follow the on-screen instructions to complete the installation. If the installation doesn’t start automatically, you can manually launch the setup by browsing the contents of the CD and running the setup file.
3. If you are downloading the printer driver software from the manufacturer’s website, locate the appropriate driver for your printer model and download it to your computer. Once the download is complete, locate the downloaded file and run the setup to begin the installation process.
4. During the installation process, you may be prompted to choose the type of connection you are using for your wireless printer. Select the wireless connection option and follow any additional instructions specific to your printer model.
5. After the installation is complete, restart your computer to ensure that the printer driver software is fully integrated into your system.
6. Once your computer has restarted, go to the Control Panel on your Windows 8 device and select “Devices and Printers”. This will display a list of all the printers that are currently connected to your computer.
7. Look for your wireless printer in the list and verify that it shows a status of “Ready”. If the status is anything other than “Ready”, right-click on the printer and select “Troubleshoot” to diagnose and resolve any issues.
8. Congratulations! You have successfully installed the printer driver software for your wireless printer on your Windows 8 device. You can now start printing documents wirelessly from your computer.
It’s worth noting that if you have opted to download the printer driver software from the manufacturer’s website, it is always a good idea to check for updates periodically. Manufacturers often release updated versions of the driver software to enhance performance, add new features, or fix any bugs or compatibility issues.
Step 4: Add the wireless printer to your Windows 8 device
After connecting your wireless printer to your network and installing the necessary printer driver software, it’s time to add the printer to your Windows 8 device. Follow these simple steps to complete the process:
1. Open the Control Panel on your Windows 8 device. You can easily access it by right-clicking on the Start button and selecting “Control Panel” from the context menu.
2. In the Control Panel window, click on the “Devices and Printers” option. This will open a new window displaying all the connected devices and printers on your computer.
3. Click on the “Add a printer” option located at the top of the Devices and Printers window. Windows 8 will now start searching for any available printers on your network.
4. Once the “Add Printer” wizard appears, select the option “Add a network, wireless, or Bluetooth printer” and click “Next”.
5. Windows 8 will now search for available printers on your network. This may take a few moments, so please be patient.
6. Once the search is complete, a list of available printers will be displayed. Locate your wireless printer from the list and click on it to select it.
7. After selecting the printer, click “Next” to continue.
8. Windows 8 will now try to install the required printer driver software. If the driver software is not available, you may need to manually download and install it from the manufacturer’s website.
9. Once the driver installation is complete, you will be prompted to give the printer a name. You can choose a name that is easy to remember and identify, such as “Wireless Printer” or “Office Printer”.
10. Finally, click “Finish” to complete the process. Your wireless printer is now successfully added to your Windows 8 device.
With the wireless printer added, you can now easily print documents and photos directly from your Windows 8 device without the need for any physical connections.
Conclusion
Adding a wireless printer to your Windows 8 computer is a relatively simple process that can greatly enhance your printing experience. By following the step-by-step guide outlined in this article, you can effortlessly connect your wireless printer and start printing wirelessly in no time.
With the convenience of wireless printing, you can enjoy the freedom of printing from anywhere within your network, eliminating the hassle of plugging in cables or transferring files. Whether you’re at home or in the office, having a wireless printer is a game-changer.
Remember to always refer to your printer’s manual or manufacturer’s website for specific instructions on adding a wireless printer to Windows 8, as different printers may have slight variations in the setup process.
Now that you’re equipped with the knowledge of how to add a wireless printer on Windows 8, why wait? Go ahead and take advantage of the benefits of wireless printing and make your printing tasks smoother and more efficient.
FAQs
1. How do I add a wireless printer on Windows 8?
Adding a wireless printer on Windows 8 is a relatively straightforward process. Here’s how you can do it:
- Ensure that your wireless printer is turned on and connected to the same Wi-Fi network as your Windows 8 device.
- On your Windows 8 device, go to the Control Panel by right-clicking on the Start button and selecting Control Panel from the menu.
- Click on the “Hardware and Sound” category, and then select “Devices and Printers”.
- Click on the “Add a printer” button located at the top of the window.
- Windows will now search for available printers. If your wireless printer is detected, select it and click “Next”.
- Follow the on-screen instructions to complete the installation process. Once done, you should be able to print wirelessly from your Windows 8 device.
2. Can I add a wireless printer on Windows 8 without the installation CD?
Yes, you can add a wireless printer on Windows 8 even if you don’t have the installation CD. Here’s how:
- Ensure that your wireless printer is turned on and connected to the same Wi-Fi network as your Windows 8 device.
- On your Windows 8 device, go to the Control Panel by right-clicking on the Start button and selecting Control Panel from the menu.
- Click on the “Hardware and Sound” category, and then select “Devices and Printers”.
- Click on the “Add a printer” button located at the top of the window.
- Windows will now search for available printers. If your wireless printer is detected, select it and click “Next”.
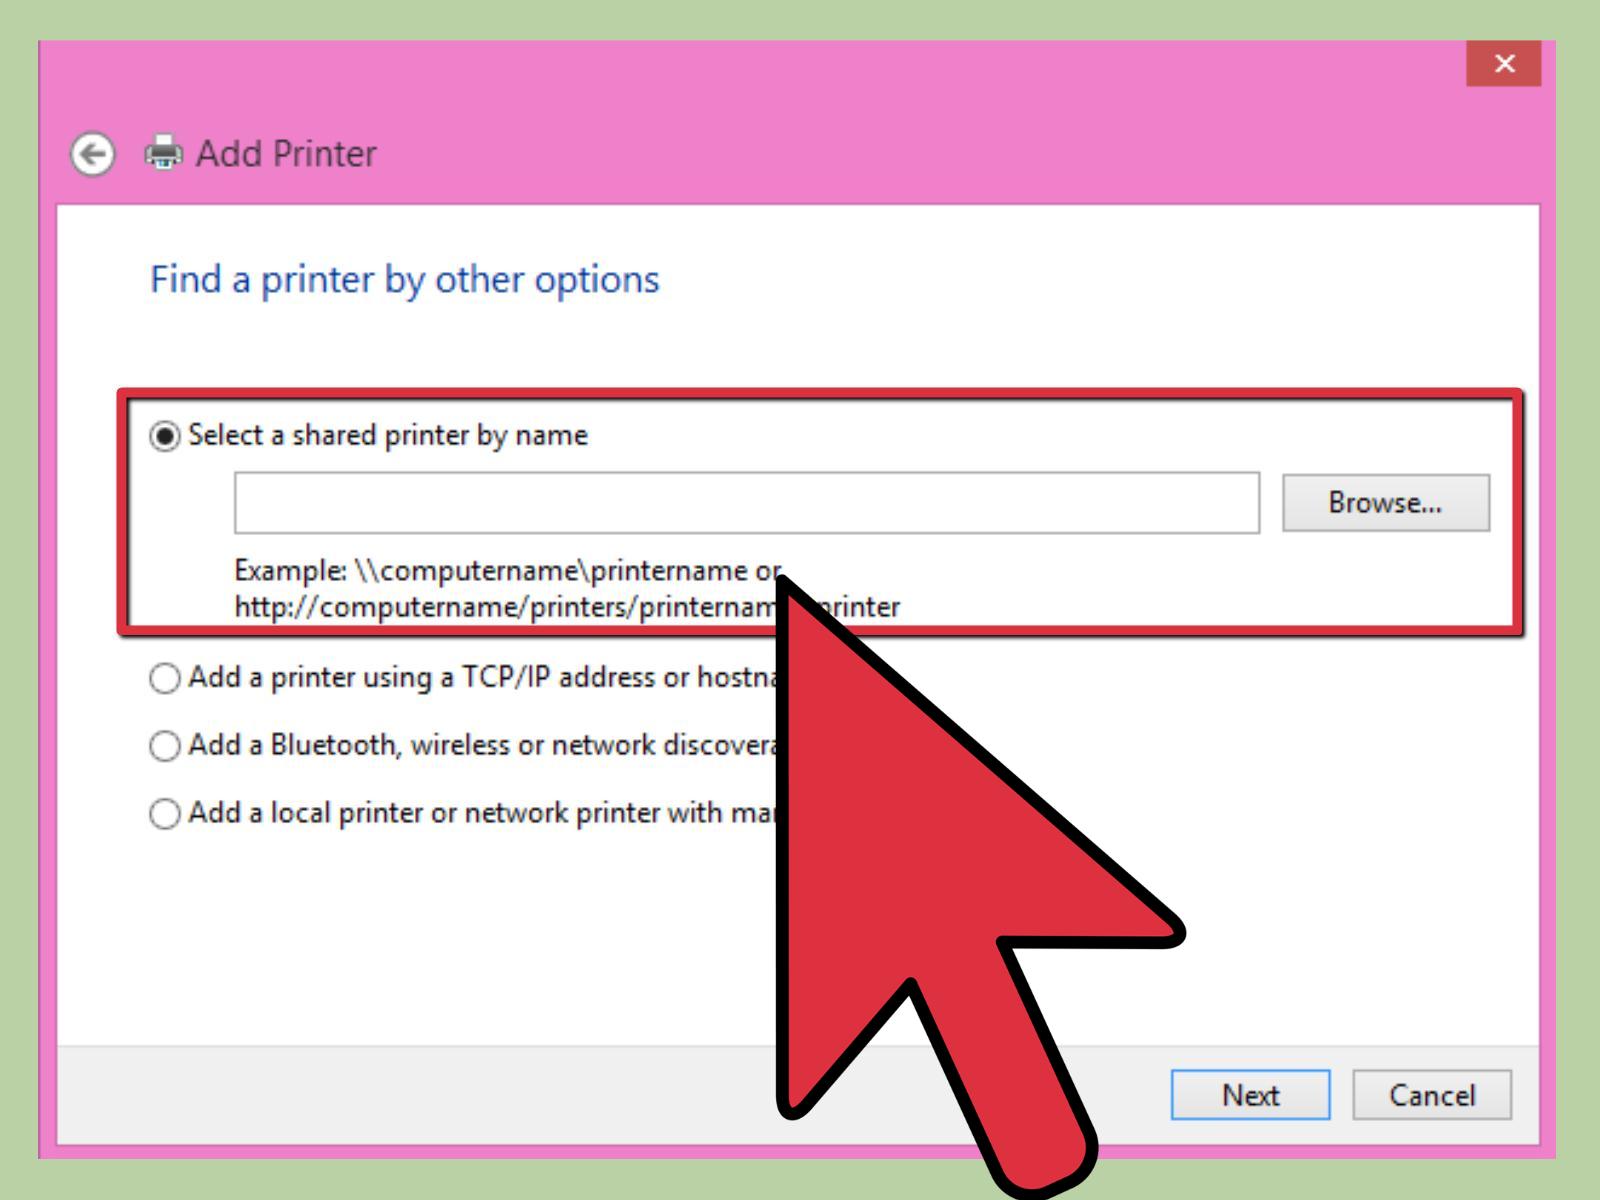
- If your printer is not listed, click on the option to add a printer using a TCP/IP address or hostname.
- Follow the on-screen instructions to enter the IP address or hostname of your wireless printer, and complete the installation process.
3. How can I find the IP address of my wireless printer on Windows 8?
To find the IP address of your wireless printer on Windows 8, you can follow these steps:
- Go to the Control Panel by right-clicking on the Start button and selecting Control Panel from the menu.
- Click on the “Hardware and Sound” category, and then select “Devices and Printers”.
- Right-click on your wireless printer and select “Printer properties”.
- In the printer properties window, go to the “Ports” tab.
- Look for the port that is checked and labeled as your wireless printer.
- Note down the IP address mentioned next to the checked port. This is the IP address of your wireless printer.
4. My wireless printer is not being detected on Windows 8. What should I do?
If your wireless printer is not being detected on Windows 8, there are a few troubleshooting steps you can try:
- Ensure that your wireless printer is turned on and connected to the same Wi-Fi network as your Windows 8 device.
- Restart both your wireless printer and your Windows 8 device, and try again.
- Check if your printer has the latest firmware updates installed. Visit the manufacturer’s website for more information on how to update the firmware.
- Temporarily disable any firewall or security software on your Windows 8 device, as they might be blocking the printer detection.
- If all else fails, consult the user manual or contact the manufacturer’s support for further assistance.
5. Can I connect multiple wireless printers to Windows 8?
Yes, you can connect multiple wireless printers to Windows 8. Each wireless printer will need to be connected to the same Wi-Fi network as your Windows 8 device. Follow the same steps mentioned earlier to add each printer to your Windows 8 device. Once added, you can select the desired printer from the print menu when you want to print a document or file.