
The wireless channel on your Asus router plays a crucial role in determining the overall performance and stability of your wireless network. By strategically changing the wireless channel, you can potentially mitigate interference issues and improve the speed and reliability of your connection.
In this article, we will guide you through the steps of changing the wireless channel on your Asus router. Whether you are experiencing slow speeds, dropped connections, or simply want to optimize your wireless network, this guide will equip you with the knowledge to make the necessary adjustments. So, let’s dive in and explore how you can change the wireless channel on your Asus router for a better online experience.
Inside This Article
- Step 1: Accessing the Asus Router’s Admin Panel
- Step 2: Locating the Wireless Settings
- Step 3: Changing the Wireless Channel
- Step 4: Saving and Applying the Changes
- Conclusion
- FAQs
Step 1: Accessing the Asus Router’s Admin Panel
Accessing the admin panel of your Asus router is the first step towards changing the wireless channel. To begin, you’ll need a device that is connected to your Asus router either through a wired or wireless connection.
Open your preferred web browser, such as Google Chrome or Mozilla Firefox, and enter the IP address of your Asus router in the address bar. Usually, the default IP address is “192.168.1.1.” Press the Enter key to proceed.
A login page will appear, prompting you to enter your username and password. If you haven’t changed the default login credentials, you can find them in the manual or on the back of your Asus router. Enter your username and password and click on the “Login” or “Sign In” button.
After successful login, you will be directed to the Asus router’s admin panel, which is the control center for all the router’s settings. Here, you can customize various aspects of your router, including the wireless channel.
Step 2: Locating the Wireless Settings
Once you have accessed the Asus router’s admin panel, the next step is to locate the wireless settings. These settings allow you to make changes to your wireless network, including the wireless channel. To locate the wireless settings, follow the steps below:
- Look for the “Wireless” or “Wi-Fi” tab on the router’s admin panel. It is usually located in the main menu or navigation bar at the top of the page.
- Click on the “Wireless” or “Wi-Fi” tab to access the wireless settings.
- Once you are in the wireless settings section, you will see various options related to your wireless network. This is where you can change the wireless channel.
It’s important to note that the exact location and wording of the wireless settings may vary depending on the model and firmware version of your Asus router. However, most routers have a dedicated section for wireless settings, making it relatively easy to find.
If you are having trouble locating the wireless settings on your Asus router, you can refer to the user manual that came with your router. The manual usually provides step-by-step instructions on how to access and navigate the admin panel.
Once you have successfully located the wireless settings on your Asus router, you are ready to proceed to the next step: Changing the wireless channel.
Step 3: Changing the Wireless Channel
When it comes to optimizing the performance of your Asus router, changing the wireless channel can make a significant difference. Wireless channels are like lanes on a highway: multiple devices in close proximity can cause congestion and slow down your network speed. By changing the channel, you can find a less crowded lane for your Wi-Fi signal to travel through, resulting in improved connectivity and faster internet speeds.
To change the wireless channel on your Asus router, follow these simple steps:
- Log into the admin panel of your Asus router by typing the default IP address (e.g., 192.168.1.1) into your web browser.
- Enter your router’s username and password. If you haven’t changed these credentials, check the manual or the sticker on the router for the default login information.
- Once logged in, locate the “Wireless” or “Wireless Settings” tab in the admin panel. This tab houses all the settings related to your wireless network.
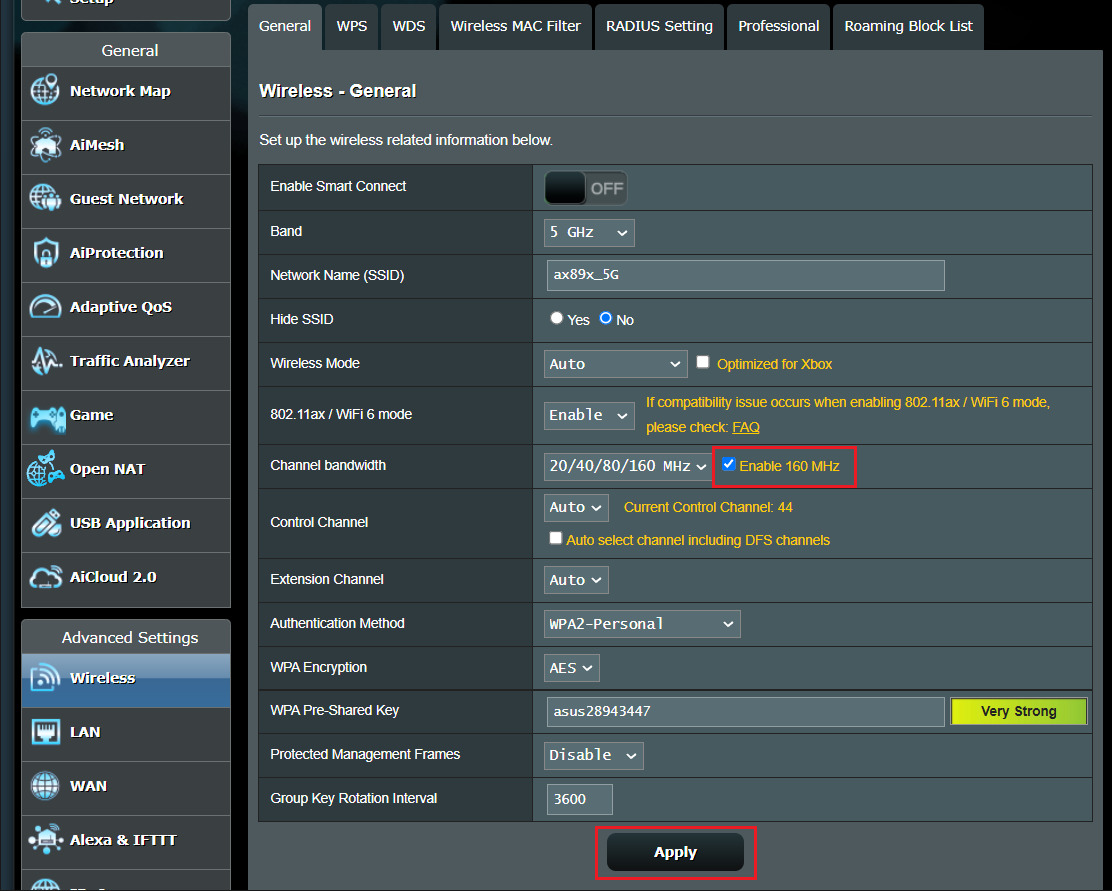
- In the wireless settings, you should find an option called “Channel” or “Wireless Channel.” Click on it to access the channel settings.
- By default, the channel selection is set to “Auto.” However, you can manually change the channel to optimize your router’s performance. Look for a drop-down menu or a list of available channels.
- Choose a different channel from the available options. It is recommended to select a channel that is less congested. Channels 1, 6, and 11 are typically the least congested channels in the 2.4GHz band.
- Once you have selected the desired channel, save the changes and apply them to your router. The router will reboot, and the new channel settings will take effect.
Changing the wireless channel on your Asus router can help minimize interference and improve the stability and speed of your Wi-Fi connection. Keep in mind that other electronic devices, such as cordless phones and microwave ovens, can also interfere with your Wi-Fi signal. If you continue to experience connectivity issues, consider relocating your router or upgrading to a dual-band router that supports both the 2.4GHz and 5GHz bands.
Step 4: Saving and Applying the Changes
Now that you have successfully changed the wireless channel on your Asus router, it’s essential to save and apply the changes for them to take effect. Follow these simple steps to complete the process:
- Locate the “Apply” or “Save” button on the router’s admin panel. This button is typically found at the bottom or in the wireless settings section.
- Click on the “Apply” or “Save” button to initiate the process.
- Wait for a few seconds for the changes to be saved and applied. During this time, it’s important not to interrupt the process or turn off the router.
- Once the changes have been successfully applied, you will typically see a confirmation message or a page refresh indicating the update.
- After the changes have been saved, it’s a good idea to reboot your router. This will help ensure that all settings are properly applied and any potential connectivity issues are resolved.
That’s it! You have successfully saved and applied the changes to the wireless channel on your Asus router. Your devices will now connect to the new channel, which can help enhance the overall performance and reduce interference.
Remember, if you ever need to make further changes to your router’s wireless settings, you can always revisit the admin panel and follow the steps outlined in this guide.
Now that you’re familiar with the process of changing the wireless channel on an Asus router and saving the changes, you’re well-equipped to optimize your network and improve your wireless connectivity. Enjoy faster and more reliable internet speeds!
Conclusion
Changing the wireless channel on your Asus router can significantly improve your Wi-Fi signal strength and overall network performance. By following the simple steps outlined in this guide, you can easily select and switch to a less crowded channel, reducing interference from other wireless devices and neighboring networks.
Remember to regularly monitor your wireless channel and make adjustments if necessary, especially if you are experiencing slow internet speeds or connectivity issues. Experimenting with different channels can help you find the optimal configuration for your specific environment.
With a stronger and more stable Wi-Fi connection, you can enjoy seamless browsing, streaming, and online gaming experiences. So don’t hesitate to take advantage of this quick and easy solution to maximize the potential of your Asus router.
FAQs
Q: Why do I need to change the wireless channel on my Asus router?
A: Changing the wireless channel on your Asus router can help improve the performance and stability of your wireless connection. By selecting a less congested channel, you can minimize interference from other devices and networks, resulting in faster and more reliable Wi-Fi speeds.
Q: How do I access the router settings to change the wireless channel?
A: To access the router settings on your Asus router, open a web browser and enter the router’s IP address in the address bar. Typically, the default IP address for Asus routers is 192.168.1.1. Once you have entered the IP address, press Enter, and you will be redirected to the router’s login page where you can enter your administrator credentials.
Q: How can I determine which wireless channel is the least congested?
A: There are several tools available that can help you determine the least congested wireless channel in your area. One popular option is to use a Wi-Fi analyzer app on your smartphone or tablet. These apps can scan the Wi-Fi networks in your vicinity and provide information about the networks and the channels they are using. Additionally, you can also check your router’s settings, as some models offer a built-in channel scanning feature.
Q: Can I change the wireless channel on my Asus router manually?
A: Yes, you can manually change the wireless channel on your Asus router. Once you have accessed the router settings, navigate to the wireless settings section. Look for the option to change the channel, which is usually found under the wireless configuration or advanced settings. Select a channel that is less congested and save the changes. Keep in mind that some routers may require a reboot for the new channel to take effect.
Q: How often should I change the wireless channel on my Asus router?
A: The frequency at which you should change the wireless channel on your Asus router depends on the level of interference and congestion in your area. If you notice a significant drop in Wi-Fi performance or experience frequent disconnections, it may be a good idea to check if changing the channel improves the situation. Additionally, if you live in a densely populated area or an apartment building with many neighboring networks, it may be beneficial to periodically scan for less congested channels and make the switch if necessary.