
Are you experiencing slow internet speeds or interference with your wireless connection? Changing your wireless channel might be the solution you’re looking for. Wireless channels are like virtual lanes that allow your devices to communicate with your Wi-Fi network. Just like a highway, certain channels can become overcrowded with traffic, leading to slower speeds and connectivity issues. Fortunately, most routers allow you to manually change the wireless channel to find a less congested one.
In this article, we will guide you through the process of changing wireless channels, whether you are using a computer, smartphone, or tablet. We will also provide you with some helpful tips on selecting the best channel for optimal Wi-Fi performance. So, if you’re tired of dealing with a sluggish connection, keep reading to discover how to change wireless channels and improve your internet experience.
Inside This Article
- Why Change Wireless Channels
- How to Determine the Current Wireless Channel
- Steps to Change Wireless Channels
- Tips for Optimal Wireless Channel Selection
- Conclusion
- FAQs
Why Change Wireless Channels
Wireless channels play a crucial role in the performance and stability of your wireless network. By default, most routers are set to automatically select the wireless channel for you. However, there are instances when changing the wireless channel can significantly improve the signal strength, reduce interference, and ultimately enhance your overall Wi-Fi experience.
One of the main reasons to change wireless channels is to avoid interference from other nearby networks. Wi-Fi operates on different channels within the 2.4 GHz and 5 GHz frequency bands. If multiple networks in your vicinity are using the same channel, it can result in congestion and a decrease in network performance. By changing the wireless channel, you can find a less crowded channel and minimize interference.
Another reason to change wireless channels is to overcome signal degradation caused by physical barriers. The signal quality of your Wi-Fi network can be affected by various factors such as walls, furniture, and other electronic devices. By changing the wireless channel, you may find a channel that provides better coverage and stability, enabling you to enjoy a stronger and more reliable wireless connection.
Additionally, changing the wireless channel can be beneficial if you experience frequent disconnections or slow internet speeds. Interference from neighboring networks or devices can disrupt the Wi-Fi signal and impact the overall performance of your network. Adjusting the channel can help mitigate these issues and lead to improved connectivity and faster data transfer speeds.
Lastly, it is essential to periodically change the wireless channel to adapt to changes in your environment. New devices, such as cordless phones, baby monitors, and microwave ovens, can introduce interference and affect your Wi-Fi network. By regularly monitoring and adjusting the wireless channel, you can maintain optimal wireless performance and minimize disruptions.
How to Determine the Current Wireless Channel
When it comes to troubleshooting Wi-Fi connectivity issues or optimizing your network performance, it’s essential to know what wireless channel your devices are using. Fortunately, identifying the current wireless channel is a straightforward process. Follow the steps below to determine the channel your Wi-Fi network is operating on:
1. First, ensure that you are connected to your Wi-Fi network. You can do this by accessing the internet on any device connected to your network.
2. Once connected, open a web browser and enter the default gateway IP address in the address bar. This IP address is specific to your router manufacturer and can usually be found in the router’s documentation or on the manufacturer’s website.
3. After entering the IP address, press Enter. This will bring you to the router’s login page. Enter the username and password for your router. If you have not changed the default login credentials, you can find them in the router’s manual or on the manufacturer’s website.
4. Once logged in, navigate to the wireless settings page. The location of this page may vary depending on the router model and firmware version. Look for options like “Wireless Settings” or “Wi-Fi Configuration.”
5. On the wireless settings page, you should find an option labeled “Wireless Channel” or “Channel.” This is where you can determine the current wireless channel being used by your router. The channel number will be displayed in this section.
6. Take note of the current wireless channel, as you may need this information later for troubleshooting or channel optimization purposes.
Once you have determined the current wireless channel, you can evaluate its performance and consider changing it if necessary. Remember that Wi-Fi channels can become congested, especially if there are multiple networks operating on the same channel in the vicinity. Choosing the right wireless channel can significantly improve your Wi-Fi signal strength and overall network performance.
Steps to Change Wireless Channels
Changing the wireless channel on your router can significantly improve your Wi-Fi performance and reduce interference from other devices. Follow these simple steps to change the wireless channel:
- Access your router’s settings: Open your web browser and enter the IP address of your router in the address bar. This is usually something like “192.168.1.1” or “192.168.0.1”. Consult your router’s manual or the manufacturer’s website if you’re unsure of the IP address.
- Login to your router: Enter your router’s username and password. This information can also be found in your router’s manual or on the manufacturer’s website.
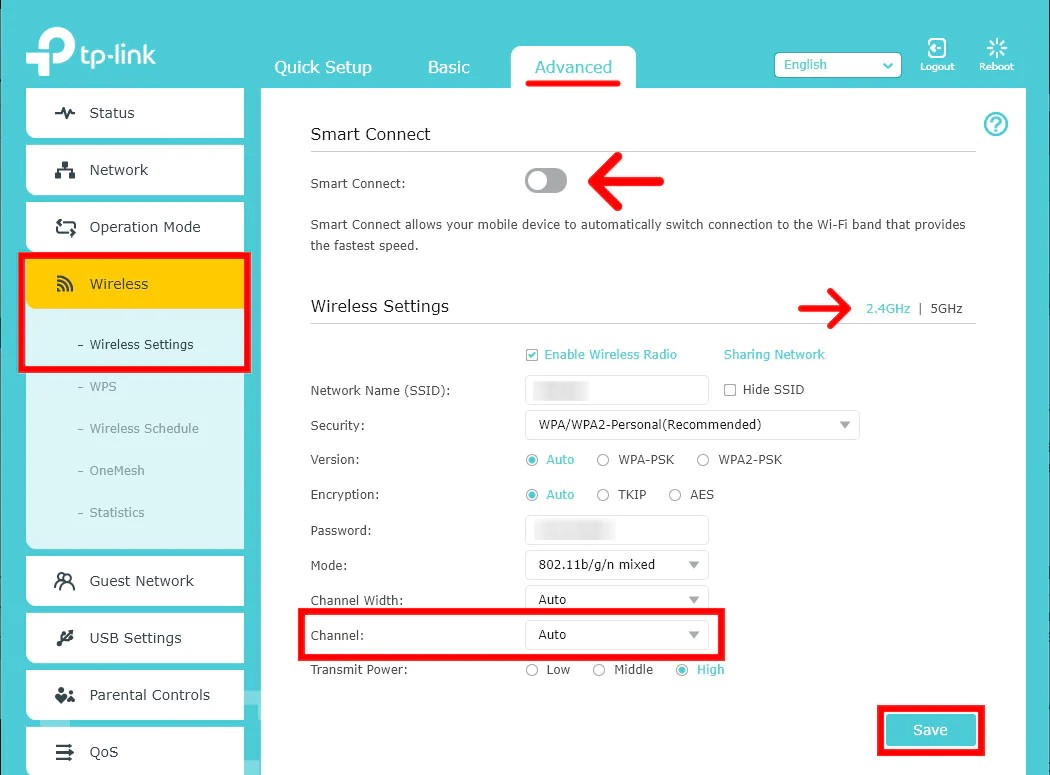
- Navigate to the wireless settings: Once logged in, look for the wireless settings tab or menu option. This may vary depending on your router’s interface, but it is usually labeled “Wireless” or “Wi-Fi Settings”.
- Select the channel: Within the wireless settings, you should see a dropdown menu or options to select the wireless channel. Choose a different channel from the one currently selected.
- Apply the changes: After selecting the new wireless channel, save or apply the changes. Your router will reboot, and the new channel will be implemented.
- Reconnect devices: Once your router restarts, you may need to reconnect your devices to the Wi-Fi network using the new wireless channel. Search for available networks on your devices and select your Wi-Fi network.
- Monitor performance: Check the performance of your Wi-Fi network after changing the channel. If you notice improved speed and reduced interference, you have successfully changed your wireless channel.
Remember, it is recommended to change your wireless channel if you experience slow internet speeds or frequent disconnections. Experiment with different channels to find the one that offers the best performance for your specific environment.
Tips for Optimal Wireless Channel Selection
When it comes to optimizing your wireless network, selecting the right channel is crucial. The channel you choose can greatly impact the performance and stability of your wireless connection. To help you make the best choice, here are some tips for optimal wireless channel selection:
1. Analyze Wi-Fi Interference: Before deciding on a channel, it’s important to identify potential sources of Wi-Fi interference. This can include nearby routers, cordless phones, microwaves, and even neighboring networks. Analyzing Wi-Fi interference will help you determine which channels are most crowded and which ones are less congested.
2. Use a Wi-Fi Analyzer: To simplify the process of identifying Wi-Fi interference, consider using a Wi-Fi analyzer app or software. These tools provide a visual representation of the available channels and their signal strengths. Wi-Fi analyzers can also help you detect overlapping channels or channels with high levels of interference.
3. Avoid Overlapping Channels: Overlapping channels can cause interference and result in decreased network performance. It’s important to choose a channel that is not overlapping with nearby networks. Ideally, you should select a channel that has the least amount of overlapping signals for optimal performance.
4. Consider 2.4GHz vs. 5GHz: Most routers support both 2.4GHz and 5GHz frequencies. While the 2.4GHz frequency offers better range, it is more prone to congestion and interference. The 5GHz frequency, on the other hand, provides faster speeds and is less crowded. Consider using the 5GHz frequency if your devices support it and if you’re experiencing congestion on the 2.4GHz band.
5. Experiment with Different Channels: Don’t be afraid to experiment with different channels to find the one that works best for your network. Start with the least congested channel and monitor the performance. If you notice any issues, try switching to a different channel to see if it improves your connection quality.
6. Update Router Firmware: Keeping your router’s firmware up to date is essential for optimal performance. Router manufacturers often release firmware updates that include performance improvements and bug fixes. Check for firmware updates regularly and install them to ensure your router operates at its best.
7. Regularly Monitor Network Performance: After selecting a channel, it’s important to regularly monitor the performance of your network. Keep an eye on signal strength, connection stability, and overall speed. If you notice any deterioration in performance, consider reevaluating your channel selection.
By following these tips, you can make informed decisions when it comes to selecting the optimal wireless channel for your network. This will help maximize performance, minimize interference, and ensure a stable and fast wireless connection for all your devices.
Conclusion
In conclusion, changing wireless channels can greatly improve your network performance and stability. By selecting the right channel, you can minimize interference and maximize your signal strength. Remember to consider the specific factors that may affect your network, such as neighboring Wi-Fi networks, electronic devices, and physical obstructions.
By following the step-by-step instructions provided in this article, you now have the knowledge to change your wireless channel and optimize your network settings. Don’t hesitate to experiment with different channels to find the one that works best for your specific environment.
Now that you understand the importance of wireless channels, take control of your network and enjoy smoother internet connectivity, faster speeds, and reduced buffering time. With a simple channel change, you’ll unlock the full potential of your wireless network and enhance your online experience.
FAQs
Q: Why would I need to change wireless channels on my cell phone?
Changing wireless channels on your cell phone can help improve the overall performance and stability of your Wi-Fi connection. If you’re experiencing slow internet speeds, dropped connections, or interference from other devices, switching to a different wireless channel can help alleviate these issues.
Q: How do I know if I should change wireless channels on my cell phone?
If you’re experiencing connectivity issues or poor Wi-Fi signal strength on your cell phone, it may be worth considering changing the wireless channel. Common signs that a channel change may be necessary include slow loading times, buffering while streaming content, and frequent disconnections from the Wi-Fi network.
Q: How do I change wireless channels on my cell phone?
To change wireless channels on your cell phone, follow these steps:
1. Go to the Settings menu on your cell phone.
2. Look for the Wi-Fi or Network settings option.
3. Find the wireless network you want to change channels for.
4. Tap on the network and select the option to “Forget” or “Disconnect”.
5. Reconnect to the network and your cell phone will automatically choose the best available channel.
Note: The exact steps may vary depending on the make and model of your cell phone.
Q: Which wireless channel should I choose for my cell phone?
The optimal wireless channel for your cell phone depends on the specific Wi-Fi environment and interference factors in your area. In general, it is recommended to use either channel 1, 6, or 11, as they are non-overlapping channels. However, it’s best to use a Wi-Fi analyzer app on your cell phone to identify the least congested channel and select that for better performance.
Q: Can I change wireless channels on my cell phone without affecting other devices?
Yes, changing the wireless channel on your cell phone should only affect your cell phone’s connection to the Wi-Fi network. Other devices connected to the same network, such as laptops, tablets, and smart home devices, should not be impacted by this change. However, it’s always a good idea to inform other users about any network changes to ensure seamless connectivity for everyone.