
Are you experiencing connectivity issues with your wireless router? Before calling technical support, why not try checking the settings of your wireless router yourself? Knowing how to check and modify the settings can help you troubleshoot and resolve common issues, such as slow internet speeds or intermittent connectivity. In this article, we will guide you step-by-step through the process of checking your wireless router settings. Whether you’re a tech-savvy individual or a beginner, we’ll make sure you have the knowledge and confidence to navigate your router’s settings interface and make necessary adjustments. So, grab your laptop or smartphone and let’s dive into the world of wireless router configurations.
Inside This Article
- Basic Router Configuration
- Accessing Router Settings
- Checking Wireless Router Settings
- Modifying Router Settings
- Conclusion
- FAQs
Basic Router Configuration
Setting up your wireless router is an essential step to ensure a stable and secure internet connection for your devices. By configuring the basic settings of your router, you can establish a network that meets your specific needs. This article will guide you through the process of basic router configuration, allowing you to optimize your router’s performance.
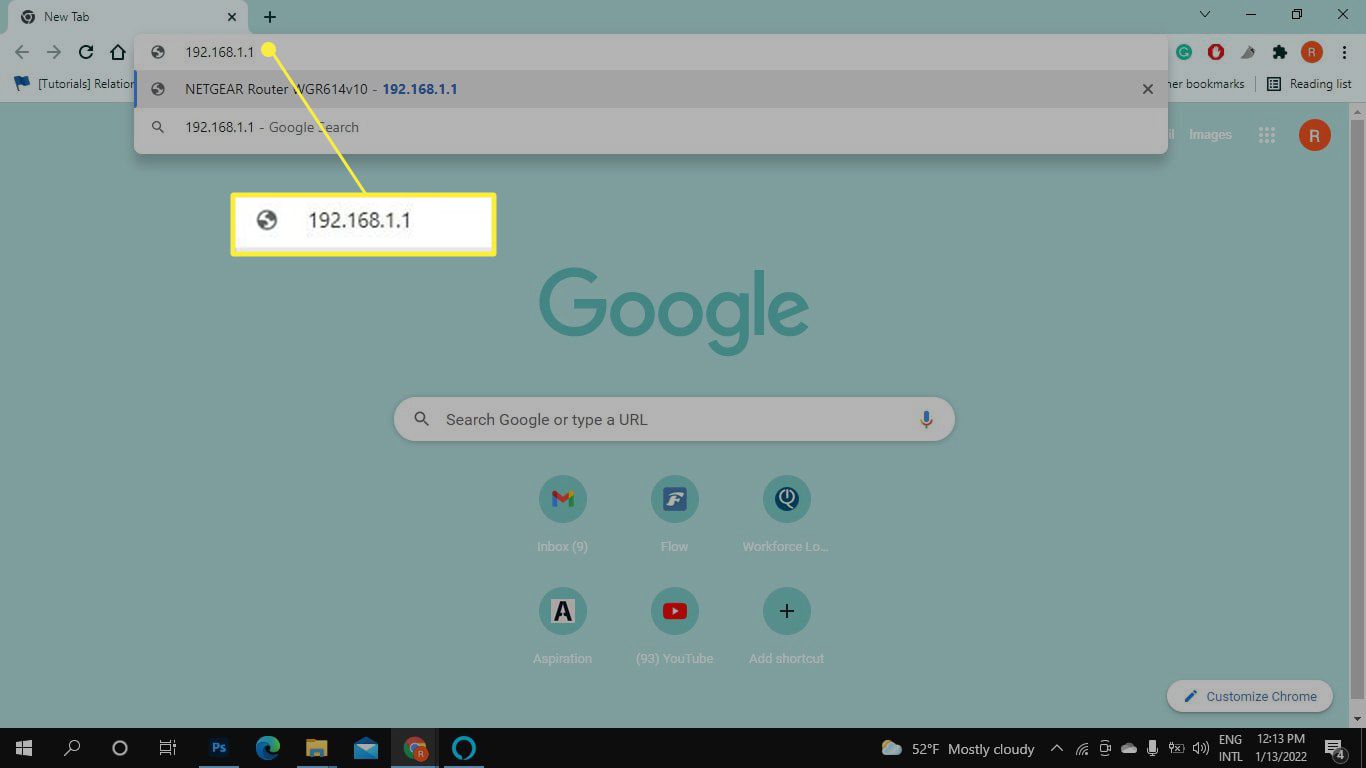
1. Connect to your router’s web interface: To access your router’s configuration settings, you’ll need to connect your computer or device to the router via an Ethernet cable or Wi-Fi. Open a web browser and enter the default IP address of your router (such as 192.168.1.1) in the address bar. This will take you to the login page of your router’s web interface.
2. Enter the login credentials: Most routers have default login credentials, which are usually “admin” for both the username and password. However, it is recommended to change these default credentials for security reasons. Consult your router’s documentation or the manufacturer’s website for the specific login credentials of your router.
3. Set up the wireless network: Once you have accessed the web interface, navigate to the wireless settings section. Here, you can customize the network name (SSID) and password for your wireless network. Make sure to choose a strong password to protect your network from unauthorized access.
4. Configure DHCP settings: DHCP (Dynamic Host Configuration Protocol) allows your router to assign IP addresses automatically to devices connected to your network. Typically, DHCP is enabled by default. However, you may need to adjust the DHCP range if you have a large number of devices or require specific IP address assignments.
5. Enable wireless security: It is crucial to enable wireless security measures to protect your network from potential threats. Choose a strong encryption method, such as WPA2-PSK (AES), and set a unique password. Remember to periodically change your network password to maintain security.
6. Update firmware: Firmware updates fix bugs, enhance performance, and introduce new features to your router. Check the manufacturer’s website for the latest firmware version for your model. Follow the instructions provided to update the firmware of your router to ensure optimal performance.
7. Save your settings: Once you have configured all the necessary settings, don’t forget to save your changes. Look for the “Save” or “Apply” button in the web interface, and click it to save your configurations. Your router will then apply the changes, and you can start enjoying your secure and efficient wireless network.
By following these basic router configuration steps, you can optimize your wireless network settings and ensure a seamless online experience for all your connected devices. Remember to regularly review and update your router’s settings to adapt to your changing needs and maintain a secure network environment.
Accessing Router Settings
Accessing your router’s settings is the first step in managing and configuring your wireless network. By accessing the router’s web interface, you can make changes to network settings, security protocols, and other advanced configurations. Here’s how you can access your router’s settings:
1. Connect your device to the router: To access the settings, your device must be connected to the router’s network. You can do this by connecting your computer or mobile device to the router via an Ethernet cable or through a wireless connection.
2. Determine the router’s IP address: Every router has a default IP address that allows you to access its settings. Typically, this is something like 192.168.1.1 or 192.168.0.1. You can check the router’s manual or search online to find the default IP address specific to your router model.
3. Open a web browser: Once you have the IP address, open a web browser like Chrome, Firefox, or Safari.
4. Enter the router’s IP address: In the address bar of the web browser, type in the router’s IP address and press Enter. This will take you to the login page of the router’s web interface.
5. Enter login credentials: To access the router’s settings, you need to enter the login credentials. The default username and password are often provided in the router’s manual. If you have changed the login information in the past and cannot remember it, you may need to reset the router to its factory settings.
6. Explore the router’s settings: Once you have successfully logged in, you can explore and make changes to various network settings, including wireless network configurations, security settings, port forwarding, and more. Be careful when making changes, as incorrect settings can impact your network’s performance.
7. Save your changes: After making any modifications to the settings, remember to save the changes before exiting the router’s web interface. This ensures that the new settings are applied and will take effect on your network.
By following these steps, you can easily access your wireless router’s settings and make any necessary adjustments to optimize your network performance and security.
Checking Wireless Router Settings
Wireless router settings are crucial for maintaining a stable and secure internet connection. Whether you want to troubleshoot connectivity issues, change network configurations, or ensure your wireless network is secure, checking your wireless router settings is essential. In this article, we will guide you through the process of accessing and reviewing your wireless router settings.
Accessing the Router’s Web Interface
The first step is to access your router’s web interface. To do this, you need to know the IP address of your router. Usually, the default IP address is either 192.168.0.1 or 192.168.1.1. Open a web browser and type the IP address in the address bar. Press Enter, and you will be prompted to enter your router’s username and password. Once authenticated, you will gain access to the router’s configuration page.
Verifying Wireless Network Settings
Once you are logged into the router’s web interface, navigate to the wireless settings section or something similar. Here, you can verify important wireless network settings, such as the network name (SSID), the wireless channel, and the type of security being used (e.g., WEP, WPA, WPA2). Ensure that the settings are correct and aligned with your network requirements. If necessary, you can make changes to optimize your wireless network’s performance.
Reviewing Security Settings
The security settings of your wireless router play a vital role in protecting your network from unauthorized access. Check the encryption method being used and ensure it is set to the highest level available, preferably WPA2-PSK (AES). Review the passphrase or security key, and if it is weak or outdated, consider changing it to a strong and unique one. Additionally, enabling MAC address filtering can add an extra layer of security, allowing only devices with approved MAC addresses to connect to your network.
Configuring Advanced Router Settings
Advanced router settings offer additional customization options to enhance your wireless network experience. This includes features like Quality of Service (QoS), which allows you to prioritize certain types of network traffic, such as video streaming or online gaming. You can also adjust the channel width and transmission power to optimize signal strength and coverage. However, it is important to note that these settings should only be modified if you have a good understanding of their impact on your network.
By regularly checking your wireless router settings, you can ensure that your network is operating at its best performance and security levels. Remember to save any changes you make and test your internet connectivity afterward to confirm that everything is functioning correctly.
Modifying Router Settings
Modifying the settings on your wireless router can greatly improve your network performance and security. Whether you want to change the broadcast channel, set up a guest network, or configure parental controls, accessing and modifying the router settings is crucial. In this article, we will guide you through the necessary steps to modify your wireless router settings.
Step 1: Accessing the Router’s Web Interface
To modify your router settings, you need to access the router’s web interface. First, connect your computer to the router either via an Ethernet cable or through a wireless connection. Open a web browser and enter the default IP address of your router (commonly 192.168.1.1 or 192.168.0.1) into the address bar. Press Enter and you will be redirected to the router’s login page.
Enter the router’s username and password. If you haven’t changed them, you can find the default login credentials in the router’s manual or on the manufacturer’s website. Once logged in, you will have access to the router’s settings.
Step 2: Verifying Wireless Network Settings
The next step is to verify and modify your wireless network settings. In the router’s interface, look for the “Wireless” or “Wireless Network” tab. Here, you can change the network name (also known as SSID) to something unique and memorable. It is also recommended to enable WPA2-PSK security and set a strong password to protect your network from unauthorized access.
Additionally, you can select the appropriate wireless channel to minimize interference from other nearby networks. Experiment with different channels to find the one that provides the best signal strength and reliability for your devices.
Step 3: Reviewing Security Settings
Security should be a top priority when it comes to your wireless router. In the router’s settings, navigate to the “Security” or “Firewall” section. Here, you can configure the firewall settings, enable MAC address filtering, and set up a VPN for added security. It is also essential to keep the router’s firmware up to date to protect against any potential vulnerabilities.
Step 4: Configuring Advanced Router Settings
If you are comfortable with advanced settings, you can explore additional options in the router’s interface. Some routers offer features like Quality of Service (QoS) settings, which allow you to prioritize certain types of traffic for a smoother online experience. You may also find options for port forwarding, dynamic DNS, and remote management.
Remember, when modifying advanced settings, be cautious and backup your current configuration to avoid any network disruptions. If you are unsure about any specific settings, consult the router’s manual or seek assistance from the manufacturer’s support forums.
By following these steps, you can easily modify your wireless router settings to optimize performance, enhance security, and personalize your network. Remember to make changes judiciously and test the impact of each modification before making further adjustments. Happy customizing!
Conclusion
Checking your wireless router settings is essential for ensuring a secure and efficient internet connection. By accessing the router’s admin interface, you can manage various settings such as network name, password, security protocols, and more. Understanding how to access these settings can help you troubleshoot connectivity issues, optimize performance, and protect your network from unauthorized access.
Remember to keep your router’s firmware up to date and periodically change your network password to further enhance security. By regularly reviewing and adjusting your wireless router settings, you can enjoy a seamless internet experience and peace of mind knowing that your connection is safe and optimized.
If you’re unsure about any specific router settings, consult the manufacturer’s documentation or contact their support for assistance. Taking the time to familiarize yourself with your router’s settings will empower you to make the necessary adjustments for a better wireless experience.
FAQs
1. How do I log into my wireless router settings?
To log into your wireless router settings, you first need to connect your device to the router either via Wi-Fi or with an Ethernet cable. Once connected, open a web browser and enter the router’s default IP address (e.g., 192.168.1.1) in the address bar. This will take you to the router’s login page. Enter the default username and password (often found on the router itself or in the user manual) to access the settings.
2. Can I change the wireless network name (SSID) and password of my router?
Yes, you can change the wireless network name (SSID) and password of your router. After logging into your router’s settings, look for the wireless or network settings section. Within this section, you will find options to modify the network name and password. Make sure to save the changes before exiting the settings page.
3. How can I improve the Wi-Fi signal strength in my home?
To improve the Wi-Fi signal strength in your home, there are a few things you can try:
- Position your router in a central location, away from obstructions and interference.
- Ensure that your router firmware is up to date.
- Use a Wi-Fi range extender or mesh Wi-Fi system to extend coverage.
- Minimize interference from other devices, such as cordless phones or microwave ovens.
- Reduce the number of connected devices on your network.
4. How can I secure my wireless router?
To secure your wireless router, you should take the following steps:
- Change the default administrator username and password.
- Enable network encryption (WPA2 is recommended).
- Use a strong and unique Wi-Fi password.
- Disable remote management.
- Enable and configure a firewall on your router.
5. What should I do if I forget my wireless router password?
If you forget your wireless router password, you can usually reset the router to its factory default settings. Look for a small reset button on the back or bottom of the router. Press and hold the reset button for about 10 seconds until the router restarts. Note that doing this will erase all previous settings, and you will need to set up your router again from scratch, including creating a new password.