
Are you struggling to set up your Netgear N300 wireless router? Look no further! In this comprehensive guide, we will walk you through the step-by-step process of configuring your Netgear N300 router to ensure a seamless and secure wireless connection.
Whether you are a tech-savvy individual or a beginner in the world of networking, we have got you covered. From connecting and configuring the router to optimizing its settings for fast and reliable internet access, this article will provide you with the necessary knowledge to get your Netgear N300 up and running quickly.
So, let’s dive in and equip you with the skills to configure your Netgear N300 wireless router like a pro!
Inside This Article
- Overview of Netgear N300 Wireless Router
- Step 1: Connecting the Router to Your Modem
- Step 2: Accessing the Router’s Web Graphical Interface
- Step 3: Configuring the Basic Wireless Settings
- Step 4: Setting Up Wireless Security
- Step 5: Configuring Advanced Router Settings
- Step 6: Troubleshooting and Common Issues
- Conclusion
- FAQs
Overview of Netgear N300 Wireless Router
The Netgear N300 Wireless Router is a popular and affordable choice for home and small office users who need reliable and secure wireless internet access. It offers fast wireless speeds, wide coverage, and easy setup, making it a convenient option for users of all skill levels.
The N300 supports the latest wireless standards, including 802.11n, to provide fast and stable connections for your devices. With a wireless speed of up to 300Mbps, you can enjoy smooth streaming, online gaming, and quick file transfers without any lag or buffering.
This router features external antennas that help to extend the Wi-Fi coverage throughout your home or office. This means you can stay connected in every corner, eliminating dead spots and ensuring a consistent and reliable internet connection wherever you are.
Setting up the Netgear N300 Wireless Router is a breeze. With its easy-to-follow setup wizard and web graphical interface, even users with little to no technical knowledge can get their network up and running quickly. Simply connect the router to your modem, follow the step-by-step instructions, and you’ll be ready to go in no time.
The N300 also offers advanced security features to keep your network and data safe. It supports WPA/WPA2 encryption protocols, which provide strong and secure wireless connections. Additionally, it has a built-in firewall that helps protect your network from potential threats and intrusions.
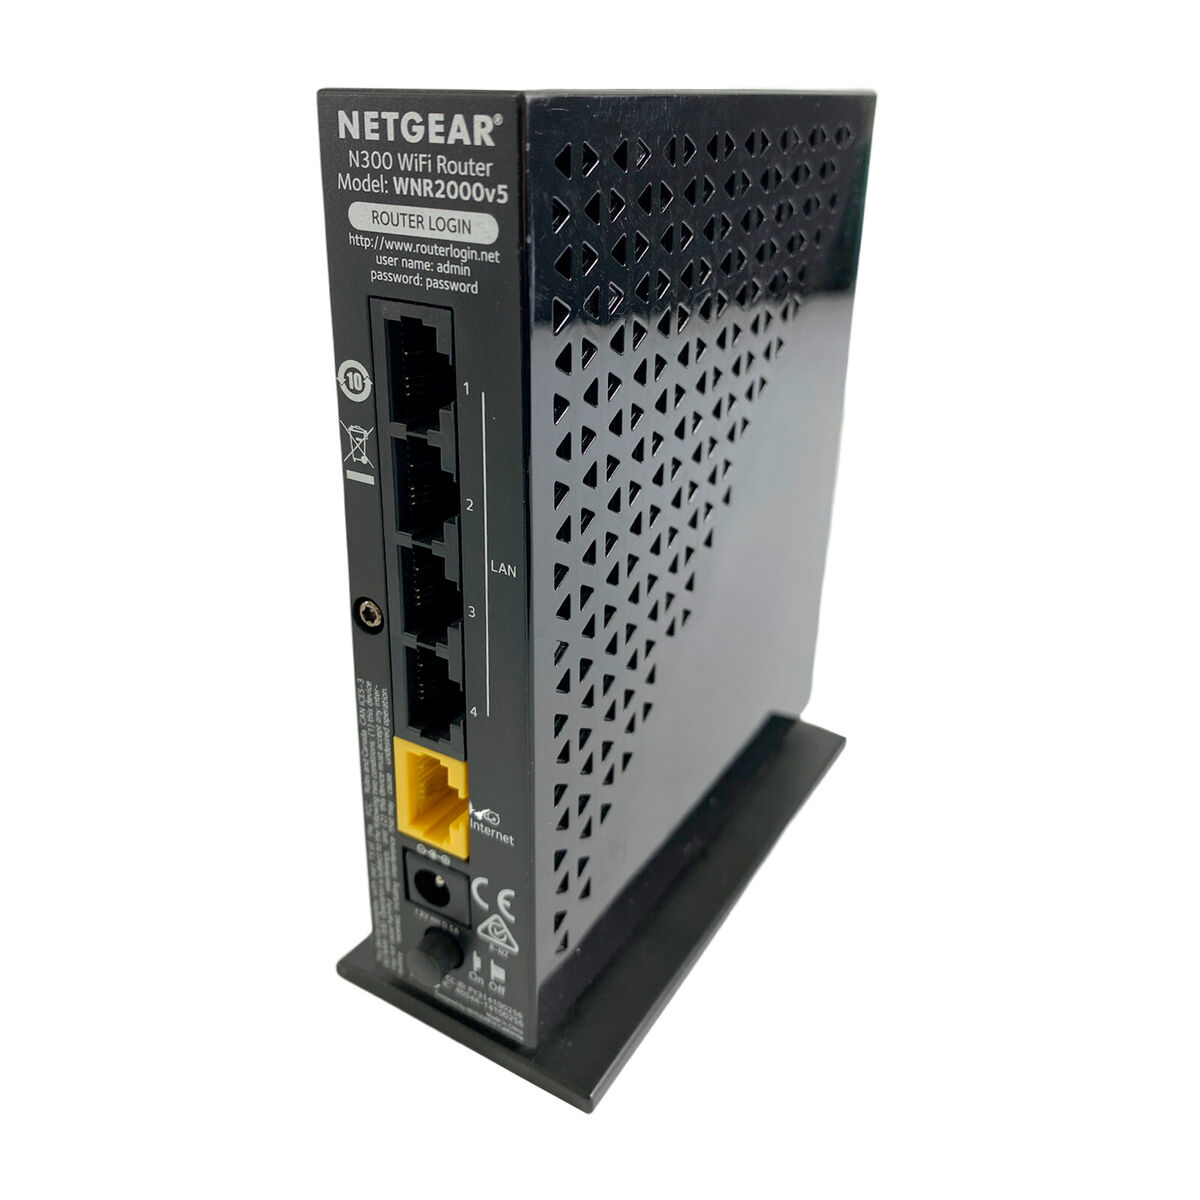
This router is equipped with four Ethernet ports, allowing you to connect wired devices such as desktop computers, gaming consoles, or Smart TVs directly to the network. This ensures a stable and consistent wired connection for activities that require high bandwidth, such as streaming movies or transferring large files.
Furthermore, the Netgear N300 Wireless Router comes with a range of additional features to enhance your internet experience. It supports Quality of Service (QoS), which allows you to prioritize certain applications or devices for better performance. It also has a guest network feature, enabling you to create a separate network for your guests without compromising the security of your main network.
Step 1: Connecting the Router to Your Modem
Before you can start enjoying the benefits of your Netgear N300 wireless router, you need to first connect it to your modem. This step is crucial as it establishes the connection between your internet service provider (ISP) and your router, allowing you to access the internet wirelessly.
To begin, ensure that both your modem and router are powered off. Locate the Ethernet cable that connects your modem to your computer and unplug it from your computer’s Ethernet port. Take the other end of the cable and plug it into the yellow Ethernet port on the back of your Netgear N300 router.
Next, take a separate Ethernet cable and connect one end to the router’s blue WAN port, which stands for Wide Area Network. The other end of this cable should be plugged into the Ethernet port on your modem. This establishes the connection between your modem and router.
Once the cables are connected, power on your modem first and wait for it to establish a connection with your ISP. Once the connection is established, proceed to power on your Netgear N300 router.
It’s important to note that during the initial setup process, the router may take a few minutes to boot up and establish a stable connection. Be patient and allow ample time for this process to complete.
Once the router has fully powered on and connected to your modem, you can proceed to the next step of accessing the router’s web graphical interface (GUI) to configure the settings and personalize your wireless network.
Step 2: Accessing the Router’s Web Graphical Interface
Once you have connected your Netgear N300 Wireless Router to your modem, it’s time to access the router’s web graphical interface to configure its settings. This interface allows you to customize various features of your router, such as network settings, security options, and more.
To access the web graphical interface, follow these simple steps:
- Open a web browser on your computer or mobile device. It can be any web browser of your choice, such as Google Chrome, Mozilla Firefox, or Safari.
- Type the default IP address of your Netgear N300 router into the address bar of the web browser. The default IP address for most Netgear routers is typically “192.168.1.1”.
- Press the Enter key on your keyboard or click the Go button next to the address bar.
- A login page will appear, prompting you to enter your username and password. The default username is often “admin” and the default password is “password”. However, it’s always a good practice to check the manual or the sticker on the back of your router for the correct default login credentials.
- Enter the username and password in the respective fields and click the Login or Submit button to proceed.
Once you successfully log in, you will be granted access to the router’s web graphical interface. Here, you can explore the various settings and options that the Netgear N300 router offers, allowing you to personalize your network configuration to suit your needs.
It’s important to note that after accessing the web graphical interface, you should change the default username and password to ensure the security of your router. This will help prevent unauthorized access and keep your network safe.
Now that you know how to access the router’s web graphical interface, you can proceed to the next step in configuring your Netgear N300 Wireless Router.
Step 3: Configuring the Basic Wireless Settings
Configuring the basic wireless settings on your Netgear N300 Wireless Router is essential for ensuring seamless connectivity and optimal performance. By following these simple steps, you can easily set up your wireless network and start enjoying the benefits of wireless connectivity.
The first step in configuring the basic wireless settings is to access the router’s web graphical interface. Open a web browser on your computer and enter the default IP address of the router (usually 192.168.1.1) into the address bar. Press Enter to proceed.
Once you are on the router’s web graphical interface, you will need to enter the username and password. By default, the username is ‘admin’ and the password is ‘password’. If you have changed these login credentials, enter your custom username and password to continue.
After successfully logging in, you will be directed to the router’s dashboard. Look for the ‘Wireless Settings’ or ‘Wireless Setup’ tab in the menu. Click on it to access the basic wireless settings.
In the basic wireless settings, you can customize the network name (SSID) and set the security options for your wireless network. The SSID is the name that identifies your wireless network. Choose a unique and recognizable name, as it will be visible to other devices when they search for available networks.
Next, select the appropriate wireless security options to secure your network. It is highly recommended to use the WPA2-PSK (AES) security mode, as it offers the highest level of encryption. Create a strong and unique password, preferably a combination of letters, numbers, and symbols, to protect your network from unauthorized access.
Once you have configured the SSID and security settings, click on the ‘Apply’ or ‘Save’ button to save the changes. The router may take a few seconds to apply the settings and restart the wireless network.
After the router restarts, your wireless network will be ready for use. Locate the Wi-Fi icon on your devices and select your network name from the list of available networks. Enter the password you configured earlier, and you will be connected to your Netgear N300 Wireless Router.
Remember to write down the SSID and password for future reference and to share with trusted individuals who need access to your network. You can also customize additional settings, such as Wi-Fi channel and transmission power, to optimize your wireless network’s performance and coverage.
By following these steps to configure the basic wireless settings, you can ensure a secure and reliable wireless network for all your connected devices. Enjoy the freedom of wireless connectivity and experience the convenience it brings to your home or office.
Step 4: Setting Up Wireless Security
Setting up wireless security is a crucial step to protect your network from unauthorized access and ensure the safety of your personal information. By implementing the right security measures, you can prevent unwanted users from connecting to your wireless network. Here are some steps to follow:
1. Access the router’s web graphical interface: Open a web browser and enter the IP address of your Netgear N300 Wireless Router in the address bar. You will be prompted to enter the login credentials. Once logged in, navigate to the wireless settings page.
2. Choose a strong network name (SSID): The SSID is the name that identifies your wireless network. Avoid using personal information or easily guessable names. Instead, choose a unique and memorable name that does not reveal any personal details.
3. Enable network encryption: Encryption scrambles the data transmitted over your network, making it unreadable to unauthorized users. Select WPA2-PSK (AES) as the encryption type, as it is the most secure option available. Create a strong passphrase that is at least 8 characters long and includes a combination of letters, numbers, and symbols.
4. Change the default router login credentials: It is essential to change the default username and password for your router’s administration interface to prevent unauthorized access. Choose a strong and unique password that combines upper and lowercase letters, numbers, and special characters.
5. Enable MAC address filtering: MAC address filtering allows you to control which devices can connect to your wireless network based on their unique MAC addresses. Add the MAC addresses of your devices to the allowed list to ensure only authorized devices can connect.
6. Disable SSID broadcast: By disabling SSID broadcast, you make your network invisible to casual users. This adds an extra layer of protection as users won’t be able to see your network when scanning for available Wi-Fi networks.
7. Regularly update firmware: Keep your router’s firmware up to date to benefit from the latest security patches and enhancements. Check the Netgear support website regularly for firmware updates and follow the instructions to install them.
By following these steps, you can greatly enhance the security of your Netgear N300 Wireless Router and protect your wireless network from potential threats. Remember to keep your network passphrase and router login credentials in a safe place and avoid sharing them with anyone.
Step 5: Configuring Advanced Router Settings
Once you have successfully set up the basic wireless settings and secured your Netgear N300 Wireless Router, it’s time to explore the advanced options and optimize your router’s performance. Here are the steps to configure the advanced settings:
1. Access the router’s web graphical interface by typing the router’s IP address into your web browser. This information can usually be found on the back of the router or in the user manual. Once you are on the login page, enter the username and password to log in.
2. Navigate to the “Advanced” or “Advanced Settings” tab in the router’s interface. Here, you will find a range of options to customize your router’s behavior.
3. QoS (Quality of Service) Settings: Quality of Service allows you to prioritize certain types of network traffic. If you use bandwidth-intensive applications like online gaming or streaming, you can allocate more bandwidth to them to enhance their performance. Adjust the QoS settings based on your needs.
4. Port Forwarding: If you need to access specific services or applications from the internet, you may need to configure port forwarding. This involves redirecting incoming traffic from specific ports to specific devices on your network. Consult the user manual or Netgear’s support website for instructions on setting up port forwarding.
5. Dynamic DNS: Dynamic DNS (Domain Name System) allows you to assign a hostname to your router’s IP address. This is useful if your internet service provider assigns you a dynamic IP address that changes periodically. With dynamic DNS, you can access your router remotely using a domain name instead of the ever-changing IP address.
6. VPN (Virtual Private Network): If you need to securely connect to your home network from an external location, configuring a VPN on your router is a great option. A VPN creates a secure encrypted tunnel between your device and your home network, ensuring your data remains private. Follow the instructions provided by Netgear to set up a VPN on your router.
7. Parental Controls: Netgear routers offer robust parental control features, allowing you to manage and monitor your children’s internet usage. Set up website blocking, schedule internet access times, and even monitor browsing history through the router interface.
8. Device Management: Finally, take advantage of the various device management options. You can update the firmware of the router, backup and restore settings, view system logs for troubleshooting purposes, and much more. Regularly check for firmware updates to ensure your router’s security and performance.
By configuring these advanced router settings, you can enhance your network performance, protect your online activities, and customize your router’s behavior to suit your needs. Take the time to explore these options and make the most out of your Netgear N300 Wireless Router!
Step 6: Troubleshooting and Common Issues
Even with the most advanced technology, issues can sometimes arise when setting up and using your Netgear N300 Wireless Router. This step will guide you through troubleshooting common problems that you may encounter, ensuring a smooth and hassle-free experience.
1. No Internet Connection: If you are unable to establish an internet connection after setting up your Netgear N300 router, try these troubleshooting steps:
- Check your modem and ensure it is connected properly to the router.
- Reset your modem and router by unplugging them from the power source, waiting for 10 seconds, and then plugging them back in.
- If the issue persists, contact your internet service provider (ISP) to ensure there are no network outages or problems with your internet connection.
2. Slow or Weak Wi-Fi Signal: If your wireless signal is weak or your internet speed is slower than expected, follow these steps:
- Place your router in a central location to ensure maximum coverage.
- Avoid placing your router near obstructions such as walls, cabinets, or other electronic devices that may interfere with the signal.
- Consider purchasing a Wi-Fi range extender to enhance the signal in areas with poor coverage.
3. Forgotten Router Password: If you have forgotten the password for accessing your router’s web graphical interface, you can reset it to the factory default settings. Here’s how:
- Locate the reset button on the back of the router.
- Using a paperclip or small tool, press and hold the reset button for about 10 seconds until the router’s lights flash.
- Your router will reset to the factory default settings, including the password.
4. Firmware Update: It’s essential to keep your Netgear N300 Wireless Router’s firmware up to date to ensure optimal performance. To update the firmware:
- Visit the Netgear support website and download the latest firmware for your router model.
- Access the router’s web graphical interface and go to the firmware update section.
- Upload the downloaded firmware file and follow the on-screen instructions to complete the update process.
5. Firewall Blocking Connections: If you’re having trouble establishing connections to certain websites or services, your router’s firewall settings may be blocking them. To resolve this:
- Access the router’s web graphical interface and go to the firewall settings.
- Disable the firewall temporarily and test the connections again.
- If the issue is resolved, consider adjusting the firewall settings to allow the necessary connections.
6. Incompatible Devices: If you’re experiencing compatibility issues with certain devices, make sure they are using the correct wireless standards supported by the Netgear N300 Wireless Router. Consult the router’s documentation or the manufacturer’s website to confirm compatibility.
By following these troubleshooting steps, you can overcome common problems that may arise when configuring and using your Netgear N300 Wireless Router. Remember to consult the router’s documentation or reach out to Netgear’s customer support for additional assistance if needed.
Conclusion
Configuring your Netgear N300 Wireless Router is a simple and straightforward process that allows you to enjoy a seamless and secure wireless internet connection. By following the steps outlined in this guide, you can easily set up your router, customize the settings according to your preferences, and troubleshoot any connectivity issues that may arise.
Remember to keep your router firmware up to date to ensure optimal performance and security. Additionally, make sure to safeguard your network by setting a strong password and enabling encryption.
With the Netgear N300 Wireless Router, you can experience fast and reliable Wi-Fi coverage throughout your home or office. Whether you need to connect your laptops, smartphones, or smart devices, this router offers the speed and range to keep you connected.
So, go ahead and configure your Netgear N300 Wireless Router to enjoy uninterrupted internet access and maximize your wireless network’s potential.
FAQs
1. How do I configure my Netgear N300 wireless router?
Configuring your Netgear N300 wireless router is relatively simple. First, connect your router to your modem using an Ethernet cable. Then, connect your computer to the router either via Ethernet cable or Wi-Fi. Open a web browser and type in the default IP address of the router, usually 192.168.1.1. Enter the default username and password (which can be found in the router’s user manual or on the bottom of the router itself) to access the router’s settings. From here, you can modify your network name (SSID), set a secure password, and configure other settings as needed.
2. How can I change the Wi-Fi password on my Netgear N300 wireless router?
To change the Wi-Fi password on your Netgear N300 wireless router, you’ll need to log in to the router’s administration page. Open a web browser and type in the default IP address of the router, typically 192.168.1.1. Enter the username and password to access the router’s settings. Once logged in, navigate to the Wireless settings section and look for the option to change the password. Enter a new password and save the changes. Make sure to update the password on your devices that connect to the router as well.
3. How do I update the firmware on my Netgear N300 wireless router?
Updating the firmware on your Netgear N300 wireless router is important to ensure optimal performance and security. To update the firmware, follow these steps: First, visit the Netgear support website and download the latest firmware version for your specific router model. Next, access the router’s administration page by entering the default IP address (usually 192.168.1.1) into a web browser. Log in using the administrator username and password. Navigate to the Firmware Update section and choose the option to upload the new firmware file. Follow the on-screen instructions to complete the firmware update.
4. Why can’t I connect to the internet after configuring my Netgear N300 wireless router?
If you’re unable to connect to the internet after configuring your Netgear N300 wireless router, check the following: First, make sure that your modem is connected to the router correctly. Ensure that all cables are securely connected. Restart both the modem and router, and wait for them to fully initialize. Check the internet connectivity status on your router’s admin page to ensure it shows as connected. If the issue persists, you can try resetting your router to factory settings and reconfiguring it from scratch. If problems persist, contact your internet service provider for further assistance.
5. How can I improve the Wi-Fi range of my Netgear N300 wireless router?
If you want to improve the Wi-Fi range of your Netgear N300 wireless router, try these tips: First, position your router in a central location in your home or office, away from obstructions. Place the router at an elevated location, preferably at a higher floor level. Avoid placing the router near other electronic devices that may interfere with its signal. You can also try adjusting the router’s antenna orientation for better coverage. If you have a large area to cover, consider using Wi-Fi range extenders or repeaters to extend the signal further.