
If you’re looking to disable the wireless functionality on your Netgear router, you’ve come to the right place. Whether you want to prioritize your wired connections or simply need to temporarily turn off the Wi-Fi, this guide will walk you through the process step by step. By disabling the wireless feature, you can ensure that only devices connected via Ethernet cables can access the internet, providing enhanced security and stability. Whether you’re a tech-savvy individual or a beginner, this article will help you navigate the Netgear router settings and disable the wireless function easily. So, let’s dive in and learn how to disable wireless on your Netgear router.
Inside This Article
- Why Disable Wireless on Netgear Router?
- How to Disable Wireless on Netgear Router
- Step 1: Accessing the Router’s Web Interface
- Step 2: Navigating to the Wireless Settings
- Step 3: Disabling the Wireless Feature
- Step 4: Saving and Applying the Changes
- Conclusion
- FAQs
Why Disable Wireless on Netgear Router?
There can be several reasons why you might want to disable the wireless feature on your Netgear router. Let’s explore some of the key reasons:
- Better Security: By disabling wireless, you eliminate the risk of unauthorized users accessing your network. This can help safeguard your sensitive information and protect your network from potential cyber threats.
- Reduced Interference: In crowded areas with multiple Wi-Fi networks, disabling the wireless feature on your Netgear router can help reduce interference and improve network performance for connected devices.
- Saving Bandwidth: By disabling the wireless feature, you can prevent unnecessary bandwidth usage from devices that are not actively being used. This can be useful if you have a limited data plan or want to prioritize bandwidth for specific devices.
- Enhanced Parental Control: Disabling wireless can be an effective way to control internet access for children or limit the usage of certain devices. This can help promote a healthy balance between online and offline activities.
- Extended Battery Life: If you have devices like smartphones or tablets constantly searching for wireless networks, disabling the wireless feature on your Netgear router can help conserve battery life.
Considering these reasons, disabling the wireless feature on your Netgear router can offer a range of benefits depending on your specific needs and preferences.
How to Disable Wireless on Netgear Router
Are you looking for a way to disable the wireless feature on your Netgear router? Whether you want to prioritize a wired connection or enhance the security of your network, disabling the wireless function can be a simple and effective solution. In this article, we’ll walk you through the steps to disable the wireless feature on your Netgear router.
Before we delve into the steps, let’s explore the reasons why you might want to disable the wireless feature on your Netgear router.
- 1. Priority of Wired Connection: By disabling the wireless function, you can prioritize the use of a wired connection. This is particularly useful if you rely heavily on activities that require a stable and high-speed connection, such as online gaming or video streaming.
- 2. Enhanced Security: Disabling the wireless feature adds an extra layer of security to your network. With wireless functionality turned off, potential hackers won’t be able to connect to your router wirelessly, reducing the risk of unauthorized access to your network.
- 3. Reduced Interference: In some cases, the wireless signals from multiple routers in close proximity can interfere with each other. By disabling the wireless function on your router, you can minimize interference and improve the overall performance of your network.
Now that you understand the benefits of disabling the wireless feature, let’s move on to the step-by-step process.
Step 1: Accessing the Router’s Web Interface
To disable the wireless feature on your Netgear router, you need to access the router’s web interface. Open a web browser on a device connected to the router and enter the router’s IP address in the address bar. If you don’t know the IP address, you can find it on the back or bottom of your Netgear router or refer to the instruction manual.
Step 2: Navigating to the Wireless Settings
Once you’ve entered the router’s IP address, you’ll be prompted to enter the username and password. Enter the credentials and log in to the router’s web interface. From the dashboard, navigate to the wireless settings. This can usually be found under the “Wireless” or “Advanced” tab.
Step 3: Disabling the Wireless Feature
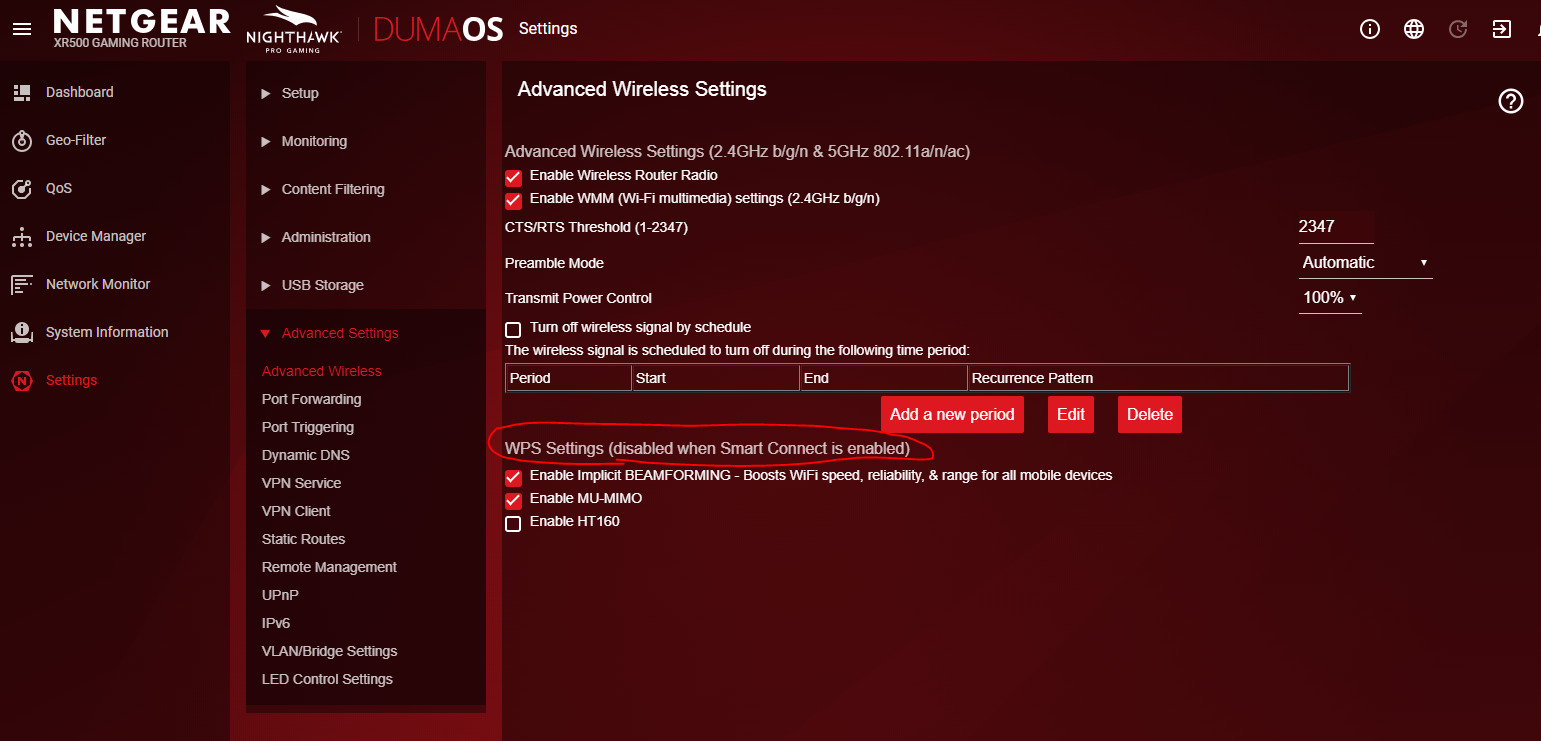
Within the wireless settings, you’ll find an option to enable or disable the wireless feature. Look for a checkbox or toggle switch labeled “Enable Wireless” or something similar. Untick or switch off the option to disable the wireless feature.
Step 4: Saving and Applying the Changes
After disabling the wireless feature, don’t forget to save and apply the changes. Look for a button or link that allows you to save the settings. Click on it and wait for the changes to be applied. Your Netgear router’s wireless function is now disabled.
Step 1: Accessing the Router’s Web Interface
Accessing the web interface of your Netgear router allows you to configure various settings, including disabling the wireless feature. Here’s how you can access the router’s web interface:
1. Connect your computer or laptop to the Netgear router using an Ethernet cable. Ensure that the connection is stable and that the cable is securely plugged into both the computer and the router.
2. Open a web browser on your computer and type the default IP address of the router into the address bar. The default IP address for Netgear routers is usually 192.168.1.1 or 192.168.0.1. Press Enter to proceed.
3. You will be prompted to enter your router’s username and password. By default, the username is usually “admin,” and the password is “password” or “1234.” If you have changed these credentials in the past, enter the updated username and password to continue.
4. After entering the correct login credentials, click on the “Login” or “Submit” button to access the router’s web interface.
Once you successfully log in to the router’s web interface, you can proceed with the next steps to disable the wireless feature on your Netgear router.
Step 2: Navigating to the Wireless Settings
Once you have successfully accessed the web interface of your Netgear router, you can navigate to the wireless settings to proceed with disabling the wireless feature. Follow the steps below:
1. Look for the “Advanced” or “Advanced Setup” option in the navigation menu. It is usually located on the left-hand side of the page.
2. Click on the “Wireless Settings” or “Wireless” option. This will open the wireless settings page where you can configure the wireless features of your router.
3. On the wireless settings page, you will find various options related to your router’s wireless network. These options may include the network name (SSID), security settings, channel selection, and more.
4. Locate the checkbox or option that allows you to enable or disable the wireless feature. The option may be labeled as “Enable Wireless” or “Wireless On/Off.” Uncheck or disable this option to turn off the wireless functionality.
5. Some Netgear routers may require you to click on a “Apply” button or save the changes before the wireless feature is disabled. Look for the “Apply” or “Save” button on the page, and click on it to save the changes you made to the wireless settings.
That’s it! You have successfully navigated to the wireless settings of your Netgear router and disabled the wireless feature. This will ensure that no one can connect to your router wirelessly.
Step 3: Disabling the Wireless Feature
Disabling the wireless feature on your Netgear router is a straightforward process that can help enhance your network security or conserve power. By disabling the wireless feature, you effectively turn your router into a wired-only device, meaning that only devices connected through Ethernet cables can access your network.
To disable the wireless feature, follow these simple steps:
- Access your router’s web interface by opening a web browser and entering the router’s IP address in the address bar. The default IP address for Netgear routers is often 192.168.1.1 or 192.168.0.1.
- Enter your username and password to log in to the router’s web interface. If you haven’t changed these credentials, the default username is usually admin, and the default password is either password or 1234.
- Navigate to the wireless settings page. The location of this page may vary depending on the router model, but you can typically find it under the “Wireless” or “Wireless Settings” tab.
- Look for an option to disable the wireless feature. It may be labeled as “Enable Wireless,” “Wireless On/Off,” or something similar. Select the option to disable the wireless feature.
- Once you have disabled the wireless feature, click on the “Save” or “Apply” button to save and apply the changes to your router’s settings.
And that’s it! You have successfully disabled the wireless feature on your Netgear router. Keep in mind that after disabling the wireless feature, you will no longer be able to connect to your router using Wi-Fi. However, any devices connected via Ethernet cables will still be able to access your network and the internet.
This additional layer of security can be beneficial in preventing unauthorized access to your network, especially if you live in a densely populated area or if you have sensitive data that you want to protect.
If, in the future, you decide to re-enable the wireless feature, you can follow the same steps and simply select the option to enable wireless on your router’s settings page.
Remember, as technology continues to evolve, it is important to stay secure and adapt your network settings accordingly. Disabling the wireless feature on your Netgear router is just one of the many steps you can take to ensure the safety and efficiency of your home or office network.
Step 4: Saving and Applying the Changes
Once you have made the necessary adjustments to the wireless settings on your Netgear router, it is important to save and apply the changes to ensure they take effect. This step is crucial in disabling the wireless feature effectively. Here’s how you can save and apply the changes:
1. Look for the “Apply” or “Save” button on the router’s web interface. It is usually located at the bottom or top of the settings page.
2. Click on the “Apply” or “Save” button to initiate the saving and applying process.
3. Depending on your router’s model and firmware, you may encounter a warning message confirming your action. This message may mention that the router will reboot or that your internet connection will be temporarily interrupted. Read the message carefully and proceed accordingly.
4. Once you are sure that you want to save and apply the changes, click on the “OK” or “Apply” button on the warning message. This will initiate the saving and applying process.
5. The router will now start saving and applying the changes you made to the wireless settings. The process may take a few moments, so be patient and avoid interrupting it.
6. After the changes have been applied successfully, you may be redirected back to the router’s web interface or see a confirmation message. This indicates that the changes have been saved and the wireless feature on your Netgear router has been disabled.
7. It is recommended to reboot your router after applying the changes. This ensures that the settings are properly implemented and any lingering wireless connections are terminated.
Remember, once the wireless feature is disabled, you will no longer be able to connect to your Netgear router via Wi-Fi. To access the router’s settings in the future, you will need to use a wired connection.
By following the steps outlined above and saving and applying the changes correctly, you can successfully disable the wireless feature on your Netgear router. This can be beneficial in scenarios where you want to prioritize wired connections or enhance the security of your network.
Conclusion
Disabling wireless functionality on a Netgear router can be a useful step in various situations. Whether you want to prioritize a wired connection, increase security, or limit access to your network, this guide has provided you with the necessary steps to disable wireless on your Netgear router.
By following these instructions, you can easily navigate the router’s admin interface and make the desired changes. Remember to save your settings and restart the router for the changes to take effect.
Remember, if you ever want to re-enable the wireless function on your Netgear router, you can simply follow the same steps and toggle the appropriate settings back on.
With the ability to control your wireless connectivity, you can optimize your network to suit your specific needs. Whether it’s prioritizing stability, managing security, or limiting access, disabling wireless on your Netgear router gives you the flexibility to create a customized networking environment.
FAQs
1. Can I disable the wireless feature on my Netgear router?
Yes, you can disable the wireless feature on your Netgear router. By accessing the router’s settings, you can turn off the wireless functionality, effectively making it operate only as a wired router.
2. Why would I want to disable the wireless feature on my Netgear router?
There are a few reasons why you might want to disable the wireless feature on your Netgear router. One possible reason is if you prefer to use a wired connection for increased stability and security. Additionally, disabling the wireless feature can help conserve bandwidth and reduce potential interference from nearby networks.
3. How do I access the settings to disable the wireless feature on my Netgear router?
To access the settings of your Netgear router, you need to open a web browser on a device connected to the router and enter the default IP address (such as 192.168.1.1) or the router’s domain name (such as routerlogin.net) in the address bar. You will then be prompted to enter the router’s admin username and password. Once logged in, navigate to the wireless settings and disable the wireless feature.
4. Will disabling the wireless feature affect the wired connections on my Netgear router?
No, disabling the wireless feature on your Netgear router will not affect the wired connections. The wired connections will continue to work as usual, providing internet access to the devices connected via Ethernet cables.
5. Can I enable the wireless feature again after disabling it on my Netgear router?
Yes, if you want to enable the wireless feature again on your Netgear router, you can simply access the router’s settings, navigate to the wireless settings, and turn on the wireless functionality. This will allow your router to provide both wired and wireless internet connections.