
Are you tired of dealing with slow or unreliable internet connections in your home or office? One possible solution is to configure a wireless router from Dlink. With their advanced features and user-friendly interface, Dlink routers can provide you with a fast and secure wireless network connection. But how exactly do you go about setting up your Dlink router? In this article, we will guide you through the process of configuring your wireless router from Dlink, step by step. Whether you’re a tech-savvy individual or a complete beginner, we will provide you with all the information you need to get your wireless network up and running smoothly. So, grab your Dlink router and let’s get started!
Inside This Article
- Step 1: Accessing the Router’s Configuration Page
- Step 2: Connecting to the Internet
- Step 3: Setting Wireless Network Name (SSID)
- Step 4: Choosing Wireless Encryption Method
- Conclusion
- FAQs
Step 1: Accessing the Router’s Configuration Page
Configuring your wireless router is the first step towards setting up a secure and efficient wireless network. To begin, you need to access the router’s configuration page. This page allows you to customize various settings and features of your router.
To access the configuration page, you will need to connect your computer or mobile device to the router using an Ethernet cable or through a wireless connection. Here are the steps to access the router’s configuration page:
- Ensure that your computer or device is connected to the router either through an Ethernet cable or via a wireless connection.
- Open a web browser (such as Chrome, Firefox, or Safari) on your computer or device.
- In the address bar, type the default IP address of your router. Commonly used default IP addresses for routers are 192.168.0.1 or 192.168.1.1. If you are unsure of the default IP address, you can look it up in the router’s user manual or visit the manufacturer’s website.
- Press the Enter key or click the Go button. This will take you to the login page of your router.
- On the login page, enter the username and password for your router. These credentials are usually written on the router itself or provided in the user manual. If you haven’t changed the default login credentials, check the manufacturer’s documentation for the default username and password.
- Once you have entered the login details, click the Login or Sign In button to proceed.
After successfully logging in, you will have access to the router’s configuration page. From here, you can modify settings related to wireless networks, security protocols, port forwarding, and much more.
It’s important to note that changing certain settings without proper knowledge can cause connectivity issues or security vulnerabilities. Hence, it’s recommended to consult the router’s user manual or seek assistance from the manufacturer’s support team if you are unsure about any specific configuration changes.
Step 2: Connecting to the Internet
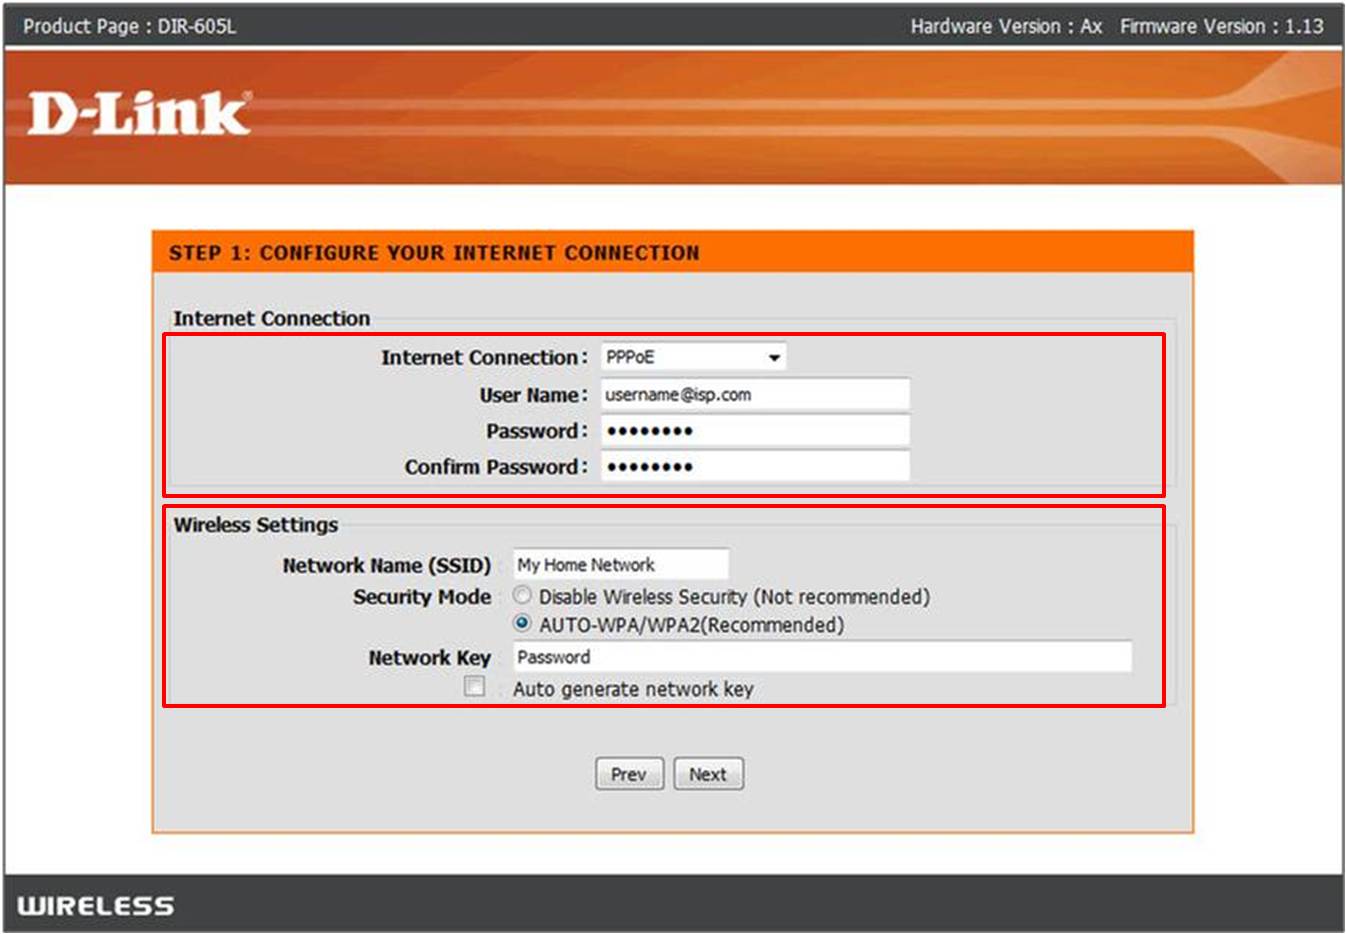
Now that you have accessed the configuration page of your Dlink wireless router, the next step is to connect to the internet. Without an internet connection, your wireless network will be limited to local file sharing and communication between devices within your network. Follow the steps below to establish an internet connection:
Step 1: Locate the “Internet” or “WAN” port on the back of your Dlink router. This port is usually distinguishable from other ports and may be labeled with a different color. Insert one end of an Ethernet cable into this port.
Step 2: Connect the other end of the Ethernet cable to the modem provided by your internet service provider. Ensure that the cable is securely attached to both the router and the modem.
Step 3: Power on the modem and wait for it to establish a connection to your ISP (Internet Service Provider). This may take a few minutes, depending on your internet connection type.
Step 4: Once the modem has established a connection, power on your Dlink router. Allow a few moments for the router to boot up and establish a connection with the modem.
Step 5: Once the router has established a connection with the modem, you should see the internet LED indicator on the front of the router light up. This indicates that the router is successfully connected to the internet.
Step 6: To verify your internet connection, open a web browser on a device connected to your Dlink wireless network. Enter a website URL, such as www.google.com, into the address bar and press Enter. If the website loads successfully, congratulations! You are now connected to the internet through your Dlink wireless router.
By following these steps, you can easily connect your Dlink wireless router to the internet. Once your router is connected, you can start enjoying seamless internet access on all your devices within the range of your network.
Step 3: Setting Wireless Network Name (SSID)
One crucial step in configuring your wireless router is setting the wireless network name or SSID. The SSID, short for Service Set Identifier, is the name that identifies your wireless network to other devices. It helps distinguish your network from others in the vicinity and allows you to connect to your specific network.
To set the wireless network name, you’ll first need to access the router’s configuration page. Refer to the previous step for instructions on how to do this. Once you’re on the configuration page, follow these steps:
- Locate the “Wireless” or “Wireless Settings” section on the configuration page. This may differ slightly depending on your router model.
- Look for the “SSID” field or a similar option to enter the desired network name.
- Choose a unique and easily recognizable name for your network. Avoid using personal information or generic names that could be confused with other networks.
- Make sure the name you choose is alphanumeric and does not contain any special characters or spaces.
- Remember to keep the SSID name somewhat simple and easy to remember for yourself and others who may need to connect to your network.
Once you have entered the desired SSID, save the changes and apply the settings. Your wireless network will now be identified by the new name you have set. It is recommended to keep a record of the SSID name and password for future reference.
Setting a unique and easily identifiable wireless network name not only helps with connection convenience but also adds a layer of security. It allows you to easily recognize and connect to your network without mistakenly connecting to other nearby networks.
Remember, if you ever need to change the SSID in the future, you can revisit the router’s configuration page and perform these steps again. Keeping your network name up to date and secure can help ensure a smooth and secure wireless experience.
Step 4: Choosing Wireless Encryption Method
When setting up your wireless router, choosing the right encryption method is crucial to ensure the security of your wireless network. Encryption plays a vital role in protecting the confidentiality and integrity of your data transmission.
There are several encryption methods available for wireless networks, but the two most popular ones are WPA (Wi-Fi Protected Access) and WPA2. These encryption methods provide a higher level of security compared to the older and less secure WEP (Wired Equivalent Privacy) encryption.
WPA and WPA2 use a combination of advanced encryption algorithms and authentication protocols to secure your wireless network. They provide stronger encryption keys and more robust security features, making it harder for unauthorized users to infiltrate your network.
When choosing between WPA and WPA2, it is always recommended to select WPA2 if your router and devices support it. WPA2 is the latest and most secure encryption method available, offering enhanced protection against hacking attempts and data breaches.
It is important to note that older devices may not support WPA2 encryption. In such cases, you can choose the WPA encryption method. Although less secure than WPA2, WPA still provides a reasonable level of security for most home networks.
During the configuration process, you will have the option to choose the encryption method. Access the router’s configuration page and navigate to the wireless settings section. Look for the encryption or security settings and select either WPA or WPA2, depending on your preferences and device compatibility.
In addition to selecting the encryption method, you will also need to provide a strong and unique wireless network password or passphrase. This password will be used to authenticate devices that want to connect to your network, adding an extra layer of security.
Remember to choose a password that is not easily guessable and consists of a combination of letters, numbers, and special characters. Avoid using common passwords or personal information that can be easily associated with you.
Once you have chosen the preferred encryption method and set a strong password, save the settings and restart your router. Your wireless network is now configured with the selected encryption method, providing a secure and private connection for your devices.
By choosing the right encryption method and setting a strong password, you can protect your wireless network from intruders and ensure the safety of your data while enjoying the convenience of a wireless connection.
Conclusion
Configuring a wireless router, such as the Dlink, may seem like a daunting task, but with the right knowledge and guidance, it can be a relatively straightforward process. By following the steps outlined in this article, you can ensure that your Dlink wireless router is properly set up and optimized for a seamless and secure internet connection.
Remember to always consult the user manual specific to your Dlink router model for any troubleshooting or additional setup instructions. Keeping your router firmware up to date, using strong network passwords, and implementing security features like MAC address filtering and encryption will help protect your network from unauthorized access.
With a well-configured Dlink wireless router, you can enjoy fast, reliable, and secure internet connectivity throughout your home or office. So, go ahead and take control of your network by following the steps provided in this article. Happy browsing!
FAQs
1. How do I configure my Dlink wireless router?
Configuring your Dlink wireless router is a simple process. First, connect your router to your computer using an Ethernet cable. Open a web browser and enter the default IP address of your Dlink router in the address bar. This is typically 192.168.0.1 or 192.168.1.1. Enter the default username and password (usually “admin” for both) to access the router’s web interface. Follow the on-screen instructions to configure your wireless network settings, including the network name (SSID), security type, and password.
2. How do I change the Wi-Fi password on my Dlink router?
To change the Wi-Fi password on your Dlink router, open a web browser and enter the IP address of your router. Log in to the router’s web interface using your username and password. Navigate to the Wireless settings or Wi-Fi settings section. Look for the option to change the security key or passphrase. Enter your desired new password and save the changes. Remember to reconnect all your devices to the Wi-Fi network using the updated password.
3. Can I set up a guest network on my Dlink router?
Yes, most Dlink routers allow you to set up a guest network. This feature lets you create a separate network for your guests to connect to, keeping your main network secure. To set up a guest network, log in to your Dlink router’s web interface and navigate to the Wi-Fi settings section. Look for the option to enable the guest network and configure its settings. You can usually customize the guest network name, password, and access permissions. Once set up, your guests can connect to the guest network without accessing your main network.
4. How do I update the firmware on my Dlink router?
Updating the firmware on your Dlink router can improve its performance, add new features, and address security vulnerabilities. To update the firmware, start by downloading the latest firmware file from the Dlink support website. Log in to your router’s web interface and navigate to the firmware update section. Choose the option to browse for the downloaded firmware file and click on the “Update” button. Wait for the update process to complete, and do not power off the router during this time. After the update, your router will reboot with the new firmware.
5. How can I improve the wireless signal strength on my Dlink router?
To improve the wireless signal strength on your Dlink router, try the following tips:
- Position the router in a central location and away from obstructions.
- Ensure the router is placed at an optimal height and avoid placing it on the floor.
- Reduce interference by keeping the router away from other electronics and appliances.
- Upgrade to a higher-gain or directional antenna for better coverage.
- Update the router’s firmware to the latest version.
- Adjust the wireless channel settings to avoid interference from nearby networks.
- Consider adding a wireless range extender to amplify the signal in weak areas of your home or office.
These tips can help enhance the wireless signal strength and improve the overall performance of your Dlink router.