
Connecting your router to a wireless network is a critical step in setting up your home or office internet connection. It allows you to enjoy wireless connectivity on multiple devices, such as smartphones, laptops, and tablets, without the need for messy cables.
In this article, we will guide you through the process of connecting your router to a wireless network. Whether you’re a beginner or someone with some technical knowledge, we’ve got you covered. By the end of this article, you’ll be able to effortlessly establish a wireless connection and enjoy a seamless internet experience.
So, let’s dive in and discover how you can connect your router to a wireless network easily and efficiently.
Inside This Article
- Overview
- Step 1: Check Router Compatibility
- Step 2: Connect the Router to Power
- Step 3: Connect the Router to a Modem
- Step 4: Access the Router’s Configuration Web Page
- Step 5: Configure Wireless Network Settings
- Step 6: Connect Devices to the Wireless Network
- Troubleshooting Tips
- Conclusion
- FAQs
Overview
Connecting your router to a wireless network is a crucial step in setting up a home or office network. By doing so, you’ll be able to enjoy the convenience of connecting your devices to the internet without the need for cumbersome Ethernet cables. In this article, we’ll guide you through the step-by-step process of connecting your router to a wireless network, ensuring a seamless and hassle-free experience.
Before we dive into the details, it’s important to ensure that your router is compatible with wireless connectivity. Most modern routers come with built-in wireless capabilities, but it’s always a good idea to double-check. Look for the Wi-Fi logo or specifications that indicate wireless connectivity on your router. If your router doesn’t have wireless capabilities, you may need to purchase a separate wireless access point or upgrade to a new router.
Once you’ve confirmed the compatibility, the first step is to connect the router to a power source. Plug one end of the power adapter into the router and the other end into a nearby power outlet. Ensure that the power cable is securely connected on both ends.
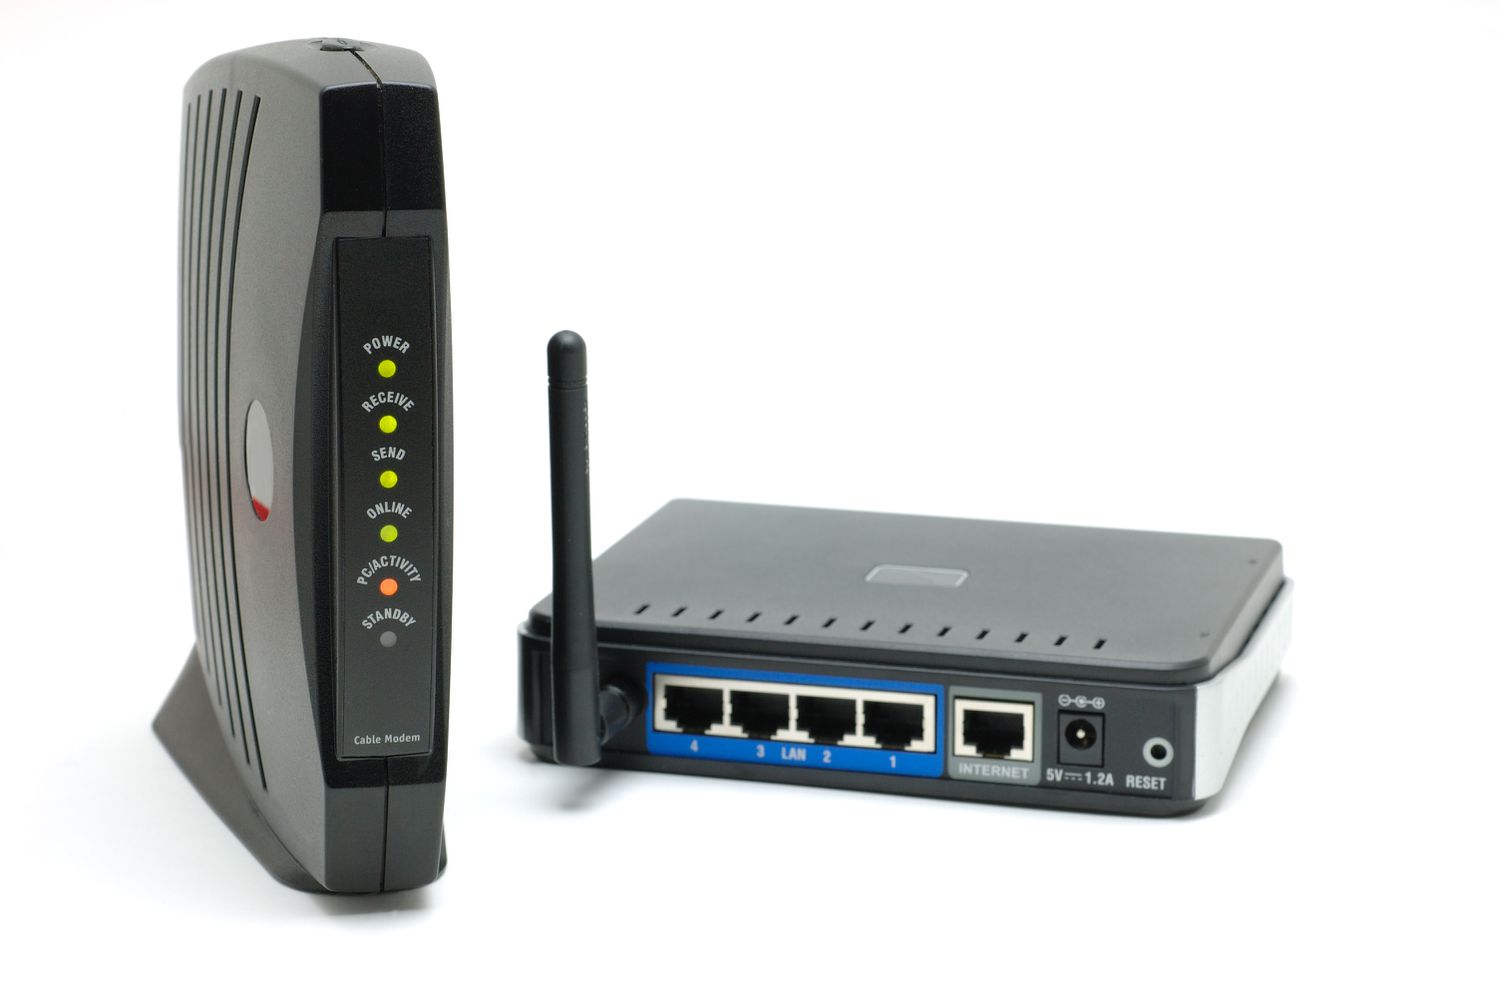
Next, you’ll need to connect your router to a modem, which is responsible for connecting your network to the internet. Most routers have a designated WAN (Wide Area Network) port specifically for connecting to the modem. Take an Ethernet cable and connect one end to the modem’s Ethernet port and the other end to the WAN port on your router. Make sure the connections are snug and secure.
Accessing the router’s configuration web page is the next step. Open a web browser on your computer or mobile device and enter the default IP address of your router in the address bar. Common IP addresses for routers include 192.168.0.1 or 192.168.1.1, but your router’s manual or documentation should provide the correct IP address. Hit enter, and you should be directed to the login page of your router’s configuration web page.
Once you’ve accessed the configuration web page, you’ll need to configure the wireless network settings. Locate the wireless settings tab or menu, where you’ll be able to set the network name (SSID), security type (WPA2 is recommended for optimal security), and passphrase (password) for your wireless network. Make sure to choose a strong and unique password to protect your network from unauthorized access.
Now that your router is connected to a wireless network and the settings are configured, it’s time to connect your devices to the network. On your device, go to the Wi-Fi settings and search for available networks. Select the network name (SSID) that matches the one you set on your router and enter the passphrase (password) when prompted. Once entered, your device should connect to the wireless network, allowing you to browse the internet and enjoy the benefits of a wireless connection.
If you encounter any issues during the setup process or while connecting devices, here are a few troubleshooting tips to consider:
- Ensure that all connections are securely plugged in and that the router and modem are powered on.
- Try restarting your devices, including the router and modem, to reset any temporary issues.
- Double-check the wireless settings on your router to ensure that the network name (SSID) and password are correctly entered.
- Consider updating the firmware of your router to the latest version, as it may resolve any compatibility or performance issues.
- If all else fails, consult the user manual or contact the manufacturer’s customer support for further assistance.
Step 1: Check Router Compatibility
Before connecting your router to a wireless network, it’s important to ensure that the router is compatible. This step is crucial to avoid any compatibility issues or performance limitations that may arise.
Firstly, check the specifications of your router to determine its compatibility with the wireless network you intend to connect to. Make sure that your router supports the same wireless standards, such as 802.11ac, 802.11n, or 802.11g, as the network you want to connect to. This information is typically available in the router’s user manual or on the manufacturer’s website.
In addition to wireless standards, it’s also important to consider the network frequency. Most routers support 2.4GHz and 5GHz frequencies. Ensure that your router is compatible with the frequency used by the wireless network. Some networks may only operate on a specific frequency, so it’s crucial to check this information beforehand.
Furthermore, consider the router’s security capabilities. If the wireless network requires a specific security protocol, such as WPA2 or WEP, ensure that your router supports it. This is important for maintaining a secure connection to the network and protecting your data from unauthorized access.
Lastly, check for any additional features or functionalities that the wireless network may require. For example, some networks may require support for VLANs or Dynamic DNS. Double-check that your router has the necessary capabilities to meet these requirements.
By thoroughly checking the compatibility of your router, you can ensure a smooth and hassle-free connection to the wireless network. This step sets the foundation for a successful setup and allows you to fully utilize the features and performance of your router.
Step 2: Connect the Router to Power
Once you have selected a suitable location for your router, it’s time to power it up. The process of connecting your router to power is relatively simple and straightforward. Follow the steps below to connect your router to power:
1. Check the power cord and ensure it is securely plugged into the power outlet. Make sure the other end of the power cord is firmly connected to the power input port on the router.
2. Take a moment to verify that the power switch on the router is in the “off” position. This step is essential to prevent any potential electrical surges when connecting the router.
3. Press the power switch to turn the router on. You should see indicator lights on the router illuminate, indicating that it is receiving power.
4. Wait for a few minutes while the router boots up. This process may take some time, during which the router will perform self-checks and establish connections with the necessary components.
5. Once the router has finished booting up, you are ready to proceed to the next step in the setup process.
It is important to note that different router models may have variations in their power setup. Always refer to the manufacturer’s manual or documentation for specific instructions regarding your router’s power requirements and setup process.
Now that your router is powered on and ready, you can move on to the next step in the setup process, connecting it to a modem.
Step 3: Connect the Router to a Modem
Once you have the router powered on and connected to your computer, the next step is to connect the router to a modem. The modem is responsible for connecting your home network to the internet.
Here’s how you can connect the router to a modem:
- First, locate the WAN or Internet port on the back of your router. This port is usually labeled with “WAN” or “Internet.”
- Take an Ethernet cable and insert one end into the WAN or Internet port of the router.
- Next, locate the Ethernet port on your modem. This port is typically labeled with “Internet” or “WAN.”
- Connect the other end of the Ethernet cable to the Ethernet port on the modem.
- Ensure that the modem is powered on and connected to the internet service provider.
- Finally, power on your router and wait for it to establish a connection with the modem. This may take a few minutes.
Once the router establishes a connection with the modem, you can proceed to configure the wireless network settings. This will allow you to connect your devices to the wireless network and enjoy internet access throughout your home.
Step 4: Access the Router’s Configuration Web Page
Once you have successfully connected your router to a modem, the next step is to access the router’s configuration web page. This web page allows you to customize various settings of your router, including network name (SSID), password, security settings, and more.
To access the router’s configuration web page, follow these steps:
- Open a web browser on a device that is connected to the router. It can be a computer, laptop, smartphone, or tablet.
- In the address bar of the web browser, type the default IP address of the router. This IP address is usually mentioned in the router’s manual or printed on a sticker on the router itself. Common default IP addresses include 192.168.0.1, 192.168.1.1, or 192.168.2.1. Press Enter after typing the IP address.
- You will be directed to the router’s login page. Enter the default username and password for your router. Again, these credentials can be found in the router’s manual or on the router itself. If you have changed the default login details in the past, use the updated username and password.
- After successfully logging in, you will have access to the router’s configuration web page. From here, you can navigate through different sections to modify settings according to your preferences.
It is important to note that accessing the router’s configuration web page may require a wired connection initially. Once you have configured the wireless settings, you can access the router’s web page wirelessly on any connected device.
Additionally, if you are unable to access the router’s configuration page using the default IP address, you can try resetting the router to its factory settings. This will restore the default IP address, username, and password, allowing you to access the configuration web page easily.
Now that you have learned how to access the router’s configuration web page, you are one step closer to customizing your wireless network settings and ensuring a secure and personalized browsing experience.
Step 5: Configure Wireless Network Settings
After successfully connecting your router to a modem and accessing the router’s configuration web page, it’s time to configure the wireless network settings. This step is crucial as it determines the security, network name (SSID), and password for your wireless network.
To begin, locate the wireless settings section on the router’s configuration page. This is typically found under the “Wireless” or “Wi-Fi” tab. Here, you’ll find options to configure the network name, password, encryption type, and other important settings.
The first setting to consider is the network name, also known as the SSID (Service Set Identifier). It’s a unique name that will be displayed when users search for available wireless networks. Choose a name that is easy to remember but not too generic.
Next, you’ll need to set a strong password for your wireless network. It’s important to choose a password that is difficult to guess and includes a combination of letters, numbers, and special characters. This will help secure your network and prevent unauthorized access.
You should also select an encryption type for your wireless network. The most common options are WEP, WPA, and WPA2. It is highly recommended to choose WPA2, as it provides the highest level of security for your network.
Once you have configured these settings, don’t forget to save and apply the changes. Keep in mind that it may take a few seconds for the changes to take effect. Afterward, your wireless network should be up and running with the new settings.
It’s worth mentioning that some routers offer additional advanced settings for optimizing your wireless network performance. These settings may include options for channel selection, transmission power, and quality of service (QoS). Take the time to explore these settings if you’re looking to fine-tune your network’s performance.
Remember, it’s crucial to regularly update your router’s firmware to ensure optimal performance and security. Check the router manufacturer’s website for any available updates. Firmware updates often include bug fixes, performance improvements, and security enhancements.
With the wireless network settings configured, you’re now ready to connect your devices to the network.
Step 6: Connect Devices to the Wireless Network
Now that your router is properly configured and the wireless network is set up, it’s time to connect your devices and enjoy the convenience of wireless internet access throughout your home. Follow these steps to connect your devices to the wireless network:
- Locate the Wi-Fi settings: On your device, such as a smartphone, tablet, or laptop, navigate to the Wi-Fi settings. This can usually be found in the settings or network preferences menu.
- Scan for available networks: Once in the Wi-Fi settings, your device will scan for available wireless networks. Wait for the scan to complete, and a list of networks will appear.
- Select your network: Look for your wireless network name, also known as the SSID (Service Set Identifier), in the list of available networks. It should match the network name you configured in the previous step.
- Enter the network password: If your network is secured, you will need to enter the network password to establish a connection. This password is typically provided by your router’s manufacturer or can be set by you during the configuration process.
- Connect to the network: Once you have entered the correct password, select the “Connect” or “Join” button to establish a connection to the wireless network.
- Repeat for additional devices: If you have multiple devices you wish to connect to the wireless network, repeat steps 1-5 for each device.
Keep in mind that some devices may have different options or settings for connecting to a wireless network, but the general steps outlined above should apply to most devices. If you encounter any issues or difficulties during the connection process, refer to your device’s user manual or contact the manufacturer’s support for further assistance.
Once all your devices are connected to the wireless network, you can enjoy the freedom of surfing the web, streaming media, and accessing online content from anywhere within the range of your wireless network.
Troubleshooting Tips
If you are experiencing difficulties in connecting your router to a wireless network, there are several troubleshooting tips that can help you resolve the issue. Here are some common problems and their solutions:
1. No Internet Connection: If you have successfully connected your router to a wireless network, but are unable to access the Internet, try the following:
- Restart your router and modem.
- Verify that the Ethernet cables are securely connected.
- Check your Wi-Fi settings and make sure you are connected to the correct network.
- Reset your network settings on your device and try connecting again.
2. Weak Wi-Fi Signal: If you have a weak Wi-Fi signal or are experiencing slow internet speeds, try these tips:
- Place your router in a central location, away from obstructions.
- Ensure that there are no other electronic devices interfering with the Wi-Fi signal.
- Consider upgrading your router to a more powerful model.
- Use Wi-Fi extenders or mesh systems to improve coverage in larger spaces.
3. Intermittent Connection: If your wireless connection keeps dropping or disconnecting frequently, these troubleshooting steps may help:
- Update your router’s firmware to the latest version.
- Check for any hardware issues, such as loose cables or overheating.
- Adjust the channel settings on your router to avoid interference.
- Try changing the Wi-Fi security settings to a different encryption method.
4. Incorrect Network Password: If you are unable to connect to a wireless network due to an incorrect password, follow these steps:
- Double-check that you have entered the correct password, paying attention to case sensitivity.
- If you have forgotten the password, reset your router to factory settings and set up a new password.
- Try connecting to the network with a different device to ensure the issue is not specific to one device.
5. Router Not Responding: If your router is unresponsive or not working properly, you can try the following troubleshooting measures:
- Restart the router by unplugging it from the power source and waiting for a few seconds before plugging it back in.
- Reset the router to factory settings, which will erase all previous configurations.
- Contact your Internet service provider for assistance if the router continues to have issues.
By following these troubleshooting tips, you can overcome common issues when connecting your router to a wireless network. If you are still experiencing problems, don’t hesitate to seek professional assistance or contact your router’s manufacturer for further support.
In conclusion, connecting your router to a wireless network is a relatively straightforward process that can greatly enhance your internet experience. By following the steps outlined in this article, you can easily establish a reliable and secure connection that allows you to access the internet from any corner of your home or office. Remember to consult your router’s user manual or the manufacturer’s website for specific instructions tailored to your device. With a stable wireless connection, you can enjoy seamless online gaming, streaming, browsing, and communication. Don’t let tangled cables limit your internet usage – take advantage of the convenience and flexibility offered by connecting your router to a wireless network.
FAQs
Q: How do I connect my router to a wireless network?
To connect your router to a wireless network, follow these steps:
1. Plug in your router and turn it on.
2. Access the router’s administration page by typing the default IP address (usually 192.168.1.1 or 192.168.0.1) in a web browser.
3. Enter the default username and password (usually admin for both) to log in to the router’s settings.
4. Look for the wireless settings or Wi-Fi setup section in the router’s interface.
5. Enable the wireless function if it’s not already enabled.
6. Set a unique network name (SSID) for your wireless network.
7. Choose a secure wireless security protocol, such as WPA2-PSK (AES), and set a strong password.
8. Save your settings and wait for the router to restart.
9. On your device, search for available Wi-Fi networks and select the one with the SSID you set.
10. Enter the password when prompted and connect to the network.
Your router is now connected to the wireless network, allowing you to access the internet wirelessly.
Q: What is the default IP address of a router?
The default IP address of a router is typically 192.168.1.1 or 192.168.0.1. However, different router models may have different default IP addresses. You can find the exact default IP address of your router in the manufacturer’s documentation or by searching for your specific router model online.
Q: How do I access the router’s administration page?
To access the router’s administration page, you need to open a web browser on a device connected to the router. Then, type the router’s default IP address (usually 192.168.1.1 or 192.168.0.1) in the address bar and press Enter. This will take you to the router’s login page where you’ll be prompted to enter the default username and password to log in.
Q: What is an SSID?
SSID stands for Service Set Identifier. It is the name assigned to a wireless network to identify it among other available networks. When you search for Wi-Fi networks on your device, you’ll see a list of SSIDs. You can set a unique SSID for your wireless network to easily distinguish it from others.
Q: How can I secure my wireless network?
To secure your wireless network, you should follow these best practices:
– Set a strong password for your Wi-Fi network using a combination of uppercase and lowercase letters, numbers, and special characters.
– Use WPA2-PSK (AES) as the wireless security protocol, as it provides stronger encryption compared to older protocols like WEP.
– Disable WPS (Wi-Fi Protected Setup) if your router supports it, as it can be vulnerable to attacks.
– Regularly update your router’s firmware to ensure you have the latest security patches.
– Enable MAC address filtering to restrict access to only trusted devices.
By implementing these security measures, you can protect your wireless network from unauthorized access and potential security threats.