
Excel is a powerful tool that enables users to organize and analyze data efficiently. However, it’s crucial to ensure that the data within an Excel spreadsheet is accurate and reliable. That’s where data validation comes into play. Data validation in Excel is a feature that allows you to set specific rules and restrictions on the type and format of data that can be entered into a cell.
By implementing data validation, you can minimize errors, prevent inconsistencies, and improve data integrity. Whether you are performing data entry or collaborating with others on a shared spreadsheet, understanding how to use data validation in Excel can save you time and effort.
In this article, we will explore the ins and outs of data validation in Excel, providing you with a step-by-step guide on how to find and apply data validation rules effectively. Let’s dive in!
Inside This Article
- Enable Data Validation in Excel
- Access Data Validation through the Ribbon
-
Use Shortcut Keys to Find Data Validation
- Utilize Excel’s Search Functionality for Data Validation
- Conclusion
- FAQs
Enable Data Validation in Excel
If you’re looking to enhance the accuracy and integrity of your data in Excel, one powerful tool at your disposal is data validation. Data validation allows you to set up rules and restrictions on the input that users can enter into a cell or range of cells. By enabling data validation, you can prevent errors, ensure consistency, and improve the overall quality of your data.
To enable data validation in Excel, follow these simple steps:
- Select the cell or range where you want to apply data validation. This could be a single cell or a range of cells.
- Go to the “Data” tab on the Excel ribbon. The “Data” tab is where you’ll find all the data-related tools and features.
- Click on the “Data Validation” button. This will open the data validation dialog box.
- In the data validation dialog box, choose the type of validation you want to apply. Excel provides various options such as whole number, decimal, list, date, and time.
- Configure the specific settings for the chosen validation type. For example, if you selected the “List” option, you can specify the list of allowed values in the “Source” field.
- Set up any additional criteria or constraints. Depending on your requirements, you may want to add additional conditions such as minimum and maximum values, input length limits, or custom formulas.
- Click “OK” to apply the data validation settings. Excel will now enforce the rules you’ve set up for the selected cell or range.
Once data validation is enabled, any user entering data into the validated cell or range will be restricted to the specified criteria. If a user tries to enter data that violates the validation rules, Excel will display an error message and prevent the entry until valid data is provided.
Data validation is a powerful feature in Excel that can greatly improve the accuracy and reliability of your data. By enabling data validation and setting up appropriate rules and restrictions, you can ensure that your data is entered correctly and consistently, reducing the risk of errors and increasing the efficiency of your work.
Access Data Validation through the Ribbon
Microsoft Excel provides a user-friendly interface with a wide range of options to manage and analyze data effectively. One of these features is data validation, which allows you to control and restrict the type of data that can be entered into a cell.
To access the data validation feature through the Ribbon in Excel, follow these simple steps:
- Open your Excel workbook and navigate to the worksheet where you want to apply data validation.
- Select the cell or range of cells that you want to apply the validation to.
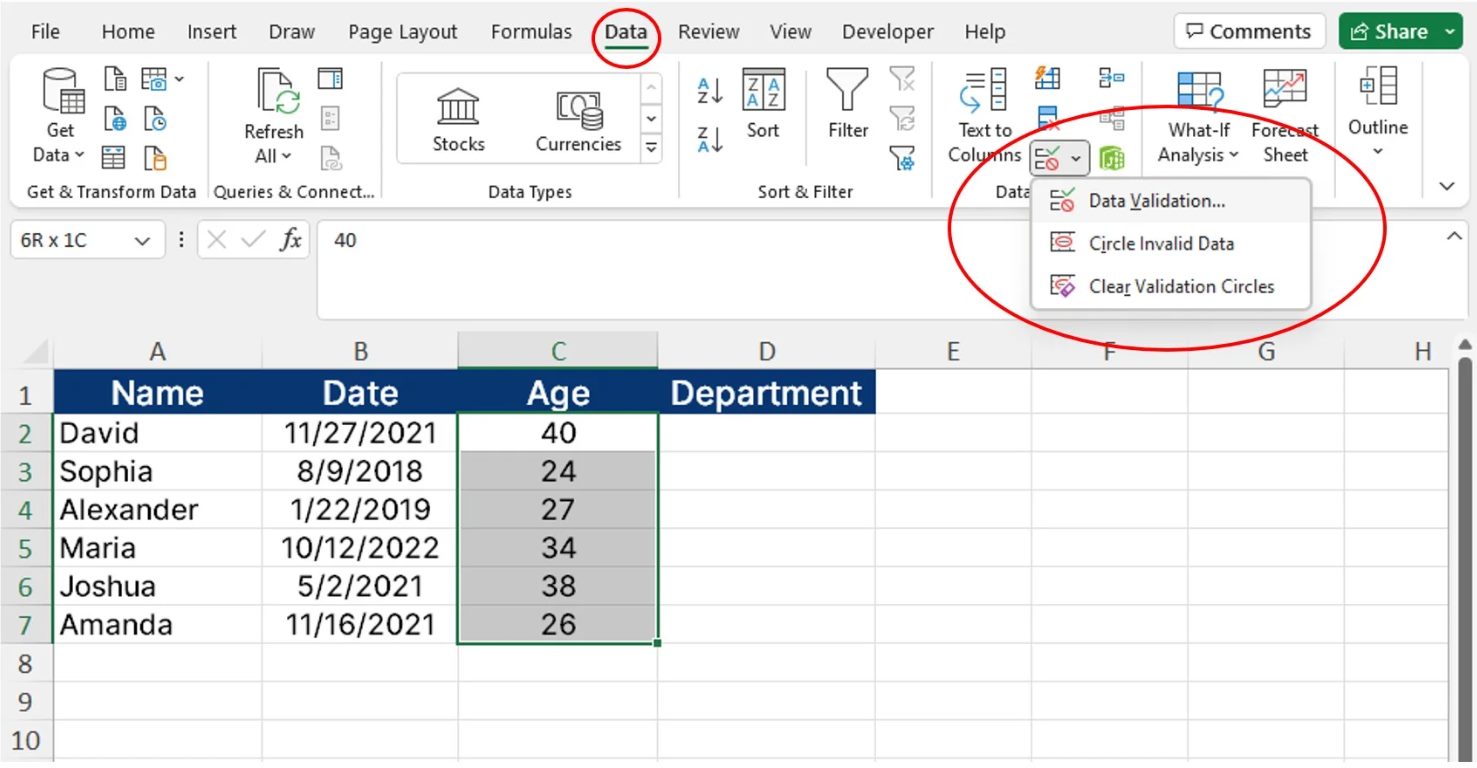
- Go to the “Data” tab in the Ribbon at the top of the Excel window.
- In the “Data Tools” group, click on the “Data Validation” button. This will open the “Data Validation” dialog box.
- In the “Settings” tab of the dialog box, you can define the criteria for data validation, such as allowing whole numbers, decimals, dates, or specifying a custom formula.
- Choose the appropriate options based on your data validation requirements.
- Click on the “Input Message” tab to add an optional message that will appear when a user selects the cell.
- Click on the “Error Alert” tab to customize the error message that will be displayed if the user enters invalid data.
- Once you have finished setting up the data validation rules, click on the “OK” button to apply it to the selected cell or range of cells.
By accessing data validation through the Ribbon, you can easily implement data restrictions and ensure data integrity in your Excel worksheets. This feature is particularly useful when creating forms, surveys, or any other scenarios where you want to control the input values in the cells.
Use Shortcut Keys to Find Data Validation
Shortcut keys are a great way to quickly navigate and perform actions in Excel. When it comes to finding data validation in Excel, there are a few handy shortcut keys that can save you time and effort. Here are some of the most useful shortcut keys to help you locate data validation:
1. Ctrl + G: Pressing Ctrl + G opens the “Go To” dialog box. In the dialog box, click on the Special button, and then select Data validation from the list. This will take you directly to the next cell with data validation applied.
2. Ctrl + F3: By pressing Ctrl + F3, you can open the “Name Manager” dialog box. In this dialog box, you will see a list of all the named ranges in your workbook, including those that have data validation applied. This allows you to easily locate cells with data validation by their named range.
3. Ctrl + ]: The shortcut key Ctrl + ] allows you to navigate to the next cell that contains a formula that refers to the cell you are currently in. This can be useful for finding data validation in cases where it has been set based on formulas or referred to by other cells.
4. Ctrl + [: Conversely, pressing Ctrl + [ takes you to the precedent cells of the current cell. This can be helpful in situations where data validation is based on values from other cells, allowing you to quickly find the cells that are influencing the data validation.
These shortcut keys can significantly ease the process of finding data validation in Excel, especially when working with large datasets or complex workbooks. They allow you to quickly jump to the cells with data validation applied or navigate to cells influencing the data validation rules.
Remember to use these shortcuts sparingly to avoid disrupting your workflow or unintentionally modifying your data. Learning and utilizing these shortcut keys will help you become more efficient in locating data validation in Excel.
Utilize Excel’s Search Functionality for Data Validation
Excel offers a powerful search functionality that can be utilized to find specific data validation rules within your spreadsheet. This feature can save you time and effort, especially when working with large datasets or complex worksheets. Let’s explore how you can use Excel’s search functionality to quickly locate data validation in your Excel file.
1. Open your Excel file and navigate to the worksheet where you want to find data validation rules.
2. Press Ctrl + F on your keyboard to open the Find dialog box. Alternatively, you can click on the Find button in the Editing group on the Home tab of the Ribbon.
3. In the Find dialog box, enter a keyword or phrase that describes the data validation rule you are looking for. It can be a specific value, text, or even a formula.
4. Click on the Find All button to display a list of all the cells in the worksheet that contain data validation matching your search criteria.
5. Review the search results to find the cell(s) that contain the data validation rule you want to locate. You can click on a specific result to navigate directly to that cell.
6. Once you have found the cell with the data validation rule, you can make any necessary changes or modifications to the rule by accessing the Data Validation settings.
By utilizing Excel’s search functionality, you can quickly and efficiently locate data validation rules within your Excel file. This can be particularly useful when you need to update or modify specific rules or when you are working with large amounts of data. With just a few simple steps, you can find the relevant cells and make the necessary adjustments.
So, the next time you are working with data validation in Excel, remember to leverage the search functionality to save time and streamline your workflow.
Conclusion:
Excel’s data validation feature is a powerful tool that allows you to ensure the accuracy and integrity of your data. By setting up validation rules, you can prevent users from entering incorrect or inconsistent data, thereby improving the quality of your spreadsheets. Whether you’re working with large datasets, managing complex calculations, or simply maintaining organized records, data validation in Excel can save you time and reduce errors.
By following the step-by-step instructions provided in this guide, you can easily set up and customize data validation rules to meet your specific needs. With features like drop-down lists, input messages, and error alerts, Excel empowers you to create user-friendly and error-free spreadsheets.
Remember, data validation in Excel is not only about validation; it’s about control. Take advantage of this feature to enforce data quality standards, streamline data entry, and enhance the overall integrity of your worksheets. Incorporate data validation into your Excel workflow today and experience the benefits first-hand.
FAQs
1. How can I find data validation in Excel?
To find data validation in Excel, go to the “Data” tab, and click on “Data Validation” in the “Data Tools” group. This will open the “Data Validation” dialog box where you can set up your validation rules.
2. What is data validation in Excel?
Data validation is a feature in Excel that allows you to define certain rules or restrictions on the data input for a specific cell or range of cells. It helps ensure data accuracy and integrity by preventing users from entering invalid or incorrect data.
3. What are the benefits of using data validation in Excel?
Using data validation in Excel offers several benefits. It helps maintain data consistency by restricting entry to only valid values, prevents data entry errors, and reduces the chances of data inconsistencies. It also improves data accuracy and efficiency by guiding users to enter the correct data.
4. How can I set up a data validation rule in Excel?
To set up a data validation rule, select the cell or range of cells where you want to apply the rule. Then, go to the “Data” tab, click on “Data Validation” in the “Data Tools” group. In the “Data Validation” dialog box, specify the validation criteria, such as allowing whole numbers, dates, or creating custom formulas. Once you have defined the criteria, specify the error prompt and input message if desired, and click “OK” to apply the rule.
5. Can I change or remove data validation in Excel?
Yes, you can change or remove data validation in Excel. To change an existing data validation rule, select the cell or range of cells with the validation, go to the “Data” tab, and click on “Data Validation” in the “Data Tools” group. Modify the validation criteria in the “Data Validation” dialog box and click “OK” to save the changes. To remove data validation, select the cell or range of cells with the validation, go to the “Data” tab, click on “Data Validation”, and choose “Clear All” to remove the validation rule.