
Excel 2013 is a powerful tool for organizing and analyzing data, but it’s important to ensure that the data entered into your spreadsheets is accurate and consistent. That’s where data validation comes in. By using data validation in Excel 2013, you can set rules and constraints on the data that users can enter into specific cells or ranges. This helps to eliminate errors and maintain data integrity.
In this article, we will explore the various ways you can use data validation in Excel 2013 to validate and control the data input. From setting range limits to creating custom validation formulas, we will guide you through the process step by step. So, whether you’re a beginner or an experienced user, get ready to master the art of data validation and take your Excel skills to the next level!
Inside This Article
- Overview
- Setting Up Data Validation
- Applying Data Validation Rules
- Customizing Data Validation Messages
- Conclusion
- FAQs
Overview
Data validation is a powerful feature in Excel 2013 that allows you to control the type and format of data entered into a cell. By setting up validation rules and customizing error messages, you can ensure accurate data entry and improve the quality of your spreadsheet.
Data validation helps avoid errors by limiting the choices users can make when entering data. It can be used to define specific data types, such as numbers, dates, or text, or restrict the values to a specific list or range. This ensures that only valid and relevant data is entered into your Excel spreadsheet.
Setting up data validation in Excel 2013 is a straightforward process. You can access the data validation feature through the Data tab on the Excel ribbon. Once enabled, you can define the criteria and restrictions for the data entered in a specific cell or range of cells.
Applying data validation rules allows you to define specific conditions that must be met for the data to be considered valid. For example, you can set a rule that only allows whole numbers between 1 and 100, or restrict dates to a specific range. This helps maintain data integrity and eliminates the need for manual error checking.
Customizing data validation messages is another essential aspect of using data validation in Excel 2013. When a user enters data that does not meet the validation rules, you can display a customized error message to guide them on the correct format or values required. This feature helps improve data accuracy and provides clear instructions to users when mistakes occur.
Overall, data validation in Excel 2013 is a powerful tool to ensure data integrity, accuracy, and consistency in your spreadsheets. By defining validation rules and customizing error messages, you can improve the quality of your data and streamline your data entry process.
Setting Up Data Validation
Data validation is a valuable feature in Excel 2013 that allows you to set specific restrictions on the data entered into a cell or range of cells. By using data validation, you can ensure the accuracy and integrity of your data, minimize input errors, and improve the overall efficiency of your workbook. Setting up data validation is a straightforward process that can be done in just a few easy steps.
To begin setting up data validation in Excel 2013, follow these steps:
- Select the cell or range of cells where you want to apply the data validation.
- Click on the “Data” tab in the ribbon at the top of the Excel window.
- In the “Data Tools” group, click on the “Data Validation” button.
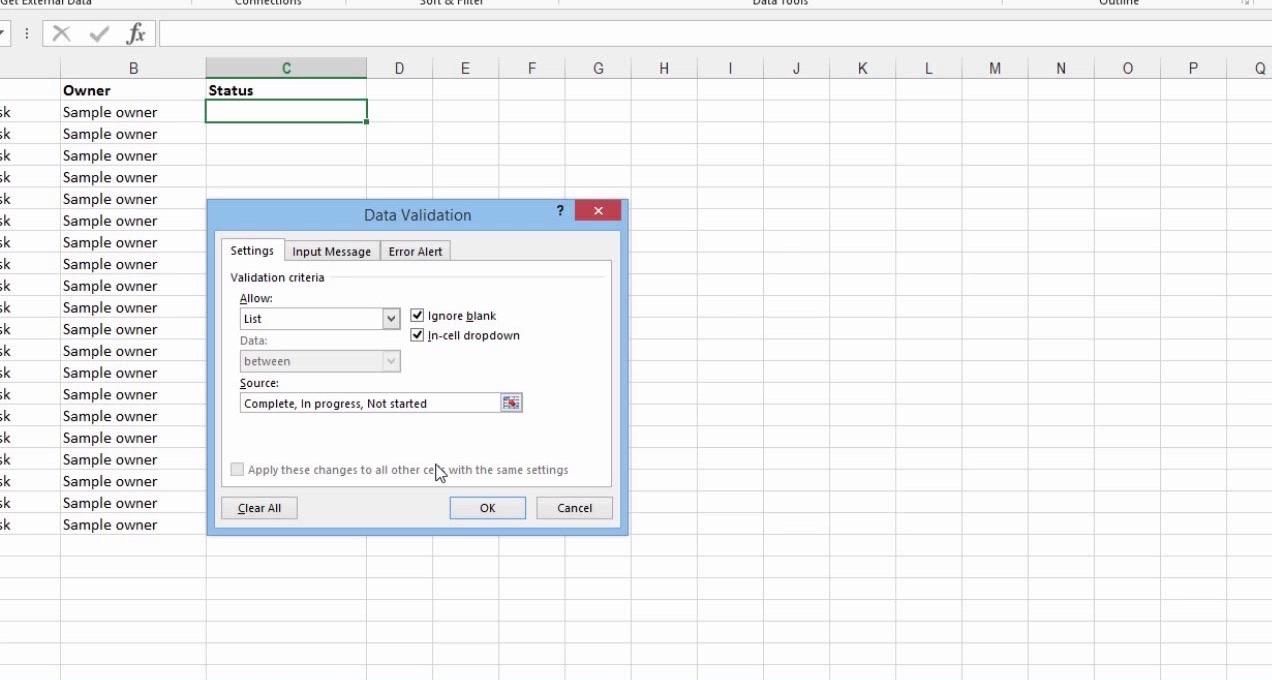
Once you have clicked on the “Data Validation” button, the “Data Validation” dialog box will appear. This dialog box allows you to customize the validation rules for the selected cell or range of cells.
In the “Settings” tab of the “Data Validation” dialog box, you can choose the type of validation you want to apply. Excel offers several options, including whole numbers, decimals, dates, times, and text length. Each option has its own set of customizable criteria that you can specify to meet your specific needs.
For example, if you want to restrict the data entered into a cell to whole numbers between 1 and 100, you would select the “Whole number” option and enter the minimum and maximum values accordingly.
In addition to specifying the validation criteria, you can also customize the input message and error alert message that will be displayed when a user attempts to enter invalid data. The input message can provide guidance or instructions to the user, while the error alert message can alert them to the invalid data and provide an explanation of why the data is invalid.
After you have defined the validation criteria and customized the messages, click on the “OK” button to apply the data validation to the selected cell or range of cells. Now, whenever a user tries to enter data that does not meet the specified criteria, they will be prompted with the input message or error alert message.
Setting up data validation in Excel 2013 can help ensure the accuracy and integrity of your data. By defining specific rules and customizing the messages for the users, you can minimize input errors and improve the overall efficiency of your workbook.
Applying Data Validation Rules
Data validation in Excel 2013 allows you to set specific rules to control the type and format of data entered in cells. By applying data validation rules, you can ensure data consistency and accuracy, saving time and preventing errors in your spreadsheets.
To apply data validation rules, follow these simple steps:
- Select the cell or range of cells where you want to apply the validation rule. You can select a single cell or a range of cells by holding down the Shift key and dragging your cursor.
- Go to the “Data” tab in the Excel ribbon and click on the “Data Validation” button.
- In the Data Validation dialog box, you can choose from a variety of validation criteria such as whole numbers, decimals, dates, times, text length, custom formulas, and more.
- Select the desired validation criteria and enter the necessary parameters or values. For example, if you want to allow only whole numbers between 1 and 10, you would select “Whole Number” as the validation criteria and set the minimum value to 1 and the maximum value to 10.
- You can also customize the error message that appears when the entered data violates the validation rule. This helps users understand why their input was rejected and how to correct it.
- Click on the “OK” button to apply the data validation rule to the selected cells.
Once the data validation rule is applied, Excel will enforce the rule and prevent users from entering invalid data in the specified cells. If a user tries to enter data that violates the validation rule, Excel will display an error message and prompt them to correct the entry or enter valid data.
Data validation in Excel 2013 is a powerful feature that ensures data accuracy and integrity in your spreadsheets. By applying data validation rules, you can have greater control over the input that goes into your cells, improving the overall quality of your data and making your spreadsheets more reliable and efficient.
Customizing Data Validation Messages
When using data validation in Excel 2013, you have the ability to customize the messages that appear when a user enters invalid data. This can be helpful for guiding users and ensuring they understand why their input is being rejected.
To customize the validation message, follow these steps:
- Select the cell or range of cells that have the data validation rule applied.
- Click on the Data tab in the ribbon.
- In the Data Tools group, click on the Data Validation button.
- In the Settings tab of the Data Validation dialog box, you will see the Error Alert section.
- Within the Error Alert section, you can customize the Error Message and the Error Title.
The Error Message is the text that will be displayed when the user enters invalid data. It is a good practice to provide clear and concise instructions or explanation about the type of data that is expected.
The Error Title is the title of the error alert box that will be displayed. It should be descriptive and make it clear that there is an error.
After customizing the messages, click on the OK button to apply the changes. Now, when a user enters invalid data, they will see the customized error message and title.
Customizing the data validation messages not only helps users understand why their input is being rejected, but it also adds a personal touch to your spreadsheet. By providing clear instructions and descriptive titles, you can facilitate smoother data entry and prevent potential errors.
Conclusion
In conclusion, Data Validation in Excel 2013 is a powerful tool that allows users to control the input and ensure data accuracy in their spreadsheets. By setting validation rules, users can prevent errors, maintain data integrity, and improve the overall reliability of their data.
Data Validation offers a range of options to choose from, including setting data types, applying custom formulas, and using predefined rules. Users can also add error alerts and input messages to guide others who enter data into the spreadsheet.
By utilizing Data Validation effectively, users can save time, reduce errors, and ensure the accuracy and consistency of their Excel data. Whether you’re working on a personal budget, a project schedule, or a complex financial model, Data Validation is an essential feature that can greatly enhance the functionality and reliability of your spreadsheets.
FAQs
1. What is data validation in Excel 2013?
Data validation is a feature in Microsoft Excel 2013 that allows you to control the type of data that can be entered into a cell or range of cells. By setting validation rules, you can ensure data accuracy and consistency, making your spreadsheets more reliable.
2. How do I apply data validation in Excel 2013?
To apply data validation in Excel 2013, select the cell or range of cells where you want the validation rule to apply. Then, go to the “Data” tab in the Excel ribbon, click on “Data Validation,” and choose the validation criteria you want to use.
3. What types of validation criteria can I use in Excel 2013?
Excel 2013 offers various types of validation criteria, including whole numbers, decimal numbers, text length, dates, times, and custom formulas. You can choose from preset criteria or create your own custom rules based on specific requirements.
4. Can I create custom error messages with data validation in Excel 2013?
Yes, you can create custom error messages to provide guidance to users when they enter data that violates the validation rules. Excel 2013 allows you to customize both the error alert title and error alert message to make it more informative and user-friendly.
5. How can I remove data validation rules in Excel 2013?
To remove data validation rules in Excel 2013, select the cell or range of cells with the validation rules you want to delete. Then, go to the “Data” tab, click on “Data Validation,” and choose “Clear All” to remove all the validation rules in the selected cells. Alternatively, you can edit the validation criteria or clear individual validation settings using the Data Validation dialog box.