
Are you struggling to find and connect to wireless networks on your Windows 10 device? Don’t worry, we’ve got you covered! In this article, we’ll walk you through the steps to view and connect to wireless networks on Windows 10. Whether you’re at home, in a café, or on the go, accessing Wi-Fi networks is essential for staying connected and getting things done. Windows 10 provides a user-friendly interface and a variety of tools to make this process seamless. So whether you’re a tech-savvy user or a complete beginner, we’ll guide you through the steps to view and connect to wireless networks on your Windows 10 device. Let’s get started!
Inside This Article
- How To View Wireless Networks Windows 10
- Connecting to Wireless Networks
- Accessing Network Settings
- View Available Wireless Networks
- Network Troubleshooting
- Conclusion
- FAQs
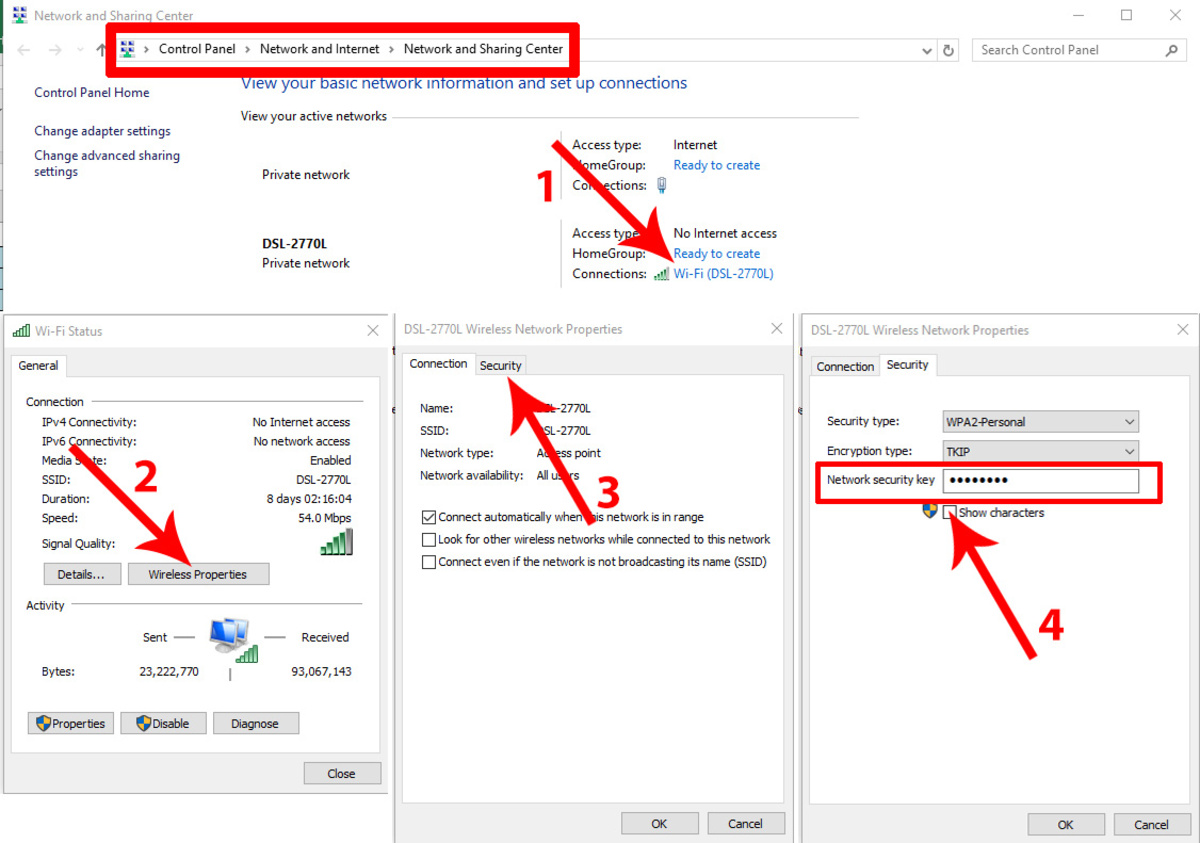
How To View Wireless Networks Windows 10
Connecting to wireless networks is essential for modern computing devices. If you’re using a Windows 10 device, accessing and viewing available wireless networks is a straightforward process. In this article, we will guide you on how to view wireless networks on your Windows 10 device.
Accessing Network Settings
The first step to view wireless networks on Windows 10 is to access the network settings. You can do this by clicking on the network icon in the system tray, located at the bottom-right corner of the taskbar. The network icon resembles a series of curved lines or bars, indicating signal strength.
After clicking on the network icon, a list of available Wi-Fi networks will appear. At the top of the list, you will find the “Network & Internet Settings” option. Click on it to access the network settings.
View Available Wireless Networks
Once you have accessed the network settings, you can easily view the available wireless networks. On the left side of the Settings window, you will find various options, including “Wi-Fi.” Click on Wi-Fi to view the Wi-Fi settings.
Under the Wi-Fi settings, you will see a switch to toggle Wi-Fi on or off. Make sure the switch is in the “On” position to enable Wi-Fi connectivity on your Windows 10 device. Below the switch, you will find the list of available wireless networks in your vicinity.
The available networks will be listed by their network names, also known as SSIDs. You will also see the signal strength of each network, represented by a series of curved lines or bars. The stronger the signal, the more bars you will see. Additionally, if a network is open and does not require a password, it will be labeled as “Open.”
To connect to a specific wireless network, simply click on its name in the list. If the network is secured, you will be prompted to enter the password. Once you have entered the correct password, your Windows 10 device will connect to the selected wireless network.
Network Troubleshooting
If you are experiencing issues with viewing wireless networks on Windows 10, there are a few troubleshooting steps you can try. Firstly, make sure that your Wi-Fi adapter is enabled. You can do this by accessing the “Device Manager” in the Control Panel and checking the status of your adapter.
Additionally, ensure that the Wi-Fi signal is within range and that you are not experiencing interference from other devices. You can try moving closer to the wireless router or changing its channel to minimize interference.
If all else fails, you can restart your Windows 10 device and try again. Restarting can often resolve minor connectivity issues and refresh network settings.
By following these steps, you should now be able to successfully view wireless networks on your Windows 10 device. Remember to connect to secure networks and keep your passwords protected to ensure a secure and reliable wireless connection.
Connecting to Wireless Networks
Connecting to wireless networks on Windows 10 is a simple and straightforward process. Whether you’re setting up a new device or connecting to a network you’ve used before, Windows 10 provides a user-friendly interface to make the process seamless. Follow these steps to connect to a wireless network:
1. Click on the network icon in the system tray, located at the bottom right corner of your screen. It looks like a series of curved lines or bars.
2. A list of available wireless networks will appear. Click on the network you want to connect to.
3. If the network is secured with a password, you will be prompted to enter the password. Type in the password and click “Connect.”
4. Wait for a few seconds as Windows 10 establishes a connection to the wireless network. Once connected, you will see a message confirming the successful connection.
That’s it! You are now connected to the wireless network on your Windows 10 device. You can now browse the internet, stream videos, and perform various online activities.
It’s important to note that Windows 10 also allows you to set your wireless network connections as “metered” connections. This means that data usage on these connections may be limited or have additional charges. If you are connecting to a Wi-Fi network with usage restrictions, you can set it as a metered connection to avoid excessive data usage.
Accessing Network Settings
When it comes to managing network settings on a Windows 10 device, knowing how to access the appropriate settings is crucial. Whether you need to troubleshoot connection issues, set up a new network, or make changes to your existing network configuration, accessing the network settings is the first step.
To access the network settings in Windows 10, follow these simple steps:
- Click on the “Start” menu, typically located in the bottom-left corner of the screen. You can also press the Windows key on your keyboard.
- Click on the “Settings” icon, which resembles a gear.
- In the “Settings” window, click on the “Network & Internet” option.
- This will open the “Network & Internet” settings page. Here, you will find various options to manage your network connections.
Once you have accessed the network settings, you can perform a range of tasks such as configuring Wi-Fi connections, setting up a VPN, managing Ethernet connections, and more. It’s important to note that some settings may require administrative privileges, so make sure you have the necessary permissions.
By accessing the network settings on your Windows 10 device, you can take control of your network connections and ensure a smooth browsing experience. Whether you’re at home, in the office, or on the go, being able to access and manage your network settings is essential for staying connected.
View Available Wireless Networks
When using a Windows 10 device, it’s important to know how to view available wireless networks. Whether you’re looking to connect to a new network or troubleshooting connectivity issues, accessing the list of available networks is the first step. In this section, we will guide you through the process of viewing available wireless networks on your Windows 10 device.
To begin, make sure your Windows 10 device is turned on and connected to the internet. Once you’re ready, follow these steps:
- Click on the “Wi-Fi” icon located in the bottom right corner of your taskbar. It resembles a series of vertical bars indicating signal strength.
- A list of available wireless networks will appear. The networks will be displayed with their names, signal strength, and security type.
- If the list is long and you want to view more networks, click on the “Show available networks” option at the bottom of the list.
- Scroll through the list to find the network you want to connect to. Take note of the network name and signal strength. Higher signal strength indicates a stronger and more stable connection.
- Once you’ve identified the network you want to connect to, click on it.
- If the network is secured, you will be prompted to enter the password or security key. Type in the password carefully and click “Connect”.
- Your Windows 10 device will attempt to connect to the selected network. Once connected, you will see a confirmation message and the network name will be displayed in the taskbar.
Keep in mind that if you are connecting to a public Wi-Fi network, it’s important to exercise caution and only connect to trusted and secure networks. Avoid entering personal information or accessing sensitive accounts when connected to public networks.
Viewing available wireless networks on your Windows 10 device is a simple process that allows you to easily connect to the network of your choice. By following the steps outlined above, you can effortlessly identify and connect to the networks that best meet your needs.
Network Troubleshooting
When it comes to using wireless networks, it is not uncommon to encounter various issues. From slow internet speeds to connection drops, these problems can be frustrating. However, with a few troubleshooting tips and solutions, you can resolve common network issues on Windows 10.
1. Check Your Wi-Fi Connection: Before diving into complicated troubleshooting steps, start by checking your Wi-Fi connection. Ensure that your device is connected to the correct network and that the Wi-Fi signal is strong. You can also try disconnecting and reconnecting to the network to refresh the connection.
2. Restart Your Device: Sometimes a simple restart can make a big difference. Restart your Windows 10 device and see if the network issue resolves itself. This can help in clearing any temporary glitches or conflicts that might be causing the problem.
3. Update Network Drivers: Outdated or corrupted network drivers can lead to connectivity issues. To resolve this, navigate to the Device Manager on your Windows 10 device. Locate the Network Adapters section, right-click on your network adapter, and select “Update driver.” This will ensure you have the latest driver version installed.
4. Reset Network Settings: If your network issues persist, resetting the network settings might help. To do this, go to the Settings menu, select “Network & Internet,” and click on the “Network reset” option. Please note that this action will remove all saved Wi-Fi networks and their passwords, so make sure to reconnect to your network afterward.
5. Disable Power Saving Mode: Windows 10 features a power-saving mode that can affect network performance. To disable it, go to the Power Options in the Control Panel, select your current power plan, and adjust the settings so that the wireless adapter remains active and doesn’t turn off to save power.
6. Run Network Troubleshooter: Windows 10 has a built-in network troubleshooter that can automatically detect and fix common network issues. To use it, go to the Settings menu, select “Update & Security,” and click on “Troubleshoot.” Choose the “Network Adapter” option and follow the on-screen instructions to complete the troubleshooting process.
7. Check Firewall and Antivirus Settings: Sometimes, firewall or antivirus settings can block network access. Ensure that your firewall and antivirus software are not causing any restrictions by temporarily disabling them or adjusting their settings. However, exercise caution and re-enable these security features after troubleshooting.
8. Contact Your Service Provider: If none of the above solutions work, the issue might lie with your internet service provider (ISP). Reach out to your ISP’s customer support for further assistance. They can help diagnose and resolve any network-related problems from their end.
By following these troubleshooting tips and solutions, you can effectively address common network issues on Windows 10. Remember, each issue may have a different root cause, so try different solutions until you find the one that works for you.
Conclusion
Wireless networks have become an integral part of our daily lives, offering convenience and connectivity like never before. Windows 10 provides a user-friendly interface to view and connect to wireless networks effortlessly. By following the steps outlined in this guide, you can easily access the list of available wireless networks, troubleshoot connection issues, and manage your network preferences.
Remember to always prioritize the security of your wireless network by using strong passwords and enabling encryption. Regularly updating your Windows 10 operating system and network drivers will also help ensure optimal performance and compatibility.
With the knowledge and tools gained from this article, you’ll be able to navigate the wireless network landscape on Windows 10 with confidence and efficiency. Stay connected and enjoy the benefits of seamless connectivity, whether you’re at home, work, or on the go.
FAQs
1. How do I view wireless networks in Windows 10?
To view wireless networks in Windows 10, you can follow these steps:
1. Click on the Wi-Fi icon in the taskbar.
2. A list of available wireless networks will appear. Click on the network you want to connect to or view.
3. The network details, including its strength and security type, will be displayed.
4. If required, enter the network password and click on “Connect” to join the network.
2. Why can’t I see any wireless networks on my Windows 10 device?
If you are unable to see any wireless networks on your Windows 10 device, here are a few possible reasons and solutions:
– Check if the Wi-Fi is turned on by pressing the Wi-Fi toggle switch on your device or keyboard.
– Make sure you are within range of a Wi-Fi network and that the network is available.
– Restart your router and modem to refresh the network connection.
– Ensure that your device’s Wi-Fi drivers are up to date.
– If the issue persists, try troubleshooting the network connection using the Windows Network Diagnostics tool.
3. How can I improve the Wi-Fi signal strength on my Windows 10 device?
To enhance the Wi-Fi signal strength on your Windows 10 device, consider the following tips:
– Position your device closer to the Wi-Fi router to minimize interference.
– Remove any obstacles, such as walls or large objects, that may obstruct the Wi-Fi signal.
– Ensure that your device’s Wi-Fi drivers are updated.
– Consider using a Wi-Fi range extender or a mesh Wi-Fi system to extend the coverage range.
– If possible, switch to the 5GHz frequency band for faster and more stable Wi-Fi connections.
4. How do I forget a Wi-Fi network in Windows 10?
To forget a Wi-Fi network in Windows 10, follow these steps:
1. Open the Settings app by pressing Windows key + I.
2. Click on “Network & Internet” and then select “Wi-Fi” from the left sidebar.
3. Under “Manage known networks,” you will see a list of previously connected Wi-Fi networks.
4. Click on the network you want to forget, and then click on the “Forget” button.
5. The selected network will be removed from your list of known networks.
5. How do I connect to a hidden Wi-Fi network in Windows 10?
To connect to a hidden Wi-Fi network in Windows 10, follow these steps:
1. Open the Settings app by pressing Windows key + I.
2. Click on “Network & Internet” and then select “Wi-Fi” from the left sidebar.
3. Click on “Hidden Network” under “Discover networks” on the right side.
4. Enter the network name (SSID) and any required security details (such as password or security type).
5. Click on “Next” and then “Connect” to join the hidden Wi-Fi network.