
Are you frustrated when you see black borders around the pictures on your TV or display? Don’t worry, you’re not alone! This issue, often referred to as black bars or black borders, can be quite annoying and detract from your viewing experience. But fear not, as there are ways to correct this problem and enjoy your pictures in their full glory. In this article, we will explore the common causes of black borders on TV or display output and provide you with practical solutions to fix them. Whether you’re watching your favorite TV show, movie, or displaying your treasured photos, we’ll guide you step-by-step to eliminate those unsightly black borders and enhance your visual experience. So, let’s dive in and learn how to correct pictures with black borders and make your viewing experience truly immersive!
Inside This Article
- Identifying the Issue
- Troubleshooting the TV/Display Settings
- Adjusting the Picture Settings
- Updating Firmware or Drivers
- Conclusion
- FAQs
Identifying the Issue
Having black borders around pictures on your TV or display can be frustrating and can negatively impact your viewing experience. However, before we can correct the issue, it’s important to identify the root cause. Here are a few factors to consider:
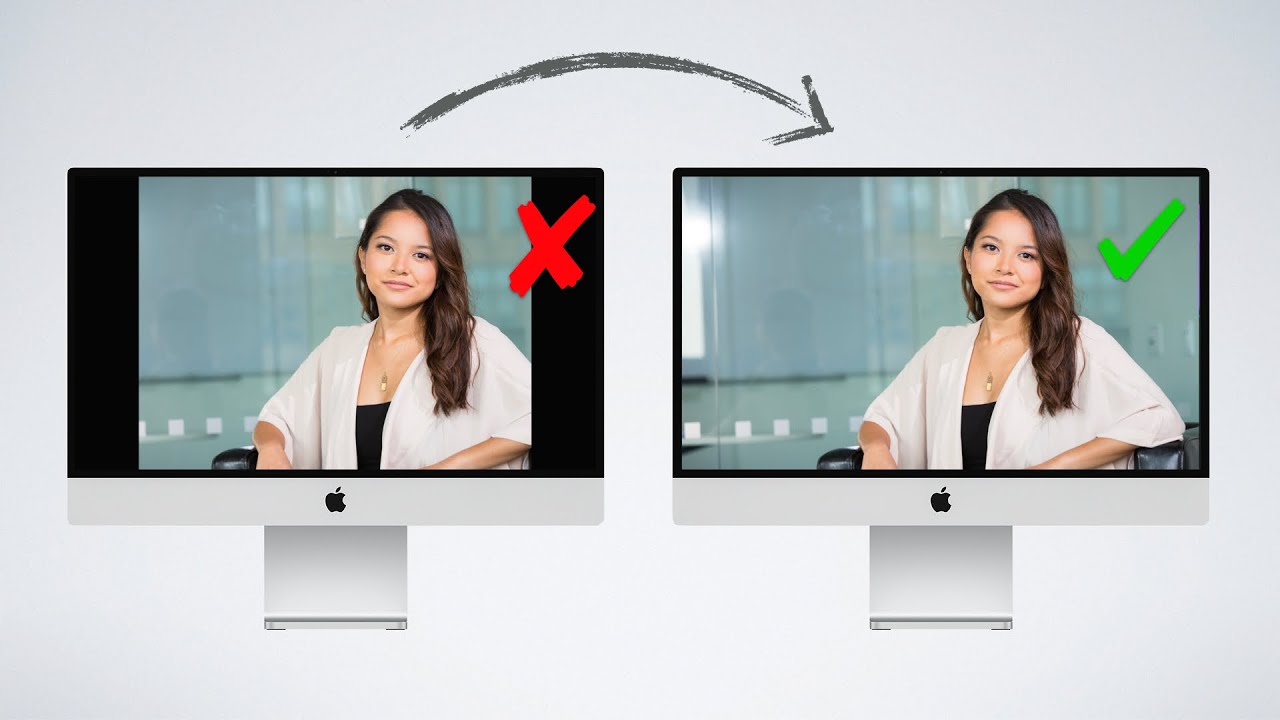
1. Aspect Ratio Mismatch: One common reason for black borders is a mismatch between the aspect ratio of the picture and the display. If the picture has a different aspect ratio than the display, black bars may appear to maintain the original proportions of the image.
2. Overscan Settings: Overscan is a feature on some TVs that slightly zooms in on the image to hide any potential noise or artifacts at the edges of the screen. However, this can also result in black borders around the picture. Check if your TV has an overscan setting and make sure it is turned off.
3. Resolution Compatibility: If the resolution of the picture is not compatible with the display, black borders may appear. For example, if you are trying to display a lower resolution picture on a higher resolution TV, the TV may add black borders to maintain the original pixel dimensions.
4. Zoom or Picture Size Settings: Some TVs have zoom or picture size settings that allow you to adjust how the picture fills the screen. If these settings are not properly configured, black borders may appear. Ensure that the picture size setting is set to “Full” or “Original” to eliminate any black borders.
By considering these factors, you can narrow down the potential causes for the black borders around pictures on your TV or display. Once you have identified the issue, you can proceed with the necessary troubleshooting steps to correct the problem and enhance your viewing experience.
Troubleshooting the TV/Display Settings
If you are experiencing pictures with black borders on your TV or display, it can be frustrating and affect your viewing experience. Fortunately, there are several troubleshooting steps you can take to address this issue and get your screen looking perfect again. Follow these steps to troubleshoot the TV/display settings:
1. Check Aspect Ratio: The first thing you should do is check the aspect ratio settings on your TV or display. Sometimes, incorrect aspect ratio settings can result in black borders. Access the settings menu and ensure that your TV is set to the appropriate aspect ratio (typically 16:9 for modern displays).
2. Zoom or Picture Size Settings: If changing the aspect ratio doesn’t fix the issue, check the zoom or picture size settings on your TV or display. It’s possible that the picture is being scaled incorrectly, resulting in black borders. Experiment with different zoom levels or picture size options to see if the black borders disappear.
3. Overscan Settings: Some TVs have an overscan feature that crops the edges of the picture to ensure it fits perfectly on the screen. However, this can sometimes lead to black borders. Check the overscan settings in your TV’s menu and disable it if necessary. This should allow the entire picture to be displayed without any borders.
4. Reset to Factory Settings: If none of the above steps resolve the issue, you can try resetting your TV or display to its factory settings. This will remove any customized settings and revert the device back to its original state. Refer to the user manual or manufacturer’s website for instructions on how to perform a factory reset.
5. Check HDMI Cables: A faulty or loose HDMI cable can also cause display issues, including black borders. Make sure that the HDMI cable is securely connected to both the TV and the source device. If possible, try using a different HDMI cable to see if the issue persists.
6. Update Firmware: Outdated firmware can sometimes cause display problems. Check for firmware updates on the manufacturer’s website and follow the instructions to update your TV’s firmware. This may include downloading a firmware file onto a USB drive and then updating it via the TV’s settings menu.
By following these troubleshooting steps, you should be able to identify and resolve any TV or display settings issues that are causing black borders on your screen. If the problem persists, it may be best to consult the manufacturer’s support or contact a professional for further assistance.
Adjusting the Picture Settings
Adjusting the picture settings on your TV or display can help resolve the issue of black borders in the output. Here are some steps you can follow:
1. Aspect Ratio: Check the aspect ratio setting on your TV or display. The aspect ratio determines the proportional relationship between the width and height of the screen. Make sure it is set to the correct aspect ratio for your content. Common options include 16:9 (widescreen) and 4:3 (standard).
2. Zoom or Picture Size: Some TVs or displays have a zoom or picture size option. If your display has black borders, try adjusting this setting to fill the screen. Be cautious not to stretch the image too much, as it may distort the picture quality.
3. Overscan: Overscan is a feature that zooms in on the image to ensure all content is visible. However, it can sometimes cause black borders to appear. Check your TV or display settings for the overscan option, and try disabling it if it is enabled.
4. Display Settings: Access the display settings on your TV or monitor to adjust parameters such as brightness, contrast, sharpness, and color saturation. Experiment with these settings to find the optimal balance that eliminates black borders and enhances the overall picture quality.
5. HDMI or DisplayPort Settings: If you are using an HDMI or DisplayPort connection, there may be specific settings related to the input port on your TV or display. Check the manufacturer’s instructions or the on-screen menu to access these settings and make adjustments if necessary.
6. Reset to Default: If you have made several adjustments and are still experiencing black borders, try resetting the picture settings to the default values. This can help eliminate any unintended changes that may be causing the issue.
7. Professional Calibration: If you want to achieve the best picture quality and eliminate black borders, consider professional calibration of your TV or display. This involves using specialized equipment and software to fine-tune the settings and ensure optimal performance.
By adjusting the picture settings on your TV or display, you can resolve the issue of black borders in the output and enjoy your content in full-screen glory.
Updating Firmware or Drivers
If you are experiencing black borders on your TV or display output despite adjusting the picture settings and troubleshooting the TV or display settings, it may be necessary to update the firmware or drivers of your device. Outdated firmware or drivers can sometimes cause compatibility issues, leading to various display abnormalities.
Updating the firmware or drivers of your device is a crucial step in resolving any software-related issues. Manufacturers often release updates that address bugs, improve performance, and enhance compatibility with different display devices.
To update the firmware or drivers, you will need to follow the specific instructions provided by your device manufacturer. Here are some general steps to guide you through the process:
- Identify the device model: In order to update the firmware or drivers, you must first determine the exact model of your device. This information can usually be found on the device itself or in the user manual.
- Visit the manufacturer’s website: Once you have identified the model, visit the official website of the device manufacturer. Look for the support or downloads section.
- Search for firmware or driver updates: Within the support or downloads section, search for firmware or driver updates specifically designed for your device model. Some manufacturers provide dedicated software or tools to assist with the update process.
- Download the update file: When you find the appropriate firmware or driver update, download it to your computer or a USB drive, depending on the instructions provided.
- Follow the installation instructions: After downloading the update file, carefully read the installation instructions provided by the manufacturer. These instructions will typically include steps to install the update, such as connecting a USB drive, entering a specific mode on the device, or using a software tool.
- Perform the update: Once you have followed all the necessary steps, initiate the update process on your device. This may involve running an executable file, following on-screen prompts, or using the manufacturer’s dedicated software tool. It is crucial to follow the instructions accurately and avoid interrupting the update process.
- Restart your device: After the update process is complete, it is recommended to restart your device to ensure that the changes take effect.
By updating the firmware or drivers of your device, you can potentially resolve any compatibility issues that were causing black borders on your TV or display output. Remember to check for firmware or driver updates periodically to ensure your device is up-to-date and optimized for the best display performance.
Conclusion
Correcting pictures with black borders in TV/display output is a common task that can greatly enhance the visual experience. By following the steps outlined in this guide, you can eliminate these black borders and ensure that your pictures are displayed accurately and beautifully on your screen.
Remember to first check your TV/display settings, adjust the aspect ratio if necessary, and make sure that you are using the correct resolution. If the black borders persist, then utilizing the overscan feature or customizing the screen size on your TV or display can usually resolve the issue.
With these techniques, you can now enjoy your favorite photos, videos, and movies without any distracting black borders. Take the time to optimize your picture settings to maximize the visual quality and immerse yourself in a truly captivating viewing experience. Happy picture correction!
FAQs
1. Why do pictures sometimes have black borders in TV or display output?
In some cases, when viewing pictures on a TV or display, you may notice black borders around the images. This typically occurs when the aspect ratio of the picture does not match the aspect ratio of the TV or display. As a result, the device adds black bars to the top and bottom or sides of the picture to maintain the original aspect ratio.
2. Can I correct pictures with black borders in TV or display output?
Yes, there are a few methods you can use to correct pictures with black borders. One option is to adjust the aspect ratio settings on your TV or display to match the aspect ratio of the picture. Another option is to use photo editing software to resize and crop the picture to fit the desired aspect ratio.
3. Are there any software tools specifically designed for correcting pictures with black borders?
Yes, there are various photo editing software tools available that offer features specifically designed to correct pictures with black borders. These tools allow you to resize, crop, and adjust the aspect ratio of your images to eliminate the black borders and optimize the display output.
4. Can I prevent pictures from having black borders in TV or display output?
It is not always possible to prevent pictures from having black borders, as it depends on the aspect ratio of the TV or display and the aspect ratio of the picture. However, you can work with images that have the same aspect ratio as your TV or display to minimize the occurrence of black borders. Additionally, resizing and cropping pictures before displaying them can help ensure a proper fit.
5. Are there any best practices to follow when correcting pictures with black borders?
When correcting pictures with black borders, it is important to maintain the original composition and ensure that important details are not lost during the resizing or cropping process. It is also recommended to make use of guides or grids provided by photo editing software to assist in aligning and cropping the image accurately. Additionally, previewing the corrected picture on various devices with different aspect ratios can help ensure optimal display output.