Visual Voicemail is a great way to go through your voicemail if you’re on the go. It helps you keep track of your messages and go back to them according to priority. The service is available on most mobile carriers and they usually come with data plans that you can avail of. Some services vary depending on the carrier that you have. Nonetheless, it’s a great upgrade from the traditional voicemail. Visual Voicemail is a great alternative for those who need more flexibility when it comes to managing voicemails.
It’s an extension of the traditional voicemail service. So to avail of it, you must set up voicemail on your phone first. In this article, we’ll be giving you a rundown of everything that you need to know about Visual Voicemail.
Also read: What Is Call Forwarding and How to Use It? (Complete Guide)
What Is Visual Voicemail?

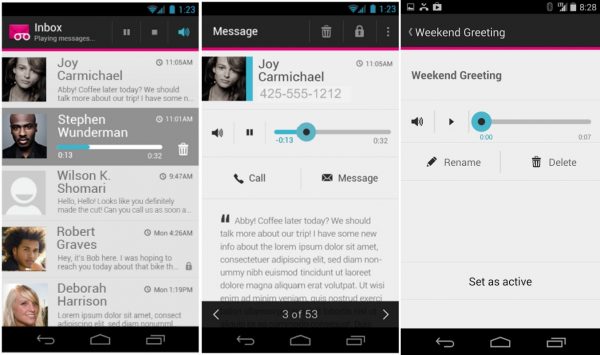
Visual Voicemail provides you with an easier way to access your voicemail visually. The messages can be transcribed and stored longer so you can read through them anytime at your leisure. They also provide you with important information about the caller and how long the voicemail is.
This not only helps users save time but also gives them more flexibility over their messages. They can prioritize responses and even forward transcriptions. With this, users can scan through their messages quickly without having to listen to every message that they receive. It saves time more than the traditional voicemail. It’s something that people should consider getting especially if they have a business because it saves time.
The best thing about this is that you have the option to add a PIN. This keeps your messages private even when you have multiple phones connected to the same number. It’s a functional and flexible way to manage your calls even when you’re out.
How Does Visual Voicemail Work?
Contrary to traditional voicemail, you will need an app or a website to access your messages with Visual Voicemail. Once you have access to the website or the app, you’ll be able to view your messages on a visual interface. Whenever you receive a voicemail, the app will store it temporarily for a certain number of days until you choose to save it.
You’ll be able to store and manage your voicemails easier once you get the service. You’ll be able to see a list of messages that you can either read or listen to. The list provides you with details like the caller’s number and the duration of the call so you can easily see who left the message. Additionally, depending on the app or the service that you’re using, it will automatically transcribe the message for you so you can breeze through it without having to listen to the recording. It’s a relatively new technology, however, so the accuracy of transcription will depend on the quality of voicemail recording.
Also read: Visual Voicemail Not Working
Visual Voicemail: Availing of the Service
The service is not free on most carriers. Contrary to the traditional voicemail that you can easily set up and access through your phone’s settings, you will have to avail of the service from your carrier. It usually either comes with a prepaid plan or you can get it as an upgrade to an already existing plan. It usually doesn’t cost much and you can get the service without having to add too much to your phone bill.
Here’s how you can avail of the service from top mobile carriers:
T-Mobile

You can use T-Mobile’s Basic Visual Voicemail for free as it comes with your phone and data plan. It’s automatically a part of your phone when you join T-Mobile. Contrary to other carriers, however, you won’t be able to transcribe the messages into text.
While Voice-To-Text is a notable feature of this service, T-Mobile separates the transcription service from the main service. Voice-to-Text is an upgrade that you can try out for free when you get Visual Voicemail. Once your trial is up and you want to keep the service, you will have to pay around $4/month for the service.
You can check out T-Mobile’s page on the Visual Voicemail app to get more information. You will need to access your T-Mobile account to be able to see the plans and upgrades for it.
Verizon

Verizon offers Basic Visual Voicemail for both Android and iPhone for free. It comes with your smartphone plans. However, like T-Mobile, you will need to pay an additional fee if you want access to their premium transcription service. The transcription service costs $2.99/month per phone.
The premium service will grant you Voice-To-Text transcription, additional storage capacity, and longer message duration. Of course, these aren’t really necessary if you’re only using your phone casually and not for business. You can easily make do with the basic Verizon Visual Voicemail for casual use.
To access the prices and upgrades for this service, you will need to access your Verizon account. Otherwise, you can refer to their FAQs section to learn more about their voicemail services.
AT&T

If you’re using AT&T, you will need to consider the phone and the service that you have. If you have a wireless and AT&T data plan with a compatible smartphone, you can upgrade to AT&T Visual Voicemail for free. However, if you only have a Wireless Home Phone or if you don’t have a data plan, you can only use Basic Voicemail. You can, of course, upgrade to AT&T’s Enhanced Voicemail for a small fee per month to get additional message capacity and storage time.
For AT&T, it’s only available on compatible smartphones. You can also only get it if you’re on a Data and Voice plan with the service. This will get you a maximum message capacity of 40 messages and a storage time of 30 days. The network has other voicemail plans for users who can’t avail of Visual Voicemail.
To learn more about AT&T’s plans, you can head to their website for more information.
Setting-Up Visual Voicemail
As already mentioned, mobile carriers often have dedicated apps for their Visual Voicemail services. All you have to do is to install the app and you’re set from there. Bear in mind that this will only work for Android phones. There is a different setup method for iPhones.
Here’s how you can set up Visual Voicemail for your phones:
T-Mobile
T-Mobile’s Visual Voicemail is quick and easy. Everything can be done through the carrier’s Visual Voicemail app.

To set up the service on T-Mobile, follow these steps:
- Download and install the T-Mobile Visual Voicemail app.
- Open the app and tap on Next.
- From there, simply allow the permissions that the app needs to proceed.
And you’re done! The service is set up and ready to use. Be careful when you’re setting up the app because you will get a prompt for the Voice-to-Text upgrade as you might accidentally activate it. Read through the prompts carefully so that you can avoid accidentally activating the service.
Verizon
Verizon Visual Voicemail is available within the phone itself. You don’t have to download an app for it because it already comes with your phone.
To set up your Verizon Voicemail, follow the steps below:
- Go to your phone’s Settings.
- Navigate through the menu and open Apps.
- Tap on Voicemail.
- Alternatively, you can go to Call Settings > Voicemail.
- Toggle the switch to turn it on.
With that, you’re all set. Keep in mind that these steps are applicable for Android phones that run on Oreo OS (8.0) and newer software.
AT&T
If you have a compatible phone and data plan, your next step to using the service with AT&T is setting up your account. Fortunately, you can do everything through the network’s app.

To set up your AT&T Visual Voicemail, follow the steps below:
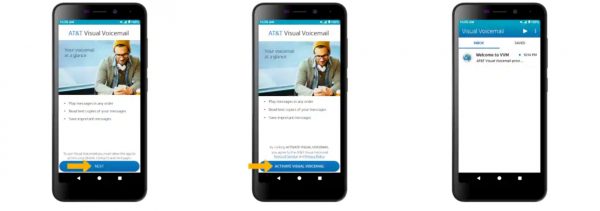
- Download and install the AT&T Visual Voicemail app.
- Open the app and tap Next.
- Tap on Activate Visual Voicemail.
Voila! You can now use the service with your AT&T phone. Keep in mind that this service is only available for select data plans and smartphones. There will be instances where the phone might not be compatible with the service. Also, this service is only available to Android, hence, you won’t be able to use it if you have an iPhone.
Download for Android (Play Store)
Visual Voicemail: iPhone Setup
Setting up Visual Voicemail on an iPhone is different from Android phones. If your carrier supports the service and if you have it in your plan, you can easily set it up by following the steps below:
- Head to your Phone app and go to the Voicemail tab.
- Tap on Set Up Now.
- Input your voicemail password and tap on Done. You will be asked to key in your password again for confirmation.
- Set up your voicemail greeting.
- Tap Save.
And you’re all set. Take note that you will need to have a carrier that supports the service for this to work. You will not be able to access Visual Voicemail if your carrier does not support it.
Visual Voicemail: Alternatives
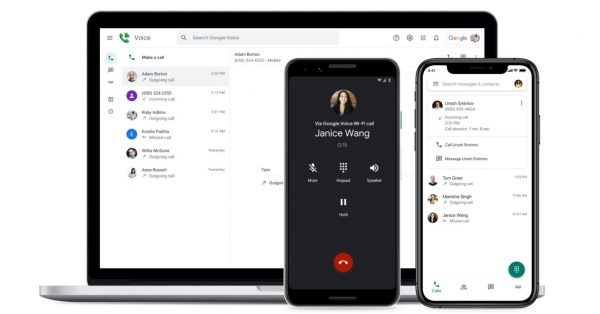
If you want to use this service but you don’t have a phone that’s compatible with it or your carrier doesn’t support it, you can consider using alternative apps. One popular app that you can use is Google Voice — a call forwarding service that gives you a phone number that is linked to your Google Account. This is a great alternative to consider especially if you have an unlocked phone and you want to use the service.

Here’s how you can use Visual Voicemail with Google Voice:
- Download and Install Google Voice.
- Create your Google Voice Number.
- Link your Google Voice Number with your existing phone number.
- Enable notifications and allow other permissions.
With that, you’re all set. You can now use the service with Google Voice. Keep in mind that you might need to enable or set up your phone’s Call Forwarding for this to work properly.
Download for Android (Play Store)
Wrap-Up
For professionals and those with businesses, Visual Voicemail is definitely something to consider getting. It allows users to manage and keep track of their voice messages without having to go through them one-by-one. It’s also helpful when you need to transcribe a message to understand it better. In all, the service is great to use when you want more control over the voice messages that you receive over the phone.
