
Tired of your iPhone 14 running slow? One effective solution to improve its performance is to clear the cache. Whether you’re experiencing lag while opening apps or noticing a decrease in overall speed, clearing the cache can help free up valuable storage space and enhance your iPhone’s efficiency.
In this article, we’ll guide you through the step-by-step process of clearing cache on your iPhone 14. We’ll cover different methods to ensure you have options that fit your preferences. So, if you’re ready to give your iPhone a boost and say goodbye to sluggishness, read on to learn how to clear cache on your iPhone 14!
Inside This Article
How to Clear Cache on iPhone 14
Is your iPhone 14 running slow? Are you experiencing frequent app crashes or glitches? The culprit might be a cluttered cache. Clearing the cache on your iPhone 14 can help optimize its performance and resolve various software issues. In this article, we will guide you through the process of clearing the cache on Safari, apps, system, and photo storage.
Clear Cache on Safari
Safari is the default browser on iPhone 14, and its cache can accumulate over time, leading to slower performance. Fortunately, clearing the Safari cache is a straightforward process. Follow these steps:
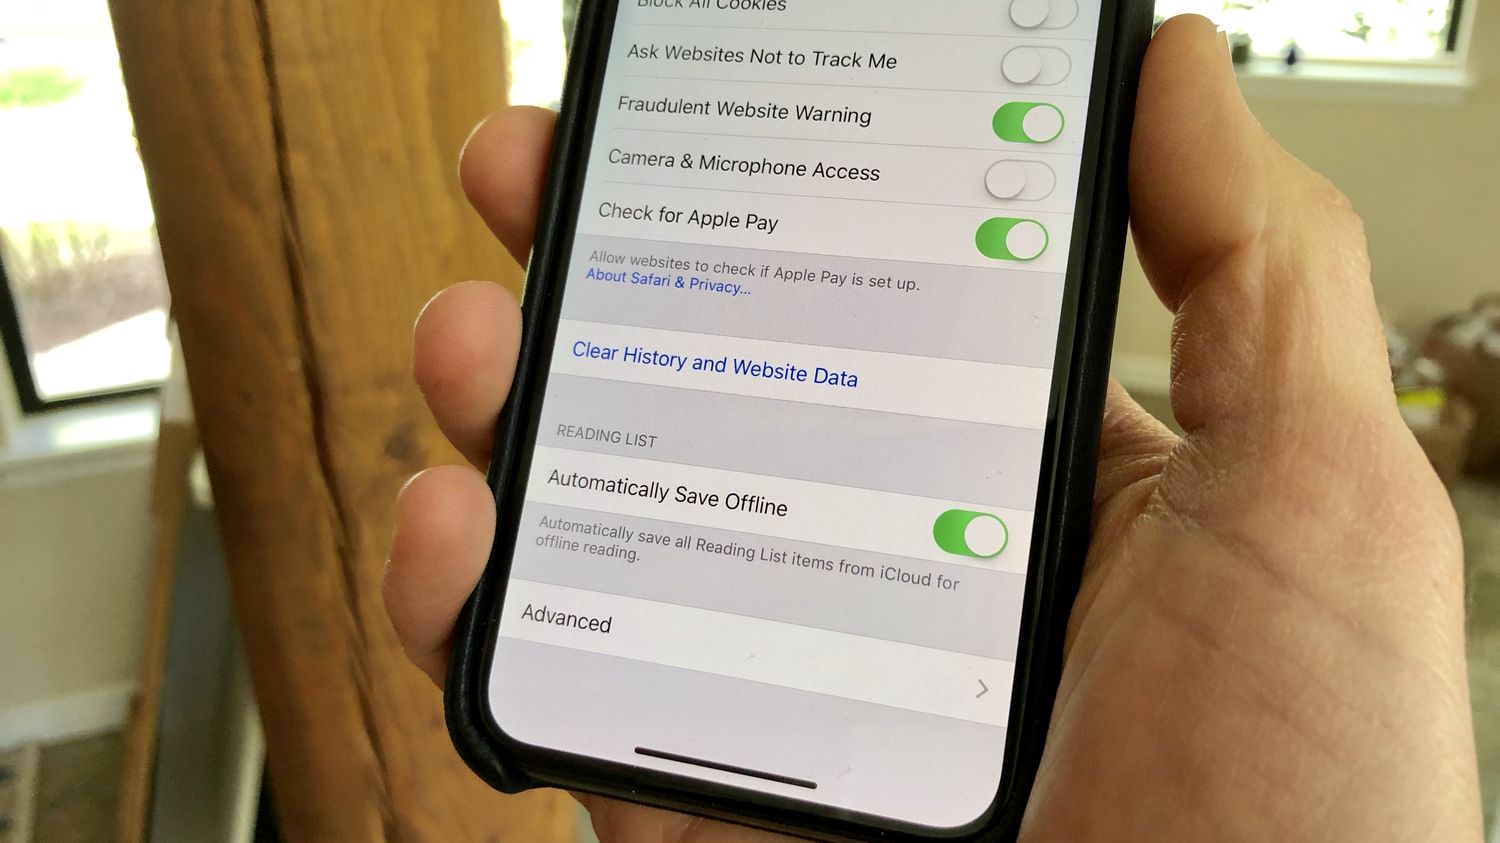
- Open the Settings app on your iPhone 14.
- Scroll down and tap on Safari.
- Under the Safari settings, tap on “Clear History and Website Data.
- A pop-up will appear to confirm your action. Tap on “Clear History and Data” again.
By following these simple steps, you will clear the cache and browsing history accumulated in Safari, improving its speed and performance.
Clear App Cache
Apps on your iPhone 14 also have their own cache, which can take up valuable storage space and impact their performance. To clear app cache, follow these steps:
- Go to the Settings app on your iPhone 14.
- Scroll down and tap on “General”.
- Tap on “iPhone Storage” or “Storage & iCloud Usage.
- Select the app you want to clear the cache for.
- Tap on “Offload App” or “Delete App”. This will remove the app along with its cache.
After clearing the app cache, you can reinstall the app from the App Store, if needed. This will ensure a fresh installation without any accumulated cache data.
Clear System Cache
Over time, the system cache on your iPhone 14 can also become cluttered, impacting its performance. To clear the system cache, follow these steps:
- Press and hold the Power button until the “Slide to Power Off” option appears.
- Release the Power button and hold the Volume Down button until your iPhone 14 restarts.
- Once the Apple logo appears, release the Volume Down button.
Your iPhone 14 will reboot, and the system cache will be cleared during the process. This can help improve the overall performance of your device.
Clear Photo Cache
If you frequently use the Camera app and take numerous photos on your iPhone 14, it can result in a large photo cache. To clear the photo cache, follow these steps:
- Open the Photos app on your iPhone 14.
- Tap on the “Photos” tab at the bottom of the screen.
- Scroll to the bottom and tap on “Recently Deleted”.
- Tap on “Select” in the top right corner.
- Tap on “Delete All” to remove all photos permanently from the Recently Deleted album.
Clearing the photo cache can free up storage space on your device and improve the performance of your Photos app.
By following these steps, you can effectively clear the cache on your iPhone 14, optimizing its performance, and resolving any software issues that may be affecting its speed or functionality. Keep your device running smoothly by regularly clearing the cache.
Conclusion
In conclusion, knowing how to clear the cache on your iPhone 14 is essential for maintaining optimal performance and freeing up valuable storage space. By following the simple steps outlined in this article, you can easily clear the cache in various apps and Safari, ensuring that your device runs smoothly and efficiently.
Regularly clearing the cache can help improve the speed and responsiveness of your iPhone 14, as well as resolve any potential issues that may arise due to cached data. It is a simple yet effective way to keep your device running smoothly and ensure you have enough storage for all your needs.
Remember, clearing the cache is a safe and straightforward process that you can undertake whenever you feel the need to refresh your device. By doing so, you can enjoy a smoother and more enjoyable user experience on your iPhone 14.
FAQs
1. Why should I clear the cache on my iPhone 14?
Clearing the cache on your iPhone 14 can help improve its performance by freeing up storage space and removing temporary files that may be causing slowdowns or glitches. It can also resolve issues with apps not working properly or displaying outdated information.
2. How do I clear the cache on my iPhone 14?
To clear the cache on your iPhone 14, follow these steps:
- Go to the “Settings” app on your iPhone 14.
- Scroll down and tap on “Safari” (or the app you want to clear the cache for).
- Scroll down again and tap on “Clear History and Website Data”.
- Confirm the action by tapping on “Clear History and Data”.
3. Will clearing the cache on my iPhone 14 delete any of my personal data?
No, clearing the cache on your iPhone 14 will not delete any of your personal data such as photos, contacts, or messages. It will only remove temporary files and data stored by apps or websites.
4. How often should I clear the cache on my iPhone 14?
The frequency of clearing the cache on your iPhone 14 depends on your usage. If you notice any performance issues or app glitches, clearing the cache can be done as a troubleshooting step. Some users prefer to perform this task once every few weeks to keep their device running smoothly.
5. Can I clear the cache for specific apps on my iPhone 14?
Yes, you can clear the cache for specific apps on your iPhone 14. The process may vary depending on the app, but usually, you can find the option to clear app cache within the app’s settings or preferences. If you’re experiencing issues with a specific app, clearing its cache can often resolve the problem.