
Are you a proud owner of the Moto G smartphone and looking to explore some advanced settings and options? If so, you’re in luck! One of the hidden gems of the Moto G is the Developers Options, a secret menu that allows you to unlock a whole new world of customization and optimization.
In this article, we will guide you through the step-by-step process of accessing the Developers Options on your Moto G. Whether you’re an experienced user looking to tweak your device or a curious beginner wanting to experiment, we’ve got you covered. So, let’s dive in and uncover the hidden power of your Moto G!
Inside This Article
- Enabling Developer Options on Moto G
- Accessing Developer Options on Moto G
- Modifying Developer Options settings on Moto G
- Conclusion
- FAQs
Enabling Developer Options on Moto G
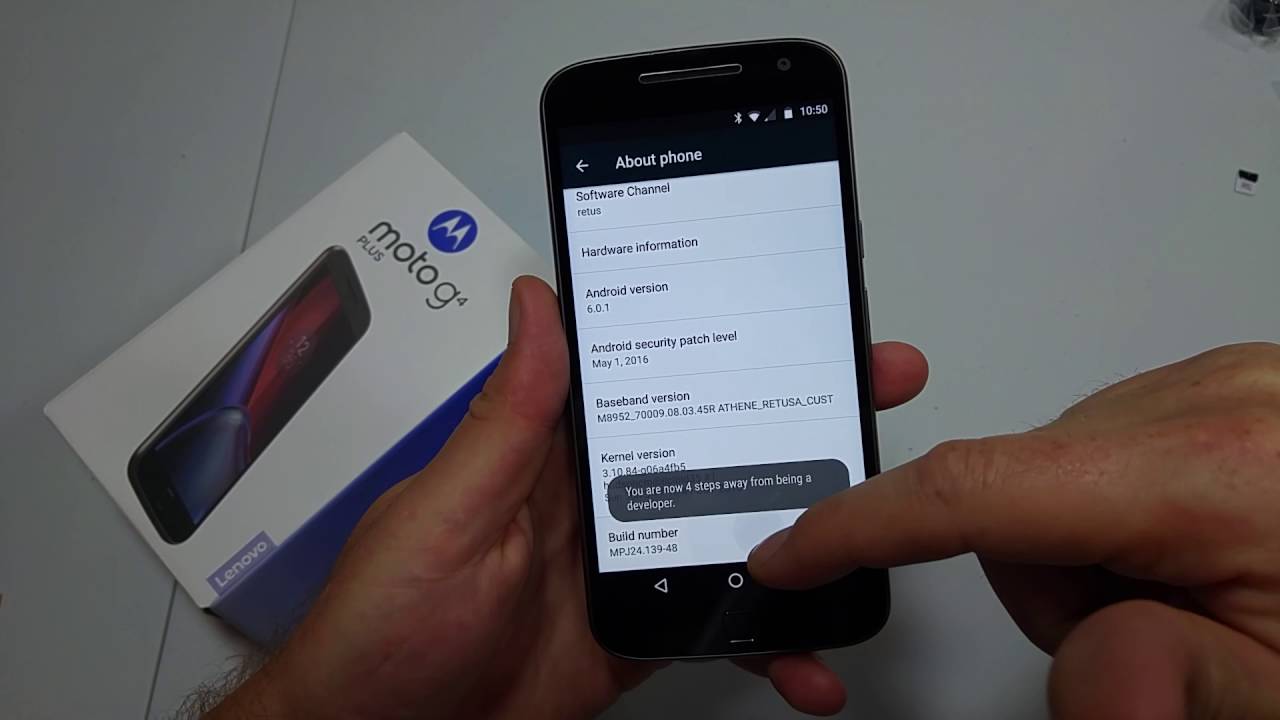
Moto G is a popular smartphone that offers a range of features and customization options. One of the hidden gems of this device is the Developer Options menu, which allows users to access advanced settings and make changes to optimize their device’s performance. However, before you can access Developer Options on the Moto G, you need to enable it first.
To enable Developer Options on your Moto G, follow these simple steps:
- Go to the “Settings” app on your Moto G.
- Scroll down and tap on “About Phone.”
- Look for the “Build Number” option.
- Tap on “Build Number” repeatedly for about seven times.
- Enter your device’s security PIN or pattern, if prompted.
By tapping on “Build Number” multiple times, you activate the hidden Developer Options feature. After completing these steps, you should see a message that says “You are now a developer!” This indicates that you have successfully enabled Developer Options on your Moto G.
It is worth mentioning that the “Build Number” option may vary slightly depending on the specific version of the Moto G you are using, but it should generally appear within the “About Phone” section of the settings.
Now that you have successfully enabled Developer Options on your Moto G, you can proceed to access and modify the advanced settings to enhance your smartphone experience.
Accessing Developer Options on Moto G
Developer Options on Moto G is a hidden menu that allows you to tweak advanced settings and access additional features on your smartphone. To unlock this menu, you’ll need to follow these simple steps:
-
Open the “Settings” app on your Moto G device. You can find the “Settings” app in the app drawer or by swiping down from the top of the screen and tapping on the gear icon.
-
Scroll down and tap on “About phone” near the bottom of the settings menu.
-
In the “About phone” menu, look for the “Build number” or “Build version” option. Tap on it multiple times, usually around 7 times, until you see a toast message saying “You are now a developer!”
-
Once you’ve tapped on the build number several times, a new menu called “Developer Options” will appear in the main settings menu, just above the “About phone” option.
-
Tap on “Developer Options” to access the hidden menu.
It’s important to note that enabling Developer Options on your Moto G does not void your warranty or make any permanent changes to your device. It simply unlocks additional settings that are intended for developers and advanced users. These options can be incredibly useful for tasks such as debugging apps, unlocking bootloader, or enabling USB debugging for development purposes.
However, it’s advisable to exercise caution while making any changes in the Developer Options menu, as modifying certain settings without knowledge or understanding can have an adverse impact on the performance or stability of your device.
In the next section, we’ll explore how to modify the Developer Options settings on your Moto G, further unleashing the full potential of your device.
Modifying Developer Options settings on Moto G
Once you have successfully accessed Developer Options on your Moto G, you’ll be able to customize various settings to enhance your smartphone experience. Let’s explore some of the key modifications you can make within Developer Options.
1. USB Debugging: USB Debugging is an essential feature for developers as it allows your Moto G to communicate with your computer while debugging applications. To enable USB Debugging, simply toggle the switch next to “USB Debugging” to the ON position. This will enable you to transfer data, install and test apps, and perform other debugging tasks.
2. Stay Awake: The “Stay Awake” option keeps your Moto G’s screen on while it is connected to a power source. This can be useful when you want to keep your device awake for testing purposes or if you frequently refer to your phone while it is charging. To activate this feature, simply toggle the switch next to “Stay Awake” to the ON position.
3. Background Process Limit: By default, Android manages the number of background processes running on your Moto G. However, within Developer Options, you have the ability to modify this limit. You can select from various options, such as “Standard Limit,” “No Background Processes,” or “1 Background Process,” to customize your device’s behavior based on your preferences.
4. Animation Scale: Developer Options also allows you to adjust animation scales for window animation, transition animation, and animator duration scale. These settings control the speed and smoothness of animations on your Moto G. By modifying the animation scale values, you can make your device feel faster or add more visual flair to the transitions and effects.
5. Debug GPU Overdraw: The “Debug GPU Overdraw” option provides a visual representation of how your Moto G’s graphics are being rendered. It overlays a color-coded grid on the screen to indicate areas that are being redrawn multiple times. This feature is especially useful for developers to optimize their app’s performance and ensure efficient use of resources.
6. Force RTL Layout: “RTL” stands for “right-to-left,” and this option allows you to force the layout of your Moto G’s interface to be displayed in a right-to-left fashion. This can be beneficial if you are testing an app that supports languages such as Arabic or Hebrew, which are written from right to left.
7. Mock Location: The “Mock Location” feature allows you to simulate a different location on your Moto G. This can be useful for testing location-based apps or services without physically being in that location. However, please note that this feature should be used responsibly and with permission, as it can impact the accuracy of location-based services.
8. OEM Unlocking: The “OEM Unlocking” option is primarily used when you want to unlock the bootloader on your Moto G. Unlocking the bootloader allows you to install custom firmware or gain root access, but it also voids your device’s warranty. If you decide to unlock the bootloader, proceed with caution, as it can lead to unintended consequences.
Remember, while modifying these settings can offer a more personalized experience on your Moto G, it’s important to exercise caution and only make changes if you are familiar with the implications. Experimenting with the Developer Options can provide exciting opportunities for customization and optimization, but it’s always wise to research and understand the potential impact of each setting.
The Developers Options on Moto G are a powerful set of hidden features that can greatly enhance your smartphone experience. From enabling USB debugging for app development to tweaking system settings for advanced customization, these options offer a multitude of possibilities.
By following the step-by-step instructions outlined in this article, you can easily access and explore the Developers Options on your Moto G device. Remember to exercise caution when making any changes, as some settings can have an impact on the overall performance and stability of your phone.
Whether you’re a developer looking to test apps or a tech enthusiast who wants to unlock the full potential of your Moto G, the Developers Options can provide a wealth of options to play with. So, go ahead and dive into the world of customization, experimentation, and optimization with the Developers Options on your Moto G smartphone.
FAQs
1. What is the Developers Options on Moto G?
The Developers Options on Moto G is a hidden menu that provides advanced settings and options for developers to customize and optimize their device’s performance.
2. How do I access the Developers Options on Moto G?
To access the Developers Options on your Moto G, follow these steps:
- Go to the Settings menu on your Moto G.
- Scroll down and tap on “About phone”.
- Find the “Build number” and tap on it repeatedly until you see a message that says “You are now a developer”.
- Go back to the main Settings menu, and you should see the “Developer options” listed.
3. What can I do with the Developers Options on Moto G?
The Developers Options on Moto G allows you to enable USB debugging, which is helpful for installing custom ROMs or debugging apps. It also provides access to various performance tweaking options, such as adjusting the animation scale, limiting background processes, or forcing GPU rendering, among others.
4. Should I enable the Developers Options on my Moto G?
Enabling the Developers Options on Moto G is not necessary for regular users. It is mainly intended for developers or advanced users who want to fine-tune their device’s performance or experiment with custom settings. If you’re not familiar with its options, it’s recommended to leave it disabled to avoid unintended changes or issues.
5. Can I revert back to the default settings after enabling the Developers Options?
Yes, you can easily revert back to the default settings after enabling the Developers Options on your Moto G. Simply go to the “Developer options” menu and tap on the “Reset to default settings” or similar option. This will reset all the settings within the Developers Options back to their default values.