
Gaming on PC offers an immersive experience that can be enhanced further by using a gamepad. Steam, the popular gaming platform, provides support for gamepad controllers, allowing gamers to play their favorite titles with ease. However, setting up a gamepad for Steam can sometimes be a bit challenging for newcomers.
In this article, we will guide you through the step-by-step process of setting up a gamepad for Steam, ensuring that you can seamlessly navigate through your games and enjoy a comfortable gaming experience. Whether you’re new to PC gaming or just need a refresher, we’ve got you covered with all the information you need to get started. So, buckle up, grab your gamepad, and let’s dive into the world of hassle-free gaming on Steam!
Inside This Article
- Installing the Gamepad Drivers
- Connecting the Gamepad to your Computer
- Configuring the Gamepad in Steam
- Testing and Troubleshooting the Gamepad
- Conclusion
- FAQs
Installing the Gamepad Drivers
Before you can start using your gamepad with Steam, you need to install the appropriate drivers for your specific gamepad model. These drivers allow your computer to recognize and communicate with the gamepad, ensuring that it works seamlessly with Steam games. Here’s a step-by-step guide on how to install the gamepad drivers:
- Start by plugging in your gamepad to one of the USB ports on your computer. Make sure it is securely connected.
- Next, visit the manufacturer’s website and search for the drivers section. Look for the drivers that are compatible with your gamepad model and the operating system you are using, whether it’s Windows, macOS, or Linux.
- Download the appropriate drivers for your gamepad. They are usually available in the form of an executable file, which you can run to start the installation process.
- Once the installation process begins, follow the on-screen instructions provided by the driver installer. It may prompt you to restart your computer after the installation is complete.
- After restarting, your gamepad drivers should be successfully installed. You can verify this by checking the device manager on your computer. Look for your gamepad in the “Human Interface Devices” or “Game Controllers” section. If you see it listed without any warning or error indicators, it means the drivers are installed correctly.
With the gamepad drivers installed, you can now move on to connecting the gamepad to your computer and configuring it in Steam. Keep in mind that some gamepads may come with their own software or configuration utilities, which can further enhance your gaming experience.
Connecting the Gamepad to your Computer
Now that you have your gamepad and drivers installed, it’s time to connect it to your computer. Follow these steps to ensure a seamless connection:
1. Plug in the gamepad to an available USB port on your computer. Make sure it is securely inserted to avoid any connection issues.
2. Once plugged in, your computer will typically recognize the gamepad automatically and may install any necessary drivers. If prompted, follow the on-screen instructions to complete the installation.
3. If your gamepad requires additional software or drivers for proper functioning, visit the manufacturer’s website and download the appropriate software. Install it on your computer according to the provided instructions.
4. After the drivers are installed, give your computer a moment to detect the gamepad. You can check the connectivity status by opening the Device Manager (Windows) or System Preferences (Mac) and looking for the gamepad under the “Game Controllers” or “USB Devices” section.
5. With the gamepad connected, it’s important to ensure that it is set as the default controller for your computer. To do this, go to the Control Panel (Windows) or System Preferences (Mac) and navigate to the “Devices” or “Bluetooth & Other Devices” section. From there, locate the gamepad and set it as the default input device.
6. If your gamepad uses Bluetooth connectivity, make sure you have Bluetooth enabled on your computer. Follow the manufacturer’s instructions to pair the gamepad with your computer via Bluetooth. Once successfully paired, it should connect automatically whenever it’s in range.
7. Lastly, it’s a good idea to test the gamepad’s buttons and analog sticks to ensure they are working correctly. You can use the built-in “Game Controllers” or “Joystick” calibration tools in your operating system to verify functionality.
With these steps completed, your gamepad should now be connected and ready to use with your computer. You can now proceed to configure it in Steam to enjoy your favorite games with enhanced controls.
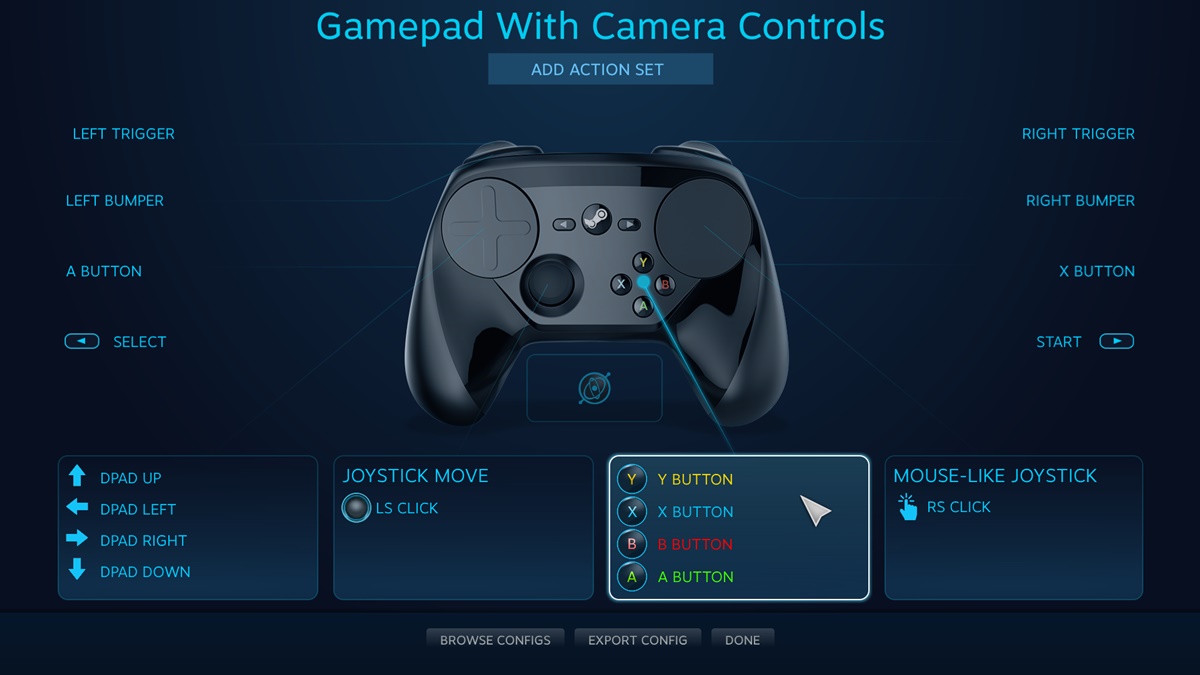
Configuring the Gamepad in Steam
Once you have connected your gamepad to your computer and installed the necessary drivers, the next step is to configure it in Steam. Configuring the gamepad in Steam will allow you to customize its buttons, sensitivity, and other settings to fit your gaming preferences. To get started, follow the steps below:
1. Launch the Steam application on your computer and log into your Steam account.
2. Once you are logged in, click on the “Steam” tab located at the top-left corner of the Steam window.
3. From the drop-down menu, select “Settings” to open the Steam Settings window.
4. In the Steam Settings window, click on the “Controller” tab located on the left-hand side of the window.
5. In the Controller settings, you will see a list of connected controllers. Select your gamepad from the list.
6. After selecting your gamepad, you will see various configuration options for the selected controller.
7. Customize the settings as per your preference. You can remap the buttons, adjust the sensitivity, and even set up different profiles for different games.
8. Once you have made the desired changes, click on the “OK” button to save the configuration.
9. You can now launch a game from your Steam library and test out the configured gamepad. The game should now recognize the inputs from your gamepad.
Keep in mind that some games might have their own in-game settings for gamepad configuration. Make sure to check the game’s settings menu to further customize the gamepad inputs if necessary.
If you encounter any issues or face difficulties while configuring the gamepad in Steam, you can consult Steam’s official support documentation or seek assistance from the Steam community forums. Remember to save and backup your gamepad configuration settings, as they can be useful if you need to set up the gamepad on another computer or reinstall Steam.
Configuring your gamepad in Steam opens up a whole new level of immersive gaming experiences. Whether you prefer playing action-packed shooters or exploring vast open-world adventures, having a properly configured gamepad can enhance your gaming performance and enjoyment.
Testing and Troubleshooting the Gamepad
Once you have successfully set up and configured your gamepad in Steam, it’s time to start testing it to ensure everything is working correctly. Additionally, if you encounter any issues or face troubleshooting situations, this section will guide you in resolving them.
1. Start by launching a game on Steam that supports gamepad controls. This can be any game from your library that is compatible with a gamepad.
2. Once the game is launched, navigate to the options or settings menu within the game. Look for a section that specifically deals with gamepad controls or input settings.
3. In the game’s input settings, you should see an option to select the gamepad as the preferred input device. Make sure to select your gamepad from the available options.
4. Now, proceed to test each button and joystick on your gamepad. Press every button and move each joystick to ensure that the corresponding action is detected in the game. This will help you confirm if the gamepad is properly functioning.
5. Pay close attention to any unusual behavior or button mapping issues. If you find that certain buttons are not registering or if the gamepad’s inputs are not being recognized correctly, you may need to recalibrate the gamepad or check for any software/firmware updates.
6. To recalibrate the gamepad, you can usually find this option within the game’s settings menu. Follow the on-screen instructions to recalibrate the controller and ensure optimal performance.
7. If recalibrating the gamepad doesn’t solve the issue, you may need to update the firmware or drivers of your gamepad. Check the manufacturer’s website for any available updates and follow their instructions for installing them.
8. Should the troubleshooting steps mentioned above fail to resolve the issue, it’s worth reaching out to the game’s support or the gamepad manufacturer’s support for further assistance. Provide them with a detailed description of the problem and any error messages you encounter.
Remember, different games may have varying compatibility and settings for gamepad controllers. Some games might require additional configuration or mapping in order to function correctly with your gamepad. Always check the game’s documentation or online forums for any specific instructions related to gamepad setup and troubleshooting.
By following these steps and troubleshooting tips, you should be able to ensure that your gamepad is working properly and enjoy a seamless gaming experience on Steam.
Conclusion
Setting up a gamepad for Steam is a straightforward process that can greatly enhance your gaming experience. Whether you prefer the precision of a controller or the convenience of a wireless connection, Steam offers a variety of options to cater to your gaming needs. By following the steps outlined in this guide, you can quickly and easily configure your gamepad to work seamlessly with Steam and start enjoying your favorite games with enhanced control.
Remember, it’s important to ensure that your gamepad is compatible with Steam and that you have the necessary drivers installed. Additionally, make sure you familiarize yourself with the controller settings within Steam and customize them to suit your playstyle.
So, go ahead and connect your gamepad to your computer, dive into Steam’s vast library of games, and get ready to elevate your gaming experience to new heights!
FAQs
1. Can I use a gamepad for Steam?
Yes, you can definitely use a gamepad for Steam. Steam supports various gamepads and controllers, allowing you to have a more immersive gaming experience.
2. How do I set up a gamepad for Steam?
To set up a gamepad for Steam, follow these steps:
- Connect your gamepad to your computer using a USB cable or wireless connection.
- Launch the Steam application on your computer.
- Go to Steam’s “Settings” menu.
- Select the “Controller” tab.
- Click on “General Controller Settings.”
- Ensure that your gamepad is detected by Steam. If not, try disconnecting and reconnecting the gamepad or restarting your computer.
- Follow the on-screen prompts to calibrate your gamepad, if required.
- You can also customize the button mapping and sensitivity of your gamepad in the “Controller Configuration” section.
- Once your gamepad is set up, you can start using it to play games on Steam.
3. Do all gamepads work with Steam?
Most gamepads should work with Steam, but there may be compatibility limitations with certain models. It is recommended to check the Steam community forums or the manufacturer’s website for specific information on gamepad compatibility and any required drivers or software updates.
4. Can I use a PlayStation or Xbox controller with Steam?
Yes, you can use both PlayStation and Xbox controllers with Steam. Steam has built-in support for these popular controllers, making it easy to connect and use them for gaming.
5. Are there any specific settings I need to change for gamepad usage in Steam?
By default, Steam should automatically recognize and configure your gamepad. However, you can customize various settings in the Steam “Controller” section, such as enabling Xbox configuration support, adjusting the stick response curves, and changing the vibration settings. These settings allow you to optimize the gamepad experience according to your preferences.