
Welcome to our comprehensive guide on how to set up a headset on OBS! OBS (Open Broadcaster Software) is a popular live-streaming and recording software that allows you to broadcast your content to various platforms. Whether you are a streamer, content creator, or simply want to enhance your audio quality during video calls, setting up your headset on OBS is essential for a seamless experience.
In this article, we will walk you through the step-by-step process of configuring your headset with OBS. From selecting the right audio device to adjusting settings within OBS, we will cover everything you need to know to get your headset up and running. So grab your headphones and let’s dive right in!
Inside This Article
- Initial Setup
- Connecting the Headset to your Computer
- Configuring Audio Settings in OBS
- Checking the Headset Audio Output in OBS
- Conclusion
- FAQs
Initial Setup
Setting up a headset on OBS (Open Broadcaster Software) is an essential step to ensure high-quality audio output for your live streams or recorded videos. Whether you are a streamer, content creator, or someone who needs to communicate clearly during online meetings, having a properly configured headset is crucial. In this guide, we will walk you through the initial setup process.
Before you begin, make sure you have a compatible headset and the necessary cables. Most headsets will come with their own USB or audio jack connectors, so ensure that you have the appropriate cable for your headset. Additionally, ensure that your computer’s audio drivers are up to date to avoid any compatibility issues.
The first step in the initial setup process is to connect your headset to your computer. Depending on your headset’s connectivity options, you may need to plug the USB connector or the audio jack into the corresponding ports on your computer. Once connected, your computer should recognize the headset as a new audio device.
Next, navigate to the audio settings on your computer. On Windows, you can access the sound settings by right-clicking on the speaker icon in the system tray and selecting “Open Sound settings” or “Playback devices.” On macOS, you can find the sound settings by going to System Preferences, then selecting “Sound.” In the sound settings, ensure that your headset is selected as the default audio output device.
Once you have connected your headset and set it as the default audio output device, it’s time to configure the audio settings in OBS. Launch OBS and go to the “Audio Mixer” section. Here, you’ll see a list of available audio sources. Locate the source that corresponds to your headset and click on the “Settings” icon next to it.
In the audio settings for your headset source, you can adjust the volume levels, enable or disable audio monitoring, and apply any necessary filters or effects. Make sure to test your audio settings by speaking into the microphone and monitoring the audio levels in OBS.
Finally, check the headset audio output in OBS to ensure that it is working properly. Start a test recording or stream and listen to the playback. If you hear clear and high-quality audio in the playback, then congratulations! You have successfully set up your headset on OBS.
Remember, it’s important to regularly check and update your headset drivers and OBS software to ensure optimal performance. By following these initial setup steps, you can enjoy crystal-clear audio during your live streams or recorded videos.
Connecting the Headset to your Computer
Connecting your headset to your computer is an essential step in setting up your audio for OBS. Follow these simple steps to establish a seamless connection:
1. Check the compatibility: Before connecting the headset, ensure that it is compatible with your computer. You can refer to the headset’s user manual or the manufacturer’s website for compatibility details.
2. Locate the headset port: Look for the headset port on your computer. In most cases, it is labeled with a headphone or microphone icon. The port is usually located on the front or back of the computer, depending on the model.
3. Plug in your headset: Take the connector on your headset cable and carefully insert it into the corresponding headset port on your computer. Ensure that it is fully inserted to establish a reliable connection.
4. Test the audio: Once the headset is connected, test the audio to ensure it is working correctly. Play some music or a video and make sure you can hear it through the headset. You can adjust the volume using the controls available on your headset or the computer.
5. Adjust microphone settings (if applicable): If your headset has a built-in microphone, you may need to adjust the microphone settings on your computer. To do this, right-click on the speaker icon in the system tray, select “Recording devices,” and make sure your headset microphone is set as the default recording device. You can also adjust the microphone volume and other settings in this window.
With these steps, you have successfully connected your headset to your computer. Now, let’s move on to configuring the audio settings in OBS to ensure your headset is properly integrated into your streaming or recording setup.
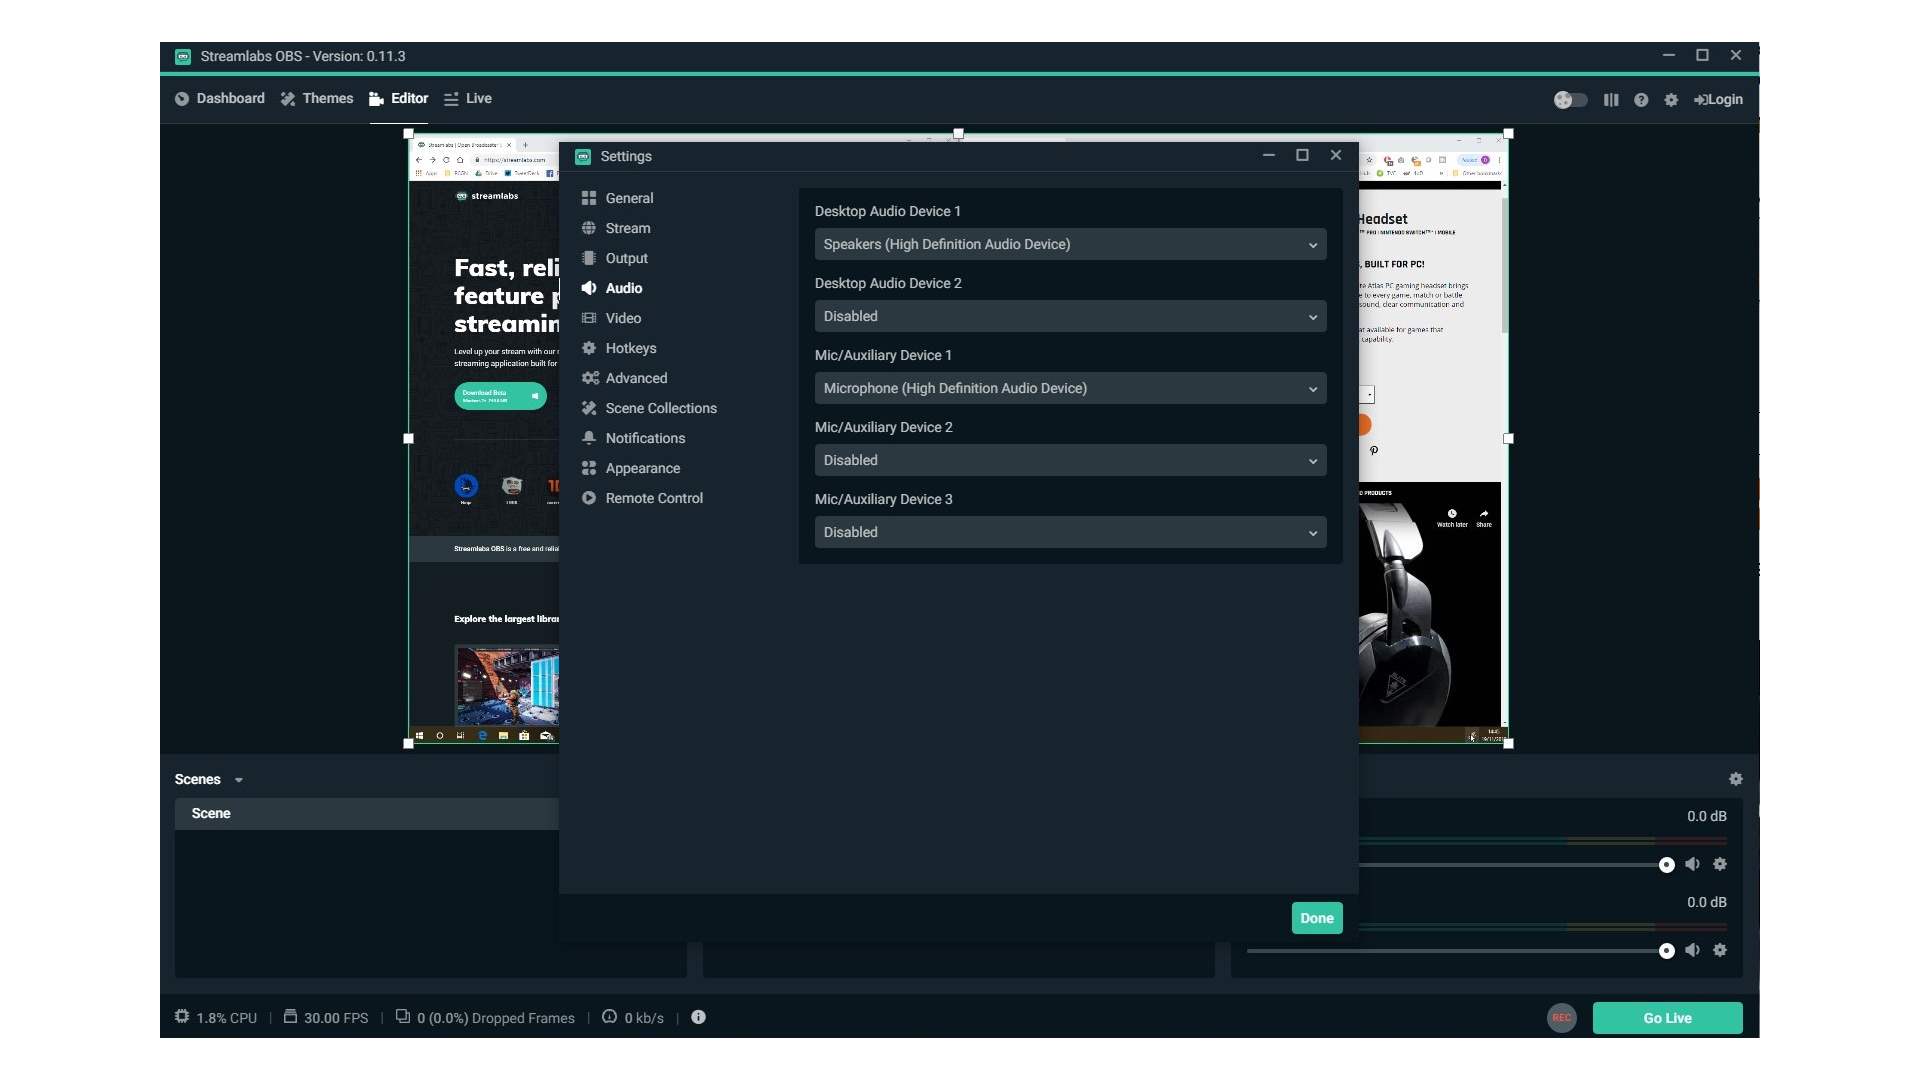
Configuring Audio Settings in OBS
After connecting your headset to your computer, the next step is to configure the audio settings in OBS (Open Broadcaster Software) to ensure optimal sound quality for your recordings or live streams. Follow these steps to set up your headset in OBS:
- Launch OBS: Open OBS on your computer and make sure you are in the main OBS window.
- Go to Settings: Click on the “Settings” button in the bottom-right corner of the OBS window. This will open the Settings menu.
- Audio Settings: In the Settings menu, click on the “Audio” tab to access the audio settings.
- Audio Device Selection: Under the “Audio” tab, you will see the “Device” section. In the “Default” dropdown menu, select your headset as the default audio input and output device.
- Audio Mixer: Below the “Device” section, you will find the “Audio Mixer” section. Here, you can adjust the audio levels for your headset and other audio sources. Make sure the audio level for your headset is set properly to avoid any distortion or sound issues.
- Monitor Off: To prevent echo or feedback, make sure the “Monitoring” option is set to “Off” for your headset.
- Advanced Audio Properties: If you require more advanced audio settings, you can click on the “Advanced” button below the audio mixer. Here, you can fine-tune things like audio syncing, audio monitoring, and more.
- Apply and Save: Once you have configured all the necessary audio settings, click on the “Apply” button at the bottom right corner of the Settings menu, and then click on the “OK” button to save the changes.
By following these steps, you should now have your headset properly configured in OBS. Ensure that your audio levels are balanced, and double-check that the correct audio input and output devices are selected. With these settings in place, you are ready to start recording or streaming with high-quality audio using your headset.
Checking the Headset Audio Output in OBS
Once you have connected your headset to your computer and configured the audio settings in OBS, it’s important to check the headset audio output to ensure that everything is working as intended. Here’s how you can do it:
1. Open OBS and go to the “Settings” menu by clicking on the “File” tab at the top left corner of the screen.
2. In the “Settings” menu, click on the “Audio” tab located on the left-hand side.
3. Under the “Audio” tab, you will find the “Audio Monitoring” section. This is where you can check the headset audio output.
4. To check the headset audio output, look for the “Monitoring Device” dropdown menu. Click on the dropdown menu and select your headset from the list of available devices.
5. Once you have selected your headset as the monitoring device, OBS will start playing the audio output through your headset. You can now listen to the audio from your stream or recording in real-time.
6. Make sure to adjust the volume of your headset to a comfortable level using the volume controls on the headset itself or through the operating system’s audio settings.
7. To test the audio output, you can play a test sound or video in OBS and check if the audio is coming through your headset. If you can hear the audio clearly, then the headset audio output in OBS is working correctly.
8. If you are unable to hear the audio through your headset, double-check the connection of your headset to the computer and ensure that it is properly plugged into the correct audio port.
9. Additionally, you can also check the audio settings in OBS to make sure that the correct audio device is selected for recording or streaming.
By following these steps, you can easily check the headset audio output in OBS to ensure that your audio is being captured and monitored correctly. This will help you deliver high-quality sound in your streams or recordings, providing an immersive and engaging experience for your audience.
Conclusion
In conclusion, setting up a headset on OBS can greatly enhance your streaming or recording experience. By following the steps outlined in this guide, you can ensure that your audio quality is clear, crisp, and immersive for your viewers or audience.
Remember to connect your headset properly, adjust the audio settings in OBS, and test your audio levels to achieve the desired sound quality. Taking the time to calibrate and optimize your headset setup will make a noticeable difference in the overall production value of your content.
Whether you’re a streamer, content creator, or simply someone who enjoys capturing and sharing moments, having a reliable and well-configured headset is essential. It allows you to communicate clearly, immerse yourself in the game or media, and deliver an engaging experience to your audience.
By implementing the tips and techniques discussed in this guide, you’ll be well on your way to enjoying the benefits of a seamless and high-quality headset setup on OBS. So go ahead, dive into your next streaming session, and let your voice be heard!
FAQs
Q: How do I set up a headset on OBS?
A: Setting up a headset on OBS is a simple process. Start by plugging in your headset to the appropriate audio input/output ports on your computer or audio interface. Then, open OBS and navigate to the “Settings” menu. In the “Audio” tab, select your headset as the audio device for both the “Desktop Audio Device” and “Mic/Auxiliary Audio Device” options. Save your settings, and your headset should now be set up and ready to use with OBS.
Q: Can I use any headset with OBS?
A: Yes, you can use any headset with OBS as long as it is compatible with your computer or audio interface. Most headsets connect via USB or audio jacks, so ensure that your computer has the corresponding ports or adapters. Additionally, some headsets require specific drivers or software for advanced features, so check the manufacturer’s instructions and download any necessary drivers before using it with OBS.
Q: How do I test my headset in OBS?
A: To test your headset in OBS, open the software and go to the “Settings” menu. Click on the “Audio” tab and look for the “Mic/Auxiliary Audio Device” section. There, you will find a “Mixer” panel. Speak into your headset’s microphone, and you should see the audio levels in the mixer panel moving. This indicates that your headset is properly set up and sending audio to OBS.
Q: My headset is not working with OBS. What do I do?
A: If your headset is not working with OBS, there are a few troubleshooting steps you can try. First, ensure that your headset is properly connected to your computer or audio interface. Check the audio input/output settings in OBS to make sure your headset is selected. If the issue persists, try plugging your headset into a different USB port or audio jack. If none of these steps work, check if there are any software updates for your headset or OBS, as outdated software can cause compatibility issues.
Q: Can I use a wireless headset with OBS?
A: Yes, you can use a wireless headset with OBS. However, the setup process may vary depending on your specific wireless headset model. Generally, you will need to connect a wireless receiver to your computer via USB and follow the manufacturer’s instructions to pair your headset with the receiver. Once the wireless headset is paired, you can select it as the audio device in OBS just like you would with a wired headset.