
Are you tired of being constantly bombarded by notification badges on your iPhone? Whether it’s the red dot on your app icons or the persistent notification numbers, these badges can be overwhelming and distracting. Thankfully, you can easily turn off notification badges on your iPhone to regain control over your device.
In this article, we will guide you through the steps to disable notification badges on your iPhone. By doing so, you can eliminate the visual clutter and enjoy a cleaner home screen. Not only will this help you stay focused, but it will also enhance your user experience. Let’s dive in and discover how to turn off those pesky notification badges on your iPhone!
Inside This Article
- Disabling Notification Badges
- Customizing App Notifications
- Using Do Not Disturb Mode
- Managing Individual App Notifications
- Conclusion
- FAQs
Disabling Notification Badges
Notification badges on your iPhone can be helpful for keeping track of unread messages or notifications. However, if you find them distracting or overwhelming, you have the option to disable them. Here are a few steps to turn off notification badges on your iPhone:
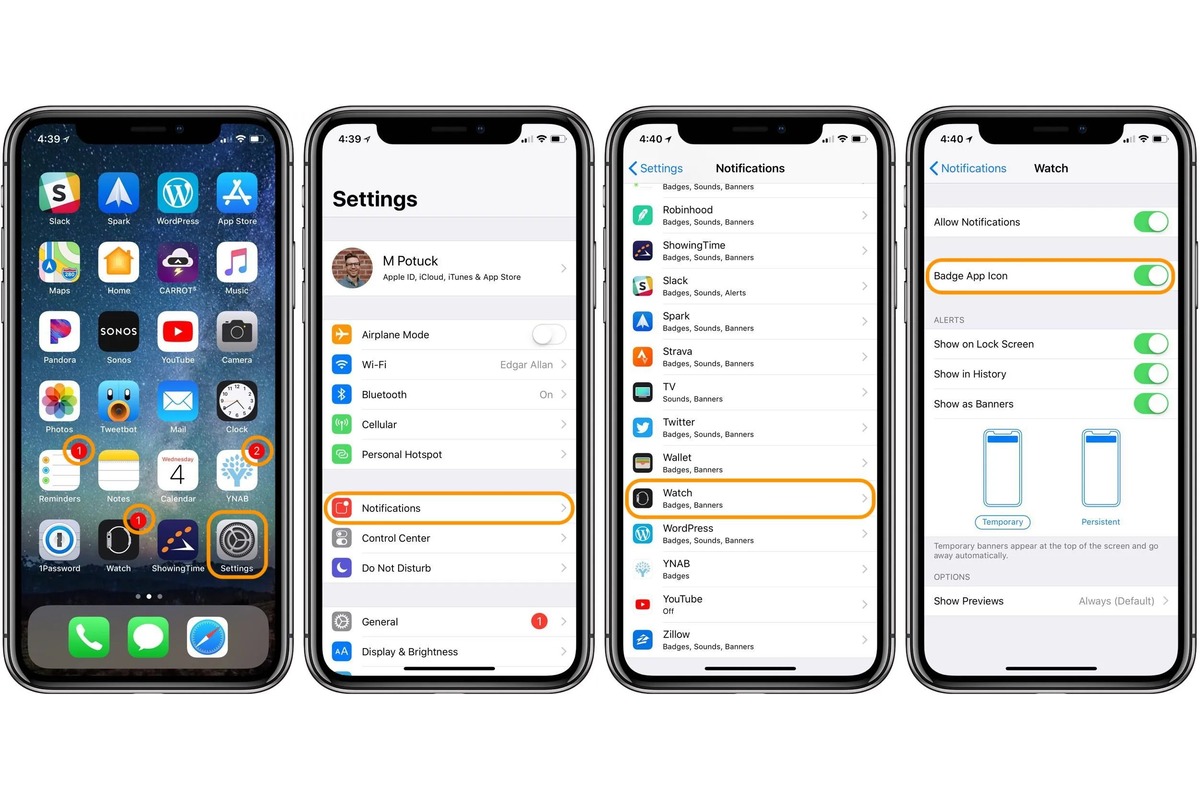
1. Open the “Settings” app on your iPhone.
2. Scroll down and tap on “Notifications.”
3. Select the app for which you want to disable notification badges.
4. Toggle off the “Badge App Icon” option.
By following these steps, you can easily disable the notification badges for specific apps on your iPhone. When you turn off the badge app icon, you won’t see the red notification badges on the app icons anymore.
It is important to note that disabling notification badges for an app will not turn off the actual notifications from that app. You will still receive notifications, but the badges will no longer appear on the app icons.
If you want to enable the notification badges again, simply follow the same steps and toggle on the “Badge App Icon” option for the desired app.
Disabling notification badges can help declutter the home screen of your iPhone and provide a more streamlined experience. It allows you to focus on the content without being constantly reminded of pending notifications.
However, it’s worth mentioning that turning off notification badges completely may cause you to miss important notifications if you rely solely on visual cues. It’s advisable to find a balance that suits your personal preferences and needs.
Customizing App Notifications
Customizing app notifications on your iPhone allows you to have more control over which alerts you receive and how they are presented. Here are some ways you can personalize your app notifications:
1. Accessing Notification Settings: To customize app notifications, go to your iPhone’s Settings, then tap on “Notifications.” You’ll see a list of all the apps installed on your device.
2. Enabling or Disabling Notifications: To turn off notifications for a specific app, simply find it in the list and toggle the switch to the off position. This will prevent any notifications from that app from appearing on your lock screen or in the Notification Center.
3. Setting Notification Priorities: Some apps offer the option to set notification priorities. This allows you to prioritize certain app notifications over others. For example, you may want to receive important emails or messages immediately, while less important notifications can be delivered silently.
4. Configuring Notification Styles: Each app has different notification styles that you can customize. For instance, you can choose to have notifications appear as banners, alerts, or in the notification center. You can also select whether or not to show previews of the content.
5. Managing Notification Grouping: iOS automatically groups notifications by app to prevent your lock screen from being cluttered. However, you have the option to change this behavior and have notifications appear individually. This can be useful if you want to have a clearer view of each notification.
6. Scheduling Notification Delivery: If you prefer to receive notifications at specific times, you can schedule their delivery with the “Scheduled Delivery” feature. This is particularly helpful if you want to avoid being disturbed during certain hours, such as when you’re sleeping or in a meeting.
7. Customizing Sounds and Badges: In addition to visual notifications, you can customize the sounds and badges that accompany the alerts. This lets you personalize your notification experience even further and make it more tailored to your preferences.
By customizing your app notifications on your iPhone, you can ensure that you only receive the alerts that are important to you and avoid unnecessary distractions. Take some time to explore the notification settings for each app and tailor them to your needs.
Using Do Not Disturb Mode
Do Not Disturb mode is a handy feature on the iPhone that allows you to silence notifications and calls temporarily. It can be useful when you need some uninterrupted time or want to avoid distractions during certain hours of the day. Here’s how you can use Do Not Disturb mode on your iPhone:
Step 1: Open the Control Center by swiping down from the top-right corner of your iPhone screen (on iPhone models with Face ID) or up from the bottom of the screen (on iPhone models with a Home button).
Step 2: Look for the crescent moon icon, which represents Do Not Disturb mode, and tap on it. This will activate the mode, and you will see a moon icon in the status bar at the top of your screen.
Step 3: By default, Do Not Disturb mode will silence all incoming calls and notifications. However, you can customize the settings to allow certain calls or enable calls from specific contacts in your Favorites list.
Step 4: To customize the settings, go to Settings > Do Not Disturb. Here, you can set a schedule for when you want Do Not Disturb mode to automatically turn on and off. You can also allow calls from specific contacts, enable repeated calls to come through, and choose whether to silence calls and notifications while your iPhone is locked or only when it’s in use.
Step 5: Additionally, you can enable the “Bedtime” mode within Do Not Disturb settings. This feature, when activated, will dim the lock screen, silence calls and notifications, and provide a peaceful environment for better sleep.
Using Do Not Disturb mode can be a great way to take control of your notifications and create uninterrupted moments in your day. Whether you’re attending an important meeting, spending time with loved ones, or simply enjoying some quiet time, Do Not Disturb mode ensures that your iPhone won’t interrupt you unnecessarily.
Managing Individual App Notifications
Managing individual app notifications on your iPhone allows you to have more control over the alerts and notifications you receive. Whether you want to prioritize certain apps or simply reduce the number of notifications you receive, here are some steps you can take:
1. Open the “Settings” app on your iPhone.
2. Scroll down and tap on “Notifications”.
3. You will see a list of all the apps installed on your iPhone. Tap on the app for which you want to manage notifications.
4. In the app’s notification settings, you can choose to allow or disable notifications entirely by toggling the “Allow Notifications” switch.
5. If you want to customize the notification style for that app, tap on “Notification Style”. Here, you can choose whether to have banner notifications, alerts, or no notifications at all.
6. You can also choose the notification sound by tapping on “Sounds”. Select the sound that you prefer from the list of available options.
7. To further customize the notifications, tap on “Lock Screen” or “Notification Center” options. Here, you can enable or disable notifications from appearing on your lock screen or in the notification center.
8. If you want to prioritize or organize your notifications, you can use the “Notification Grouping” feature. This allows you to group notifications from the same app together or have them appear individually depending on your preference.
By managing individual app notifications, you can declutter your notifications and ensure that only important alerts come through. It gives you the flexibility to tailor your notification experience to suit your needs and preferences.
Remember, you can always revisit the notification settings for any app and make changes whenever you want. This allows you to have complete control over the notifications you receive on your iPhone.
In conclusion, being able to turn off notification badges on your iPhone is a handy feature that can help you declutter your home screen and reduce distractions. Whether you find the badges overwhelming or simply prefer a cleaner look, the ability to disable them provides a welcome customization option.
By following the steps outlined in this article, you can easily turn off notification badges for individual apps or disable them altogether. Remember, this can be done through the Settings app or by using the home screen widget, giving you flexibility and convenience.
So, take control of your iPhone’s notifications and create a more organized and focused experience by turning off those notification badges that are no longer serving you. Enjoy a clutter-free home screen and a more peaceful digital environment.
FAQs
1. How do I turn off notification badges on my iPhone?
To turn off notification badges on your iPhone, go to Settings > Notifications > [App Name] and toggle off the “Badge App Icon” option.
2. Can I selectively turn off notification badges for certain apps?
Yes, you can selectively turn off notification badges for certain apps on your iPhone. Simply go to Settings > Notifications > [App Name] and toggle off the “Badge App Icon” option for the desired app.
3. Will turning off notification badges disable all notifications for an app?
No, turning off notification badges only disables the notification badges displayed on the app’s icon. You will still receive notifications from the app, but they will not be indicated by a badge on the app’s icon.
4. Can I customize the appearance of notification badges on my iPhone?
Unfortunately, you cannot customize the appearance of notification badges on your iPhone. The badges will appear as a numeric indicator on the app’s icon, indicating the number of unread notifications.
5. Are there any other ways to manage notifications on my iPhone?
Yes, there are several ways to manage notifications on your iPhone. You can go to Settings > Notifications to customize notification settings for individual apps, including enabling or disabling notifications, choosing the notification style, and controlling the behavior of notifications.