
Are you tired of trying to explain something to someone using just words? Or do you often find yourself needing to add notes or draw on screenshots to illustrate a point? Well, if you’re an iPhone user, we have a solution for you! In this article, we will walk you through the process of markup on screenshots on your iPhone. Whether you want to highlight an important detail, circle a specific area, or add annotations, this feature has got you covered. No need to download third-party apps or go through a complicated process – your iPhone has all the tools you need to markup your screenshots right at your fingertips. So, let’s dive in and discover how to easily draw and write on your screenshots using your iPhone.
Inside This Article
- Why Markup Screenshots on Your iPhone?
- How to Markup Screenshots on Your iPhone
- Using the Markup Tools
- Saving and Sharing Markup Screenshots
- Conclusion
- FAQs
Why Markup Screenshots on Your iPhone?
Markup Screenshots on Your iPhone is a great way to enhance your communication and productivity. Whether you are using screenshots for work or personal use, being able to annotate and draw on them can make your messages clearer and more engaging.
When you markup a screenshot, you can easily highlight important information, make annotations, draw attention to specific areas, or add text explanations. This can be incredibly useful in various scenarios, such as sending instructions to a colleague, providing feedback on a design, or simply adding a personal touch to your messages.
Markup screenshots can also help you stay organized. By adding arrows, circles, or text labels to specific areas, you can quickly and clearly indicate what you want to highlight or discuss. This can save you time from having to write lengthy explanations or emails and can help prevent misunderstandings.
Additionally, markup screenshots can be a fun and creative way to express yourself. From adding doodles and sketches to inserting emojis or stickers, you can give your screenshots a personal touch that reflects your personality or mood.
Moreover, markup screenshots on your iPhone are not only limited to images or photos. You can also use this feature to annotate PDFs or documents, making it a versatile tool for both work and leisure.
Ultimately, the ability to markup screenshots on your iPhone offers a wide range of benefits. It helps you convey your thoughts more effectively, facilitates better collaboration and communication, and lets you add a touch of personalization to your digital interactions.
How to Markup Screenshots on Your iPhone
If you’re an iPhone user, you’re probably familiar with the ability to take screenshots of your device’s screen. But did you know that you can also markup those screenshots, adding drawings, text, and other annotations to make them more informative or visually appealing?
The Markup feature on your iPhone allows you to easily draw, write, and highlight on your screenshots. Whether you want to emphasize a specific detail, add a caption, or just have some fun, markup can be a useful tool. In this article, we’ll walk you through the process of markup, step by step.
To begin, you’ll first need to take a screenshot on your iPhone. To do this, simply press the side button (or the top button on older models) at the same time as the home button. You’ll see a flash on your screen, indicating that the screenshot has been captured.
Once you’ve taken the screenshot, a thumbnail will appear in the bottom left corner of your screen. Tap on the thumbnail to open the screenshot in the Markup editor.
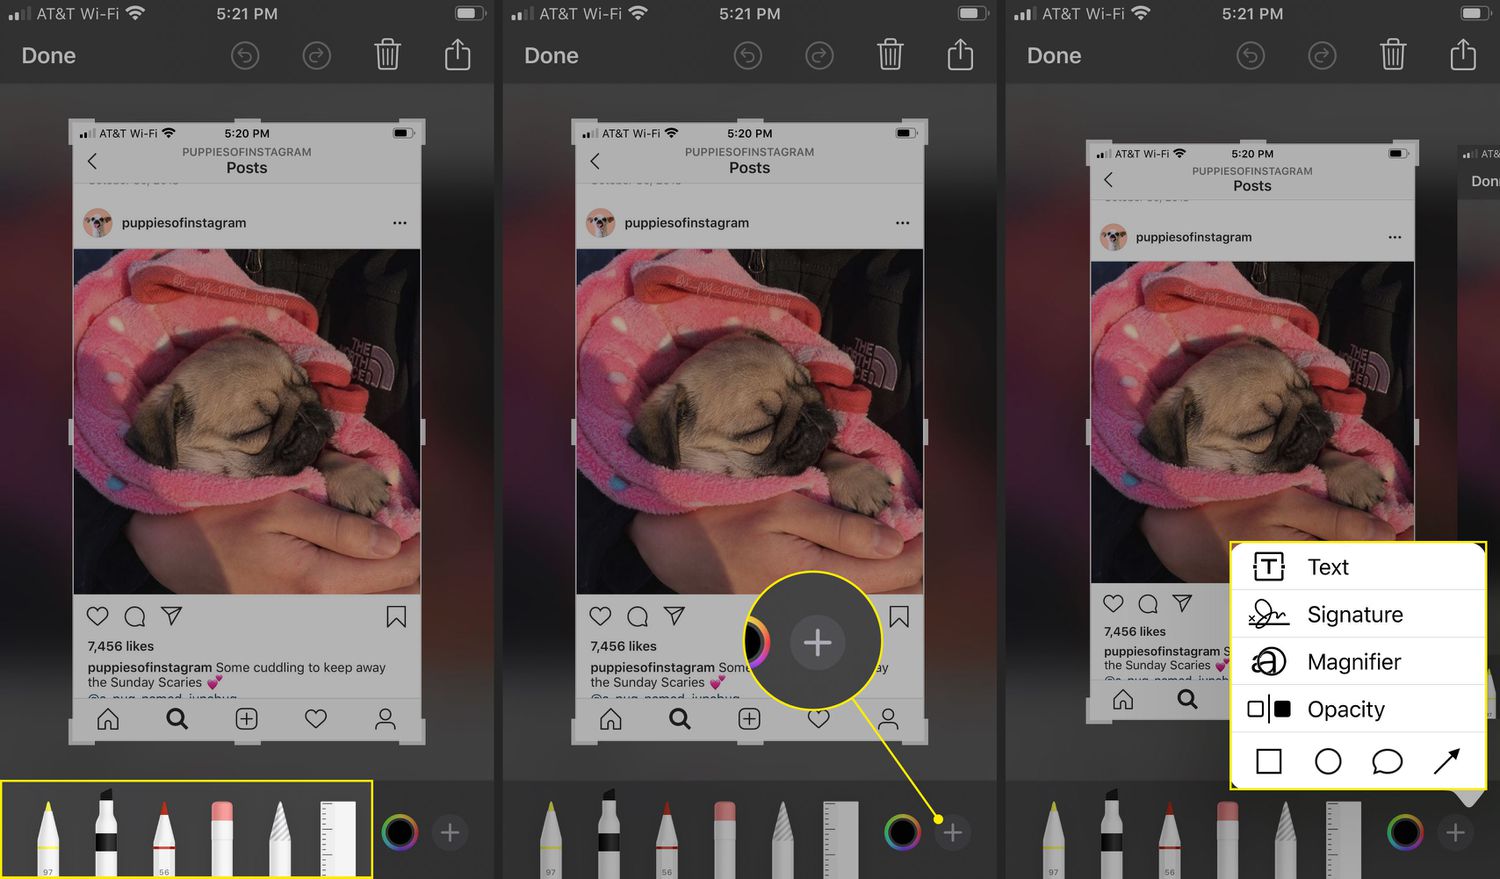
Now that you’re in the Markup editor, you have a variety of tools at your disposal. Let’s take a look at some of the most commonly used markup options:
- Pencil: This tool allows you to draw freehand on the screenshot. You can select different colors and brush sizes to customize your drawings.
- Text: Use this tool to add text to your screenshot. You can choose from different fonts, sizes, and colors.
- Highlighter: Similar to the pencil, this tool allows you to draw freehand, but with a translucent ink that highlights the area.
- Eraser: If you make a mistake or want to remove a markup, simply use the eraser tool to undo your changes.
- Shapes: This tool lets you add shapes such as squares, circles, and arrows to your screenshot.
Once you’ve added the desired markup to your screenshot, you can save it or share it with others. To save the edited screenshot to your Photos app, simply tap on the “Done” button in the top left corner of the screen. You can also choose to discard your changes by tapping on “Cancel”.
If you want to share the markup screenshot with others, you can use the share sheet. Tap on the “Share” button (often represented by an arrow pointing upwards) and choose from various sharing options, such as messaging, email, or social media platforms.
That’s it! Now you know how to markup screenshots on your iPhone. Whether it’s for work, personal use, or just for fun, the Markup feature provides an easy and versatile way to enhance your screenshots and make them more engaging. So go ahead, give it a try, and let your creativity shine!
Using the Markup Tools
When it comes to editing screenshots on your iPhone, the Markup tools can be incredibly useful. With these tools, you can draw, write, highlight, and add text to your screenshots, making them more expressive and informative. Here are some of the key markup tools and how to use them:
1. Drawing tool: The drawing tool allows you to create freehand drawings on your screenshots. Simply select the pencil icon and choose the desired color and thickness. Then, use your finger or Apple Pencil (if available) to draw directly on the screenshot. This tool is perfect for highlighting specific areas or adding personalized annotations.
2. Text tool: The text tool enables you to add text to your screenshots. Tap on the text icon and select the font style and size. Then, click on the screenshot where you want to insert the text and start typing. You can move and resize the text box to fit your needs. This tool is great for adding captions, labels, or additional information to your screenshots.
3. Shape tool: The shape tool allows you to add geometric shapes such as rectangles, circles, arrows, and more to your screenshots. Choose the shape icon and select the desired shape. Then, drag and resize the shape on the screenshot as required. This tool is helpful for highlighting specific areas, pointing out details, or creating visual aids.
4. Loupe tool: The loupe tool is especially handy for magnifying specific areas of your screenshots. Select the loupe icon and adjust the size of the magnification circle. Place the circle over the area you want to magnify, and it will enhance the details within the circle. This tool is perfect for zooming in on intricate parts or small text.
5. Eraser tool: The eraser tool allows you to remove any unwanted drawings or annotations from your screenshots. Tap on the eraser icon and select the size of the eraser. Then, simply swipe over the marks you want to erase. This tool helps you refine your edits and make adjustments without starting over.
By utilizing these markup tools, you can transform plain screenshots into visual masterpieces tailored to your needs. Whether you want to circle important details, add explanatory text, or draw attention to a specific area, the Markup tools offer a wide range of options to bring your screenshots to life.
Saving and Sharing Markup Screenshots
Once you have finished marking up your screenshot on your iPhone, you can save and share it with others. The Markup tools allow you to easily save and share your edited screenshots in just a few simple steps.
To save your markup screenshot, simply tap on the “Done” button located in the top-right corner of the screen. This will bring up a menu with several options. Choose the “Save to Photos” option to save the edited screenshot to your iPhone’s Photos app.
Alternatively, you can also choose the “Save to Files” option if you prefer to save the screenshot to a specific folder within the Files app on your iPhone. This is handy if you want to keep your markup screenshots organized and easily accessible.
Once your markup screenshot is saved, you can share it with others in various ways. One easy method is to open the Photos app on your iPhone, locate the saved screenshot, and tap on the share button (represented by a square with an arrow pointing upwards).
From the share menu, you can choose to send the screenshot via iMessage, email, or other messaging apps installed on your iPhone. Additionally, you can also upload the screenshot to social media platforms like Facebook, Instagram, or Twitter, or share it with other apps that support image sharing.
If you prefer to share the markup screenshot directly from the Markup interface, you can do so by tapping on the share button (represented by a square with an arrow pointing upwards) located in the top-right corner of the screen.
This will bring up the share menu, where you can select the desired sharing option and follow the prompts to complete the process. Whether you choose to save and share your markup screenshots through the Photos app or directly from the Markup interface, the process is quick and straightforward.
Now that you know how to save and share your markup screenshots on your iPhone, you can easily communicate your ideas, highlight important details, and collaborate with others by providing clear and annotated visuals.
Conclusion
In conclusion, learning how to markup, draw, and write on screenshots on your iPhone can greatly enhance your productivity, communication, and creativity. The built-in Markup feature in the Photos app provides you with a simple yet powerful tool to annotate and personalize your screenshots.
From adding text, arrows, and shapes to highlighting important details, Markup gives you the flexibility to express your thoughts and ideas visually. Whether you need to emphasize information in work documents, collaborate with colleagues, or simply add a personal touch to your photos, Markup has got you covered.
By following the steps mentioned in this article, you can quickly and easily access Markup and make the most out of this handy feature. So, why not take advantage of this powerful tool and level up your screenshot game on your iPhone today!
FAQs
- Can I markup screenshots on my iPhone?
- How do I markup a screenshot on my iPhone?
- Can I undo my markup changes on a screenshot?
- Are there any additional markup tools available on the iPhone?
- Can I share my marked-up screenshot directly from the Markup editor?
Yes, you can easily markup screenshots on your iPhone. The Markup feature allows you to draw and write on your screenshots, adding annotations, text, shapes, and more.
To markup a screenshot on your iPhone, simply follow these steps:
1. Take a screenshot by pressing the side button and the volume up button simultaneously.
2. Once the screenshot thumbnail appears on the bottom left corner of your screen, tap on it to open the Markup editor.
3. From the Markup editor, you can draw using your finger or Apple Pencil, add text or shapes, highlight areas, and even magnify certain sections.
4. Once you’re done with your markup, tap on “Done” to save the edited screenshot to your Photos app.
Yes, you can undo your markup changes on a screenshot. In the Markup editor, simply tap on the undo arrow icon located on the top left corner of the screen. This will revert the last change you made, allowing you to go back step by step.
Yes, apart from the basic markup tools like pen, highlighter, text, and shapes, you can access additional tools by tapping on the “+” icon in the Markup editor. This will reveal more options such as the magnifier, signature, and the ability to insert a photo.
Yes, you can share your marked-up screenshot directly from the Markup editor. After you have finished making your changes, tap on the share icon located on the top right corner of the screen. This will open the sharing options, allowing you to send the marked-up screenshot via email, message, or any other compatible app.