
Portrait mode lighting is a key feature on the iPhone that allows users to capture stunning photos with professional-looking lighting effects. Whether you want to enhance the dramatic effect of your subject or create a soft, studio-like ambiance, the iPhone’s portrait mode lighting options give you the flexibility to adjust and fine-tune the lighting to your liking.
In this article, we will dive into the world of portrait mode lighting on the iPhone and explore how you can easily adjust and manipulate different lighting effects to take your photos to the next level. From natural light to studio-inspired setups, we will guide you through the steps to achieve the desired mood and atmosphere in your portrait shots. So, grab your iPhone, and let’s begin the journey of capturing stunning portrait mode photos with perfect lighting!
Inside This Article
- Overview of Portrait Mode Lighting on iPhone
- Steps to Adjust Portrait Mode Lighting on iPhone
- Tips for Getting the Best Results with Portrait Mode Lighting on iPhone
- Conclusion
- FAQs
Overview of Portrait Mode Lighting on iPhone
The Portrait mode on the iPhone has revolutionized smartphone photography by allowing users to capture professional-looking photos with enhanced depth-of-field effects. One of the standout features of Portrait mode is the ability to adjust the lighting effects directly within the camera app.
Portrait mode lighting offers a range of creative options to enhance the subject and make the photo truly stand out. Whether you want a dramatic look or a soft, natural glow, the various lighting settings can help you achieve the desired effect.
There are currently five different lighting options available in Portrait mode on iPhone:
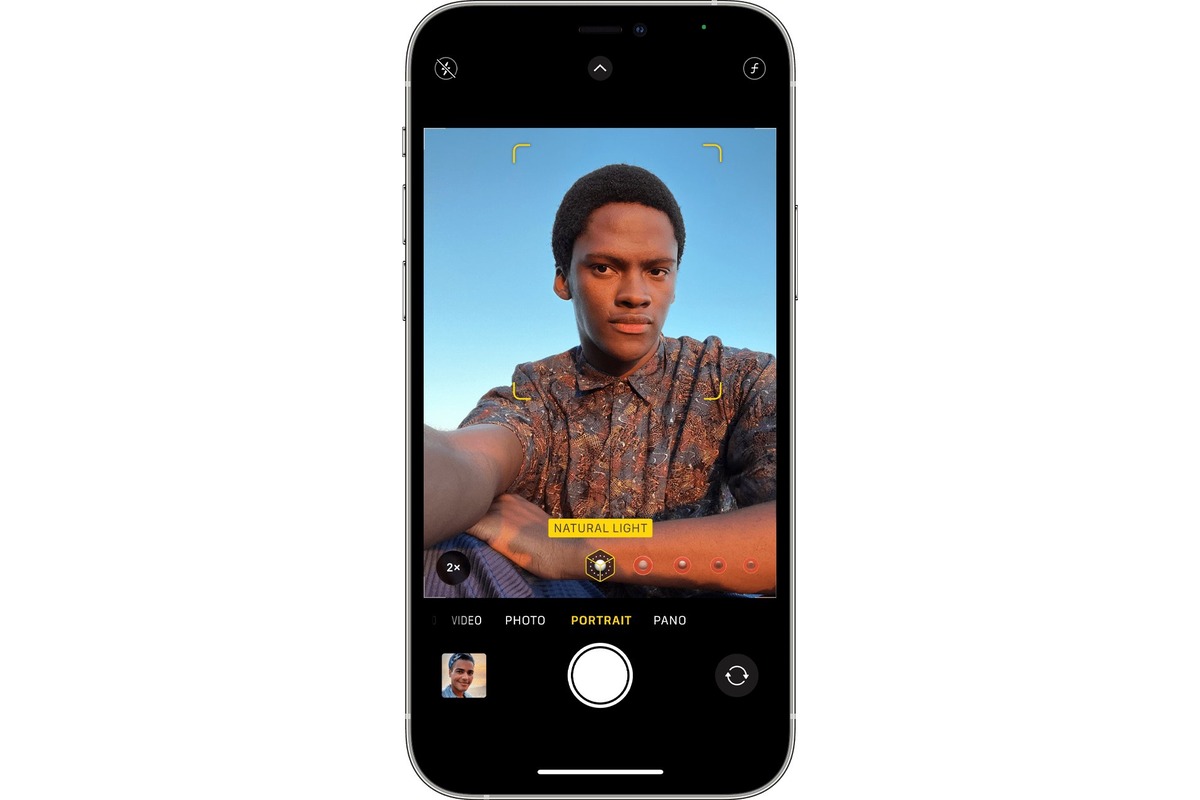
- Natural Light: This option mimics natural, ambient lighting for a realistic and untouched look.
- Studio Light: The Studio Light setting brightens your subject’s face, giving them a beautifully lit appearance as if they were standing in a studio.
- Contour Light: This setting enhances the depth and definition of facial features by adding dramatic shadows and highlights.
- Stage Light: With Stage Light, the background is completely blacked out, isolating the subject and creating a striking contrast.
- Stage Light Mono: Similar to Stage Light, this setting creates a visually stunning black and white portrait with the subject in focus.
Each lighting option in Portrait mode has its own distinctive effect, allowing you to experiment and find the perfect look for your photographs. Moreover, these settings can be adjusted both before and after taking the photo, giving you flexibility and control over the final result.
Now that you have an overview of Portrait mode lighting on the iPhone, let’s dive into the steps to adjust these settings and capture phenomenal portraits!
Steps to Adjust Portrait Mode Lighting on iPhone
Adjusting the lighting in portrait mode on your iPhone can take your photos to the next level. With the right lighting, you can create stunning portraits with depth and dimension. Here are the steps to adjust portrait mode lighting on your iPhone:
1. Open the Camera app: Launch the Camera app by tapping on the camera icon on your iPhone’s home screen or swiping right from the lock screen.
2. Select Portrait mode: Once the Camera app is open, swipe right on the camera modes at the bottom of the screen until you find “Portrait” mode. Tap on it to enter portrait mode.
3. Frame your subject: Position your subject in the frame, making sure they are well-lit and in focus. The iPhone will automatically detect the person and blur the background, creating a professional-looking portrait.
4. Choose the lighting effect: Once you have framed your subject, you will see a selection of lighting effects at the bottom of the screen. Swipe left or right to preview the different options, such as Natural Light, Studio Light, Contour Light, etc.
5. Adjust the intensity: After selecting a lighting effect, you can adjust the intensity by using the slider that appears on the screen. Slide it to the left or right to decrease or increase the effect’s strength. This allows you to customize the lighting to suit your preference.
6. Capture the photo: Once you are satisfied with the lighting adjustment, tap the shutter button to capture the photo. You can then review and edit the photo in the Photos app.
7. Experiment with different lighting effects: Don’t be afraid to experiment with different lighting effects to achieve the desired mood and tone in your portraits. Each lighting effect can create a unique look, so try them all to find your favorite.
8. Edit the photo: After capturing the photo, you can further enhance it by using the built-in editing tools in the Photos app. Adjust the brightness, contrast, and other settings to fine-tune the portrait and make it truly standout.
9. Save and share: Once you are happy with the final result, save the photo to your camera roll and share it with friends and family on social media or through messaging apps.
By following these steps, you can easily adjust the portrait mode lighting on your iPhone and unlock the full potential of portrait photography. Experiment with different lighting effects, angles, and compositions to create stunning portraits that will impress everyone.
Tips for Getting the Best Results with Portrait Mode Lighting on iPhone
Portrait Mode lighting on the iPhone is a powerful tool for capturing stunning photos with professional-looking depth-of-field effects. To get the best results, here are some tips to keep in mind:
1. Choose the Right Lighting Condition: The success of your Portrait Mode photo heavily relies on the lighting condition. Natural, soft, and diffused lighting works best as it helps to highlight the subject while creating a pleasing background blur. Avoid harsh or direct light that may create sharp shadows.
2. Use the Stage Lighting Effect: The Stage Lighting effect can add drama to your portraits by isolating the subject and placing them against a black or white background. Experiment with this effect to create unique and striking images.
3. Pay Attention to Distance: When shooting in Portrait Mode, make sure to maintain an optimum distance between the subject and the camera. Too close or too far can result in distorted or blurred images. Follow the on-screen prompts or guidelines provided by the camera app to ensure the right distance.
4. Keep Your Subject in Focus: Portrait Mode relies on the camera’s ability to detect the subject and blur the background. To ensure accurate focus, tap on the subject on the screen and wait until you see the yellow focus box appear. This will ensure that the camera is properly focusing on your subject.
5. Utilize Depth Control: The Depth Control feature allows you to adjust the level of background blur in your Portrait Mode photos. Experiment with different levels to achieve the desired effect. For example, increase the blur to make the subject stand out even more or decrease it to maintain some background details.
6. Experiment with Different Portrait Lighting Effects: The iPhone offers a variety of Portrait Lighting effects, such as Natural Light, Studio Light, Contour Light, and Stage Light. Each effect creates a unique lighting style and mood. Take the time to experiment with these options to find the one that best suits your subject and enhances the overall composition of your photo.
7. Consider Composition and Background: While Portrait Mode focuses on the subject, it is still important to pay attention to the overall composition and background of the photo. Make sure the subject is well-positioned within the frame, and the background is clean and clutter-free. A balanced composition and a complementary background can enhance the impact of your portrait.
8. Tap to Adjust Exposure: If you find that the overall exposure of your Portrait Mode photo is too bright or too dark, tap on the screen to adjust the exposure manually. This will help to ensure that the subject is well-lit and the details are properly captured.
9. Editing and Post-processing: After capturing your Portrait Mode photo, don’t be afraid to utilize the editing tools available on your iPhone. You can make further adjustments like adjusting brightness, contrast, and saturation to enhance the final result. Additionally, experiment with different filters and effects to add a personalized touch to your photos.
10. Practice and Experiment: Like any skill, mastering Portrait Mode photography on the iPhone takes practice. Take the time to experiment with different lighting conditions, subjects, and composition techniques to develop your own unique style. The more you practice, the better you’ll become at capturing stunning portraits.
By keeping these tips in mind and putting them into practice, you’ll be able to leverage the full potential of Portrait Mode lighting on your iPhone and capture breathtaking portraits that are sure to impress.
Conclusion
In conclusion, adjusting portrait mode lighting on the iPhone is a fantastic way to enhance your photography skills and capture stunning portraits. With just a few simple steps, you can transform your ordinary photos into professional-looking masterpieces. By understanding the different lighting options available and how they affect the overall image, you can experiment and find the perfect lighting setting for each unique situation.
Whether you want a natural, studio, or contour lighting effect, the portrait mode lighting feature on the iPhone provides you with the versatility to achieve your desired look. Don’t be afraid to play around with the settings and see which one best complements your subject and background. With practice and a bit of creativity, you’ll be able to take breathtaking portrait shots that will impress your friends and family.
So, grab your iPhone, head out, and start exploring the world of portrait mode lighting. It’s time to unleash your inner photographer and capture those unforgettable moments in the most captivating way possible.
FAQs
Q: What is portrait mode on the iPhone?
A: Portrait mode is a feature on the iPhone’s camera app that allows you to take professional-looking photos with depth-of-field effects. It blurs the background while keeping the subject in sharp focus, giving a beautiful bokeh effect.
Q: How do I enable portrait mode on my iPhone?
A: To enable portrait mode on your iPhone, open the camera app and select “Portrait” mode at the bottom of the screen. This mode is available on iPhone models that have dual cameras, such as the iPhone 7 Plus, 8 Plus, X, XR, XS, and 11 series.
Q: How do I adjust the lighting in portrait mode?
A: To adjust the lighting in portrait mode, follow these steps:
1. Open the camera app on your iPhone and select “Portrait” mode.
2. Swipe left or right at the bottom of the screen to choose the desired lighting effect.
3. Experiment with different lighting options, such as Natural Light, Studio Light, Contour Light, Stage Light, or Stage Light Mono, to find the look you prefer.
Q: Can I change the lighting effect after taking a portrait mode photo?
A: Yes, you can change the lighting effect even after taking a portrait mode photo. Simply open the photo in the Photos app, tap on “Edit,” and then tap on the “Lighting” icon at the top of the screen. From there, you can select and adjust the lighting effect to your liking.
Q: Are there any third-party apps that offer portrait mode on iPhones?
A: Yes, there are several third-party camera apps available on the App Store that offer portrait mode functionality for iPhones. Some popular options include Camera+ 2, ProCamera, and Halide. These apps often provide additional features and controls for capturing stunning portrait photos.