
Have you ever taken a photo on your iPhone using Portrait Mode and later realized that you would prefer the standard photo without the depth effect? While Portrait Mode offers stunning depth-of-field effects and beautifully blurred backgrounds, there may be instances when you want to turn it off after capturing a photo. Thankfully, Apple provides a simple solution to this problem. In this article, we will guide you on how to turn off Portrait Mode after taking a photo on your iPhone. Whether you want to remove the depth effect, adjust the focus, or simply revert to the standard photo, we will show you step-by-step instructions to do so. So, without further ado, let’s dive into the process of disabling Portrait Mode and discover how to achieve the desired effect on your iPhone’s photos.
Inside This Article
- Understanding Portrait Mode on iPhone
- Steps to Turn Off Portrait Mode after Taking a Photo
- Adjusting Portrait Mode Settings on iPhone
- Conclusion
- FAQs
Understanding Portrait Mode on iPhone
Portrait Mode is a feature available on certain iPhone models that allows you to capture stunning photos with a professional-looking depth-of-field effect. It creates a sharp focus on the subject while blurring the background, resulting in images that beautifully highlight the main subject.
This feature is particularly popular for capturing portraits of people, as it helps to create a more visually appealing and artistic photograph. It adds a sense of depth and dimensionality to the image, making the subject stand out and giving it a professional look.
Portrait Mode utilizes the dual-camera system on compatible iPhone models to achieve this effect. By using advanced depth-sensing technology, it can accurately separate the subject from the background and apply the desired blur effect.
It’s worth noting that not all iPhones have Portrait Mode. Initially, it was introduced on the iPhone 7 Plus and has since been included in subsequent models like the iPhone 8 Plus, iPhone X, iPhone XR, iPhone XS, and iPhone 11 series. So, if you own one of these models, you’re in luck!
To access Portrait Mode, open your iPhone’s camera app and select the “Portrait” mode from the available options. You’ll notice a depth-of-field preview on the screen, indicating that the feature is active. Now, you can adjust your position and focus to frame the shot perfectly.
It’s important to keep in mind that Portrait Mode works best in well-lit environments. Adequate lighting allows the camera to capture more details and produce better results. If the lighting conditions are not ideal, the camera may struggle to accurately detect the subject and apply the desired depth-of-field effect.
Once you have captured your photo using Portrait Mode, you may wonder if there’s a way to turn off the effect if you decide you don’t like it. The good news is that you can indeed disable Portrait Mode after taking a photo on your iPhone. There are a few different methods you can use, as outlined in the sections below.
Steps to Turn Off Portrait Mode after Taking a Photo
Portrait mode is a popular feature on iPhone cameras that allows you to capture stunning photos with depth-of-field effect. However, there may be times when you want to turn off the portrait mode after taking a photo. Don’t worry, we’ve got you covered! In this guide, we’ll walk you through three simple methods to turn off portrait mode on your iPhone.
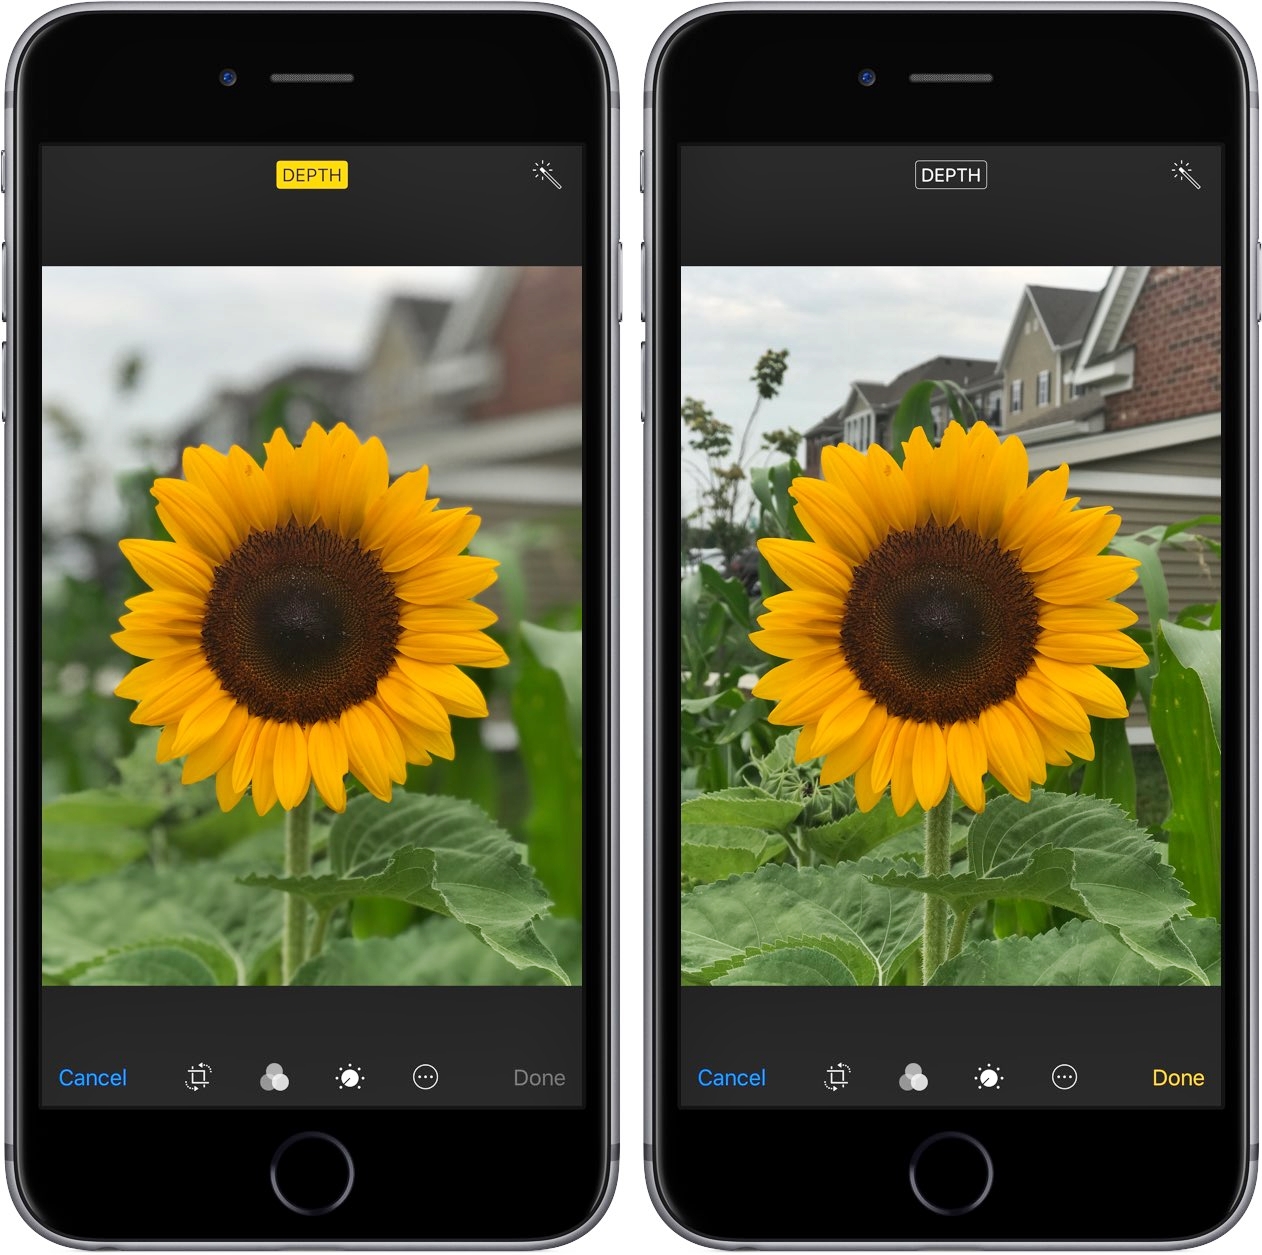
Method 1: Using the Photos App
The first method involves using the built-in Photos app on your iPhone. Here’s how to do it:
- Open the Photos app on your iPhone.
- Select the photo that you want to turn off portrait mode for.
- Tap on the Edit option located at the top-right corner of the screen.
- At the bottom of the screen, you’ll find various editing tools. Tap on the Portrait button, which typically looks like two circle icons overlapping each other.
- This action will disable the portrait mode on your chosen photo.
- Once you’re done, tap on the Done button to save your changes.
Method 2: Using the Edit Feature
If you prefer a quicker way to turn off portrait mode, you can use the Edit feature directly from the camera app. Follow these steps:
- Open the Camera app on your iPhone.
- Find the photo that you want to edit and tap on it.
- Tap on the Edit option at the bottom of the screen.
- Look for the Portrait button (two overlapping circle icons) and tap on it to disable portrait mode.
- Once you’ve turned off portrait mode, tap on the Done button to save the changes to your photo.
Method 3: Using Third-Party Apps
If you’re looking for additional editing options and flexibility, you can also use third-party apps to turn off portrait mode. Many photo editing apps, like Snapseed or Adobe Lightroom, allow you to adjust various aspects of your photo, including the blurring effect applied by portrait mode. Simply download and install the app of your choice from the App Store, import the photo, and use the available editing tools to turn off portrait mode.
By following these simple steps, you can easily turn off portrait mode after taking a photo on your iPhone. Whether you prefer using the built-in Photos app or opt for third-party editing tools, you have the flexibility to control the portrait mode effect and transform your photos to suit your preferences.
Adjusting Portrait Mode Settings on iPhone
Portrait Mode is a feature on iPhones that allows you to capture stunning photos with a blurred background, making your subject stand out. However, sometimes you may want to adjust the settings of Portrait Mode to suit your preferences or the specific conditions of the photo. Luckily, iPhones offer various options to tweak the Portrait Mode settings. In this article, we will guide you through the steps to adjust the Portrait Mode settings on your iPhone.
Before we delve into the methods, it’s important to note that the availability of Portrait Mode and its associated settings may vary depending on the model of your iPhone and the version of iOS you are using. With that said, let’s explore different methods to adjust Portrait Mode settings.
Method 1: Adjusting Portrait Mode Settings from Camera App
1. Open the Camera app on your iPhone.
2. Swipe to Portrait Mode or select it from the available camera modes.
3. Position your subject and compose your shot. Ensure that the camera has detected the subject properly and displays the “Depth Effect” notification.
4. Tap on the “???” icon at the top of the screen to access additional settings.
5. Here, you can adjust the level of blur in the background by using the slider. Slide it towards the “+” to increase the blur, or towards the “-” to reduce it.
6. You can also experiment with the lighting effects by swiping left or right to cycle through the available options. These effects can add different moods and styles to your portrait photos.
7. Once you have made the desired adjustments, capture your photo by pressing the shutter button.
Method 2: Adjusting Portrait Mode Settings in the Photos App
1. After taking a photo in Portrait Mode, open the Photos app on your iPhone.
2. Find and select the portrait photo you want to adjust.
3. Tap on the “Edit” button at the top right corner of the screen.
4. At the bottom of the screen, you will see various editing tools. Swipe left to reveal more options.
5. Look for the “Depth” or “Portrait” option. This allows you to adjust the background blur of the photo.
6. Drag the slider to increase or decrease the intensity of the blur effect.
7. Once you’re satisfied with the adjustments, tap “Done” to save the changes.
Method 3: Adjusting Portrait Mode Settings with Third-Party Apps
If you’re looking for more advanced control over the Portrait Mode settings on your iPhone, you can explore third-party camera apps that offer additional features and customization options. There are numerous apps available on the App Store, such as ProCamera, Halide, and Camera+ 2, which provide users with extensive control over Portrait Mode settings like aperture, focus, and more.
Simply search for these apps in the App Store, read reviews, and choose the one that suits your needs. Once downloaded, open the app, select the Portrait Mode, and explore the various settings and customization options it offers.
With these methods, you can easily adjust the Portrait Mode settings on your iPhone to capture stunning photos with personalized effects. Whether you prefer more or less background blur or want to experiment with different lighting effects, the flexibility of Portrait Mode settings puts the power of creativity in your hands.
Conclusion
In conclusion, learning how to turn off portrait mode after taking a photo on iPhone can be a valuable skill for any iPhone user. Portrait mode is a fantastic feature that allows you to capture stunning photos with a depth effect, enhancing the focus on your subject. However, there may be occasions where you prefer to have a more traditional, non-blurred background. Knowing how to disable portrait mode gives you the flexibility to switch between styles and tailor your photos to your preference.
By following the simple steps outlined in this guide, you can easily turn off portrait mode and revert back to the original image. Whether for professional purposes, social media posts, or personal memories, having control over the look and feel of your photos is empowering. So go ahead and experiment with portrait mode on your iPhone, knowing that you can always disable it with ease.
FAQs
1. How do I turn off portrait mode after taking a photo on iPhone?
2. Can I edit the depth effect in portrait mode after capturing a photo on an iPhone?
3. Will disabling portrait mode affect previously captured photos on the iPhone?
4. Is there a way to enable portrait mode again after turning it off on an iPhone?
5. Can I apply portrait mode to photos that were not captured in portrait mode on an iPhone?